Assume that the following symptoms have been reported for this DECnet Phase IV network:
Note For the purposes of this scenario, assume that the hosts in Test Engineering (VAX-31 and VAX-21) are fully operational.
Environment Description
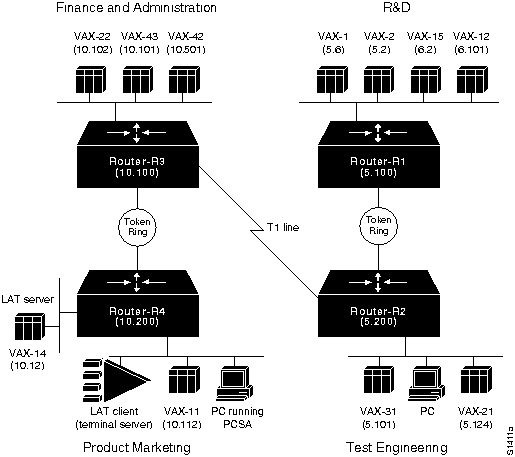
The relevant elements of the internetworking environment shown in Figure 7-1 can be summarized as follows:
- Intercampus service is provided via a T1 serial link; Router-R2 and Router-R3 interconnect the networks.
- The various DEC hosts are connected to Ethernets, with intervening Token Ring segments interconnecting certain segments.
- The network applications that run over the network include DECnet file transfer and Local Area Transport (LAT) connection service (bridged). The network is a Phase IV network divided into several DECnet areas.
Diagnosing and Isolating Problem Causes
The following problems are likely candidates for the first symptom (VAX-21 and VAX-31 cannot communicate with VAX-42):
- Certain interfaces connected to affected segments do not have DECnet routing enabled.
- A misconfigured or incorrectly applied access list is blocking specific traffic.
- Certain end systems are in a partitioned area.
- DECnet protocol parameter values associated with the path between nodes exceed the maximum values specified on the router. The associated DECnet routing parameters may be incorrectly assigned.
- The node number associated with an end node is higher than allowed by the decnet max-address global configuration command on one of the routers.
The following problems are likely candidates for the second symptom (no connectivity to or from VAX-12 and VAX-15 in DECnet area 6):
- A misconfigured or incorrectly applied access list.
- The area is partitioned.
- The router that is attached to the physical network segment of this area is not in the same area as the isolated nodes (no Level 2 routers).
The following problems are likely candidates for the third symptom (R&D, Test Engineering, and Finance nodes cannot communicate to any nodes in Product Marketing):
- DECnet is not enabled on certain routers or Ethernet segments.
- Routers are in different areas (no Level 2 routers).
- Area is partitioned.
- DECnet routing parameters (such as maximum area or maximum cost) are incorrectly assigned.
- DEC Token Ring implementations and differing router software versions combine to block connectivity.
After you identify a list of possible problems, you can analyze each potential cause. Use your judgment and experience to determine where to start the diagnosis process. Notice that for these symptoms, some of the possible problems overlap. The following discussion considers the problems listed and illustrates resolution of discovered problems. Where possible, overlapping problems are addressed for all symptoms.
Determining Which Connections Are Working
The first diagnostic activity to perform before attacking specific problems is to identify what connectivity is available on the network, as well as what is not.
Assume that the following connectivity is verified using set host connection commands from various (known operational) VAX hosts on the network:
- VAX-21 and VAX-31 (Test Engineering) can communicate with VAX-22 and VAX-43 (in Finance and Administration) and VAX-1 and VAX-2 (in R&D).
- VAX-22 and VAX-43 can also communicate with VAX-1 and VAX-2.
- All nodes in an area can communicate with other nodes in the same area. For instance, VAX-12 and VAX-15 in area 6 can communicate with each other. Similarly, VAX-14 and VAX-11 in area 10 also can communicate with each other. However, no node can communicate with any host outside of its area.
Determining Whether DECnet Is Enabled
After you identify working and broken connections, determine whether routers in the path of connection problems are enabled to support the routed or bridged protocols. Inspect the configuration listings for each of the routers as follows:
Step 1 Use the write terminal or show decnet interface EXEC commands to determine whether the configuration includes the decnet routing decnet-address global configuration command, as well as any decnet cost cost-value interface configuration commands for interfaces intended to route DECnet traffic.
Step 2 Because LAT is being bridged in this internetwork, review the configurations for appropriate bridging configuration commands, including the bridge group protocol global configuration command and the bridge-group group interface configuration command.
In this case, assume that these routers have been properly configured to support DECnet routing and to bridge LAT as needed.
Checking Configurations for Misconfigured Access Lists
Next, determine whether any access lists have been incorrectly applied or configured.
Step 1 Remove any access list specifications on all relevant interfaces.
Step 2 See whether traffic can get through by testing the connection from any clients to the target server.
Step 3 If connections now work, a misconfigured access list needs modification. If connectivity is not restored, access lists are not necessarily the problem. However, it is possible that access lists are improperly implemented, but masked by another problem. You may have to return to this step if, after connectivity is restored, connections are again lost when you reinstall access lists.
Step 4 If access lists are known to be the problem, isolate the location of the bad access list specification by applying one access list statement at a time until you can no longer create connections. Make sure that access lists are applied to the correct interface.
For the purposes of this scenario, assume that no access lists are used.
Determining Whether Nodes Are in a Partitioned Area
If a DECnet area is not contiguous (parts of one area are separated by another area), it is "partitioned," and nodes in the separate areas cannot communicate with each other. Use the following steps to determine whether areas are contiguous.
Step 1 Review the topology for any discontiguous areas.
Step 2 If any partitioned areas exist, eliminate them by reconfiguring the physical network or reassigning network area addresses so that all the Level 2 areas are contiguous.
For the purposes of this implementation, assume that there are no partitioned areas.
Ensuring That Level 2 Routers Are in Place for All Areas
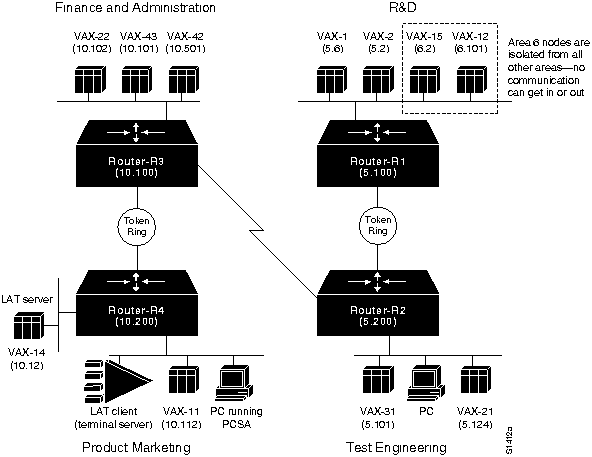
If a Level 2 DECnet router does not exist for a given area, the effect is similar to having a partitioned area. All traffic from the isolated area (that is, the area for which there is no Level 2 router) is ignored by all network devices that are not in the same area. This particular problem is suspected because there is no connectivity to or from nodes in DECnet area 6, as shown in Figure 7-2.
Figure 7-2 : DECnet Scenario Map Illustrating Isolated DECnet Area
The following steps illustrate how to identify and remedy this problem:
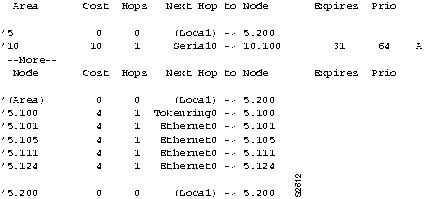
Step 1 Use the show decnet route command at Router-R1 to determine whether a Level 2 router exists for DECnet area 6 in the route table. Figure 7-3 presents the output of the show decnet route command, which shows that there is not a Level 2 router for area 6.
Figure 7-3 : Output of the show decnet route Command
Step 2 Because a Level 2 router is required to allow area 6 nodes to communicate with devices in other areas (even devices on the same physical cable), you must include an area 6 Level 2 routing node on the same cable with area 6 nodes.
- You can set up one of the VAX hosts (such as DECnet node 6.101, VAX-12) as a Level 2 routing node, or you can add another router to the LAN segment as the Level 2 router for area 6.
Assume that after VAX-12 is reconfigured as a Level 2 router, area 6 nodes can communicate with nodes in other areas. However, VAX-31 still cannot communicate with VAX-42, and nodes in R&D still cannot communicate with nodes in Product Marketing. More troubleshooting remains to be done.
Determining Whether DECnet Parameters Are Misconfigured
Depending on the situation, connectivity loss can result from misconfigured values for a variety of DECnet parameter settings on a router. If the cost of a path to a node, the number of hops to a node, the cost to an area, or the hops to an area exceed the configured values for a given router, connectivity to the remote node will be blocked. Troubleshoot this problem as follows:
Step 1 Use the show decnet interface command to determine whether the various maximum parameter values are set (cost, hops, area cost, and area hops).
Step 2 If any of these values are set, compare the configured value with the value indicated in the DECnet routing table (obtained with the show decnet route command).
Step 3 If any of the actual values exceed the configured values, change the configuration of the router accordingly (with the decnet max-cost, decnet area-max-cost, decnet max-hops, and decnet area-max-hops commands).
For this scenario, assume that none of these values are explicitly configured, which means that the default values are in effect. (The default values are the maximum possible values for DECnet.)
Finding an Out-of-Range Node Number
One symptom cited at the beginning of this scenario is that VAX-31 cannot communicate with VAX42. (See Figure 7-4.) However, VAX-31 can communicate with VAX-43. This situation indicates that some DECnet traffic is passing between Test Engineering and Finance through RouterR2 and Router-R3.
Figure 7-4 : DECnet Scenario Map Illustrating Blocked Connectivity to Specific Host
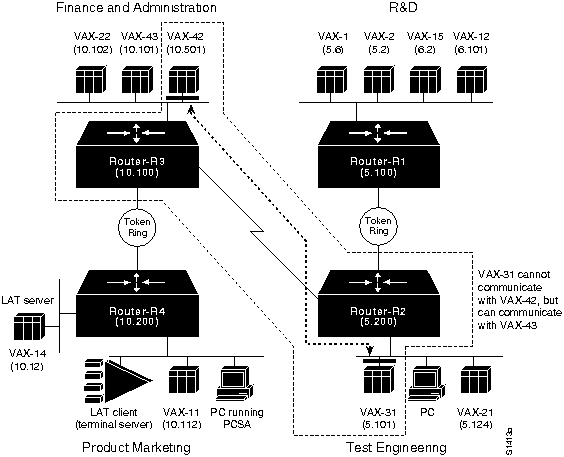
One problem that can cause this symptom is an out-of-range DECnet node address. The easiest solution is to make sure that the router can accommodate the maximum allowable number of addresses (1023), as follows:
Step 1 Use the show decnet interface command at Router-R2 to determine the maximum address for the router. (See Figure 7-5.)
Figure 7-5 : DECnet Maximum Node Address Display
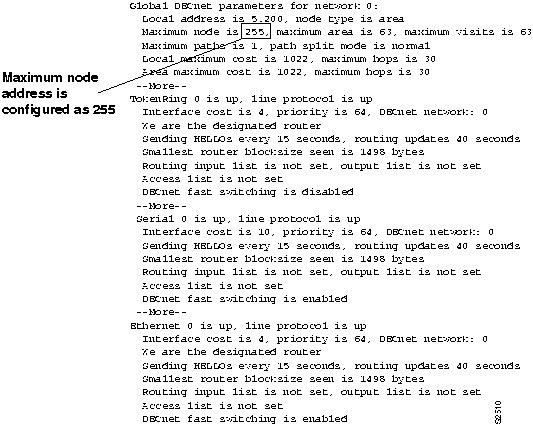
Step 2 Reconfigure Router-R2 with a maximum address value of 1023 using the decnet max-address global configuration command.
Assume that when this change is made, connectivity is restored between VAX-31 and VAX-42. However, the hosts and users in R&D and Product Marketing still are unable to communicate.
Reconciling Encapsulation Differences for DECnet over Token Ring
For this scenario, remember that VAX-22, VAX-42, VAX-1, VAX-2, VAX-31, and VAX-21 are all able to communicate with each other over the router links (Router-R1, Router-R2, and Router-R3). However, none of these hosts can communicate with VAX-14 or VAX-11. These facts point to a problem between Router-R3 and Router-R4.
In prior diagnostic steps, the following possible problems were eliminated:
- DECnet is not enabled on certain routers.
- Routers are in different areas (no Level 2 routers).
- An area is partitioned.
- DECnet routing parameters (such as maximum cost or maximum hop) are incorrectly assigned.
One problem remains to be diagnosed: a possible configuration problem associated with DEC Token Ring implementations and differing router software versions.
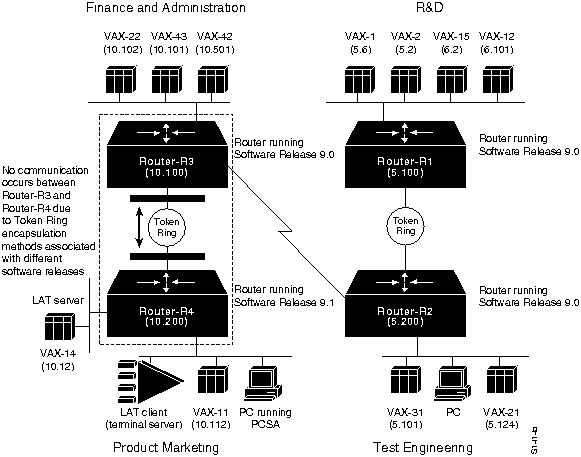
The method of DECnet encapsulation over Token Ring differs between software releases. In particular, software prior to Software Release 9.1 uses an encapsulation method that does not interoperate with non-Cisco DECnet Token Ring nodes. Cisco routers that use Software Release 9.1 and later are, by default, configured to interoperate with non-Cisco nodes.
Assume that Router-R4 is running Software Release 9.1, while the other routers are running Software Release 9.0. In this situation, all 9.1 routers must be set to support the "pre-DEC" option in the decnet encapsulation interface configuration command. Figure 7-6 illustrates this problem and its effects on connectivity.
Figure 7-6 : Scenario Map Showing Blocked Communication because of Differing Token Ring Encapsulations
Diagnose this problem as follows:
Step 1 Use the show version EXEC command on all Token Ring-attached routers in the path where connectivity is blocked. Check the software version string for the release number.
Step 2 Look for routers that have Software Release 9.1 (and later) and earlier releases. If both are found, the DECnet encapsulation type being used must be reconciled for all Token Ring-attached routers.
Step 3 All-Cisco internetwork only---Use the write terminal privileged EXEC command on each of the routers running Software Release 9.1 or later. Look for a decnet encapsulation interface configuration command. If it is not present (and if all routers in the network are Cisco routers), add the decnet encapsulation pre-dec command. As an alternative, you can upgrade routers running a software release prior to Software Release 9.1 to Software Release 9.1 or later.
- Interoperation internetwork---If you must support interoperation between Cisco routers and non-Cisco devices over Token Ring, upgrade the software versions on routers running a software release prior to Software Release 9.1 or later.
When the decnet encapsulation pre-dec command is configured for Router-R4, connectivity between nodes in R&D and Product Marketing is reestablished and all symptoms for this scenario are eliminated.
Note If DECnet Phase IV Prime hosts are connected to your network, they will not be able to communicate with Cisco routers configured as DECnet Phase IV routers unless you upgrade the routers to Cisco Internetwork Operating System (Cisco IOS) Release 10.0, which supports DECnet Phase IV Prime.
Problem Solution Summary
This scenario focused on diagnosing blocked connectivity in DECnet internetworks. Three problems were discovered and resolved:
- Missing Level 2 router for an area
- End node number that was greater than maximum allowed on the router
- Token Ring encapsulation type mismatch
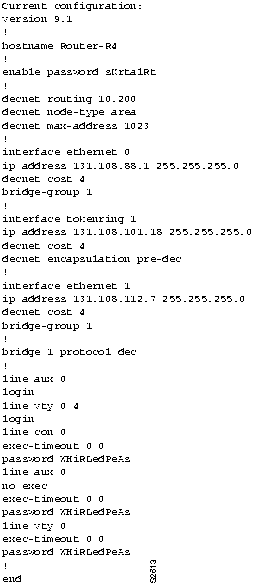
Figure 7-7 illustrates a complete configuration listing for Router-R4 as discussed in this scenario. In this configuration, the Token Ring encapsulation is set to the pre-dec option. Also note that bridging is configured on the Ethernet interfaces to support all nonroutable protocols (such as DEC Maintenance Operation Protocol [MOP], LAT, Local Area VAX Cluster [LAVC], and Local Area Disk Services [LAD]). This configuration also includes the change to increase the DECnet maximum address to 1023.
Figure 7-7 : Complete DECnet Router-R4 Final Configuration
Configuring a DECnet Node to Log DECnet Events
In addition to the diagnostic tools available with your router, DECnet environments provide a wealth of diagnostic information. DECnet nodes can use the DECnet Event Logging Facility (EVL) to track DECnet events. EVL allows you to monitor significant network events, such as lost packets and circuit failures.
The following steps loosely outline the basic tasks required to enable event logging on a VMS system:
Step 1 Determine whether the Operator Communication Manager (OPCOM) process is running:
$ show system
Step 2
If OPCOM does not appear in the list of running processes, enter the following command to start it:
$ @sys$system:STARTUP.com OPCOM
Step 3
Use the Network Control Protocol (NCP) to enable event logging:
$ MCR NCP
NCP> SET logging MONITOR KNOWN Events
NCP> DEFINE logging MONITOR KNOWN Events
NCP> SET logging MONITOR STATE ON
NCP> DEFINE logging MONITOR STATE ON
Step 4
Exit NCP:
NCP> Exit
Step 5
To monitor network events from a console terminal, enter the following command at the VMS system prompt:
$ REPLY/ENABLE = NETWORK
(This command is equivalent to the terminal monitor privileged EXEC command.)
Note In some of the symptom discussions that follow, OPCOM messages are used to illustrate certain errors. These examples assume that OPCOM is running and event logging is enabled.
DECnet Connectivity Symptoms
The symptom modules in this section pertain to DECnet internetwork problems and cover the following topics:
Note For more details about isolating problems for DECnet Phase V internetworks, see Chapter 9, "Troubleshooting ISO CLNS Connectivity."
Connection Attempts to DEC Hosts Fail over Routers (Router Configuration)
Symptom: DECnet nodes are unable to communicate when attempting to make connections over routers. This module focuses on possible causes related to router configuration. The next module, "Connection Attempts to DEC Hosts Fail over Routers (End Nodes)," addresses end node issues. Table 7-1 outlines possible causes and suggested actions when connection attempts to DEC hosts fail due to router configuration problems.
Table 7-1 : DECnet: Connection Attempts to DEC Hosts Fail over Routers (Router Configuration)
| DECnet not enabled |
Step 1 Use the write terminal privileged EXEC command to determine whether appropriate DECnet global configuration and interface command specifications are included in the configuration of the router.
Step 2 Enable as required on router and interface. |
| End nodes not in the same area |
Step 1 Check the configuration for the address of the router.
Step 2 If end nodes are not in the same area, verify that routers with which these end nodes can communicate are able to reach a Level 2 router. |
| Actual cost to the destination area is more than the configured cost (Level 1 routers) |
Step 1 Use the show decnet interface EXEC command to determine the configured maximum cost.
Step 2 Use the show decnet route EXEC command to determine the actual cost to the destination.
Step 3 If the actual cost is more than the configured maximum cost, use the decnet max-cost global configuration command to increase the maximum cost. |
| Actual cost to the destination area is more than the configured cost (Level 2 routers) |
Step 1 Use the show decnet interface command to determine the configured maximum area cost.
Step 2 Use the show decnet route EXEC command to determine the actual cost to the destination area.
Step 3 If the actual cost is more than the configured cost, use the decnet area-max-cost global configuration command to increase the area maximum cost. |
| Actual number of hops to the destination is more than the configured maximum number of hops (Level 1 routers) |
Step 1 Use the show decnet interface command to determine the maximum number of hops allowed for intra-area routing.
Step 2 Use the show decnet route EXEC command to determine the actual number of hops to the destination as shown in the DECnet routing table.
Step 3 If the actual number of hops is more than the configured maximum allowed hops, use the decnet max-hops global configuration command to increase the maximum hops. |
| Actual number of hops to the destination area is more than the configured maximum number of hops (Level 2 routers) |
Step 1 Use the show decnet interface command to determine the maximum number of hops configured for intra-area routing.
Step 2 Use the show decnet route EXEC command to determine the actual number of hops to the destination area as shown in the DECnet routing table.
Step 3 If the actual number of hops to an area is more than the configured maximum hops to an area, use the decnet areamaxhops global configuration command to increase the maximum number of hops. |
| Access list is improperly applied to DECnet interface |
Step 1 Use the show decnet interface EXEC command to determine whether an access list is set.
Step 2 If an access list is applied to the interface, use the write terminal privileged EXEC command to determine whether any access list entry in the list denies required access.
Step 3 Use the debug decnet connects privileged EXEC command to determine whether the relevant packets are being permitted.
Step 4 Use the no decnet access-group interface configuration command to disable the access list on the affected interface.
Step 5 Determine whether connectivity is restored. If so, the access list is probably the problem.
Step 6 Remove all the access list statements that apply to the interface, and use the decnet access-group interface configuration command to reenable the access control for the interface.
Step 7 Enter one access list statement, and test connectivity to the destination address. Repeat until connectivity is lost, at which point you have found the problem access list.
Step 8 Modify the access list as necessary. |
| Improperly enabled Address Translation Gateway (ATG) |
Step 1 Use the show decnet map EXEC command to determine whether address mapping is configured properly.
Step 2 If address mapping is not configured properly, modify mapping using the decnet first-network map virtual-address second-network real-address global configuration command. |
| Node address out of range |
Step 1 Use the write terminal privileged EXEC command to determine whether the DECnet maximum address has been set for any routers.
Step 2 Use the decnet max-address global configuration command to verify that the DECnet maximum address is 1023 (the default). If the node address is more than the decnet max-address value, increase the decnet max-address value. |
| Partitioned area |
Step 1 Review your network topology for any discontiguous areas.
Step 2 If any discontiguous areas exist, reconfigure the topology by changing area addresses or by adding a path (router) to create a contiguous network. |
Connection Attempts to DEC Hosts Fail over Routers (End Nodes)
Symptom: Whenever a user attempts to connect to a DEC host over a router, the connection attempt fails. The previous module, "Connection Attempts to DEC Hosts Fail over Routers (Router Configuration)," focuses on issues relating to router configuration and implementation. This module focuses on possible causes associated with end nodes. Table 7-2 outlines possible causes and suggested actions when connection attempts to DEC hosts fail due to end node problems.
Table 7-2 : DECnet: Connection Attempts to DEC Hosts Fail over Routers (End Nodes)
| Host access control rejects connection (Ultrix target system); user sees the following message: connect failed, access control rejected (typically a session layer problem) |
Step 1 Make sure that the following requirements are satisfied:
- User-supplied access control information is correct.
- Proxy access is set up correctly.
- Proxy database and proxy account are correct.
Step 2 Make sure that the user's security access matches the access specifications for the user on the remote systems.
Step 3 Make changes as necessary. |
Unrecognized object (Ultrix target system); user sees the following message: connect failed, unrecognized object
|
Step 1 Use the NCP tell command to determine whether the object is defined on the target node. The format of the tell command is as follows:
- tell target-node-name show known objects
Step 2 If the object is not defined, log in to the superuser account and run NCP to define the object with the NCP set command, as follows:
- set object object-id
Step 3 After the object is defined, use the NCP tell command to determine whether the object has a file specified:
- tell target-node-name show object object-id character
Step 4 Exit NCP and use the following command to determine whether the file specified for the object exists:
- ls -l
Step 5 If the file for the requested object does not exist, create the file.
Step 6 Make sure the protection for the specified file is correct. Example:
# chmod a+x /usr/etc/fal# chmod a+x /usr/etc
|
Insufficient resource error (VMS target system); VMS user sees the following message: % system-E-REMRSC, insufficient system resource at remote node
(This error message may not indicate a problem. These parameter values can be set intentionally to prevent network connections beyond a certain number.) |
Step 1 Try tuning DEC target system parameters.
- SYSGEN parameters:
- - MAXPROCESSCNT
- NCP parameters:
- - MAXIMUM LINKS
- - ALIAS MAXIMUM LINKS
- AUTHORIZE parameters:
- - MAXJOBS
- - MAXACCTJOBS
|
| Invalid login attempted |
Step 1 Determine whether access to a host is actually required.
Step 2 Ask the system manager at the target node to set up the user's account. |
End Nodes Cannot Find a Designated Router
Symptom: When end nodes are unable to see a designated router, they cannot access any nodes that are on different LANs. Other nodes connected to the same LAN are accessible. Table 7-3 outlines possible causes and suggested actions when end nodes cannot find a designated router.
Table 7-3 : DECnet: End Nodes Cannot Find a Designated Router
| DECnet not enabled on a router or not enabled on the interface |
Step 1 Use the write terminal privileged EXEC command to determine whether the router configuration includes the appropriate DECnet global configuration and interface command specifications.
Step 2 Enable DECnet as required on routers and interfaces. |
| Router not adjacent to the end node |
Step 1 At a router believed to be adjacent to the end node, use the debug decnet packets privileged EXEC command to determine whether hello packets are being exchanged between the end node and the router.
- If hello packets are not being exchanged, the router and the end node may not be adjacent.
Step 2 Make sure the router and end node are on the same LAN. |
| Routers and end node are not in the same area |
Step 1 Check DECnet addresses of the routers to determine whether they are in the same area.
Step 2 If not, use the decnet routing decnet-address global configuration command to reconfigure the appropriate routers to be in the same area. |
| Hello packets are not being exchanged |
Step 1 Use the debug decnet packets privileged EXEC command to determine whether the router is sending hello packets that are being received by the relevant end node.
Step 2 If no exchange is occurring, use the show interfaces command to determine whether the interface input and output queues are full. A full input queue is indicated by a value of 75/75, and a full output queue is indicated by a value of 40/40.
Step 3 If the queues are full and no hello packets are being exchanged, contact your router technical support representative. |
Router or End Node Sees Unexpected Designated Routers
Symptom: If your network requires a specific router to be identified as the designated router, allowing another router to become a designated router can cause unpredictable network behavior and can block connectivity in and out of the area. Table 7-4 outlines possible causes and suggested actions when routers and end nodes see unexpected or incorrect designated routers.
Table 7-4 : DECnet: Router or End Node Sees Unexpected Designated Routers
| Router is not adjacent to expected designated router |
Step 1 At a router believed to be adjacent to the expected designated router, use the debug decnet packets privileged EXEC command to determine whether hello packets are being exchanged between the routers.
- If hello packets are not being exchanged, the routers may not be adjacent.
Step 2 Make sure the router and end node are on the same LAN. |
| Priority of the expected designated router is not configured correctly |
Step 1 Use the show decnet interface EXEC command to determine which router is the designated router. Note the priority of the router.
Step 2 Use the show decnet interface command on the expected designated router and the actual designated router. Note the priority of the router.
Step 3 Compare the router priorities. The router that you want to be the designated router should have the highest priority.
Step 4 If a change is required, use the decnet router-priority interface configuration command to specify a particular router as the designated router. |
| Multiple routers have the same router priority |
Step 1 Use the show decnet interface command to determine which router is the designated router.
Step 2 Use the show decnet interface command on the expected designated router and the actual designated router.
Step 3 If the routers have the same priority, modify the configurations so that the router that is intended to be the designated router has the highest node number or router priority. |
| Adjacency with expected designated router is in a "down" or "initializing" state (adjacency between nodes is not bidirectional) |
Step 1 Use debug decnet packets privileged EXEC command to determine whether hello packets are being exchanged.
Step 2 If a router is not sending hello packets, use the show interfaces command to determine whether the interface input and output queues are full. A full input queue is indicated by a value of 75/75, and a full output queue is indicated by a value of 40/40.
Step 3 If the queues are full, and no hello packets are being exchanged, contact your router technical support representative.
Step 4 If routers are sending hello packets, contact end node administrators to determine why end nodes are rejecting hello packets. |
Intermittent DECnet Host Connectivity over Router
Symptom: Connections sometimes drop unexpectedly, or hosts are sometimes inaccessible when connections are attempted over a router. Table 7-5 outlines possible causes and suggested actions for intermittent DECnet host connectivity over a router.
Table 7-5 : DECnet: Intermittent DECnet Host Connectivity over Router
| Misconfigured router (timers improperly configured) |
Step 1 Use the show decnet interface EXEC command to verify that hello timers and routing update timers are consistent among all routers in the network.
Step 2 Use the decnet hello-timer and decnet routing-timer interface configuration commands to make any necessary configuration changes. |
| Disabled serial link or network media |
Step 1 Refer to the discussion of media problems in Chapter 2, "Troubleshooting Router Startup Problems," for a general discussion of media problems.
Step 2 Refer to Chapter 3, "Troubleshooting Serial Line Problems," for procedures that isolate serial interconnection problems. |
Router Cannot Establish Adjacency with Another Router on the Same LAN
Symptom: Router will not establish adjacency with any other routers known to be on the same LAN. Table 7-6 outlines possible causes and suggested actions when a router cannot establish adjacency with another router on the same LAN.
Table 7-6 : DECnet: Router Cannot Establish Adjacency with Another Router on LAN
| More than 32 routers on the network |
Step 1 Enable the debug decnet routing privileged EXEC command to determine whether the adjacency is being rejected.
Step 2 If the adjacency is being rejected, reduce the number of adjacent routers or change the priority of a router that you require to be adjacent so that it has a higher priority than one of the other neighboring routers.
- (Adjacency will be established with the target router instead of a router eliminated from the environment or assigned a lower priority.)
|
| Node address out of range |
Step 1 Use the write terminal privileged EXEC command to determine whether the DECnet maximum address has been set for any routers.
Step 2 Use the decnet max-address global configuration command to verify that the DECnet maximum address is 1023 (the default). If the node address is higher than the decnet max-address value, increase the decnet max-address value. |
| Node area is more than decnet max-area configured |
Step 1 Use the write terminal privileged EXEC command to determine whether the DECnet maximum area has been set for any routers.
Step 2 Use the decnet max-area global configuration command to verify that the DECnet maximum area is more than the area of the node. If the area of the node is more than the decnet max-area value, the router will reset the adjacency. |
No Phase IV Connectivity over Phase V Backbone
Symptom: Phase IV DECnet nodes are able to communicate with each other within a Phase IV area, but cannot access Phase IV nodes on the other side of a Phase V DECnet backbone. Table 7-7 outlines possible causes and suggested actions when there is no Phase IV connectivity over a Phase V backbone.
Table 7-7 : DECnet: No DECnet Phase IV Connectivity over Phase V Backbone
| Misconfigured router (area addresses) |
Step 1 Enable the debug clns packet privileged EXEC command to determine whether packets are being converted and sent out to DECnet Phase V.
Step 2 Use the write terminal privileged EXEC command to verify that DECnet area address (specified by the decnet routing global configuration command) agrees with the CLNS area address (specified by the network router configuration command).
- (These addresses can be misconfigured easily. The area address for DECnet is specified in decimal, while the area address for CLNS is specified in hexadecimal.)
Step 3 If the area addresses do not agree, modify them as necessary. |
| Misconfigured router (ISO CLNS or DECnet not enabled on relevant interfaces) |
Step 1 Use the write terminal command to verify that DECnet and ISO CLNS are enabled on all interfaces where conversion will occur.
Step 2 Enable routing on relevant interfaces as necessary.
- (For DECnet, use the decnet cost interface configuration command; for ISO CLNS, use one of the valid variations of the clns router interface configuration commands.)
|
Service Requests Are Aborted
Symptom: When a node requests downline load services from a Maintenance Operation Protocol (MOP) server, a display similar to the following appears and repeats on the DEC system console:
%%%%%%%%%%% OPCOM 30-JUN-1993 12:55:08.65 %%%%%%%%%%%%
Message from user DECNET on Wheel
DECnet event 0.7, aborted service request
From NODE 2.1 (Wheel), 30-JUN-1993 12:55:08.65
Circuit UNA-1, Line open error
The DEC node is unable to obtain its downline load from the MOP server. This symptom is commonly encountered by DEC terminal servers, MUX servers, and satellite nodes. Table 7-8 outlines a possible cause and suggested actions when service requests are aborted.
Table 7-8 : DECnet: Service Requests Are Aborted
| Target system cannot locate matching hardware address, Ethernet address, or load file associated with node requesting service |
Step 1 At the DEC system console, look for an OPCOM message that indicates DECnet event 0.7.
Step 2 Check the node database on the MOP server for correct setup (proper hardware address, Ethernet address, and load file) for the requesting node.
Step 3 Add any missing information or correct errors in the database as needed.
Step 4 Power cycle the requesting node to determine whether it is able to obtain its downline load. |
Routing Node Adjacencies Toggle Up and Down
Symptom: The following output appears repeatedly on the DEC system console:
%%%%%%%%%%% OPCOM 30-JUN-1993 1:25:07.45 %%%%%%%%%%%%
Message from user DECNET on The Bay
DECnet event 4.16, adjacency rejected
From NODE 12.1 (The Bay), 30-JUN-1993 1:25:07.45
Circuit UNA-0, Adjacent node = 1.101 (Vax1)
%%%%%%%%%%% OPCOM 30-JUN-1993 1:25:07.46 %%%%%%%%%%%%
Message from user DECNET on The Bay
DECnet event 4.15, adjacency up
From NODE 12.1 (The Bay), 30-JUN-1993 1:25:07.46
Circuit UNA-0, Adjacent node = 1.12 (Vax2)
In this example, the routers are constantly being added and removed from the routing table. Table 7-9 outlines possible causes and suggested actions when routing node adjacencies toggle up and down.
Table 7-9 : DECnet: Routing Node Adjacencies Toggle Up and Down
| Hardware problem with routing node is causing a conflict between the designated router and another routing node |
Step 1 At the DEC system console, look for OPCOM message pairs that indicate DECnet events 4.16 (adjacency rejected) and 4.15 (adjacency up) for specific routing nodes.
Step 2 Find the routing node or nodes that are causing the adjacency to toggle.
Step 3 Troubleshoot the Ethernet cable or network interface card on the suspect nodes.
- (For details about isolating router hardware problems, refer to the hardware troubleshooting information in the "Troubleshooting Serial Line Problems" chapter.)
|
| Total number of routing nodes in the network is more than 32 |
Step 1 Enable debug decnet routing to determine whether the adjacency is being rejected.
Step 2 If the adjacency is being rejected, reduce the number of adjacent routers. |
DECnet Phase IV Prime Host Cannot Communicate over Router
Symptom: End nodes attached to a Token Ring segment are unable to communicate with hosts on the other side of a router. These end nodes are PCs running Pathworks 4.1.a. The hosts on the other side of the router are Novell-based servers. Table 7-10 outlines a possible cause and suggested actions when a Phase IV Prime host cannot communicate over a router.
Note Pathworks 4.1.a enables DECnet Phase IV Prime by default.
Table 7-10 : DECnet: DECnet Phase IV Prime Host Cannot Communicate over Router
| Router is unable to establish an adjacency with an end node |
Step 1 Upgrade to Cisco IOS Release 10.0, which supports DECnet Phase IV Prime.
Step 2 If you cannot upgrade to Cisco IOS Release 10.0, disable DECnet Phase IV Prime on the end nodes.
- To disable DECnet Phase IV Prime on end nodes that are running Pathworks 4.1.a, add the following command to the DLCNDIS driver on each end node: /P4P:N
Step 3 If the end nodes still cannot communicate with hosts over the router, contact your router technical support representative for assistance. |
Copyright 1988-1996 © Cisco Systems Inc.


![]()
![]()
![]()
![]()
![]()
![]()
![]()
![]()