This chapter presents troubleshooting information for connectivity problems in bridged internetworks. The emphasis here is on symptoms and problems encountered in internetworks featuring transparent bridging, internetworks transitioning from bridging to routing, and internetworks composed of bridging and routing nodes.
Note Problems associated with source-route bridging (SRB), translational bridging, and source-route transparent (SRT) bridging are addressed in the "Troubleshooting IBM Connectivity" chapter.
This chapter consists of the following sections:
The section on bridge-based connectivity symptoms consists of the following:
- Symptom statement---A specific symptom associated with the bridge connectivity
- Possible causes and suggested actions---A table for each symptom containing possible causes for the symptom and suggested actions for resolving each cause
Transparent Bridging Connectivity Scenario
Bridge-based internetworks often encounter problems associated with packet looping and conflicts between transparent bridges. The following scenario explores some common problems that can lead to these kinds of connectivity problems in environments that feature transparent bridging over parallel paths.
In this scenario, problems and symptoms that afflict a stable internetwork over a period of time are discussed sequentially. The scenario is split into two parts:
- Scenario Part 1: Problems associated with "spanning tree wars" resulting in no connectivity on the entire internetwork
- Scenario Part 2: Problems associated with packet looping and broadcast storms, resulting in excessively high traffic on the internetwork, extremely poor network performance, and, ultimately, blocked communications
These two parts are discussed separately. The "Problem Solution Summary" section provided at the end of the scenario addresses both parts.
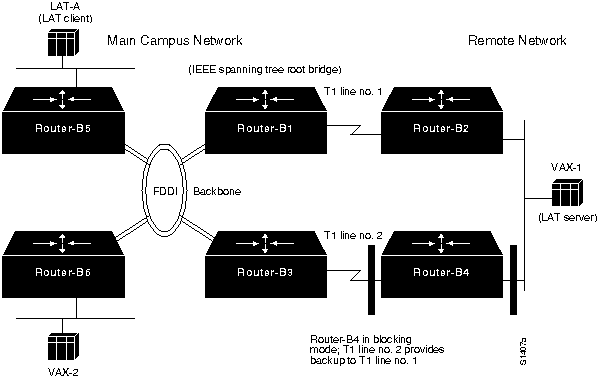
Figure 6-1 illustrates the basic stable network map for this environment. Assume in this network that all the bridges are configured to use the IEEE spanning tree algorithm and that under normal conditions, T1 Line number 2 is a backup link with Router-B4 in blocking mode. Bridged traffic between the main campus network and the remote network passes over T1 line number 1.
Figure 6-1 : Stable Transparent Bridging Scenario Network Map
Scenario Part 1: Symptoms
After a prolonged period of normal operation, assume that all connectivity on this internetwork suddenly stops. Users are unable to access any network resources, even on the same segment.
Scenario Part 1: Environment Description
The relevant elements of the internetworking environment shown in Figure 6-1 can be summarized as follows:
- LANs are Ethernet-based; the Main Campus Network is interconnected over an FDDI backbone, and the serial link to Remote Network is a dedicated T1 link (1.544 Mbps). A second T1 link provides a backup path.
- DECnet is being routed between various VAX hosts; traffic consists of file transfers.
- Local area transport (LAT) connection service is provided to a communication server (LAT-A) from a LAT server (VAX-1). LAT is bridged.
- All internetworking nodes in this environment are Cisco devices.
- All connected bridges are required to run the IEEE spanning tree algorithm.
- Bridging node Router-B1 is the spanning tree root bridge by administrative specification.
Diagnosing and Isolating Part 1 Problem Causes
In this situation, three problems might explain these connectivity symptoms:
- Unstable media (connected to root bridge)
- Unstable internetworking hardware (connected to root bridge)
- Excessive traffic
In general, it is useful to eliminate the most likely problems first, and then tackle more complex problems as necessary. The problem-solving process that follows illustrates this strategy.
After you identify a possible problem list, you must analyze each potential cause until connectivity is restored. The following discussion considers the list of problems and illustrates resolution of discovered problems.
Eliminating Excessive Traffic as the Problem
In this case, up until the network failure, traffic was normal. That is, users were able to make connections and despite occasionally slow service, complaints were minimal. A sign that excessive traffic might be a problem would be consistently degraded service, chronically slow host response, and dropped connections.
To determine whether excessive traffic has been occurring, use the show interfaces command; look for output drops and collisions on Ethernets, or high 5-minute input and output rates and full input and output queues on serial interfaces.
If these underlying symptoms do not appear, you can eliminate excess traffic as the problem.
Diagnosing Unstable Media and Hardware
After eliminating congestion as the problem, the most likely cause is some kind of hardware problem associated with the root bridge or other hardware attached to the root. These problems can result in a spanning tree war as bridges attempt to assert themselves as the root bridge every time a suspect device or bad link causes the root bridge to reset an interface. Diagnose this kind of problem using the steps that follow.
Step 1 Use the show interfaces EXEC command and examine the output for transition and reset counters at the root bridge or at an internetworking device connected to the root bridge. Figure 6-2 illustrates an example display indicating that these counters are incrementing.
Figure 6-2 : Output of the show interfaces Command Illustrating Resets and Transitions
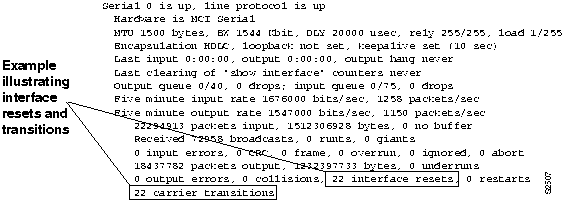
- Problems that can cause transition and reset counters to increment include bad modems, bad modem cables, noisy lines, unreliable LAN media, or bad appliques at the bridges.
- For information about troubleshooting LAN media in general, refer to Chapter 1, "Troubleshooting Overview." For more information about troubleshooting hardware, refer to Chapter 2, "Troubleshooting Router Startup Problems." For more information about troubleshooting serial lines, refer to Chapter 3, "Troubleshooting Serial Line Problems."
Step 2 After you isolate a hardware problem, replace suspected devices or cables with known working devices or cables.
Step 3 Use the clear counters command at bridges attached to the problem hardware; then use the show interfaces command again to determine whether the carrier transition and reset counters have stopped incrementing. Determine whether connectivity has been restored.
In this case, assume that connectivity is restored. Now, consider the problems discussed in Part 2 of this scenario.
Scenario Part 2: Symptoms
As discussed previously, Figure 6-1 illustrates a stable bridging network. After resolving Part 1, connectivity is reestablished and normal internetwork operations are restored. However, after a period of uninterrupted service, network managers notice that internetwork performance has again declined following increased instances of broadcast storms.
Scenario Part 2: Environment Description
The relevant elements of the internetworking environment are the same as in Part 1. One note regarding this environment is that the network managers had been making modifications to the internetwork and reconfiguring the internetworking devices when symptoms started to occur.
Diagnosing and Isolating Part 2 Problem Causes
Given the situation, there are two likely problems that can explain these connectivity symptoms:
- Mixed spanning tree environment
- Multiple bridging domains
Diagnosis for these identified possible problems follows.
Diagnosing Mixed Spanning Tree Algorithm Problems
Problems can arise for internetworks in which both IEEE and DEC spanning tree algorithms are used by bridging nodes. These problems are caused by differences in the way the bridging nodes handle spanning tree bridge protocol data unit (BPDU) packets (or hello packets) and in the way they handle data. The following procedure shows you how to determine whether both spanning tree algorithms are running:
Step 1 Use the show interfaces EXEC command to obtain input and output packet count statistics. If these counters increment at an abnormally high rate (with respect to your normal traffic loads), a loop is likely.
Step 2 Use the show span EXEC command on Cisco bridges to determine whether multiple root bridges exist and to determine which spanning tree protocols are being used.
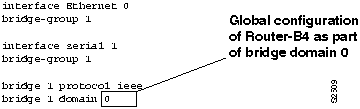
Step 3 If both DEC and IEEE appear, reconfigure bridges so that all use the same spanning tree protocol version. Use the bridge group protocol ieee global configuration command to make this change. Figure 6-3 illustrates the use of this command, as well as other required commands.
Figure 6-3 : Configuration of IEEE Spanning Tree Algorithm
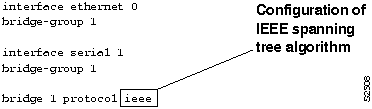
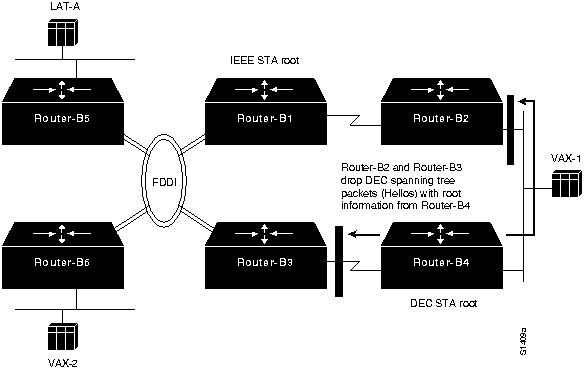
In this scenario, Router-B1, Router-B2, and Router-B3 are found to be running the IEEE spanning tree algorithm, while Router-B4 is inadvertently misconfigured to use the DEC spanning tree version. To resolve this problem, Router-B4 is reconfigured for IEEE. Figure 6-3 illustrates how to configure the IEEE spanning tree algorithm.
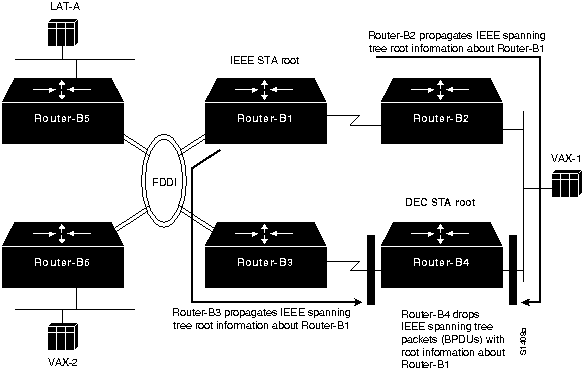
The effect of implementing the mixed spanning tree environment in this configuration is outlined in the following discussion and illustrated in Figure 6-4 through Figure 6-6.
- Router-B1 claims to be the IEEE root, while Router-B4 claims to be the DEC root.
- Router-B2 and Router-B3 propagate root information on all interfaces for IEEE spanning tree, indicating that Router-B1 is the root. However, Router-B4 drops IEEE spanning tree information regarding IEEE root Router-B1, as shown by Figure 6-4.
Figure 6-4 : Router-B4 Drops IEEE Root Information Propagated by Router-B2 and Router-B3
- Meanwhile, Router-B2 and Router-B3 similarly drop DEC root information relayed from Router-B4. (See Figure 6-5.)
Figure 6-5 : Router-B2 and Router-B3 Drop DEC Root Information from Router-B4
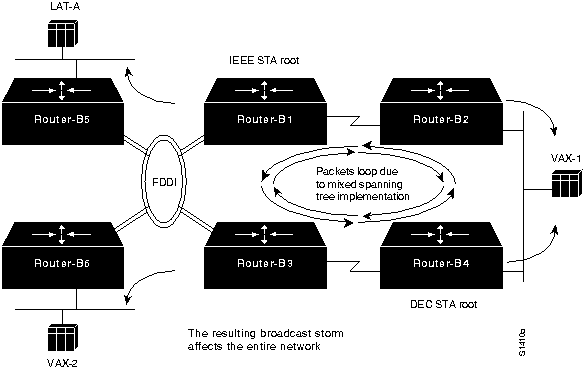
- The result is that none of the bridges in this internetwork believe that there is a loop. When a broadcast packet is sent on the network, a "broadcast storm" results over the entire internetwork (including the FDDI backbone and other networks attached via Router-B5 and Router-B6), as shown by Figure 6-6.
Figure 6-6 : Mixed Spanning Tree Implementation Results in Packet Looping
Although a configuration change is necessary here, it might not be sufficient to reestablish connectivity. Assume that in this case, connectivity is not restored, even when all bridging nodes are reconfigured to use the same spanning tree algorithm.
Diagnosing Multiple Domain Problems
Another configuration problem that results in packet looping is the inappropriate use of the spanning tree "domain" capability of Cisco bridges. The following procedure outlines how to determine whether multiple domains are specified and how to resolve the problem:
Step 1 Use the show span EXEC command on Cisco bridges to determine whether multiple root bridges exist and to ensure that all domain group numbers match for given bridging domains. The key here is that only one path can exist between different bridging domains because bridges in different domains do not exchange spanning tree information.
- In this case, assume that Router-B4 was incorrectly specified as belonging to bridge domain number 2, while all other routers are specified to be in the default domain (bridge domain number 0).
Step 2 Change the configurations so that the domain specifications match using the bridge group domain domain-number global configuration command. In this case, Router-B4 is changed to bridge domain number 0.
Figure 6-7 illustrates the use of this command, as well as other required commands.
Figure 6-7 : Modification to Router-B4 Placing It in Bridge Domain 0
Problem Solution Summary
This scenario focused on diagnosing blocked connectivity in internetworks that implement transparent bridging. The following problems were discussed:
- Unstable media or hardware (resulting in spanning tree wars)---Part 1 of this scenario used several router diagnostic tools to illustrate how to identify media and hardware problems that block network connectivity. In this case, the hardware must be tested and replaced if it is out of tolerance.
- Router configuration problems with multiple spanning tree implementations and bridge domain specifications, resulting in packet looping---Part 2 of this scenario discussed these two common configuration problems. These problems can result in packet looping and in blocked network connectivity. Simple configuration changes stopped broadcast storms and restored network service.
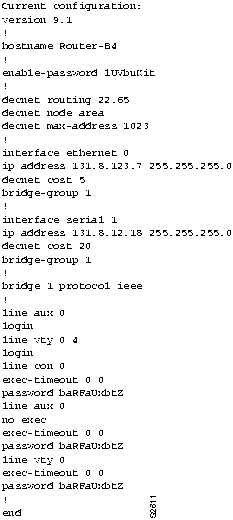
- Figure 6-8 provides a complete configuration listing for Router-B4 (obtained using the write terminal command) after changes were made to the type of spanning tree algorithm and to the bridge domain specification.
Note Bridge 1 domain 0 is not shown because it is the default.
Figure 6-8 : Complete Router-B4 Final Configuration
Creating Network Maps
An accurate and up-to-date map of your internetwork topology is an essential first step when you are troubleshooting connectivity problems. The show span EXEC command is a simple tool that you can use to create topology maps in transparent bridging networks. This command is particularly useful when all bridges consist of Cisco internetworking nodes. The information provided in the following discussion is presented in three parts:
- Explanation of the key information displayed by the show span EXEC command
- Method for creating network maps from the show span display output
- Example of the map creation process
Note This discussion assumes that the internetwork does not have any connectivity or design problems. If you try to create a map of a nonoperational internetwork, multiple root bridges may appear or bridging nodes may not be accessible.
Key show span Command Information
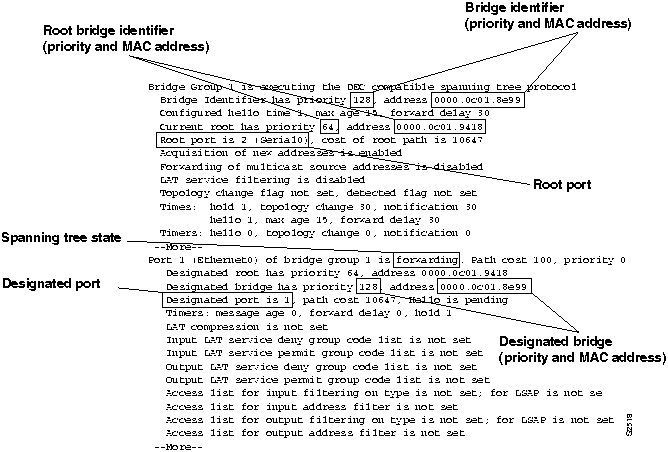
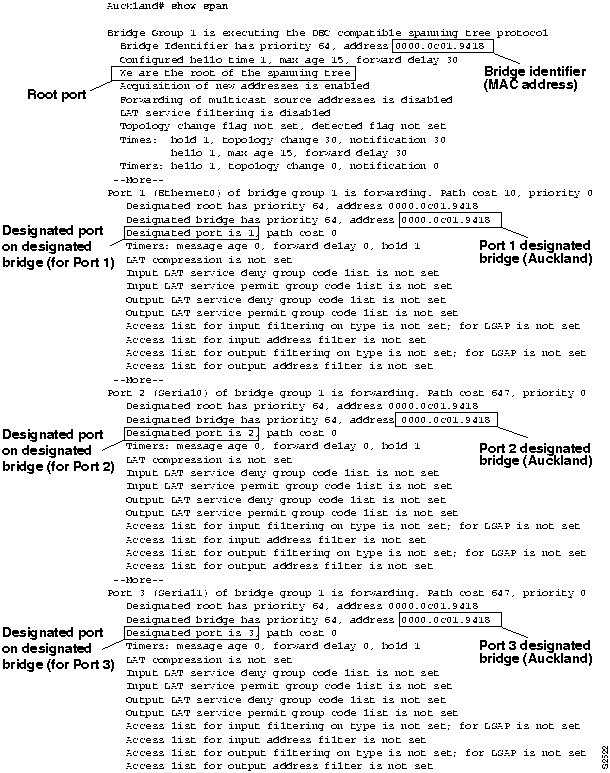
Figure 6-9 highlights the key fields for building a network map that are displayed by the show span EXEC command. The fields include the following:
- Bridge identifier---Spanning tree priority and Media Access Control (MAC) address of the bridging node for which the show span EXEC command was executed.
- Root bridge identifier---Spanning tree priority and MAC address of the known root bridge; this information appears in two places: with global information and with port-specific information.
- Root port---Spanning tree port on the bridge being examined through which the root bridge for the internetwork is found.
- Spanning tree state---When a port is in forwarding mode, it is actively able to pass traffic over the link; when a port is in blocking mode, the link is an online backup that is not forwarding bridge traffic. Other possible modes are down, listening, and learning. Traffic is only forwarded over the link when the port is in forwarding mode.
- Designated bridge---Spanning tree designated bridge MAC address for the port or interface. If the designated bridge does not match the bridge identifier, and the port is in the forwarding state, the port is a root port. If the designated bridge matches the bridge identifier, the port is in the forwarding state or is down.
- Designated port---Spanning tree port associated with the designated bridge.
Figure 6-9 : show span Command Output Illustrating Location of Key Fields
General Method
Creating a network map is a relatively simple, iterative process that consists of the following steps:
Step 1 Obtain the show span EXEC command output for each Cisco bridging node and make note of the values of the key fields.
Step 2 For each nonroot bridge, determine the direction, in terms of the relevant interface and port, to the root bridge.
Step 3 Draw your map as you identify the links.
The following rules apply when using spanning tree information to create a network map:
- When the MAC address of the designated bridge is the same as the MAC address of the root bridge, the port or interface of the bridge being examined and the root bridge are attached to the same network.
- When the MAC address of the designated bridge is different from the MAC address of the bridge being examined, the designated bridge is in the path to the root bridge.
- When the MAC address of the designated bridge is the same as the bridge identifier of the bridge being examined, the port or interface points away from the root bridge.
- The designated port value specified for a particular port belongs to the bridge associated with the designated bridge shown in the port listing.
Creating a Sample Network Map
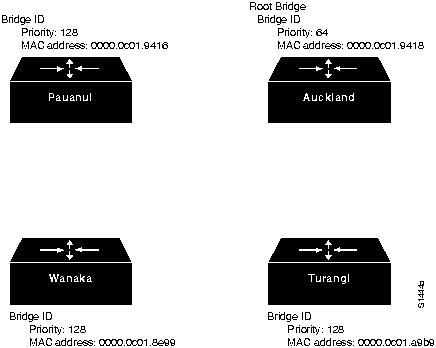
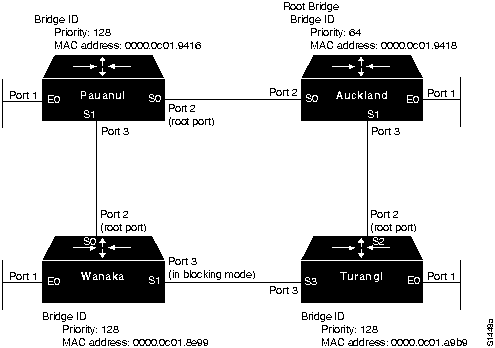
This section guides you through the steps of using the output of the show span EXEC command to create a map for an internetwork that consists of four bridges (Wanaka, Pauanui, Turangi, and Auckland). For each bridge, the discussion includes the output of the show span EXEC command, an interpretation of the output, and a network map.
Step 1 Gather the key show span information. Table 6-1 summarizes the key information for the four bridges.
Table 6-1 : Summary of Show Span Display Information for Each Bridge
| Bridge priority |
128 |
128 |
128 |
64 |
| Bridge MAC address |
0000.0c01.8e99 |
0000.0c01.9416 |
0000.0c01.a9b9 |
0000.0c01.9418 |
| Root status |
Nonroot |
Nonroot |
Nonroot |
Root bridge |
| Root port |
Port 2 (Serial0) |
Port 2 (Serial0) |
Port 2 (Serial2) |
-- |
Port 1 interface |
Ethernet0 |
Ethernet0 |
Ethernet0 |
Ethernet0 |
| Port 1 designated bridge |
000.0c01.8e99 |
0000.0c01.9416 |
0000.0c01.a9b9 |
0000.0c01.9418 |
| Port 1 designated port for designated bridge |
Port 1 |
Port 1 |
Port 1 |
Port 1 |
| Port 1 status |
Forwarding |
Forwarding |
Forwarding |
Forwarding |
Port 2 interface |
Serial0 |
Serial0 |
Serial2 |
Serial0 |
| Port 2 designated bridge |
0000.0c01.9416 |
0000.0c01.9418 |
0000.0c01.9418 |
0000.0c01.9418 |
| Port 2 designated port for designated bridge |
Port 3 |
Port 2 |
Port 3 |
Port 2 |
| Port 2 status |
Forwarding |
Forwarding |
Forwarding |
Forwarding |
Port 3 interface |
Serial1 |
Serial1 |
Serial3 |
Serial1 |
| Port 3 designated bridge |
0000.0c01.a9b9 |
0000.0c01.9416 |
0000.0c01.a9b9 |
0000.0c01.9418 |
| Port 3 designated port for designated bridge |
Port 3 |
Port 3 |
Port 3 |
Port 3 |
| Port 3 status |
Blocking |
Forwarding |
Forwarding |
Forwarding |
Step 2 Use the output of the show span EXEC command to label the bridges and specify bridge indentifiers (MAC addresses). Figure 6-10 is a basic map of the four internetworking nodes without any linkages.
Figure 6-10 : Example Bridge Internetwork Map Illustrating Names and Addresses
Step 3 If possible, use the show span EXEC command output to find the root bridge. Determine the port numbers and match these to the interface names. This information will be used later in the analysis to complete the network map.
Step 4 Now you can start drawing lines between the bridges based on information from the show span output. Start with one of the bridges and move from bridge to bridge until you have defined all the linkages. For this example, start with the bridge named Wanaka.
Figure 6-11 illustrates the show span EXEC command output for Wanaka.
Note If you have an idea of the node that is farthest from the root bridge (the path that has the most intervening nodes), you might try working toward the root bridge from that node.
Figure 6-11 : Output of the show span EXEC Command for Wanaka
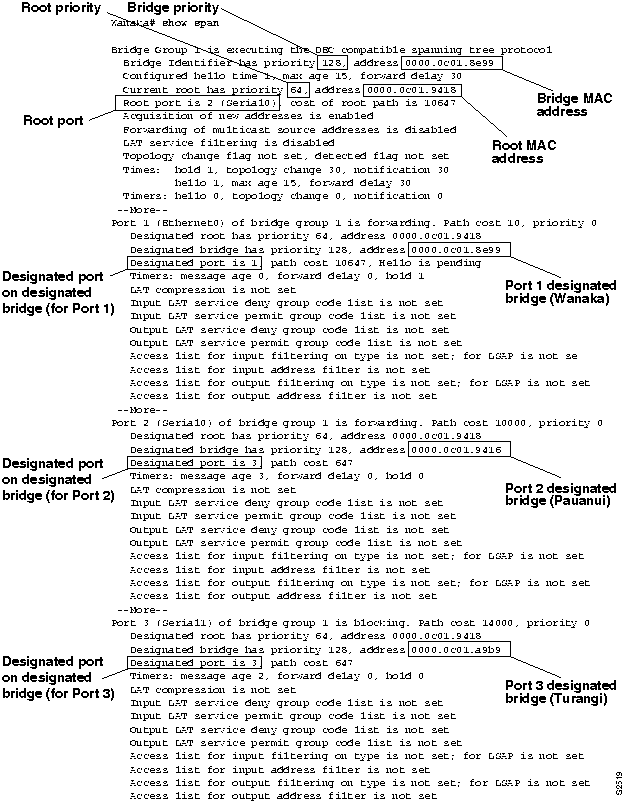
- You can use the rules outlined in the "General Method" section earlier in this chapter and the show span EXEC command output for Wanaka to make the following conclusions:
- Wanaka Port 1 (Ethernet0) points away from the root bridge, because the designated bridge for this port is the bridge identifier for Wanaka.
- Wanaka Port 2 (Serial0) points at another bridge (in this case Pauanui) that is in the path to the root bridge, because the designated bridge has a different MAC address.
- Wanaka Port 3 (Serial1) points to another bridge (in this case Turangi) that is in the path to the root bridge, because the designated bridge has a different MAC address.
- The root bridge in this internetwork (assuming that all the bridges are in a common, closed internetwork) is Auckland (bridge priority 64 and MAC address 0000.0c01.9418). In this case, the root bridge has been administratively assigned, based on priority.
- The designated port on Pauanui that points toward Wanaka is Port 3; the specific interface cannot be determined from the available information.
- The designated port on Turangi that points toward Wanaka is Port 3; the specific interface cannot be determined from the available information.
- Wanaka Port 1 is in forwarding mode; Wanaka Port 2 is in forwarding mode; and Wanaka Port 3 is in blocking mode.
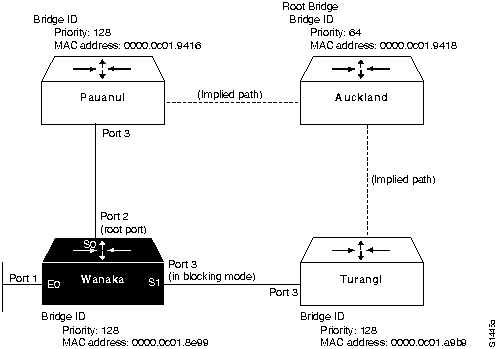
- Figure 6-12 illustrates the partial network map that can be drawn based on the information obtained from the show span EXEC command output for Wanaka. The map includes two implied links that are based on information from Wanaka; you should use the show span EXEC command output from each bridge to verify these implied links.
Figure 6-12 : Example Bridge Internetwork Map Illustrating show span Information from Wanaka
Step 5 Examine the next bridge, Pauanui. Figure 6-13 illustrates the show span EXEC command output for Pauanui.
- You can use the rules outlined in the "General Method" section earlier in this chapter and the show span EXEC command output for Pauanui to make the following conclusions:
- Pauanui Port 1 (Ethernet0) points away from the root bridge, because the designated bridge for this port is the bridge identifier for Pauanui.
- Pauanui Port 2 (Serial0) is directly connected to the root bridge, because its designated bridge MAC address matches the MAC address of the root bridge.
- Pauanui Port 3 (Serial1) points away from the root bridge, because the designated bridge for this port is the bridge identifier for Pauanui.
- The designated port on Auckland that points toward Pauanui is Port 2; the specific interface cannot be determined from the available.
- All three ports on Pauanui are in forwarding mode.
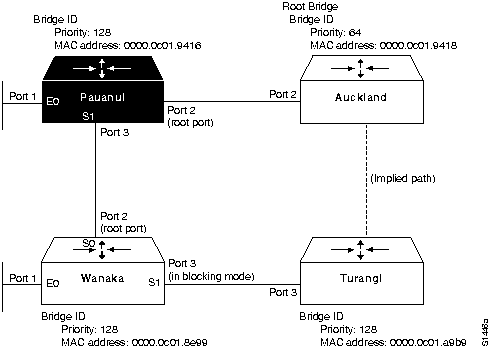
- Figure 6-14 illustrates the partial network map that can be drawn based on the information obtained from the show span EXEC command output for Pauanui (combined with Wanaka). This map still includes an implied link between Auckland and Turangi.
Figure 6-13 : Output of the show span EXEC Command for Pauanui
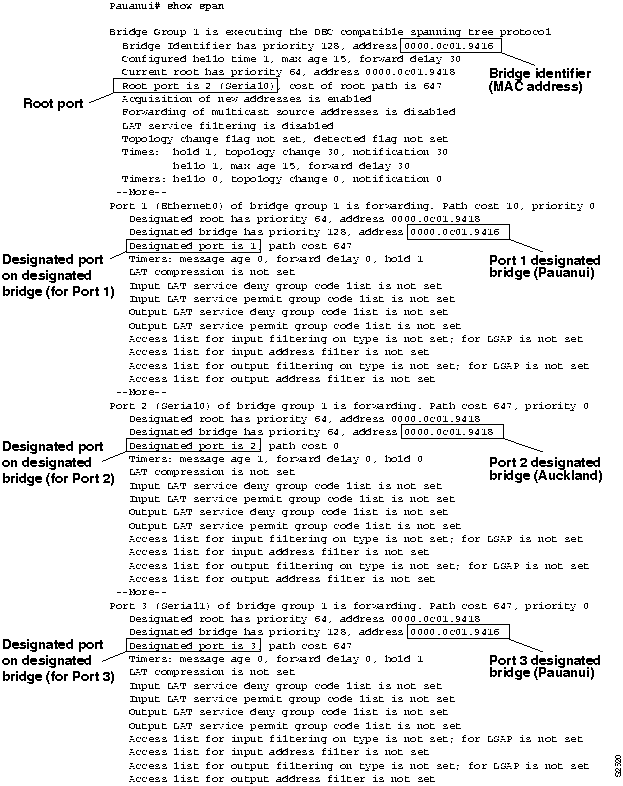
Figure 6-14 : Example Bridge Internetwork Map Illustrating Additional show span Information from Pauanui
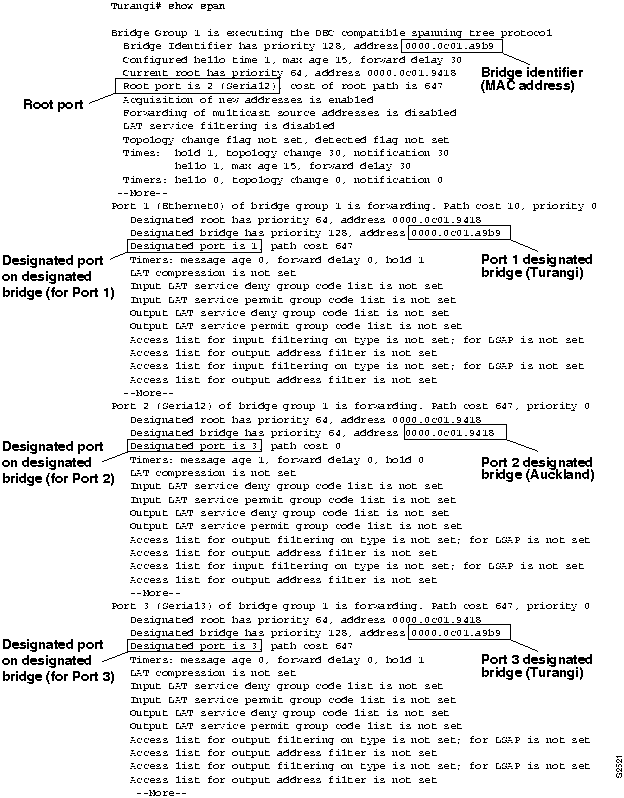
Step 6 Examine the next bridge, Turangi. Figure 6-15 illustrates the show span EXEC command output for Turangi.
- You can use the rules outlined in the "General Method" section earlier in this chapter and the show span EXEC command output for Turangi to make the following conclusions:
- Turangi Port 1 (Ethernet0) points away from the root bridge, because the designated bridge for this port is the bridge identifier for Turangi.
- Turangi Port 2 (Serial2) is directly connected to the root bridge, because its designated bridge MAC address matches the MAC address of the root bridge.
- Turangi Port 3 (Serial3) points away from the root bridge, because the designated bridge for this port is the bridge identifier for Turangi.
- The designated port on Auckland that points toward Turangi is Port 3; the specific interface cannot be determined from the available information.
- All three ports on Turangi are in forwarding mode.
Figure 6-15 : Output of the show span EXEC Command for Turangi
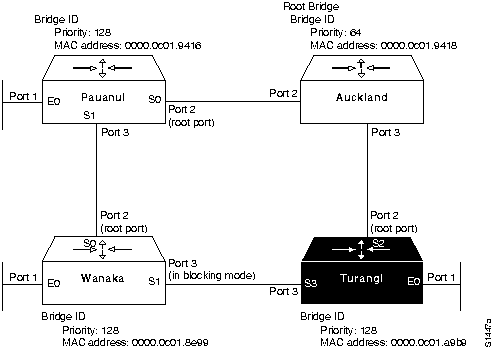
- Figure 6-16 illustrates the partial network map that can be drawn based on the information obtained from the show span EXEC command output for Turangi (combined with Wanaka and Pauanui).
Figure 6-16 : Example Bridge Internetwork Map Illustrating Additional show span Information from Turangi
Step 7 The last step is to complete this map for the root bridge, Auckland. Figure 6-17 illustrates the show span EXEC command output for Auckland.
Figure 6-17 : Output of the show span EXEC Command for Turangi
- You can use the rules outlined in the "General Method" section earlier in this chapter and the show span EXEC command output for Auckland to make the following conclusions:
- Auckland Port 1 (Ethernet0), Port 2 (Serial0), and, Port 3 (Serial1) all point away from the root bridge, because the designated bridge for each port is the bridge identifier for Auckland (the root bridge).
- Auckland Port 1, Port 2, and Port 3 are in forwarding mode.
- Figure 6-18 illustrates the completed network map based on the information obtained from the show span EXEC command output for Auckland.
Figure 6-18 : Complete Bridging Internetwork Map
Bridge-Based Connectivity Symptoms
The symptom modules in this section pertain to bridge-based internetwork problems and cover the following topics:
Packet Looping and Broadcast Storms Occur in Transparent Bridging Internetwork
Symptom: The internetwork is experiencing media saturation; end stations are forced into excessive retransmission; sessions are timing out and dropping.
Note Packet loops are typically caused by network design problems.
Table 6-2 outlines possible causes and suggested actions when packet looping and broadcast storms occur in transparent bridging environments.
Table 6-2 : Bridging: Packet Looping and Broadcast Storms in Transparent Bridging Internetwork
| No spanning tree to prevent packets from looping |
Step 1 Create and examine a topology map of your internetwork.
Step 2 Look for possible loops and eliminate any that exist or make sure that appropriate links are in backup mode.
Step 3 If broadcast storms and packet loops persist, use the show interfaces EXEC command to obtain input and output packet count statistics. If these counters increment at an abnormally high rate (with respect to your normal traffic loads), a loop is still likely.
Step 4 Conduct a binary search by segmenting networks in order to isolate any loops.
Step 5 Redesign your network to eliminate any loops.
Step 6 Implement a spanning tree algorithm to prevent loops. |
| Both IEEE and DEC spanning tree algorithms running on a looped topology |
Step 1 Use the show interfaces EXEC command to obtain input and output packet count statistics. If these counters increment at an abnormally high rate (with respect to your normal traffic loads), a loop is likely.
Step 2 Use the show span EXEC command on bridges to determine whether multiple root bridges exist and to determine which spanning tree algorithms are being used.
Step 3 If both DEC and IEEE appear, reconfigure bridges so that all use the same spanning tree algorithm. |
| Multiple bridging domains incorrectly configured |
Step 1 Use the show span EXEC command on bridges to determine whether multiple root bridges exist and to ensure that all domain group numbers match for given bridging domains.
Step 2 If multiple domain groups are configured for the bridge, ensure that all domain specifications match intended bridging domains. Use the bridge group domain domain-number global configuration command to make any necessary changes.
Step 3 Make sure that no loops exist between bridging domains. |
Excessive Packet Drops by Internetwork Nodes
Symptom: Dropped packets are typically accompanied by the inability to make connections over a bridge. Table 6-3 outlines possible causes and suggested actions when bridged internetworks experience dropped packets.
Table 6-3 : Bridging: Excessive Packet Drops by Bridged Internetwork Nodes
| Misconfigured bridging filters |
Step 1 Use the write terminal privileged EXEC command to determine whether any bridge filters exist.
Step 2 Remove bridge filters on suspect interfaces.
Step 3 Determine whether connectivity returns.
- If connectivity does not return, the filter is not the problem. If connectivity resumes after removing filters, one or more bad filters are causing the connectivity problem.
Step 4 If multiple access lists and lists with multiple statements exist, apply each filter and access list individually to identify the problem filter. |
| Physical connection problem at the bridge |
Step 1 Use the show interfaces EXEC command to determine whether the line protocol is up.
Step 2 If the line protocol is down, check the physical connection between that interface and the network. Make sure that the connection is secure.
Step 3 If the line protocol is up, but input and output packet counters are not incrementing, check the media and the connectivity of other hosts. |
| Input and output queues full due to excessive routed and broadcast traffic |
Step 1 Use the show interfaces command to look for input and output drops. Drops suggest excessive traffic over the media.
Step 2 Reduce the traffic on attached networks by implementing bridging filters, or segment the network using more internetworking devices.
Step 3 If the connection is a serial link, increase bandwidth, apply priority queuing, increase the hold queue size, or modify the system buffer size. Refer to Chapter 3, "Troubleshooting Serial Line Problems," for more details. |
| Target host is down, resulting in flooding |
Step 1 Use the show bridge EXEC command on all bridges to make sure that all forwarding databases include the required end nodes.
Step 2 If any end nodes are missing, identify them and check their status to verify that they are available.
Step 3 Reinitialize or reconfigure end nodes as necessary and reexamine the forwarding databases. |
Host Connection Sessions Time Out
Symptom: Users can make connections, but sessions terminate abruptly. Table 6-4 outlines possible causes and suggested actions for host sessions that drop in a bridged environment.
Table 6-4 : Bridging: Host Connection Sessions Time Out in Bridged Environment
| End station sessions timer is too low |
Step 1 Use a network analyzer to look for host retransmissions.
Step 2 If you see retransmissions, increase the transmission timers on the host.
Step 3 Use a network analyzer to determine whether the number of retransmissions subsides. |
| Excessive delay over slow serial link |
Step 1 Increase bandwidth, apply priority queuing, increase the hold queue size, or modify the system buffer size. For more details, refer to the "Troubleshooting Serial Line Problems" chapter. |
Users Cannot Connect over Concurrent Bridging and Routing Internetwork
Symptom: In a routing and bridging environment, users are unable to make connections over the router. Table 6-5 outlines possible causes and suggested actions when connectivity is blocked in an internetwork that features routing and bridging.
Table 6-5 : Bridging: Users Cannot Connect over a Bridging and Routing Internetwork
| Poor network design; misconfigured network address |
Step 1 Check the router configuration for assignment of incorrect network addresses. Modify any that are incorrect.
Step 2 Check each end station for an incorrectly assigned network address. Modify any network addresses that are incorrect.
Step 3 Refer to the appropriate protocol-specific chapter in this publication for more information about network address problems and conventions. |
| Misconfigured router |
Step 1 Use the write terminal privileged EXEC command to examine the configurations of all bridges and routers in the internetwork.
Step 2 Make sure traffic that needs to be bridged is being bridged and traffic that needs to be routed is being routed. |
Routing Loop Occurs in Bridging and Routing Internetwork
Symptom: Blocked connectivity to certain portions of an internetwork and the appearance of duplicate addresses suggest the presence of a routing loop. Table 6-6 outlines possible causes and suggested actions for routing loops in a bridging and routing internetwork.
Table 6-6 : Bridging: Routing Loop Occurs in a Bridging and Routing Internetwork
| Misconfigured network address |
Step 1 Use the write terminal privileged EXEC command to check the network address assignment for suspect interfaces.
Step 2 Make sure that all bridges are in the same bridge group or bridge domain.
Step 3 Retry host connections. |
| Disconnected cable |
Step 1 Check the physical attachment of all affected networks to ensure proper cable attachment.
Step 2 Retry host connections. |
| Backdoor bridge |
Step 1 Use the show interfaces EXEC command to look for excessive accumulation of input and output packets.
Step 2 Check the network topology for possible backdoor bridges that connect two or more separate networks.
Step 3 If you cannot find the backdoor bridge by inspection, use a network analyzer to examine the source MAC address of each remote node. When a router is used to segment local and remote networks, the MAC address of the router replaces the source MAC address of the remote node. If you find a packet from a remote note whose source MAC address is not the MAC address of the router, the packet arrived through a backdoor bridge. |
Copyright 1988-1996 © Cisco Systems Inc.