|
|

This chapter contains an overview of how CiscoWorks works with SunNet Manager (SNM). The following topics are discussed:
Overview of SNM Versus CiscoWorks Features
CiscoWorks uses SunNet Manager (SNM) as its platform to provide you with software applications to manage your network.
CiscoWorks schema files are installed directly into the SNM directory structure by using the CiscoWorks installation and configuration scripts. The default installation directory for SNM is /usr/snm. The default installation directory for CiscoWorks is /usr/nms. Refer to the CiscoWorks Getting Started Guide for detailed information on installing and configuring CiscoWorks.
During its installation and configuration, CiscoWorks adds customized schema files with Cisco-specific device types such as the Cisco AGS+ to the SNM schema files. CiscoWorks also adds its applications to the SNM Tools and Glyph menus.
It is important that you understand the SNM environment and how you can use SNM in conjunction with CiscoWorks. Be sure to refer to the SNM documentation set to answer your SNM network management questions.
The following list of SNM terms are defined in the SNM manual set. Refer to the glossary to help you to understand how SNM may refer to them.
SNM Processes That Affect CiscoWorks
Some processes in SNM affect how CiscoWorks runs, depending on their configuration in SNM. The following list includes some of the important issues you should be aware of:
For a brief overview on how the SNM Discover tool is used, refer to your CiscoWorks Getting Started Guide. For a detailed description of the SNM Discover tool, refer to your SunNet Manager 2.0 Reference Guide.
To use SNM and CiscoWorks, you need to ensure that the following environment variables have been set:
Normally, you should set these variables before installing CiscoWorks. Refer to the CiscoWorks Getting Started Guide for information on setting environment variables.
Configuring SNM Console Properties
SNM allows you to configure the SNM Console Properties. The SNM Console Properties windows enable you to set global preferences on how you want your SNM Console to operate.
We recommend that you configure Automatic Management in order to allow your system to automatically receive information about device status (up/down). The default for the SNM automatic node management feature is disabled. You must access the Console Properties Window and enable the automatic management feature by clicking the check box.
Refer to your SunNet Manager 2.0 Reference Guide for detailed information on SNM Console configuration.
This section briefly discusses how to start the SNM software. If CiscoWorks has been properly installed, starting SNM starts CiscoWorks as well. For a more detailed description and options, refer to the SunNet Manager 2.0 User's Guide.
You can use several different commands to start SNM. You must be running OPEN LOOK or X11.
To start the SNM Console initially (when there is no database present) or when you want to bring up the last map file, enter the following:
hostname% snm
If problems occur, your PATH environment variable may not include a path to SNM executables. If this is the case, enter a fully qualified path. In the following example,
/usr/snm/bin is the path to the executables:
hostname% /usr/snm/bin/snm
To load a database map file (in ASCII format) into the SNM Console, use the Load command on the SNM File menu.
To start the SNM Console without a database map file (which clears the run-time database), enter the following:
% snm -i
To start SNM with a specified map file (map_name is an ASCII database file), enter the following:
Refer to the SunNet Manager 2.0 User's Guide for more information on starting the SNM Console and troubleshooting problems with startup.
This section briefly outlines what steps to complete in SNM before continuing with CiscoWorks tasks. Instructions for using specific CiscoWorks applications can be found later in this manual. Refer to the specific chapter when you have questions.
Step 1: Start SNM (if not started already).
Step 2: Access Security Management to turn on authentication checking and provide users and groups privileges to CiscoWorks applications.
Step 3: Set up your SNM run-time database using SNM Discover or manual creation of devices using SNM's Create command.
Step 4: Use Sync w/Sybase to synchronize SNM database devices with the CiscoWorks Sybase database.
Step 5: Use any of the CiscoWorks applications to help you monitor and manage your network activity.
Table 2-1 lists some general network management tasks and associates the task with its responsible software application. Use this table to determine which documentation set to use if you have questions or need information. The "X" indicates this information can be found in the manual set for the tool or application.
Table 2-1 : CiscoWorks Versus SNM Task Descriptions
For more detailed information on the Results Browser and Grapher, refer to your SNM documentation set.
CiscoWorks uses the OPEN LOOK Graphical User Interface (GUI) developed by Sun Microsystems. Since CiscoWorks bases its windowing structure on the Sun OPEN LOOK graphical user interface standards, both SNM and CiscoWorks windows are structured similarly.
For information on using OPEN LOOK (including using your mouse, opening windows and menus, and manipulating windows and icons), refer to the SunNet Manager 2.0 Reference Guide.
When accessing the network management windows, keep the following points in mind:
Most primary windows contain the following common menu options:
Some primary windows contain specialized menu options. These menu options appear on the window between the File and Help menu buttons and include such menu items as Options and View. Individual menus are discussed in later chapters in the window components section for each application. Refer to the specific application for window descriptions.
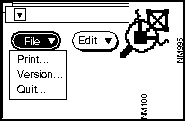
All primary windows contain a File menu. Figure 2-1 illustrates how to access the File menu.
Print Command
Each CiscoWorks primary window contains a Print command. There are two types of print options available in CiscoWorks applications. One option prints text found in a window using the lpr command. The other option prints a screen or window image using the SNM Snapshot utility. The CiscoWorks application you are using will determine the popup window that appears after you press the Print command.
Refer to the SunNet Manager 2.0 User's Guide for more information on the Snapshot utility.
Table 2-2 lists which CiscoWorks applications use the Snapshot utility and which use the lpr print command. In general, all windows containing text browsers use the lpr command.
Table 2-2 : Print Command Options in CiscoWorks Applications
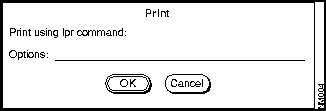
When you select Print on a window that accesses the lpr command, Figure 2-2 appears:
Figure 2-2 : Print Command Window The system requires that you to enter the Print command. The exact print command syntax depends on your system resources and configuration. Enter your print command, including any path designations, and press OK.
If printer environment options exist, they appear in the dialog box in the Options field. As soon as you begin to type the new print command, the previous command is overwritten. If you change your mind about printing, click on Cancel.
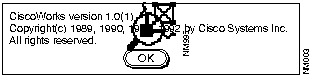
Version Command
Use the Version command to view the current version of the specific CiscoWorks software application you are in. See Figure 2-3.
Quit Command
Use the Quit command to exit the current CiscoWorks application window.
Quit closes the window from which it is invoked. If you quit from a primary window, you are returned to the SNM Console. If you quit from a secondary window, you are returned to the primary window. If multiple primary windows are opened, only the one in which Quit was invoked is closed; others remain open and active.
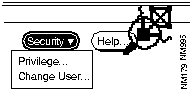
The Security menu appears in primary windows that use authority checking. Use the Security menu to access your user privileges or change your user ID.
Figure 2-4 illustrates how to access the Security menu.
Privilege Command
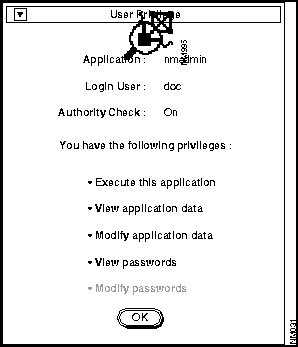
The Privilege command allows you to check your user privileges. When you select the Privilege command, the User Privilege window appears. See Figure 2-5.
Change User Command
The Change User command allows you to change your username. Use this command when you need to log in as another user (with special privileges) to access features you may not be able to perform.
Figure 2-5 : User Privilege Window The Help menu accesses online help for the current application. See Figure 2-6.
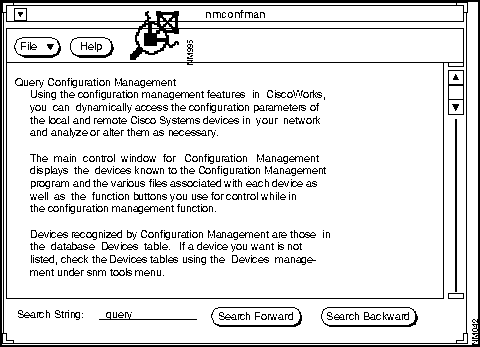
Enter characters in the search string field. Then use the Search Forward and Search Backward buttons to find your search string in the displayed text.
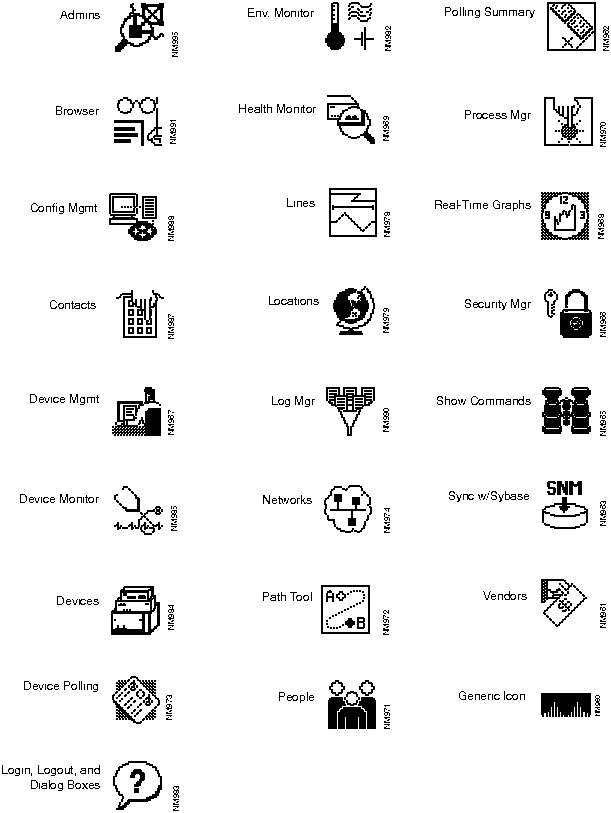
Recognizing CiscoWorks Application Icons
CiscoWorks applications have icons associated with each of the application windows. This is for easy recognition of an application when you turn the window into an icon. Figure 2-7 depicts each of the CiscoWorks application windows that are assigned an icon. These icons appear when you iconify the application window.
Figure 2-7 : CiscoWorks Application Window Icons
If you use the Security Manager to protect specified applications, all users will be required to enter a valid username and password to access the protected CiscoWorks applications. Refer to the "Using Security Manager Tools" chapter for detailed instructions on how to protect individual CiscoWorks applications.
When application security is enabled in the Security Management window, the Security Manager application requires a special Sybase or SA account name and password. If you do not have Sybase account permission, you will not have access to the Security Mgmt windows. If you set up security options using the Security Manager, any secured applications will require a username and a password.
With security on, if you have previously used the Login application on the Tools menu to log into CiscoWorks, you will not see a user identification window. If you have not used the CiscoWorks Login application, each time you access any of the secured CiscoWorks applications, CiscoWorks prompts you for a username and password. This login controls access to the application.
If you have used Security Mgmt to secure your CiscoWorks applications, you can use the Login and Logout applications on the SNM Tools menu. For more information on logging in and out, refer to the "Using Security Manager Tools" chapter.
Understanding Database Synchronization
CiscoWorks uses the Sybase relational database to supply network device information. SNM uses its own run-time database to store information about network devices; therefore, devices that appear in the SNM database might not appear in the Sybase database (unless you have synchronized the database).
Ensure that all devices that appear on your network map are in your CiscoWorks database. Use the Sync w/Sybase application to synchronize the database information. The
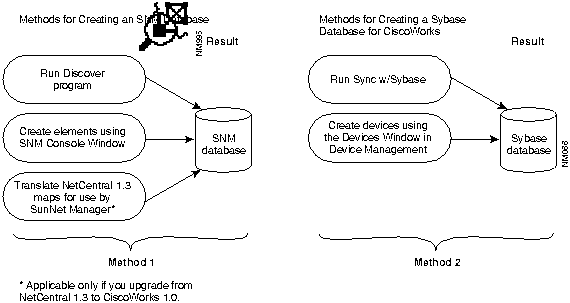
Figure 2-8 illustrates the differences between database creation in SNM and in CiscoWorks. Method 1 represents the three options you have to create an SNM database. Method 2 represents the two options you have to create a Sybase database for CiscoWorks.
Figure 2-8 : Database Creation for SNM and CiscoWorks For more detailed information about the database and the Sync w/Sybase application, refer to the "Device Management" chapter.
Copyright 1988-1996 © Cisco Systems Inc.
![]()
% snm map_name
Task
SNM Tool
CiscoWorks Application
Starting SNM Console
X
Using Discover
X
Traversing your network map (run-time database)
X
Creating or finding elements or element properties
X
Device Mgmt
Modifying or changing elements or element properties
X
Device Mgmt
Moving or connecting elements (devices)
X
Copying or deleting elements (devices)
X
Device Mgmt
Saving your network map (run-time
database)
X
Using SNM applications (such as Results Browser and Results Grapher)
X
Configuring OPEN LOOK Graphical Interface standards (such as window manipulation and mouse settings)
X
Modifying a graph display
X
Printing graphs, windows, or text files
X
Changing the state of a glyph
X
Specifying an event (condition of notification)
X
Device Monitor
Checking the cause of an event
X
Log Manager
Changing how glyph state changes propagate
X
Viewing or changing the status of requests
X
Viewing errors and traps
X
Log Manager
Managing SNMP devices
X
All CiscoWorks applications
CiscoWorks Application
Snapshot Utility
lpr Command
Configuration Management
X
Contacts
X
Device Management
X
Device Monitor
X
Device Polling
X
Environment Monitor
X
Health Monitor
X
Log Manager
X
Path Tool1
X
X
Polling Summary
X
Process Manager
X
Real-time Graphs
X
Security Manager
X
Show Commands
X
Sybase DWB
Not Applicable
Not Applicable
Sync w/Sybase
X
1 The Print command used depends on which Path Tool window you are currently in.
![]()
Sync w/Sybase application appears on the SNM Tools and Glyph menus. For more information on how to use the Sync w/Sybase application, refer to the "Device Management" chapter.
Sync w/Sybase. Sync w/Sybase copies new or updated device information from the SNM database to the CiscoWorks database.
![]()
![]()
![]()
![]()
![]()
![]()
![]()
![]()