Table of Contents
Using Security Manager Tools
Using Security Manager Tools
This chapter describes how to perform the following tasks:
- Set up the CiscoWorks default account.
- Establish users and groups.
- Establish access to applications.
- Enable application security.
- Use the Login and Logout applications.
Perform these tasks with the Security Manager application. The next section describes this application. The sections following the overview describe each specific task found in the Security Manager.
Depending on the complexity of your network, you can choose to set up some security management procedures to protect your CiscoWorks applications and your network devices from unauthorized individuals. You can set up your CiscoWorks environment to require a login to access applications. This protection ensures that only users who have a valid account and know the password can perform tasks such as configuring a router, deleting database device information, or defining polling procedures.

The CiscoWorks security system is turned off by default. Until you turn on the authority checking in the Security Mgr, you can access any CiscoWorks application without a username or password. Authority checking performs authentication on the CiscoWorks application you choose to secure. Authority checking requests a user to prove his or her identity by typing in a password. If you do not possess a valid username and password, you will be denied access.
The following steps present an overview of the Security Manager application and how to use it to protect your network devices and data:
- Step 1: Access the SNM Tools menu and pull down to Security Mgr.
- Step 2: Select the CiscoWorks applications for which you want to require usernames and passwords. Set authority checking to on for these applications.
- Step 3: Set up the usernames and group names you wish to permit to access the CiscoWorks applications.
- Step 4: Connect the users with the appropriate group names.
- Step 5: Set up individual group permissions for each CiscoWorks application.
- This includes read/write protection for network data and device password permissions.
- Step 6: View a summary of all the security permissions you have created.
Figure 7-1 illustrates the Security Manager window. Table 7-1 describes the components in
this window.
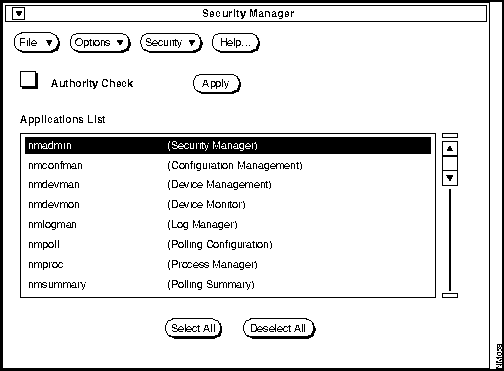
Figure 7-1 Security Manager Window
Table 7-1 Security Manager Window Components
| File |
Print
Version
Quit |
Prints a snapshot of the window.
Displays CiscoWorks version information of this application.
Exits the current window. |
| Options |
Users and Groups
Permissions
Summary |
Opens a subwindow that sets users and groups privileges.
Opens a subwindow that assigns group privileges.
Opens a subwindow that displays application authority checking status. |
| Security |
Privileges
Change User |
Provides current user privileges.
Enables user to change username. |
| Help |
|
Provides help text on the current window. |
| Authority Check box |
|
A check in this box indicates CiscoWorks performs authentication on the CiscoWorks application you choose to secure. |
| Apply |
|
Applies changes to the database. |
| Select All |
|
Selects all applications in the browser. |
| Deselect All |
|
Deslects all applications in the browser. |
The Security Manager application enables you to set privileges for your users to access the following CiscoWorks applications:
- Configuration Mgmt (nmconfman)
- Device Mgmt (nmdevman)
- Device Monitor (nmdevmon)
- Device Polling (nmpoll)
- Log Mgr (nmlogman)
- Process Mgr (nmproc)
- Polling Summary (nmsummary)
- Security Mgr (nmadmin)
- Sync w/Sybase (nmsync)
The names that follow in parentheses are filenames. If you start the application from the command line, this is the name you will use. For more information on starting applications from the command line, refer to Appendix B, "Troubleshooting CiscoWorks Errors."
All remaining CiscoWorks applications (Contacts, Env. Monitor, Path Tool, Real-Time Graphs, Show Commands) do not require usernames and passwords. These applications are meant to be shared by your network users without restrictions.
The following sections describe how to set up user and group permissions for these applications.
The CiscoWorks software contains a default account password for CiscoWorks applications that access the Sybase database. The administrator password is referred to as the SA password. The nmsanms program is a command line interface that allows you to change the default account password.
Run nmsanms in the following situations:
- To change the default account password.
- When the keyword file in $NMSROOT/etc is deleted or altered by an unauthorized person.
- In this case, the directory owner of $NMSROOT needs to create a dummy ncspwd file under $NMSROOT/etc. Enter the following command:
hostname% cd $NMSROOT/etc
hostname% su directory owner
>Password: password
> cp /dev/null ncspwd
chmod 660 ncspwd
> ^d
- An unauthorized person changes the default password in database.
To run the nmsanms program, perform the following steps:
- Step 1: To start the nmsanms program, enter the following at the command line (either a Bourne Shell or a C-Shell):
% $NMSROOT/bin/nmsanms
- A User Identification window appears. The SA name appears automatically in the window. See Figure 7-2.
- Note: Run the nmsamns program when you are not using the Security Manager application. If you run the nmsamns program when Security Manager is being used, you will need to restart the Security Manager application. Otherwise, Security Manager will be unable to access any Sybase database records.
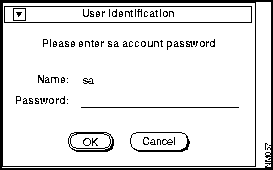
Figure 7-2 User Identification Window for SA Account
- Step 2: Enter your SA account password and click on OK.
- An nmsanms encryption window appears. See Figure 7-3.
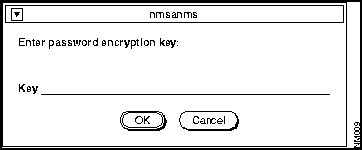
Figure 7-3 Nmsanms Encryption Window
- Step 3: Enter your password encryption key. Click on OK.
- The encryption key is used for generating the default password. For example, beta is the default keyword. The nmsanms program inserts your new password encryption key in $NMSROOT/etc/ncspwd.
- Note: Only 16 characters are allowed in the encryption key.
- Step 4: To verify your new password encryption key, list the file ncspwd to ensure it has the correct date:
% ls -l $NMSROOT/etc/ncspwd
- You should see the most current date on the file.
- Step 5: To see the password encryption key word, you can perform a more on the file.
% more $NMSROOT/etc/ncspwd
Using Security Manager, you can add new users to access the CiscoWorks applications that use the Sybase database. The Security Manager application can then administer security using the users registered to Sybase. You give privileges to users so they can access secured CiscoWorks applications. The user account name in Security Manager does not have to be the same as the user's UNIX ID.

- Time Saver: You may want to have several Security Manager subwindows open simultaneously. This allows cross referencing of changes you make in one window when you update or add new security options to another window. Only run one Security Manager application at a time.
Every user must belong to at least one group. To authorize users to access applications that have new security restrictions, define groups of users that can access each application via their username. The first time you access the Users And Groups window, there are no groups or users defined. You need to define group names and authorized users for each group.
Your security groups can contain several levels of device password access and data manipulation.
The list below provides several suggested levels; you may create different names or levels based on your individual network needs:
- No_password---Users have no password permissions, but have read/write data access.
- No_priv---Users have no password permissions and no data access.
- Read_data---Users have no password permissions and read-only data access. This group may consist of most of your network users.
- Nms---Users have no password and read/write data access. This group may be users that can access the Configuration Management application.
- SU (super user)---Users have read/write password permissions and read/write data access.
To add new group names to the Security Manager, perform the following steps:
- Step 1: From the SNM Tools menu, pull down to Security Manager.
- The Security Manager window appears. See Figure 7-4.
-
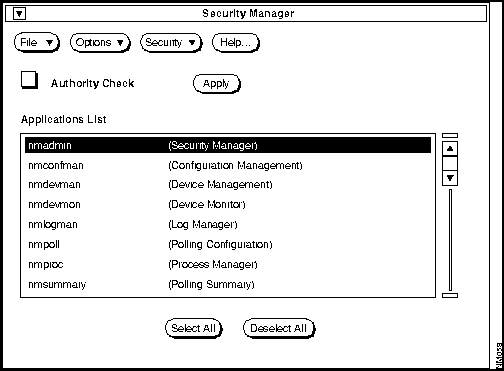
Figure 7-4 Security Manager Window
- Step 2: Pull down the Options menu to the Users And Groups command.
- The Users And Groups window appears. See Figure 7-5.
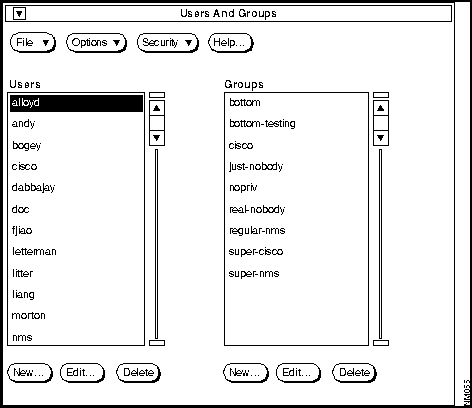
Figure 7-5 Users And Groups Window
- Step 3: To add group names, click on the New button under the Groups scroll window.
- The New Group window appears. See Figure 7-6.
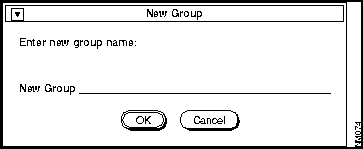
Figure 7-6 New Group Window
- Step 4: Enter your group name and click on OK.
- For example, enter the group name read_only and click on OK. The window disappears and you are returned to the Users And Groups window.
- Note: There are no spaces allowed in group names, usernames, or passwords. The maximum length for passwords, group names, or usernames is 32 characters. Refer to your Sybase manuals for specific details on legal username and password information.
- Step 5: Repeat steps 3 and 4 until you have entered all your group names.
This section describes how to edit existing group names if necessary. After you finish adding and editing your group names, you need to add your usernames.
To change the name of a group, you need to access the Security Manager and edit an existing group name. The relationship between the users and groups remain unchanged. In other words, users affiliated with the previous group name automatically move to the new group name.
To edit group names in the Security Manager, perform the following steps:
- Step 1: In the Users And Groups window, click on an existing group name in the Groups scroll window.
- By selecting a group name, the usernames associated with this group display in the Users scroll window.
- Step 2: Click on the Edit button under the Groups scroll window.
- The Edit Group window appears. See Figure 7-7.
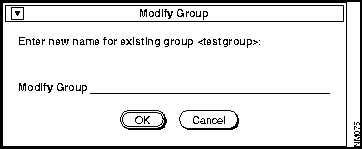
Figure 7-7 Edit Group Window
- Step 3: Enter the new name for the existing group name and click on OK.
- The window disappears and you are returned to the Users And Groups window. The modified group name appears in the scroll window.
- Step 4: Repeat steps 1 through 3 until you have modified the necessary group names.
If you are setting up first-time group and user permissions, continue to the section "Adding New Users" later in this chapter.
To remove security permissions for an entire group, delete the group name from the Security Manager. After you delete the group name, all users in that group will no longer have privileges assigned to that group.
To delete group names from the Security Manager, perform the following steps:
- Step 1: From the Users And Groups window, click on a group name in the Groups scroll window.
- By selecting a group name, the usernames associated with this group display in the Users scroll window.
- Step 2: Click on the Delete button under the Groups scroll window.
- A window appears that prompts you to confirm the deletion.
- Step 3: To delete the group name, click on OK. To return to the Users And Groups window and cancel the delete request, click on Cancel.
- By deleting the group name, all usernames associated with that group no longer have the group privileges.
You need to enter every user account name, or username, that receives permission to use the CiscoWorks applications.
- Note: You need a Sybase SA account login to run the New, Edit, and Delete button commands on the Users And Groups scroll windows. You will be asked for an SA password once. Once you enter a valid SA password, you can add, edit and delete multiple users. Since SA is a reserved database name, it will not be accepted as a valid username.
To add new usernames to the Security Manager, perform the following steps:
- Step 1: From the Security Manager window, select Options and pull down to Users And Groups.
- The Users And Groups window appears.
- Step 2: Click on the New button under the Users scroll window.
- The New User window appears. See Figure 7-8.
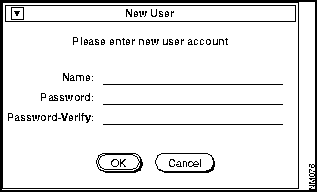
Figure 7-8 New User Window
- Step 3: Enter your username and password and verify the password by retyping it on the next line.Then click on OK.
- For example, enter the username my_name, enter the password password, and retype password on the next line. Then click on OK. The window disappears and you are returned to the Users And Groups window.
- Note: There are no spaces allowed in group names, usernames, or passwords. The maximum length for each is 32 characters.
- Step 4: Repeat steps 2 and 3 until you have entered all your usernames.
To change the name or password of a user, access the Security Manager and edit the current username or password. The relationship between the users and groups remain unchanged. The previous groups affiliated with the old username will be assigned to the new username.
To edit usernames or passwords in the Security Manager, perform the following steps:
- Step 1: From the Users And Groups window, select a username in the User scroll window and click on the Edit button under the Users scroll window.
- By selecting a username, the group names associated with this user display in the Groups scroll window.
- The Edit User window appears. See Figure 7-9.
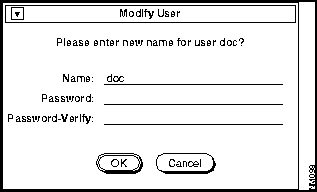
Figure 7-9 Edit User Window
- Step 2: Enter the new name for the existing username, enter your password, and verify the password by retyping it. Click on OK.
- The window disappears and you are returned to the Users And Groups window. The modified username appears in the scroll window.
- Step 3: Repeat steps 1 through 3 until you have modified the necessary usernames.
To remove security permissions for a user, you need to delete the username from the Security Manager. After you delete the username, this individual will be unauthorized to access the CiscoWorks applications previously indicated.
To delete usernames from the Security Manager, perform the following steps:
- Step 1: From the Users And Groups window, click on the username in the Users scroll window.
- By selecting a username, the group names associated with this user display in the Groups scroll window.
- Step 2: Click on the Delete button under the Users scroll window.
- A window appears that prompts you to confirm the deletion.
- Step 3: To delete the username, click on OK. To return to the Users And Groups window and cancel the delete request, click on Cancel.
- By deleting a username, there are no longer group names associated with this user.
The Security Manager authorizes groups to access CiscoWorks applications based on the permissions set in the Security Manager application. In order for individual users to receive permission, they must be part of a group.
There are two ways to add users to groups. An overview of the two procedures follows:
- You can add one user to either a single group or to several groups using the Users scroll window in the Users And Groups window.
- You can add several users to a group at one time using the Groups scroll window on the Users And Groups window.
To connect an individual user to a group or groups, perform the following steps:
- Step 1: From the Users And Groups window, click on an individual username in the User scroll window.
- The username will be highlighted.
- Step 2: Select the Option menu and pull down to Add User to Groups.
- A Connecting Users and Groups window appears. See Figure 7-10.
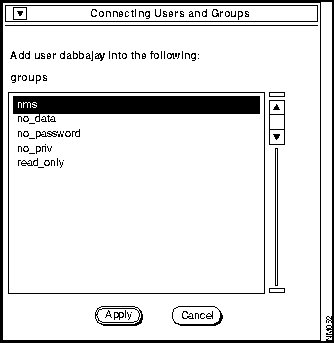
Figure 7-10 Connecting Users and Groups Window
- Step 3: Select the group names you want to add the user to.
- Step 4: To connect this username with the group or group names selected, click on Apply.
- The username is added to the group and you are returned to the Users And Groups window.
To connect several users to a group at once, perform the following steps:
- Step 1: From the Users And Groups window, click on the desired group name in the Groups scroll window.
- The group name will be highlighted.
- Step 2: Select the Option menu and pull down to Add User to Groups.
- A Connecting Users and Groups window appears. See Figure 7-11.
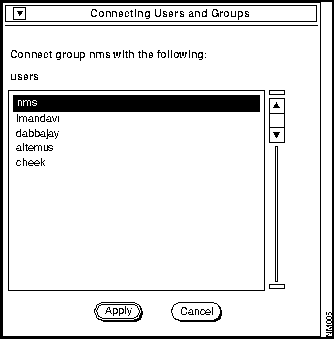
Figure 7-11 Connecting Users and Groups Window
- Step 3: Select the usernames you want to add to this group.
- Step 4: To connect the users selected with this group, click on Apply.
- The users are connected to the groups you indicate and you return to the Users And Groups window.
- Note: A user can be assigned to more than one group.
You can check your group assignments by using the Users And Groups Summary window. This window allows you to sort by groups or users. Sorting by groups provides a quick look of all user accounts with this group's privileges. Sorting by users provides a quick look at all groups associated with one user.
To view your user or group assignments, perform the following steps:
- Step 1: From the Users And Groups window, select Options and pull down to Summary.
- The Users And Groups Summary window appears. See Figure 7-12.
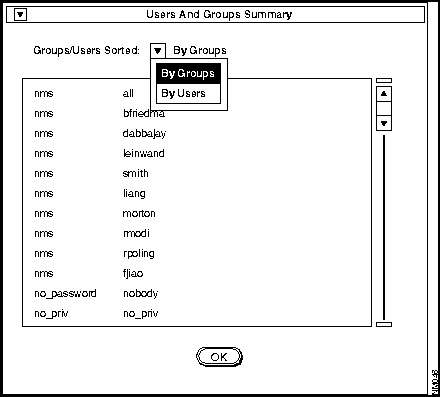
Figure 7-12 Users And Groups Summary Window
- Step 2: To change the sort category, click on the Groups/Users Sort menu and pull down to the By Groups or By Users category.
- Your summary list will be sorted according to your selection.
- Step 3: To exit this window, click on OK.
This section describes how to establish uer and group permissions and how to set up authority checking to require login information.
The Permission window enables you to set or view group security permission levels for your CiscoWorks applications.
There are four security levels within the Security Manager application:
- Data read---Enables user access to data. No file or data changes are permitted.
- Data write---Enables user access to data. File or data changes are permitted.
- Password read---Enables user to read device passwords, including enable-password, line password, community string, and TACACS user password.
- Password write---Enables user changes to device passwords.

- Time Saver: If you want to select all group or application names, click on Select All. If you want to select several group or application names but not all of them, click on Select All, and deselect those groups or applications you do not want to include.
To view or set group permissions, perform the following steps:
- Step 1: From the Users And Groups window, pull down the Permissions command.
- The Permissions window appears. See Figure 7-13.
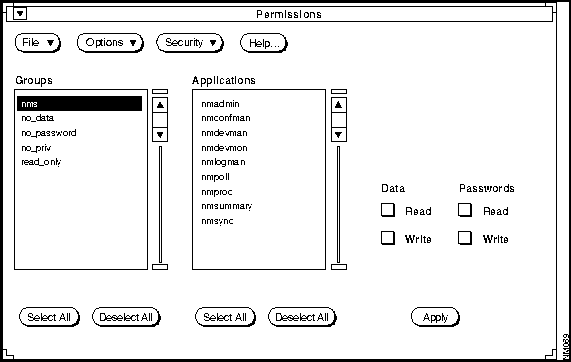
Figure 7-13 Permissions Window
- Step 2: Click on a group name or names in the Groups scroll window.
- Step 3: Click on the CiscoWorks application or applications you wish to set permissions for.
- The Data and Passwords check boxes displayed to the right of the scroller contain the security levels for the CiscoWorks application selected. The categories include data and password read and write access.
- Step 4: Click on the appropriate Data check boxes if you want to give this group permission to read or write data to this application.
- Step 5: Click on the appropriate Passwords check boxes if you want to give this group permission to a read or write password for this application.
- Step 6: Click on the Apply button to apply your group permissions to this application.

- Time Saver: To apply permissions to all groups or applications, click on the Select All button under the scroll windows. You can deselect a name by clicking on it. To reset all permissions, click on Deselect All. Click on the Apply button to set your permissions.

- Caution: Remember that the Write permissions overwrite the Read permissions.
You can use the Permissions window as a tool to view your group permissions on CiscoWorks applications. You may have already set your group's data and password access to read, write, or both read and write.
To view group permissions, perform the following steps:
- Step 1: From the Security Manager window, select the Options menu and pull down to Permissions.
- The Permissions window appears.
- Step 2: From the Permissions window, click on the group name in the Groups scroll window.
- Step 3: To view security-level permissions, click on the application name in the Applications scroll window.
- The Data and Password categories will display a check mark in the Read and Write boxes this group has permission to use.
- Note: The last selection you make is what will appear in the permission boxes in the bottom right of the Permissions window. Last means the last time you selected; it is not the last one in the order of the list. For example, if you have selected five group names and five application names, the permissions boxes display permissions for the last item selected in each scroll window.

- Time Saver: Use the Deselect All buttons under the scroll windows to clear all selections and reselect from that scroll window to view different group permissions.
You can check your group permission settings by using the Permissions Summary window. This window allows you to sort by security attribute (data or password) or by application or group. Sorting by groups provides a display of all group accounts with their specific security levels (data and/or password) and application privileges. Sorting by applications provides a display of all applications associated with their group names and specific security levels (data and/or password) privileges.
To view a summary of your permission settings, perform the following steps:
- Step 1: From the Permissions window, select Options and pull down to Summary.
- The Permissions Summary window appears. See Figure 7-14.
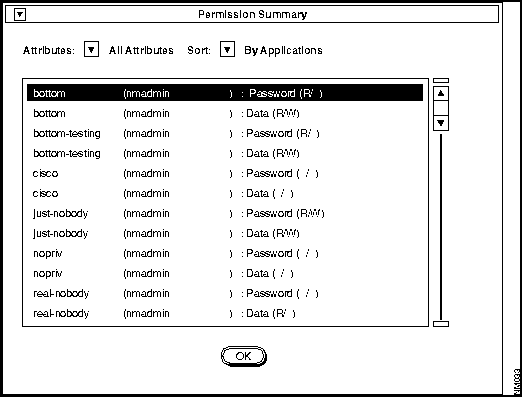
Figure 7-14 Permissions Summary Window
- Step 2: To view all group permissions for all attributes, click on the Attributes field and pull down to All Attributes.
- Your summary list sorts all security level information according to your selection.
- Step 3: Then click on Sort field and pull down to By Groups.
- Your summary list sorts group names according to your selection.
- Step 4: To change the attribute category, click on the Attributes field and pull down to the Data or Password category.
- Your summary list will be sorted according to your selection.
- Step 5: To sort your permission summary display by application, click on Sort field and pull down to By Applications.
- Your summary list will be sorted according to your selection.
- Step 6: To exit this window, click on OK.
- Note: If you enter the Permission Summary window and have a group selected in the Permissions window, your display includes information on only that group.
Part of managing CiscoWorks includes the option of setting up access to specific CiscoWorks applications. You may decide that each CiscoWorks application that uses the Sybase database requires a user to log in and provide a password. After establishing user and group privileges and assigning which groups have permission to access specific CiscoWorks applications, you must restrict that application. By invoking authority checking on the Security Manager window, users are only allowed into applications for which they received privileges for. Authority checking uses the authentication process to require a login and password before allowing access to a specific application.

- Caution: Once you add security privileges by turning on authority checking, you have restricted user access to specified CiscoWorks applications until you grant user permissions. Complete all security procedures before you exit the Security Manager. If you have problems with group permission settings and cannot login as any other username, log in as SA (the Sybase account). This login account will give you full permissions.
To require that CiscoWorks checks a username and password to access an application, perform the following steps:
- Step 1: From the SNM Tools menu, pull down to Security Manager.
- The Security Manager window appears. See Figure 7-15.
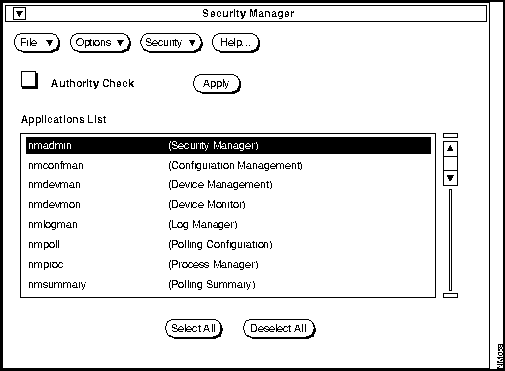
Figure 7-15 Security ManagerWindow
- Step 2: To choose the specific CiscoWorks applications for which you want to set up authority checking, click on the application names in the Applications List scroll window.
- For example, click on nmadmin (Security Manager).

- Time Saver: To set multiple applications simultaneously, click on the Set All button. To reset multiple applications to have no security options, click on the Deselect All button.Then click on the Authority Check box and press Apply. This applies the option to all applications selected in the scroll window.
- Step 3: To restrict user access to a specific CiscoWorks application, click on the Authority Check box and press Apply.
- This action saves the request for authority check (otherwise known as authentication) on the Security Manager application.
- Step 4: Continue to set your security options individually for each application.
Once you establish which applications are protected, you may want to check the result of the settings. The following section describes how to view your application privilege checks through the Applications Administration Summary window.
Once you finish securing your CiscoWorks applications, you can view a summary of each application to see if authority checking is turned on.
To view the Applications Administration Summary, perform the following steps:
- Step 1: From the Security Manager window, pull down Options to the Summary command.
- The Applications Administration Summary window appears. See Figure 7-16.
- Step 2: Use the scroller to view the CiscoWorks application security options.
- To exit, click OK.
If you need to change security options, return to the Security Manager window to make the necessary changes.
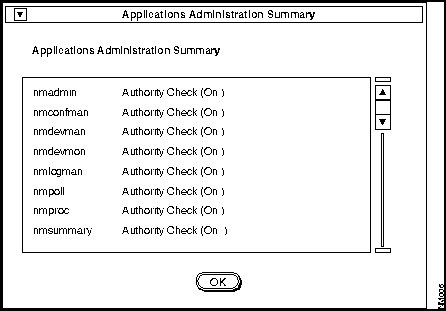
Figure 7-16 Applications Administration Summary Window
In several Security Manager windows, the Security menu contains the following options:
- Privilege---Displays your privileges while in a specific CiscoWorks application.
- Change User---Enables you to change your login account to another account which has different privileges.
When you access any CiscoWorks application that Security Manager controls, you can check to see what type of permissions, or privileges, you have on this application.
To view your user permissions, perform the following steps:
- Step 1: From the Security Manager window, select the Security menu and pull down to Privilege.
- The User Privilege window appears. See Figure 7-17.
- The User Privilege window provides the following information:
- Application---Which CiscoWorks application this security permission screen describes.
- Login User---Which user account permissions are being displayed.
- Authority Check---Whether this CiscoWorks application is checking user account permissions.
- Privileges list---Which privileges this user account possesses. This list may contain a portion or all of the following permissions: execute this application,view application data (Data read), modify application data (Data write), view passwords (Password read), and modify passwords (Password write).
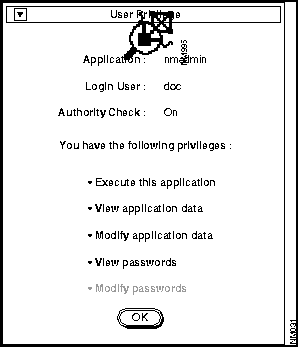
Figure 7-17 User Privilege Window
- Step 2: To quit from this window, click on OK.
- Step 3: To change to a different user account, select the Security menu and pull down to Change User.
- A User Identification window appears.
- Step 4: To change to a different username that has different privileges, enter the username and the password.
- Step 5: Click on OK to change usernames. Click on Cancel if you do not want to change the username.
- You are returned to the original window.
If you have set up some security for your CiscoWorks applications that use the Sybase database using Security Manager, you may be required to log into an application before receiving access. You can login to CiscoWorks applications in two ways:
- You can log into all secured CiscoWorks applications before you access individual applications. This saves you from logging into several applications; once you are logged in, all applications for which you have permission to use open automatically. You are requested to enter username and password information only once.
- You can log into each CiscoWorks application that requires a username and password upon request. The user identification window appears whenever a username and password is required.
Use the CiscoWorks Login application to log in to use any secured application (of the nine applications available for protection) for which you have permissions. You will be asked for your username and password only once.

The next sections describe the two login scenarios.

- Time Saver: You can save time by logging in once at any time after you enter SNM. By using the CiscoWorks Login application, all current security permissions are checked based on your settings in the Security Manager.
To log in to all CiscoWorks applications you have access to, perform the following steps:
- Step 1: On the SNM Tools menu, pull down the Tools menu to Login.
- A User Identification window appears.
- Step 2: Enter your username and password and click on OK.
- You are now logged into all CiscoWorks applications for which you have permission with this username.
If you do not wish to use the Login application, each CiscoWorks application you enter will prompt you for your user identification information.
To log in to any CiscoWorks application for the first time (without the Login application), perform the following steps:
- Step 1: Select the Tools menu and pull down to any CiscoWorks application.
- For example, pull down to Device Mgmt.
- If the authority checking in Device Mgmt is turned on, a User Identification window appears.
- Step 2: Enter your username and password. Click on OK.
- The next window that appears is your CiscoWorks application. For example, the Device Management window appears if you chose Device Mgmt in step 1.

- Caution: Open CiscoWorks applications continue with the access they had when started. To fully secure your workstation, exit all CiscoWorks applications or log out using the Logout application if your workstation will be unattended.
To ensure network security, log off the CiscoWorks applications after you have completed your CiscoWorks tasks. You only need to perform this procedure if you have previously logged in using the Login application.

If you access Logout from the SNM Tools menu and you have not previously used the Login application, you will receive the following error message. See Figure 7-18.
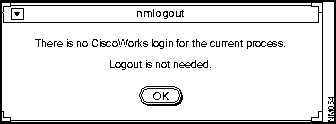
Figure 7-18 Logout Error Message
To log out from CiscoWorks applications, perform the following steps:
- Step 1: On the SNM Tools menu, pull down to Logout.
- A Logout from CiscoWorks window appears. See Figure 7-19.
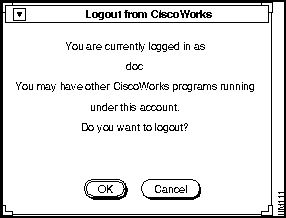
Figure 7-19 Logout from CiscoWorks Window
- Step 2: To secure your username and exit the CiscoWorks Login application, click on OK.
- You will be denied immediate access into any secured CiscoWorks application after you press OK. You will need to supply your username and password the next time you wish to access a secured CiscoWorks application.
- Step 3: To cancel the logout procedure, click on Cancel.
Copyright 1988-1995
©
Cisco Systems Inc.


![]()


![]()

![]()
![]()
![]()

![]()

![]()


![]()
![]()


