|
|

This chapter describes the Device Management application and how to use it to build the CiscoWorks database. CiscoWorks uses the database form information in several application functions. The following sections are included in this chapter:
The Device Management application, also referred to as nmdevman, stores the device information you enter into the Sybase relational database. Keep the Sybase database in CiscoWorks and the SunNet Manager (SNM) database synchronized; otherwise, you might be missing some devices or elements in your network.

Use the Sync w/Sybase application during initial setup of your network map to automatically add or update devices into the CiscoWorks database from the SNM database. Then use Sync w/Sybase or the Device Management application to add devices after your initial setup. Refer to the section "Using Sync w/Sybase" later in this chapter for more information on how to run this application.
CiscoWorks Relational Database
CiscoWorks uses the Sybase relational database management system. In a relational database, stored data is not fixed. The relationships between data items is logical and can be changed dynamically without affecting the way the data is physically stored.
In a more typical flat-file database (like the SNM database), the physical order and extent of the data in each record is defined and cannot be readily changed. You must know ahead of time how you are going to use the data so that the data can be structured for easy access. If you change the way you need to use the data, you will most likely have to restructure and rebuild the entire database---a time-consuming process. Additionally, each unique combination of data elements must also be stored as a separate record, which means a great deal of duplicated data.
A relational database has the following advantages:
Because the relationships between data are easily changed, you do not need to know ahead of time every way you will use the data. You can change relationships as your needs for data and the network change. In its simplest form, a relational database can be viewed as a series of tables that are linked together by cross-references. These cross-references are maintained by the system and allow you to change the way you access the data. You can at any time add or modify these cross-references.
Throughout the description of database functions, the words field and record have the following correlation:
Figure 6-1 shows an example of a simple relational database. The keywords used in these tables are the ID fields. The relational database manages the keys for you, and assigning an administrative contact, for example, is as easy as pointing and clicking at an already existing entry. When you ask the database to print the device name table, it looks up the real entries corresponding to the keyword ID, and prints them in the right spot.
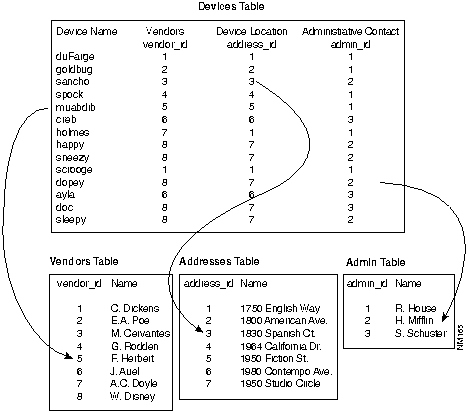
Figure 6-1 : Relational Database Concept
CiscoWorks Applications That Use Database Data
You do not have to enter any or all of the database forms for device management if you do not plan to use the following list of CiscoWorks applications. You can use the Sync w/Sybase application to create your database entries automatically.
If you plan to use the following CiscoWorks 1.0 applications, be sure you have accessed the necessary database forms and entered the information. If you do not have the necessary information in the database, you will receive error messages.
The following CiscoWorks applications use the database data provided by the Sync w/Sybase or Device Management applications:
Since it is easier to use the Sync w/Sybase application to gather device data, that application is discussed first. Use the Device Management application to add custom data that you need to access for troubleshooting, such as contact, administration, or vendor information.

The following information is added to your CiscoWorks database for each new or updated device:
If a device is already in your CiscoWorks database, Sync w/Sybase updates any changed information about this device. If a device does not exist in the CiscoWorks database, Sync w/Sybase adds the device. If a device is currently unreachable or has a name that cannot be resolved, it will not be added to the CiscoWorks database. If Sync w/Sybase finds a Cisco device, it sets the SNM properties for that device to include the Cisco agent.
Access Sync w/Sybase through either the SNM Tools or Glyph menu. The Sync w/Sybase functionality depends on which menu you use to activate the application.
Figure 6-2 illustrates the Sync w/Sybase window. Table 6-1 describes the components in this window.

Figure 6-2 : Sync w/Sybase Window
Table 6-1 : Sync w/Sybase Window Components
| Component | Subcomponent | Description |
|---|---|---|
| File | Print
Version Quit |
Prints a snapshot of the current window.
Displays the CiscoWorks version information for this application. Exits the current window. |
| Help | Provides help text on the current window. | |
| Search String field | Locates characters within browser text. | |
| Search Forward | Searches forward for a character string in the text. | |
| Search Backward | Searches backward for a character string in the text. |
Adding Devices Using Sync w/Sybase
To add or update devices from SNM to your CiscoWorks database, perform the following steps:
Step 1: From either the Tools or the Glyph menu, pull down to Sync w/Sybase.
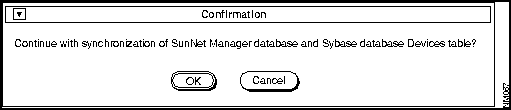
Figure 6-3 : Sync w/Sybase Confirmation Window
Step 2: Click on OK to continue with the synchronization of SNM's database and the Sybase database Devices table.
Step 3: To quit this window, select File and pull down to Quit.
This section provides an overview of CiscoWorks device management operations, describing the following:
The device management operation of CiscoWorks software is primarily used to maintain long-term records pertaining to the networks and to collect and store performance data for later evaluation.
The database helps organize the information necessary for device management. It provides the means for system operators to rapidly access online information and for network managers to respond to the long-term needs and growth of the system.
The CiscoWorks relational database management system comprises a set of related database tables and a set of user interface windows that can be easily accessed for adding and modifying database information.
Device Management Window-to-Table Relationship
The CiscoWorks device management environment is based on a series of graphical user interface windows. Each window correlates to a table in the database. Where a table contains relationships with other tables, data in those tables can be accessed directly through the Device Management window. Windows simplify the task of creating, maintaining and reviewing database file information.
The CiscoWorks database structure facilitates the creation and maintenance of static and real-time information. Static information includes vendor contacts, administrative contacts, who to call to troubleshoot, particular devices on the network, and network, device, interface, and line addresses.
Refer to Appendix C, "CiscoWorks Database Tables," for information on the file structure of each database table.
With device management capabilities, you are better able to find and isolate problems to specific devices or interfaces so that the proper repair facilities or personnel can be contacted. You also are able to produce information in various formats to support your troubleshooting requests, and discover problems before they become noticeable by network users. The end result is that your network will be more reliable.
The database window allows you to enter and view data in the database without using keyboard command sequences. As illustrated in Figure 6-1, the window transforms a series of data cells in a database table to data records in separate boxes (called fields) that contain the data you work with, such as the placement of the street address from the data record in the database to the data field box titled street. Notice that other fields are similarly placed in the window.
To open any of the database windows, select the Device Management application.
When a menu item is selected, it opens up a window that relates to one or more database relational tables. The window title is synonymous with the primary table that controls the window.
You can enter data into the database using any combination of the following methods:
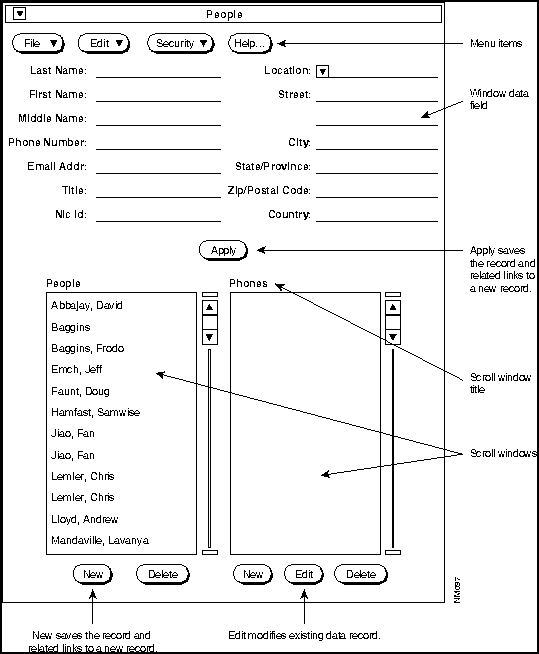
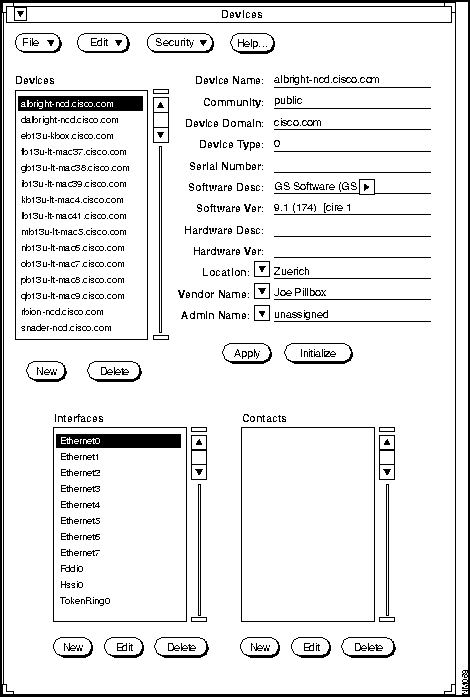
A primary window consists of a number of data fields, has at least one scroll window, a menu bar, and control buttons. Figure 6-4 illustrates a primary window.
Figure 6-4 : Sample Primary Window Scroll Windows
Each scroll window in the primary window has New, Edit, and Delete buttons. These buttons let you add, modify, and delete records in the table associated with the scroll window. In Figure 6-4, there are three scroll windows: devices, interfaces, and contacts.
The primary scroll window shares the same title as the primary window. When you select an item in the primary scroll window, the database record fills applicable data fields in the primary window.
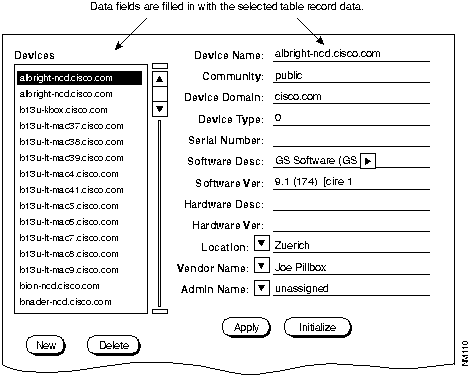
In Figure 6-5, selecting albright-ncd caused the remainder of the albright-ncd record (located in the database) to be displayed in the primary window fields.
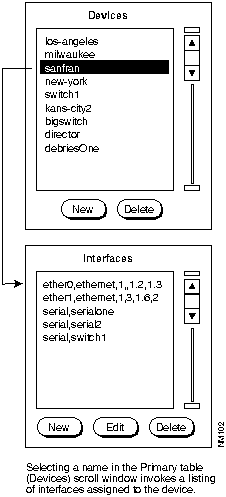
Figure 6-5 : Scroll Window Within a Primary Window In Figure 6-6, the interfaces currently assigned to sanfran are listed in the interfaces scroll window. Data in the scroll window can be viewed or added, edited, or deleted.
Figure 6-6 : Scroll-to-Scroll Window Relationship Figure 6-7 illustrates the fields in a primary window. When you click on a field, that field and all other fields from the same table are highlighted. The highlighted fields are called table groups and are used to identify which data elements belong to a table.
To manually enter data, position the cursor in a field using the mouse (click with the left mouse button) and type data in using the keyboard. To move from field to field use the Tab key, Return key, or the mouse.
Figure 6-7 : Data Fields Within a Primary Window Primary window tables may contain one or more mandatory field requirements. Mandatory fields exist in the structure to ensure minimal information is captured, made available to other tables in the database, and ultimately to the user of the database. Examples of mandatory entries are device names, people names, some basic parts of addresses such as city, state and country, and network names. Mandatory data entry fields are listed with each primary window description.
If you bypass a mandatory data entry field, a message stating "The column XXXX in table xxxx may not be null." Click on OK to acknowledge the error and close the window. Review and correct entered data. The list of mandatory data fields contained with window descriptions can be helpful.
When a selection is made in the primary scroll window, related secondary table data is automatically displayed in another related scroll window. A secondary window (a window containing secondary table data) is opened by double-clicking inside the frame of the applicable scroll window, or by clicking with the left mouse button on the New or Edit button.
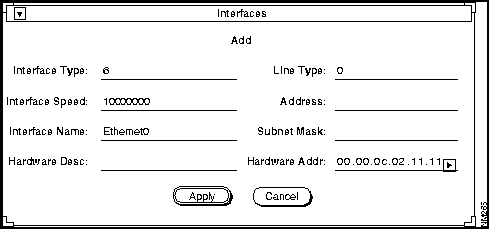
Figure 6-8 illustrates the Interfaces secondary window that is opened by double-clicking on the ether1 selection in the Interfaces scroll window. Secondary windows are opened from a primary window to enter and modify data in other related tables. These tables may have their own primary window, such as lines and people.
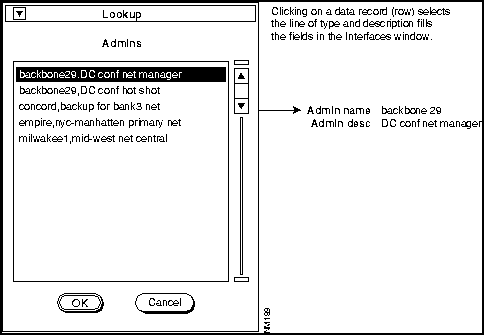
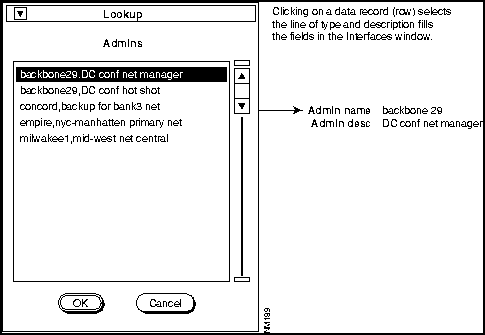
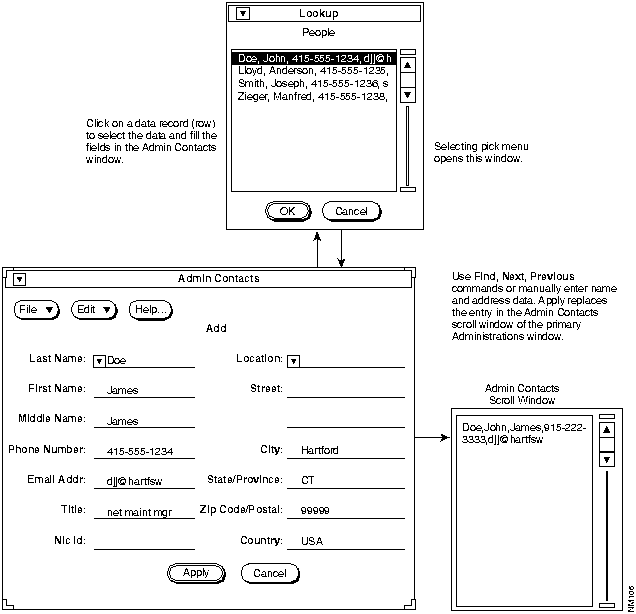
Figure 6-8 : Sample Secondary Window A typical lookup window is illustrated in Figure 6-9. Lookup windows are a labor-saving method to view and select data from your database. You can accept data from the lookup window to place the data in a primary or secondary window. You cannot enter data into a lookup window.
Lookup windows are opened by selecting the pick menu located next to a data field.
Figure 6-9 : Sample Lookup Window Once in a lookup window, data is selected by clicking on the data record (the row). Clicking on Apply places the data in the primary or secondary window data fields and closes the lookup window. Data is automatically linked to other data in the primary or secondary window.
If you decide not to use any lookup window data, click on Cancel. The lookup window closes.
The command buttons used in the Device Management windows are described in this section.
The New button is used to add, or save, a data record. Data added is immediately listed in scroll windows.
New contains a global save feature that saves relative data links, regardless of the position of the cursor in the window. This ensures that table-to-table relationships are implemented. For example, there is no need to separately open the locations window to link address data to the devices window.
New is always active. The data fields are disabled until a record is selected or you click New. One exception to this is the Devices window.
Add a data record by clicking on the New button. New operates on data in two ways:
The New command is used to save new table records. New records must contain at least one new keyword (keywords are usually people's last names, a device name, or similar reference) or the attempt will be ignored.
For instance, changing a person's last name by adding a letter to the end of the name would be interpreted as a new keyword for purposes of accepting the change and would be saved in the table as an additional record. Keyword, as used here, is synonymous with mandatory data field entry requirements. Use the Edit command to save modified records.
The Edit command is button-activated. Use Edit to change data fields of a record, saving those changes in the same record.
You can only modify data in the primary window data fields. You can place data from a scroll window, a lookup window, or a secondary window in the data fields. You can also use Find, Next, and Previous options to locate the selection.
Select the data field and click on Edit. Then enter the modified data and click on Apply.
Edit does not add a record to the database. The existing record is overwritten with the modified record.
Use the Delete button to remove a record from the database. The command physically erases a selected record from the database. It will not erase related records that belong to other tables.
To delete a record, select a record in a scroll window and click on Delete.
Device Management Window Overview
This section provides a quick overview of the Device Management windows and their relationship to the database tables.
Figure 6-10 illustrates the Device Management window. Table 6-2 provides a brief overview of the functions of each of the Device Management windows. Although the windows appear on the Device Management window in a different order, they are described in this chapter in the most logical order for adding new records to the database.
Figure 6-10 : Device Management Window
Table 6-2 : Device Management Window Overview
Refer to the subsequent section, "Adding Data to the Database," for a description of the suggested order in which to access each window to begin building your database.
If you have set up authority checking for Device Management, each time you or another user tries to access Device Management, a username and password are requested. If you have previously used the Tools menu Login application to log into CiscoWorks, you will not see a user identification window. If you have not used the Login application, each time you access Device Management, CiscoWorks prompts you for a user login and password. This login controls access to data stored in the database. If your user login does not have Sybase account permission, you will not have access to Device Management. For example, the username user has open permissions for all CiscoWorks applications.
The following sequence describes the order for accessing and entering data through the Device Management windows.
To add a device to the database, perform the following steps:
Step 1: Define all of the devices in the network using the Devices window (or Sync w/ Sybase). Devices could be any number of elements, the most common being routers, bridges, and hosts. Refer to the section "Devices Window" later in this chapter for instructions.
Step 2: Enter the network name, administrator's name, and type of network in the Networks window. The networks database table builds upon information in the People and Administrations windows. Refer to the section "Networks Window" later in this chapter for instructions.
Step 3: Provide names of management or support personnel for devices and networks in the Administrations window. Refer to the section "Administrations Window" later in this chapter for instructions.
Step 4: Enter data in the Vendors window. This information is used by the networks and devices database tables. Enter data such as vendor name, address, and contact into the vendors window. Refer to the section "Vendors Window" later in this chapter for instructions.
Step 5: Establish a base of the names and addresses of contacts using the People Window. This information is used by most of the other database tables. Enter the names and addresses of people who are vendor contacts, administrators, and troubleshooters in the People window. Refer to the section "People Window" later in this chapter for instructions.
You can access the Locations window through the People window during this sequence of database construction. However, you can only modify existing locations information from the People window. To add new location information, you must access the Locations window directly from the Device Management window.
For information on Device Management window error messages, refer to Appendix B, "Troubleshooting CiscoWorks Errors."
Devices can be any SNMP or IP equipment in your network. Examples include gateways, routers, servers, and workstations.
Device information is critical to the needs of the network manager. Through access to this information, the manager can isolate traffic routing problems, redefine router characteristics using remote configuration, locate your network inventory, keep track of revisions or releases, and allocate resources on the network.
You should define each device's domain, interfaces, characteristics, vendor, serial number, revision level, and contacts for its management and service. If you choose not to use the database forms, you can use the Sync w/Sybase application, which adds devices from the SNM database to the CiscoWorks database.
You can enter or view information for a specific device using the Devices window.
Figure 6-11 illustrates the Devices window. Table 6-3 describes the components in this window.
Table 6-3 : Devices Window Components
Selecting any one of the data fields in a window causes all of the data fields in that record to be highlighted and acted on as a group. This is also referred to as table groups. Table 6-4 lists the categories of the data fields and describes which fields are required, which are automatically assigned a variable (such as unassigned) after the Initialize process, and which are left blank if unentered.
Table 6-4 : Devices Window Data Fields
The initialize process automatically collects information about network devices, minimizing the amount of data you must enter manually into the database table.
When you click on Initialize in the Device window, the initialize process starts. This process polls the network, obtaining the MIB object information listed in Table 6-5. The collected data is placed in appropriate data fields.
Table 6-5 : MIB Objects Used by the Initialize Process
Refer to "Creating Polling Tables Using Device Polling" in Chapter 4 for information on how to select additional MIB objects for polling the network. Refer to Appendix A, "MIB Files and Objects" for details on how to modify or add MIB objects in the MIB file.
This section describes the steps to run the Initialize process, to enter data in the device scroll window, as well as its other scroll windows: interfaces and contacts. It is recommended that you use this method to add individual or small groups of devices. If you have a large number of device to add, you might want to use the Sync w/Sybase application.
Before you initialize a device, check to see that you have followed these guidelines. The sequence is explained in the following sections.
The following sequence provides an overview of how to enter data into the Devices window:
Step 1: Run the Initialize process.
Step 2: Enter device identification information (type, serial, version).
Step 3: Identify the device location.
Step 4: Identify the device vendor.
Step 5: Identify responsible administration group.
Step 6: Assign lines to the device interfaces.
Step 7: Assign contacts for the device.
Adding a Device Using the Initialize Command
To run the Initialize process, perform the following steps:
Step 1: In the SNM Console, select the Tools menu and pull down to Device Mgmt.
Step 2: Enter a user login that has Sybase account permissions. For example, enter the Sybase account name user and enter the password for the account.
Step 3: Select the Devices button.
Step 4: Click on the New button to activate the data fields and allow data entry.
Step 5: Enter the device name in the device name field.
Step 6: Enter the community string for the device in the Community field.
Step 7: Enter the domain in which the device is located in the Device Domain field.
Step 8: Select the Initialize button.
Step 9: Select the File menu and pull down to Quit to exit this window.
Adding a Device Without the Initialize Command
If you try to add a device manually (without the initialize command), you may receive the error message You can also add devices that exist in the SNM database but do not yet exist in the CiscoWorks database by using the Sync w/Sybase application. Refer to "Using Sync w/Sybase" for instructions on this application.
Entering Data in the Data Fields
If you used the Initialize process, the Device Name, Community String, and Software Descr fields have data in them.
To enter data in the remaining data fields, perform the following steps:
Step 1: If you have not already done so, enter the device domain in the Device Domain field.
Step 2: If the vendor name exists in the database, enter the vendor name directly into the Vendor Name field, or pull down the pick menu. The pick menu opens a vendors lookup window. If you open the lookup window, select the vendor from the window list and click on OK. This closes the lookup window and links the vendor to the device.
Step 3: If administration information exists in the database, enter the administrator's name directly into the Admin Name field, use the pick menu to enter that data in the admin name field. If you open the lookup window, select the administration name from the list and click on OK. This closes the lookup window and links the administration data to the device name.
Step 4: If the location data exists in the database, identify the location of the device. Use the pick menu to select a location for the device. The data is automatically entered into the Devices window.
Step 5: Click on the Apply button in the Devices scroll window.
Step 6: Select the File menu and pull down to Quit to exit this window.
Entering Interface Information
To enter interface information such as the interface type and name that is associated with the device, perform the following steps:
Step 1: From the Devices window, select the device name in the Devices scroll window.
Step 2: Click on the New button under the Interfaces scroll window.
Figure 6-12 : Secondary Interfaces Window
Step 3: Enter data in the appropriate field and then click on Apply.
Step 4: Repeat this process for each device interface.
Step 5: Select the File menu and pull down to Quit to exit this window.
Table Groups
The secondary Interfaces window consists of three table groups: interfaces and lines. The fields associated with each are described in Table 6-6.
Table 6-6 : Interfaces Window Table Groups
To add more than one protocol to an interface, open the interfaces window again. Overwrite the data and click on Apply. Repeat this process until you have entered all protocols.
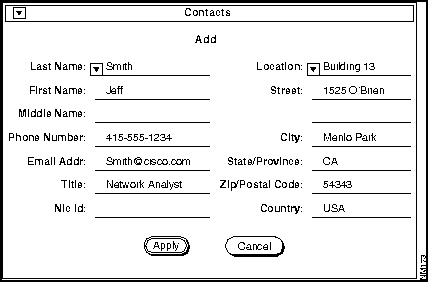
Each device should have at least one contact. Contact information is critical to the network manager. Use the contact information if you need to troubleshoot a problem or contact the responsible person for a device.
Figure 6-13 illustrates the Contacts window.
To add a contact, perform the following steps:
Step 1: From the Devices window, select the device name in the Devices scroll window.
Step 2: Click on the New button under the Contacts scroll window.
Step 3: Enter device contact name and address data. Click on Apply.
Step 4: Repeat this process for each contact you want to associate with the device.
Step 5: Select the File menu and pull down to Quit to exit this window.
You can also modify and delete contacts from the Devices window using the Edit and Delete buttons.
This section provides information on how to update data in the Devices, Interfaces and Contacts tables. You can add, modify, or delete device data when updating your database.
If you are adding a completely new device, follow the instructions in "Adding Data to the Database" earlier in this chapter.
To mmodify a device and enter data that is not yet available in the database, perform the following steps:
Step 1: From the Devices window, click on the device name in the Devices scroll window. See Figure 6-14.
Figure 6-14 : Devices Scroll Window in Devices Window Step 2: Select the desired data fields and enter the changes.
Step 3: Click on Apply.
To use data that is already available in the database by selecting existing data from a lookup window, perform the following steps:
Step 1: Pull down one of the pick menus (Location, Vendor Name, or Admin Name).
Step 2: Select the data and click on OK. This closes the lookup window and links the data to the device.
Step 3: Select the desired data in the lookup window and click on OK.
Step 4: Click on the Apply button.
To open an Administrations lookup window and update data in the devices window, perform the following steps:
Step 1: Pull down the pick menu on the Admin Name field of the Devices window.
Step 2: Click on an administration name in the lookup window.
Step 3: Click on the OK button to enter the name in the devices window field and close the lookup window.
Step 4: Click on Apply in the Devices window.
For example, in Figure 6-15, the administration name backbone29 has been selected. DC conf net manager is a description of the Admin field of the Devices window.
Figure 6-15 : Administrations Lookup Window To update device contact information, perform the following steps:
Step 1: From the Devices window, select a device name in the Devices scroll window.
Step 2: Double-click on an existing item in the Contacts scroll window to open the Contacts window.
Step 3: Use the pick menu for the Last Name or Location fields to open a lookup window.
Step 4: Enter data in the contacts window and click on OK.
You can modify the device contact's name and address information.
Figure 6-16illustrates a Contacts window that was opened and data fields filled using Find. Then the OK button was used to link the data to the device. The data displays in the contacts scroll window of the devices window.
Network information is critical to the needs of the network manager. Through access to this information, the manager can define a network, assist in identifying and isolating sources of difficulties, and provide the ability to quickly identify the administrative support for the networks.
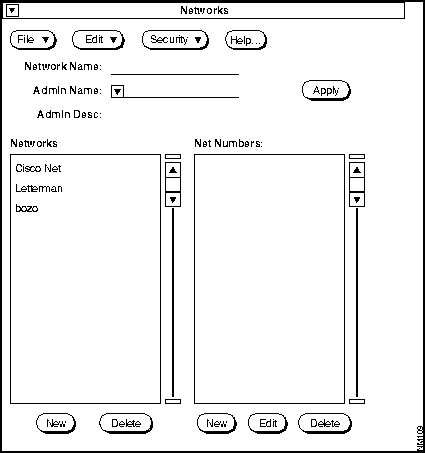
Figure 6-17 illustrates the Networks window. Table 6-7 describes the components in this window.
Table 6-7 : Networks Window Components
Table Groups
The secondary Networks window consists of two table groups described in Table 6-8.
Table 6-8 : Networks Window Table Groups
Before you build your network data, prepare a list of the network names you are going to enter. If possible, record all of the network information: network type, network number, and network mask.
To add network data, perform the following steps:
Step 1: Open the Networks window from the Device Management window.
Step 2: Click on the applicable fields and enter a network name, administration name, and administration description.
Step 3: Click on the Apply button in the Network scroll window.
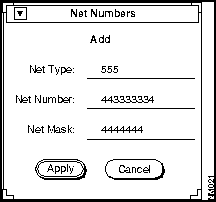
Step 4: To open a new Net Numbers window, select the network name in the Networks scroll window and then click on the New button.
Figure 6-18 : Net Numbers Window Step 5: Enter the data in the data fields and click on Apply.
Step 6: To view existing network numbers, select the name of the network in the Networks scroll window.
Step 7: To quit, pull down the File menu and select Quit.
This section provides information on how to update data in the networks database table. The most expedient method for updating your records is by using lookup windows to place existing records in the networks table. You can accept data from the lookup window and it will be placed in the appropriate data fields of the devices table. However, you cannot modify data in the lookup window.
You can also modify data using the Networks scroll window. Both methods are described in this section.
To update network numbers through the secondary Net Numbers window, perform the following steps:
Step 1: Click on a network name in the Networks scroll window.
Step 2: Click on the New or Edit button in the Net Numbers scroll window.
Step 3: Enter data directly into the Net Numbers window.
Step 4: Click on Apply.
To change or add administration data to the network designation, enter data directly into data fields in the Networks window and click on Apply in the networks scroll window.
To open the Administrations lookup window and select from the existing data, perform the following steps:
Step 1: Pull down on the pick menu in the Admin Name data field in the Networks window.
Step 2: Click on a name in the lookup window, then click on the OK button to enter the name and description in the networks window fields and close the lookup window.
Step 3: Click on Apply in the Networks scroll window to link the administration name to the database.
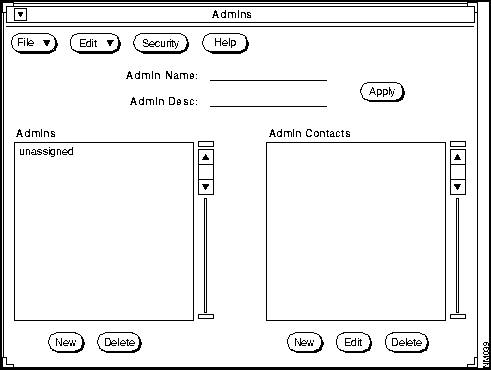
The Administrations window is critical to the needs of the network manager. Through access to this information, the manager can identify administration contacts for lines, devices, and networks.
Figure 6-19 illustrates the Administrations window. Table 6-9 describes the components in this window.
Table 6-9 : Admins Window Components
Table Groups
The secondary Administrations window consists of the two table groups described in
Table 6-10 : Admins Window Table Groups
The Administrations table references the Contacts, People, and Locations tables.
Before you build administration data, prepare a list of the administration names and descriptions, as well as names of individuals who are administrators. If the people you are going to link to an administration entity are already in the People table, you should correlate names to administration.
To add administration information, perform the following steps:
Step 1: Select the Admins button in the Device Management window.
Step 2: Click on the New button.
Step 3: Click on the Admin Name field and enter an administration name.
Step 4: Click on the Admin Desc field and enter descriptive data to identify its function.
Step 5: Click on the Apply button.
Step 6: Select the administration name in the Admins scroll window.
Step 7: Click on the New button in the Admin Contacts scroll window.
Step 8: Enter the administration contact name and address. Click on Apply.
Step 9: Repeat steps 6, 7, and 8 for each contact.
Step 10: Save this information to the database by pulling down the File menu to Quit.
This section describes how to modify administration data. You can also add administrations data using the procedure described earlier in "Building Administrations Data."
To modify data, perform the following steps:
Step 1: Select the administration name in the Admins scroll window.
Step 2: Click on the Admin Desc field and type in a description or type over the existing description.
Step 3: Click on the Apply button.
Step 4: Exit the window by pulling down the File menu to Quit.
To modify administration contacts data, perform the following steps:
Step 1: Select the administration name in the Admins scroll window.
Step 2: Click on Edit under the Admin Contacts scroll window.
Step 3: Modify the data by overwriting the applicable data fields or use a lookup window to find data.
Step 4: Click on Apply.
In Figure 6-19, data is gathered from a lookup window. The data is linked to the administration entity and the contact data is displayed as a record in the Admin Contacts scroll window.
Figure 6-20 : Admin Contacts and People Lookup Windows Vendor information is critical to the needs of the network manager. Through access to this information, the manager can easily locate and quickly call upon a vendor to assist in responding to crisis situations as well as for normal servicing, updating of equipment, transmission links, and other needs.
The vendors table holds the names and locations of any entity you want to classify as a vendor. This can range from a company supplying physical equipment, such as Cisco Systems, to network consultants and service-only firms.
Create the vendor table by entering vendor identification and address information into the database. Select and link contacts at these vendors (application engineers, sales, marketing, and support people) with the People table. These are the important contacts that will help keep network equipment current and serviced.
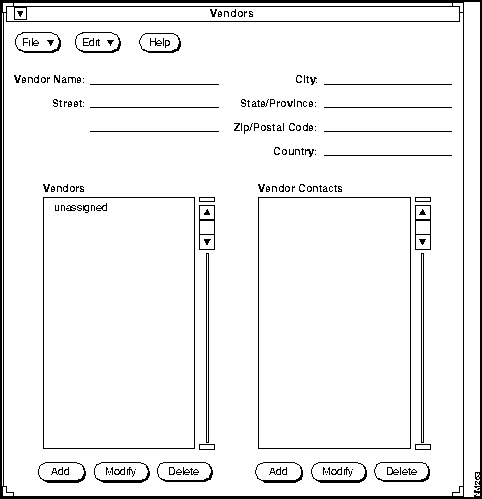
Figure 6-21 illustrates the Vendors window. Table 6-11 describes the components in this window.
Table 6-11 : Vendors Window Components
Table Groups
The secondary Vendors window consists of two table groups: vendors and locations. The fields associated with each are described in Table 6-12.
Table 6-12 : Vendors Window Table Groups
You may want to assemble vendor names (company names), people's names, title or function, telephone numbers and addresses in a list or group to speed the entry process.
To add vendor data, perform the following steps:
Step 1: Open the Vendors window from the Device Management window.
Step 2: Click on the New button in the Vendors scroll window.
Step 3: Click on the Vendor Name field and enter a vendor name.
Step 4: Click on the locations fields and enter address information.
Step 5: Click on the Apply button in the Vendors scroll window.
Step 6: To link the vendor with an individual known as the vendor contact, select the vendor name in the Vendors scroll window.
Step 7: Click on the New button under the Vendor Contacts scroll window.
Step 8: Enter the vendor contact name and address. Click on Apply.
Step 9: To quit, select the File menu and pull down to Quit.
You can make changes and additions any time using the method as described earlier in "Building Vendors Data" or follow the alternative methods described here.
For instance, you may want to add a vendor address signifying a branch office to an existing vendor.
To modify vendor data, perform the following steps:
Step 1: Select the vendor name in the Vendors scroll window.
Step 2: Type over the data in the locations fields and click on the Apply button in the Vendors scroll window.
To add an address or change contacts information for a vendor, perform the following steps:
Step 1: Select the vendor name in the Vendors scroll window.
Step 2: Click on the Edit button under the Vendor Contacts scroll window.
Step 3: Modify the data by overwriting data or use lookup windows to find replacement data. When done, click on OK.
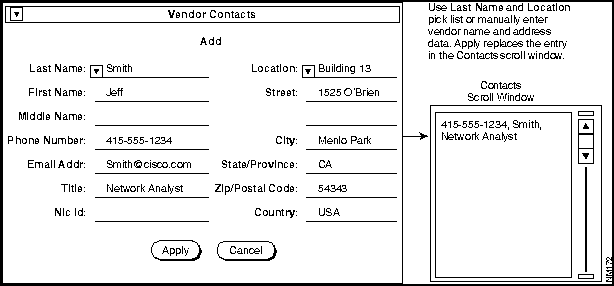
In Figure 6-22, the Vendor Contacts window fields are filled in using the Find command under the Edit menu.
After modifications or additions are made, use the OK button to close the window. Data is linked to the vendor that was selected and the contact data is displayed as a record in the Vendor Contacts scroll window.
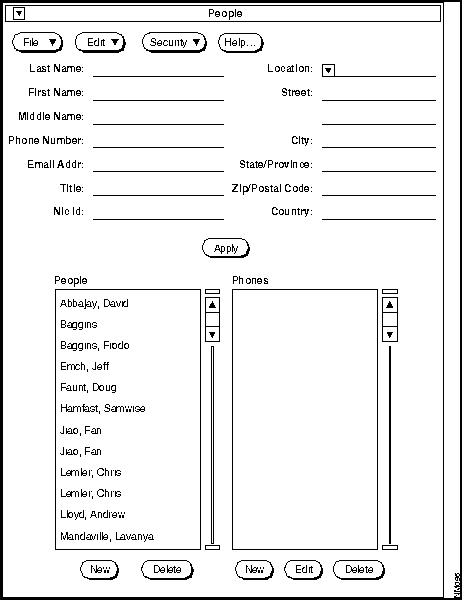
Figure 6-22 : Vendor Contacts Window The People table contains name, title, phone number, and other relevant information for individuals responsible for the administration and support of the network and network equipment. For instance, network administrators, equipment vendors, Cisco contacts, network engineers (troubleshooters in particular), key management contacts, and any other person that could be of assistance in operations and maintenance. See Figure 6-23.
The CiscoWorks database links the names, telephone numbers, and other people-specific data to their addresses. This linkage allows you to find essential contacts easily and quickly when the need arises, such as names and addresses of troubleshooters, vendors, device administrators, or simply an e-mail address or telephone number.
Figure 6-23 illustrates the People window. Table 6-13 describes the components in the window.
Table 6-13 : People Window Components
Table Groups
The secondary People window consists of three table groups: people, locations, and phones. The fields associated with each are described in Table 6-14.
Table 6-14 : People Window Table Groups
If you have not done so already, you should assemble all of the people's names, titles or functions, telephone numbers and addresses in a list or group to speed the entry process.
To add people data, perform the following steps:
Step 1: Open the People window.
Step 2: Click on New under the People scroll window.
Step 3: Click on the applicable fields and enter a name and address from the keyboard.
Step 4: Click on the Apply button.
Step 5: To quit, select the File menu and pull down to Quit.
You can make changes and additions any time using the method as described earlier in "Building People Data" or follow the alternative methods described here.
To add another individual as a contact for an existing address, perform the following steps:
Step 1: Use the Find command to obtain the name and address of a known person.
Step 2: Modify the name and other applicable fields. Click on the New button rather than the Edit button.
Step 3: To link the new contact to an existing address, pull down on the pick menu on the locations field.
Step 4: Select the location and click on OK.
Step 5: If the contact and address are entered together as a first-time entry, click on the New button in the scroll window. This links the location and individual.
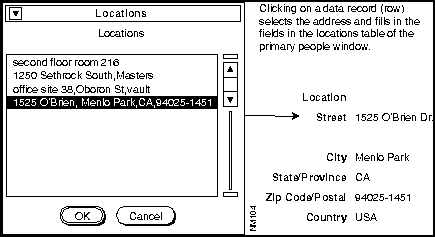
The selection process is illustrated in Figure 6-24.
Figure 6-24 : Locations Lookup Window To add a new address (you cannot modify an existing address), perform the following steps:
Step 1: Click on New under the People scroll window.
Step 2: Enter the individual's name (or select the name in the scroll window).
Step 3: Enter location data directly in the locations fields of the People window.
Step 4: Click on Apply in the People scroll window to apply your changes.
Whenever you select another record after modifying a record, without clicking Apply, the modified record is saved automatically. The autosave process is carried out whenever you attempt to select another record without saving the old one.
To review names in the database, browse through the People scroll window. If you want to see specific details about an individual, select the individual's record. The data is separated and fills the People window data fields.
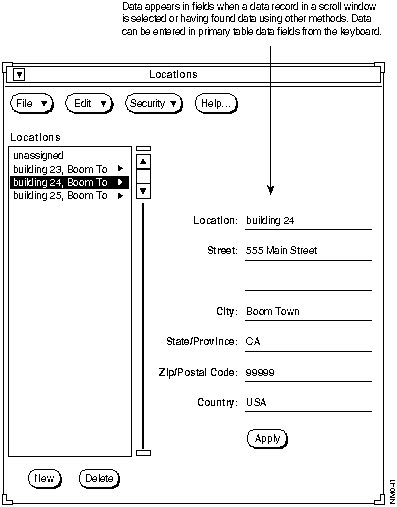
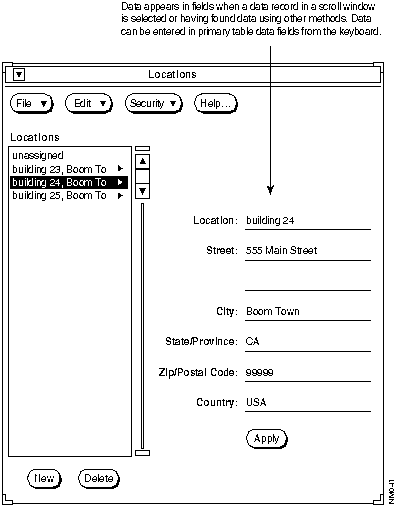
Locations is the reservoir for addresses of people, the location of network devices, and any other network associated matter. There is no requirement or recommendation that address data be entered in the Locations table through the Locations window. You can add location data from People, Vendors, Administrations, Lines, and Devices windows. However, location data can be modified only in the Locations window. See Figure 6-25.
Figure 6-25 illustrates the Locations window. Table 6-15 describes the components in the window.
Figure 6-25 : Locations Window
Table 6-15 : Locations Window Components
Table Groups
The secondary Locations window consists of one table group: locations. The fields associated with each are described in Table 6-16.
Table 6-16 : Locations Window Table Group
To speed the entry process, assemble all address information you need before starting data entry. The information in this table is used by the people, vendor contacts, lines, devices, and administrations tables to designate their specific locations.
To add locations data, perform the following steps:
Step 1: Open the Locations window in the Device Management window.
Step 2: Click on the New button.
Step 3: Click on the applicable data fields and enter address information from the keyboard.
Step 4: Proceed through all addresses in a similar manner.
Step 5: To quit, select the File menu and pull down to Quit.
You can make changes and additions any time using the method as described earlier in "Building Locations Data" or follow the alternative methods described here.
To add a location that has the same street address as an existing record in the Locations table, perform the following steps:
Step 1: Scroll through the list in the Locations scroll window to find the location record and select a record.
Step 2: Modify the location data and click the Apply button.
Step 3: To find data, search through the scroll window or use the Find command to locate the record.
Step 4: Select the record and make changes in the data fields of the window. Click on Apply to save the modified record.
Step 5: To quit, select the File menu and pull down to Quit.
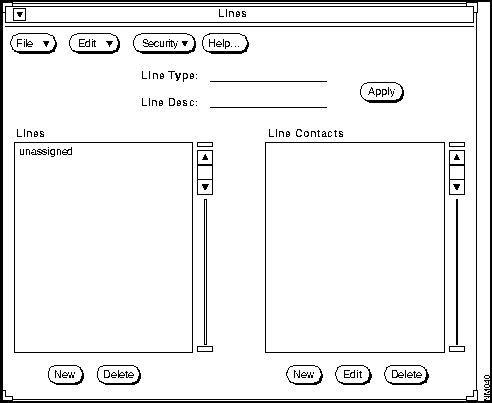
The Lines table holds line identities used in the network. Tables such as devices and interfaces rely on this information. Because lines are controlled by people, there must be a link between lines and contacts for troubleshooting. A line can have several contacts linked to it.
Figure 6-26 illustrates the Lines window. Table 6-17 describes the components in this window.
Table 6-17 : Lines Window Components
Table Groups
The secondary Lines window consists of one table group, lines. The fields associated with this group are described in Table 6-18.
Table 6-18 : Lines Window Table Groups
Assemble all of the line name designations and associated type identifiers. Along with this data, identify the contacts you want to list for activities such as troubleshooting and administration. Make a list or assemble a group to speed the entry process.
To add lines data, perform the following steps:
Step 1: Open the Lines window.
Step 2: Click on the New button.
Step 3: Click on the Line Type or Line Desc fields and enter data from the keyboard.
Step 4: Click on the Apply button to apply the changes to the database.
Step 5: To associate a line contact (individual) to a line, select the line in the Lines scroll window and click on the New button in the Line Contacts scroll window.
Step 6: Enter the name and other data for contact identity and click on OK.
Step 7: Click on the Apply button.
Step 8: To quit, select the File menu and pull down to Quit.
You can make changes and additions any time using the method described earlier in "Building Lines Data" or follow the alternative methods described here.
To modify a line type or description, perform the following steps:
Step 1: Locate the line to be modified in the scroll window or use the Find command.
Step 2: Type over the line data in the Line Type or Line Desc fields.
Step 3: Click on Apply in the Lines window.
Step 4: To quit, select the File menu and pull down to Quit.
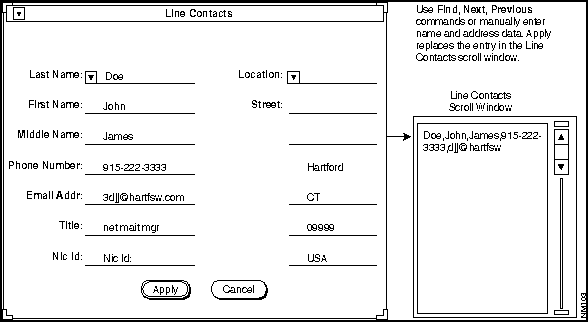
To add a line contact through the secondary Line Contacts window, perform the following steps:
Step 1: Click on New under the Line Contacts scroll window to open the line contacts window.
Step 2: Enter the name of the individual you want to add as a contact and click on Apply, or pull down the pick menu on the Last Name field.
Step 3: To quit, select the File menu and pull down to Quit.
To modify a line contact, perform the following steps:
Step 1: Select the line in the Lines scroll window.
Step 2: Click on Edit in the Line Contacts scroll window or double-click on the Line Contacts entry in the scroll window.
Step 3: Modify the data by overwriting People table fields.
Step 4: Click on Apply.
Step 5: To quit, select the File menu and pull down to Quit.
In Figure 6-27, the Line Contacts lookup window fields are filled using the Find command under the Edit menu. Information about John J. Doe was selected from the lookup window. Clicking on the Apply button in the Line Contacts window linked the data to the line selected.
Figure 6-27 : Line Contacts Window If you do not want to modify any data, click on the Cancel button. Data fields in the window that were changed revert to their original state, data selected in the window is ignored, and the lookup or secondary window is closed.
Copyright 1988-1996 © Cisco Systems Inc.
![]()

displays when you attempt to save the record, informing you of the data field and table in which the omission occurred.
![]()
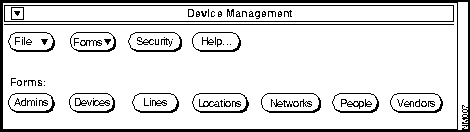
Device Management Window
Description
Devices
Defines the device name, domain name, community string, and device type. Devices are routers, bridges, hosts, and so on. It also defines the interfaces and contacts located in the devices.
Networks
Provides information to position and identify devices within networks. This information establishes links between individuals and locations in the People table, as well as information in the Administrations table.
Administrations
Provides a table for names of management or support personnel for networks and devices. Administrations data builds upon information about individuals and locations from the People table.
Vendors
Supplies information about vendors of devices, software, and so on. The vendors table builds upon information from the People table. Vendor table data is integral to both the networks and devices database tables.
People
Provides names of contacts for vendors and device or network support personnel. Data includes name, phone number, mail address, street address, and so on.
Lines
Contains line identities used in the network. Tables such as devices and interfaces rely on this information. Because lines are controlled by people, there must be a link between lines and contacts. A line can have several contacts linked to it.
Locations
Contains addresses of device contacts, vendors, and networks.

![]()
Component
Subcomponent
Description
File
Print
Version
Quit
Prints a snapshot of the current window.
Displays the CiscoWorks version information for this application.
Exits the current window.
Edit
Clear
Find
Next
Previous
Erases data appearing in the window data fields. Clear does not affect the window format or the database tables.
Locates data in the database.
Finds the next data record in the database.
Finds the previous data record in the database.
Security
Privileges
Change User
Displays the current user's security privileges.
Enables you to change your username in order to access the application.
Help
Provides help text on the current window.
Data fields
Data is used to create the data record in the database.
Devices scroll window
Selects the device that correlates to the data fields in the top portion of the Devices window
Interfaces scroll window
Displays the selected device's interfaces.
Contacts scroll window
Displays the selected device's contacts.
New
Adds a new data record.
Edit
Changes data fields of a record.
Delete
Removes a record from the database.
Apply
Updates changes to the database.
Initialize
Gathers data from a device for the database.
Field Categories
Data Fields
Field Designation
Devices fields
Device Name
Required
Community
Blank
Device Domain
Required
Device Type
Set to zero1
Serial Number
Blank
Software Desc
Blank
Software Ver
Blank
Hardware Desc
Blank
Hardware Ver
Blank
Locations fields
Location
Set to unassigned1
Vendors fields
Vendor Name
Set to unassigned1
Administrations fields
Admin Name
Set to unassigned1
1 You must use the Initialize option to assign a default to these fields.
Object
Data Gathered
Data Fields Filled In
sysDescr
A description of the device software.
Data appears in the Software Desc field of the devices secondary Interfaces window.
ipAdEntAddr
The Internet Protocol address of each interface table field.
Data appears in the Interfaces field of the Devices window.
ipAdEntNetMask
Provides the IP subnet mask number for the interface.
Data appears in the Interface window in the Subnet Mask field.
ifType
The type of interface associated with the device. Data is placed in the Interface Type field of the Interfaces table.1
Data appears in the Interface Type field of the devices secondary Interfaces window.
ifDescr
The interface description. Data is placed in the Interface Desc field of the Interfaces table. The Interfaces table is part of the Devices table.
Data appears in the Interface Desc field of the devices secondary Interfaces window.
ifPhysAddress
The interface hardware address. Data is placed in theHardware Addr field of the Interfaces table.
Data appears in the Hardware Addr field of the devices secondary Interfaces window.
ifSpeed
Provides the speed of the interface.
Data appears in the Interface Speed field of the Interfaces window.
locIfDescrip
Provides a description of the user configurable interface.
Data appears in the Interface description field.
1 Refer to RFC 1213 for detailed information on interface types.
CiscoWorks database. If a device does not exist in CiscoWorks but does exist in SNM,
Sync w/Sybase application adds these devices to the CiscoWorks relational database. For more information, refer to "Using Sync w/Sybase" earlier in this chapter.
![]()
CiscoWorks Release 1.0(2) and later. This field enables you to specify the ReadWrite (RW) community string for a device. In order to specify the RW community string in this field, you must have Write Password privilege assigned to your username in the Security Manager application. See the "Using Security Manager Tools" chapter for information on restricting permissions to CiscoWorks applications.
"The column xxxx in table devices may not be null."
This means you did not enter data into mandatory data fields. You must enter data directly in the location, vendors, and administrations windows first. Then come back to the devices window and fill in the location, vendor name, and admin name fields. Finally, select the Apply button under the text fields to add the device to the database.
![]()

Table Groups
Fields
Interfaces
Interface Type1
Interface Speed
Interface Name
Interface Address
Interface Description
Subnet Mask
Hardware Address
Lines
Line type:
0 indicates no designation (default setting).
1 indicates Ethernet thin wire.
2 indicates Ethernet thick wire.
3 indicates Ethernet twisted pair.
4 indicates a serial line.
Line description
If_Addresses
Protocol type
Protocol address
1 Interface types that are not captured by the Initialize process should be selected from RFC 1156.


Component
Subcomponent
Description
File
Print
Version
Quit
Prints a snapshot of the current window.
Displays the CiscoWorks version information for this application.
Exits the current window.
Edit
Clear
Find
Next
Previous
Erases data appearing in the window data fields. Clear does not affect the window format or the database tables.
Locates data in the database.
Finds the next data record in the database.
Finds the previous data record in the database.
Security
Privileges
Change User
Displays the current user's security privileges.
Enables you to change your username in order to access this application.
Help
Provides help text on the current window.
Network data fields
Used to create Network data records.
Apply
Updates changes into the database.
Networks scroll window
Displays network name data.
Net Numbers scroll window
Displays network type, name, and mask data.
New
Adds a new data record.
Edit
Changes data fields of a record.
Delete
Removes a record from the database.
Table Groups
Fields
Networks
Network name1
Administrations
Administration name1
Administration description
1 These fields are mandatory. You must enter data into these fields.
administration name.

Component
Subcomponent
Description
File
Print
Version
Quit
Prints a snapshot of the current window.
Displays the CiscoWorks version information for this application.
Exits the current window.
Edit
Clear
Find
Next
Previous
Erases data appearing in the window data fields. Clear does not affect the window format or the database tables.
Locates data in the database.
Finds the next data record in the database.
Finds the previous data record in the database.
Security
Privileges
Change User
Displays the current user's security privileges.
Enables you to change your username in order to access this application.
Help
Provides help text on the current window.
Admins scroll window
Displays administrations data.
Admin Contacts scroll window
Displays contact data.
Apply
Updates changes into the database.
New
Adds a new data record.
Edit
Changes data fields of a record.
Delete
Removes a record from the database.
Table 6-10.
Table Groups
Fields
Administrations
Administration name1
Administration description
Administrations contacts
1 This is a mandatory field. You must enter data in this field.
![]()

Component
Subcomponent
Description
File
Print
Version
Quit
Prints a snapshot of the current window.
Displays the CiscoWorks version information for this application.
Exits the current window.
Edit
Clear
Find
Next
Previous
Erases data appearing in the window data fields. Clear does not affect the window format or the database tables.
Locates data in the database.
Finds the next data record in the database.
Finds the previous data record in the database.
Security
Privileges
Change User
Displays the current user's security privileges.
Enables you to change your username in order to access this application.
Help
Provides help text on the current window.
Vendors scroll window
Displays vendor data.
Vendor Contacts scroll window
Displays vendor contacts data.
Apply
Updates changes into the database.
New
Adds a new data record.
Edit
Changes data fields of a record.
Delete
Removes a record from the database.
Table Groups
Fields
Vendors table
Vendor name1
Location
Street
City
State/Province
Postal/Zip code
Country
1 This field is mandatory. You must enter data into this field.
![]()

Component
Subcomponent
Description
File
Print
Version
Quit
Prints a snapshot of the current window.
Displays the CiscoWorks version information for this application.
Exits the current window.
Edit
Clear
Find
Next
Previous
Erases data appearing in the window data fields. Clear does not affect the window format or the database tables.
Locates data in the database.
Finds the next data record in the database.
Finds the previous data record in the database.
Security
Privileges
Change User
Displays the current user's security privileges.
Enables you to change your username in order to access this application.
Help
Provides help text on the current window.
People data fields
Used to create people data records.
People scroll
window
Displays people data.
Phones scroll
window
Displays phone data.
Apply
Updates changes into the database.
New
Adds a new data record.
Edit
Changes data fields of a record.
Delete
Removes a record from the database.
Table Groups
Fields
People
Last name1
First name1
Middle name
Phone number
E-mail address
Title
NIC ID2
Locations
Location1
Street1
City1
State/Province1
Zip/Postal Code1
Country1
Phones
Phone_number
Phone_desc
1 These are mandatory fields. You must enter data in these fields.
2 The NIC ID is an identifier assigned to individuals by the NIC. If known, enter the assigned code for individuals having this identification.
![]()

Component
Subcomponent
Description
File
Print
Version
Quit
Prints a snapshot of the current window.
Displays the CiscoWorks version information for this application.
Exits the current window.
Edit
Clear
Find
Next
Previous
Erases data appearing in the window data fields. Clear does not affect the window format or the database tables.
Locates data in the database.
Finds the next data record in the database.
Finds the previous data record in the database.
Security
Privileges
Change User
Displays the current user's security privileges.
Enables you to change your username in order to access this application.
Help
Provides help text on the current window.
People data fields
Used to create people data records.
People scroll window
Displays people data.
Phones scroll window
Displays phones data.
Apply
Updates changes into the database.
New
Adds a new data record.
Edit
Changes data fields of a record.
Delete
Removes a record from the database.
Table Groups
Fields
Location1
Street
City
State/Province
Postal/Zip Code
Country
1 You must enter data in at least one of the data fields.

Component
Subcomponent
Description
File
Print
Version
Quit
Prints a snapshot of the current window.
Displays the CiscoWorks version information for this application.
Exits the current window.
Edit
Clear
Find
Next
Previous
Erases data appearing in the window data fields. Clear does not affect the window format or the database tables.
Locates data in the database.
Finds the next data record in the database.
Finds the previous data record in the database.
Security
Privileges
Change User
Displays the current user's security privileges.
Enables you to change your username in order to access this application.
Help
Provides help text on the current window.
Lines data fields
Used to create lines data records.
Line scroll
window
Displays lines data.
Line Contacts scroll window
Displays line contacts data.
Apply
Updates changes into the database.
New
Adds a new data record.
Edit
Changes data fields of a record.
Delete
Removes a record from the database.
Table Groups
Fields
Lines
Line type1
0 indicates no designation (default setting).
1 indicates Ethernet thin wire.
2 indicates Ethernet thick wire.
3 indicates Ethernet twisted pair.
4 indicates a serial line.
Line description
1 Line type is used to identify the line medium and can be any numeric designation. Currently, there is no established standard or Cisco Systems predefined assignments. Examples of typical line type assignments are listed above.If you do not want to use line types, use a default of 0 in this field.
![]()
![]()
![]()
![]()
![]()
![]()
![]()
![]()