
Table of Contents
Connecting the Cisco 7513 to Your Network
Connecting the Cisco 7513 to Your Network
After you have installed your Cisco 7513, you need to connect it to the network. This chapter discusses how to connect each interface type to your network and how to connect the console and auxiliary cables to your console terminal and auxiliary equipment.
Following are guidelines to assist you in properly connecting the external network cables.
- Make certain that you connect the correct interface types.
- All FSIP serial ports use a high-density, 60-pin receptacle. Each port requires a serial cable to connect to the network. The cable determines the electrical interface type and mode of the port to which it is connected. The network end of each cable type is the industry-standard connector normally used for the interface type. (For example, the EIA/TIA-232 port adapter cable has a standard DB-25 connector at the network end.)
Note EIA/TIA-232 and EIA/TIA-449 were known as recommended standards RS-232 and RS-449 before their acceptance as standards by the Electronic Industries Association (EIA) and Telecommunications Industry Association (TIA).
- Each FSIP cable has a label molded into the connectors that identifies the electrical interface type and mode. EIA/TIA-232 and EIA-530 are the only interface types that use the same type of connector, a DB-25. If you are using EIA/TIA-232 DTE mode and EIA-530, check the labels carefully.
- Generally, cables for DTE mode use a plug at the network end, and cables for data communications equipment (DCE) mode use a receptacle at the network end.
- You must provide cables and equipment for the following interfaces:
- Console and auxiliary port. EIA/TIA-232, DB-25 male-to-female cable.
- EIP. Ethernet IEEE 802.3 media attachment unit (MAU) and attachment unit interface (AUI).
- FEIP. Fast Ethernet IEEE 802.3u 100BaseT MAU, transceivers, and RJ-45 or Media Independent Interface (MII) cables.
- FIP. FDDI, 62.5/125-micron, multimode fiber-optic cable FDDI, 8.7 to 10/125-micron, single-mode fiber-optic cable, FDDI optical bypass switching equipment, and FDDI optical bypass switch cable (for CX-FIP-MM and CX-FIP-SS only).
- HIP. High-Speed Serial Interface (HSSI) cable.
- TRIP. Token Ring 802.5, MAU and Type 1 and Type 3 lobe cable.
- The following cables are available from Cisco Systems: interface cables for the CIP, FSIP, HIP, and MIP, as spares only. For detailed cable considerations, refer to the Cisco 7513 Hardware Installation and Maintenance publication, which is available on Cisco Connection Documentation CD-ROM or as a printed copy.
- Verify the interface numbers (also called port numbers) on the rear of the chassis and the cables you will connect to each. Each port has a unique address composed of the interface processor slot number and the port number on the interface processor.
- Avoid crossing high-power cables with interface cables. Crossing high-power cables with interface cables can cause interference in some interface types.
- If possible, do not remove cable strain-relief systems. Most interfaces provide some type of strain relief to prevent the cables from being accidentally disconnected. Among these types of strain relief are the slide fasteners on Ethernet cables, the cable retention system on the AC-input power supply cord, and the screw-type fasteners on serial cables. Use all strain-relief devices provided to prevent potential problems caused by inadvertent cable disconnection.
- Verify proper interface cabling before applying power to the system to prevent unnecessary problems or component damage.
- Verify all cabling limitations before applying power to the system. When setting up your system, you must consider a number of factors related to the cabling required for your connections. For example, when using EIA/TIA-232 connections, be aware of the distance and electromagnetic interference limitations. For detailed cable considerations, refer to the Cisco 7513 Hardware Installation and Maintenance publication, which is available on Cisco Connection Documentation CD-ROM or as a printed copy.
- Verify that you have not mixed AC-input and DC-input power supplies in the same chassis.
- Check the power cable and power supply for compatibility with your power service. Check the labels on the equipment and ensure that the power service at your site is suitable for the chassis you are connecting.

Caution A voltage mismatch can cause equipment damage and may pose a fire hazard. If the voltage indicated on the label is different from the power outlet voltage, do not connect the chassis to that receptacle.
The following sections discuss how to connect cables to all of the available interfaces on the Cisco 7513 interface processors and the main system processors.
An Ethernet transceiver or MAU should already be connected to your network. Connect each Ethernet port on the EIP to an Ethernet transceiver with a transceiver cable, or to an attachment unit with an AUI, as shown in Figure 4-1.
Figure 4-1 Connecting Cables to the EIP
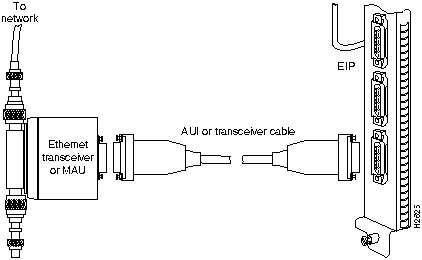
On each EIP port, slide the metal bracket up over two posts on the cable connector, or tighten the thumbscrews to secure the cable in the port and provide strain relief. Some miniature transceivers (usually the 10BaseT type) connect directly to the Ethernet port on the EIP and do not require an interface cable.
For an MII connection, a 100BaseT transceiver or MAU should already be connected to your network. An RJ-45 connection does not require an external transceiver. On a single 100BaseT port adapter, you can use either the RJ-45 connection or the MII connection. If you have two port adapters on your FEIP, you can use the RJ-45 connection on one and the MII connection on the other, as shown in Figure 4-2.
Figure 4-2 Connecting Cables to the FEIP
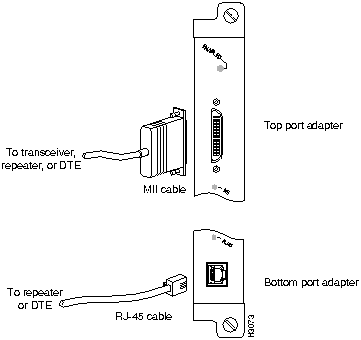
If you have RJ-45 connections, attach the Category 5 UTP cable directly to the RJ-45 port on the FEIP. If you have MII connections, attach an MII cable directly to the MII port on the FEIP, or attach a 100BaseT or 100BaseF transceiver, with the media appropriate to your application, to the MII port on the FEIP. RJ-45 and MII cables are not available from Cisco Systems, but are available from other cable vendors.
Attach the network end of your RJ-45 or MII cable to your 100BaseT or 100BaseF transceiver, switch, hub, repeater, DTE, or similar external 100BaseT equipment.
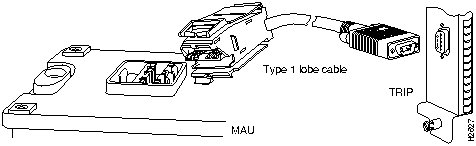
Token Ring MAU connectors provide a direct connection between the TRIP and the ring, as shown in Figure 4-3.
Figure 4-3 Connecting Cables to the TRIP
Note Depending on your Token Ring network, it might be necessary to make Token Ring connections to the TRIP after you turn on the Cisco 7513 and configure the system.
Specific CIP connection requirements for bus and tag or Enterprise System Connection (ESCON) cables are discussed in detail in the configuration note Channel Interface Processor (CIP) Installation and Configuration, which is available on Cisco Connection Documentation CD-ROM or as a printed copy (Document Number 78-1342-xx, where xx is the latest version of the document). This configuration note also ships with CIP-related spare parts.
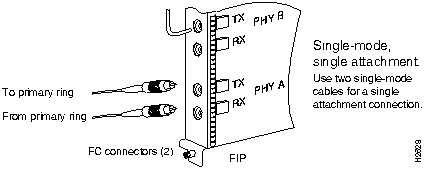
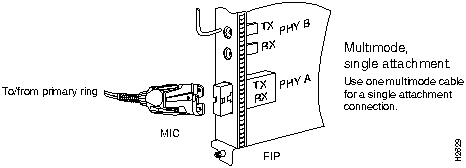
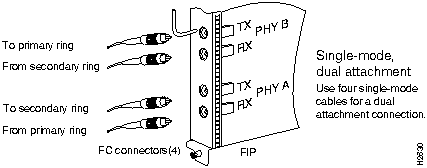
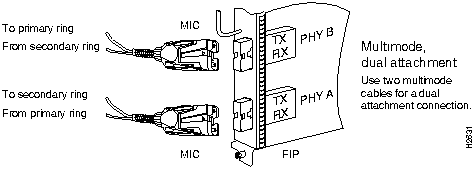
Both single-mode and multimode, single and dual attachment connections are available and can be combined on one FIP. Fiber-optic cable connects directly to FIP ports. Single-mode uses separate transmit and receive cables. This single-mode product meets the Class 1 Laser Emission Requirement from the Center for Devices and Radiological Health (CDRH) FDDI. Multimode uses one transmit/receive cable for each physical sublayer (PHY) interface. Connect single-mode, single attachment as shown in Figure 4-4.
Figure 4-4 Connecting FIP Cables for Single-Mode, Single Attachment

Warning Invisible laser radiation may be emitted from the aperture ports of the single-mode FDDI products when no fiber cable is connected. Avoid exposure and do not stare into open apertures. (For translated versions of this warning, refer to the appendix "Translated Safety Warnings.")
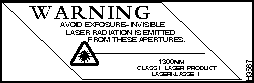
The aperture port contains an FDDI warning label, as shown in Figure 4-5.
Figure 4-5 Warning Label on the FIP

Warning Class 1 laser product. (For translated versions of this warning, refer to the appendix "Translated Safety Warnings.")
 Warning Laser radiation when open. (For translated versions of this warning, refer to the appendix "Translated Safety Warnings.")
 Warning Do not stare into beam. (For translated versions of this warning, refer to the appendix "Translated Safety Warnings.")
Connect multimode, single attachment as shown in Figure 4-6.
Figure 4-6 Connecting FIP Cables for Multimode, Single Attachment
Connect single-mode, dual attachment as shown in Figure 4-7.
Figure 4-7 Connecting FIP Cables for Single-Mode, Dual Attachment
Connect multimode, dual attachment as shown in Figure 4-8
Figure 4-8 Connecting FIP Cables for Multimode, Dual Attachment
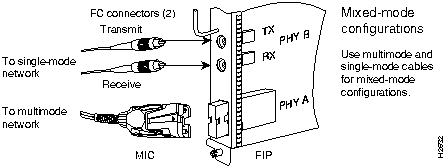
For mixed-mode configurations, the primary ring signal is received on the multimode PHY A receive port and transmitted from the single-mode PHY B transmit port.
For mixed-mode configurations, connect the cables to the FIP ports as follows:
- Connect the cable coming in from the primary ring to the PHY A receive port, and connect the signal going out to the secondary ring to the PHY A transmit port.
- Connect the cable coming in from the secondary ring to the PHY B receive port. This also connects the signal going out to the primary ring to the PHY B transmit port.
Note Your configuration may be opposite, with multimode connections on PHY B and single-mode connections on PHY A.
Connect mixed-mode configurations as shown in Figure 4-9.
Figure 4-9 Connecting FIP Cables for Mixed-Mode Configurations

Warning Invisible laser radiation may be emitted from the aperture ports of the single-mode FDDI products when no fiber cable is connected. Avoid exposure and do not stare into open apertures. (For translated versions of this warning, refer to the appendix "Translated Safety Warnings.")
Connect the optical bypass switch as follows:
- Step 1 Connect the cable coming in from the primary ring (from PHY B at the preceding station) to the PHY A receive port on the network (ring) side of the optical bypass switch.
Note Refer to Figure 4-10 if you are connecting to the multimode/multimode FIP (CX-FIP-MM), and to Figure 4-11 if you are connecting to a single-mode/single-mode FIP (CX-FIP-SS).
Figure 4-10 Connecting Optical Bypass for CX-FIP-MM
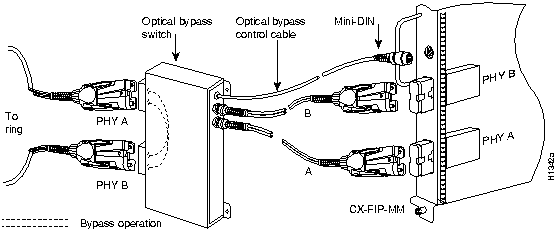
Figure 4-11 Connecting Optical Bypass for CX-FIP-SS
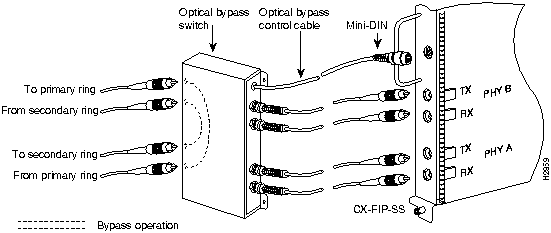
- Step 2 Connect the cable coming in from the secondary ring (from PHY A at the preceding station) to the PHY B receive port on the network (ring) side of the bypass switch.
- Step 3 Unless the documentation that accompanies the bypass switch instructs otherwise, consider the bypass switch an extension of the FIP ports and connect the switch cables from A to A and B to B. The network cables are already connected to the bypass switch following the standard B-to-A/A-to-B scheme.
- Step 4 Connect the optical bypass switch control cable. If the control cable on your optical bypass switch uses a mini-DIN connector, connect the cable directly to the mini-DIN optical bypass port on the FIP. If the switch uses a standard DIN connector, use the optical bypass adapter cable supplied with each FIP.
All FSIP ports support any available interface type and mode. The serial adapter cable determines the electrical interface type and mode of the port to which it is connected. E1-G.703/G.704, EIA/TIA-232, EIA/TIA-449, V.35, and X.21 interfaces are available in DTE mode with a plug at the network end and in DCE mode with a receptacle at the network end. EIA-530 is available only in DTE mode with a plug. Connect the FSIP serial cables as shown in Figure 4-12.
Figure 4-12 Connecting Cables to the FSIP
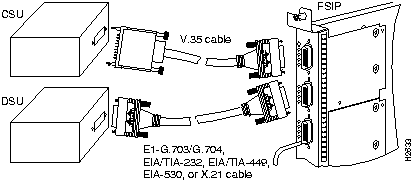
When you connect serial devices, consider the adapter cables as an extension of the router for external connections. Therefore, use DTE cables to connect the router to remote DCE devices such as modems or DSUs, and use DCE cables to connect the router to remote DTE devices such as a host, PC, or another router.
Note The serial port adapter cable determines the electrical interface type and mode of the FSIP port. When you connect a remote DTE device (which means that the FSIP port is a DCE interface), you must set the clock rate with the clockrate command. For a complete description of this command, refer to the appropriate configuration publications, which are listed in the section "If You Need More Configuration Information," in the chapter "Performing a Basic Configuration of the Cisco 7513."
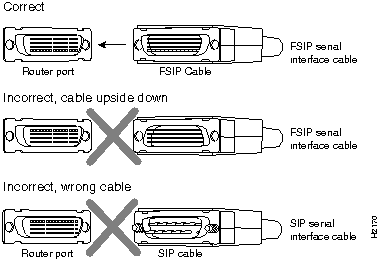
A pair of metric thumbscrews is included with each port adapter cable. If you want to connect to a remote device that uses metric hardware, replace the standard 4-40 thumbscrews at the network end of the port adapter cable with the M3 metric thumbscrews. Also, the backshell on the FSIP universal cable connector is not stiff enough to prevent you from inserting the interface cable connector into the FSIP port upside down.

Caution Forcing a SIP cable into an FSIP port or forcing an FSIP cable into the port upside down can damage the FSIP. Before inserting the cable into the FSIP port receptacle, ensure that the connector is oriented correctly.
Figure 4-13 shows the correct and incorrect ways to attach serial interface cables to the FSIP.
Figure 4-13 Correct and Incorrect Methods for Connecting FSIP Cables
The HIP port functions as a DTE when it is connected to a DSU for a standard HSSI connection; it can also be connected to a collocated router with a null-modem cable. To connect the router to an HSSI network, use an HSSI interface cable between the HIP port and the DSU. HSSI cable ends are identical; connect them as shown in Figure 4-14.
Figure 4-14 Connecting an HSSI Cable to the HIP
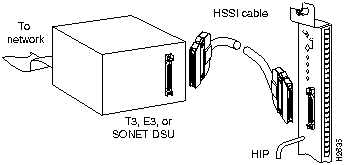
Note Use only the HSSI cable shipped with the HIP. Do not use a SCSI-II-type cable.
To verify the operation of the HSSI port or to build a larger node, use a null-modem cable between two HSSI ports and connect two routers back to back, as shown in Figure 4-15.
Figure 4-15 Connecting a Null-Modem Cable to the HIP
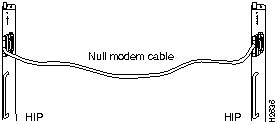
The two routers must be in the same location, and can be two Cisco 7513s or one Cisco 7513 and one Cisco 7000. When you configure the ports, you must enable the internal transmit clock on each HSSI interface with the hssi internal-clock command. When you disconnect the cable, use the no hssi internal-clock command. For complete descriptions of these commands, refer to the appropriate configuration publications, which are listed in the section "If You Need More Configuration Information," in the chapter "Performing a Basic Configuration of the Cisco 7513."
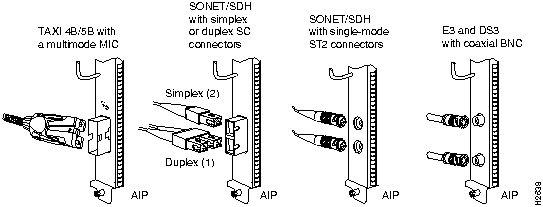
All AIP Asynchronous Transfer Mode (ATM) interfaces are full duplex. You must use the appropriate ATM interface cable to connect the AIP to an external ATM network. The AIP provides an interface to ATM switching fabrics for transmitting and receiving data at up to 155 megabits per second (Mbps) bidirectionally. The actual data rate is determined by the physical layer interface module (PLIM).
Note For more complete AIP information, you can also refer to the Asynchronous Transfer Mode Interface Processor (AIP) Installation and Configuration publication (Document Number 78-1214-xx, where xx is the latest version of the document, which is available on Cisco Connection Documentation CD-ROM or as a printed copy).
The AIP can support interfaces that connect to the following physical layers:
- Transparent Asynchronous Transmitter/Receiver Interface (TAXI) 4B/5B 100-Mbps multimode fiber-optic
- SONET/SDH 155-Mbps multimode fiber-optic---STS-3C or STM-1
- SONET/SDH 155-Mbps single-mode fiber-optic---STS-3C or STM-1
- E3 34-Mbps coaxial cable
- DS3 44.736-Mbps (±20 parts per million [ppm]) coaxial cable
Connect AIP cables as shown in Figure 4-16.
Figure 4-16 Connecting Cables to the AIP

Warning Invisible laser radiation may be emitted from the aperture ports of the single-mode FDDI products when no fiber cable is connected. Avoid exposure and do not stare into open apertures. (For translated versions of this warning, refer to the appendix "Translated Safety Warnings.")
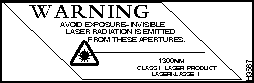
The aperture port contains a warning label, as shown in Figure 4-17.
Figure 4-17 Warning Label on the AIP
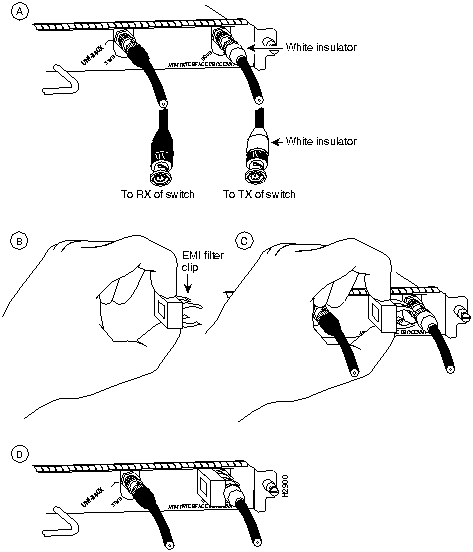
Note The E3 and DS3 PLIMs require cable CAB-ATM-DS3/E3. If you have an E3 PLIM, you must install the CAB-ATM-DS3/E3 cable and EMI filter clip. If you do not have an E3 PLIM, proceed to the appropriate section for your configuration.
 Caution To ensure compliance with EMI standards, the E3 PLIM connection requires an EMI filter clip (CLIP-E3-EMI) on the receive port (RCVR); the DS3 PLIM connection does not require this clip. The following procedure and figure discuss the EMI filter clip assembly that is required for the E3 PLIM. Do not operate the E3 PLIM without this assembly.
Following is the procedure for installing the CAB-ATM-DS3/E3 cable and the EMI filter clip:
- Step 1 Attach the CAB-ATM-DS3/E3 cable to the transmit (XMTR) and receive (RCVR) ports on the E3 PLIM, as shown in A in Figure 4-18.
- One portion of the cable has a white insulator on both ends to ensure that the receive-to-transmit and transmit-to-receive relationship is maintained between the E3 PLIM and your ATM switch. The white banded portion of the cable should attach between receive and transmit or transmit and receive ports of the E3 PLIM and your ATM switch, respectively.
- Step 2 Hold the EMI filter clip as shown in B in Figure 4-18.
- Step 3 Attach the EMI filter clip to the receive cable, as shown in C in Figure 4-18.
Note Make certain the EMI filter clip makes mechanical contact with the metal sleeve on the cable connector and the metal sleeve on the E3 PLIM connector.
- Step 4 To ensure that the clip is not pulled off when adjacent interface processors are removed, position the clip parallel to the orientation of the AIP, as shown in C and D in Figure 4-18.
Figure 4-18 Attaching the EMI Filter Clip
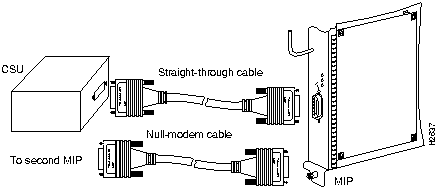
Two standard T1 serial cables are available from Cisco Systems and other vendors for use with the MIP: null-modem and straight-through. These interface cables are used to connect your MIPs to additional MIPs or external CSUs, respectively.
You must use null-modem cables for MIP-to-MIP connections and straight-through cables for MIP-to-CSU connections. The T1 cables used to connect the MIP with external T1 equipment have DB-15 male connectors on each end.
Four E1 cables are available from Cisco Systems and other vendors for use with the MIP: BNC, Twinax, DB-15, and RJ-45. The E1 cables used to connect the MIP with external E1 equipment have a DB-15 male connector on the MIP end.
Connect the MIP cables as shown in Figure 4-19.
Figure 4-19 Connecting Cables to the MIP
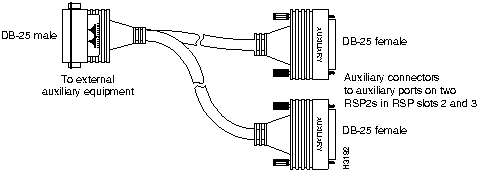
For systems with two RSP2s installed (one as master and one as slave in RSP2 slots 6 and 7), you can simultaneously connect to both console ports or both auxiliary ports using a special console Y cable or auxiliary Y cable. RSP2s ship as system masters by default and either console cable connection can be used for either RSP2. RSP2 slots 6 and 7 can contain an RSP2 designated as either a master or a slave; there are no restrictions.
Figure 4-20 and Figure 4-21 show the console and auxiliary Y cables, respectively.
Figure 4-20 Console Y Cable (CAB-RSP2CON=)
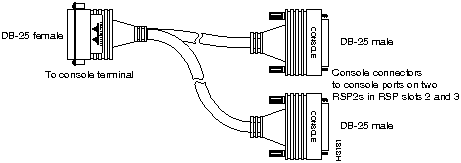
Figure 4-21 Auxiliary Y Cable (CAB-RSP2AUX=)
Following are the procedures for connecting AC- or DC-input power to your Cisco 7513.
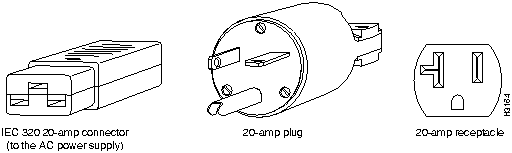
For the AC-input power supply, no tools are required. The AC-input-powered chassis, operating at 120VAC, requires a minimum of 20-amp service, with a 20-amp receptacle at the power source. See Figure 4-22.
Figure 4-22 20-Amp Power Cable Connector and Plug, and 20-Amp Receptacle

Warning See the installation instructions before you connect the system to its power source. (For translated versions of this warning, refer to the appendix "Translated Safety Warnings.")
Connect a 1200W AC-input power supply as follows:
- Step 1 Plug an appropriate power cable into the AC receptacle on each power supply.
 Warning The AC power supply for the Cisco 7513 has double pole/neutral fusing. (For translated versions of this warning, refer to the appendix "Translated Safety Warnings.")
- Step 2 Connect the power supply cable to the AC source.
The DC-input power cable must be routed through conduit from your power source to the power supply. You provide conduit through which you must route the DC-input power cable.
Note If cables from other equipment are in front of the bay, move them aside and temporarily secure them with cable ties. You must disconnect the conduit from the conduit bracket before you can remove a power supply from the chassis. Router and attach the conduit to make each power supply accessible for replacement and maintenance.
For the DC-input power, an 8-mm (5/16-inch) hex-head nut driver is required to attach the DC-input cable to the terminals.
Connect a 1200W DC-input power supply as follows:
- Step 1 Verify that the DC-input power cable you intend to connect to the power supply is disconnected from the DC power source.
 Warning Before performing any of the following procedures, ensure that power is removed from the DC circuit. To ensure that all power is OFF, locate the circuit breaker on the panel board that services the DC circuit, switch the circuit breaker to the OFF position, and tape the switch handle of the circuit breaker in the OFF position. (For translated versions of this warning, refer to the appendix "Translated Safety Warnings.")
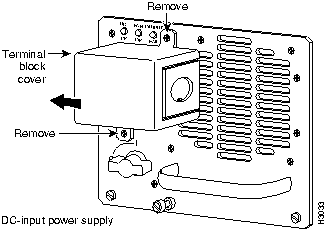
- Step 2 Loosen or remove the screws on the terminal block cover so the cover is free of the terminal block, as shown in Figure 4-23.
- Step 3 Slide the terminal block cover away from the terminal block, in the direction shown by the large arrow in Figure 4-23.
Figure 4-23 Detail of DC-Input Power Supply Terminal Block Cover
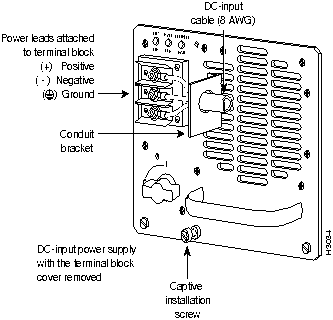
- Step 4 If not already done, route the DC-input power cable through the conduit from your power source, through the conduit bracket on the power supply (see Figure 4-24), and make a sufficient length of wire available to attach to the three terminal block connections.
- Step 5 Attach and tighten the conduit to the conduit bracket. How this conduit is attached depends on your site; its attachment is beyond the scope of this documentation.
 Caution To maintain agency compliance requirements and meet EMI emissions standards in the Cisco 7513 chassis with a single power supply, the power supply blank must remain in the power supply bay adjacent to the power supply. Do not remove this blank from the chassis unless you do so to install a redundant power supply. To prevent system problems, do not mix AC-input and DC-input power supplies in the same chassis.
- Step 6 Using an 8-mm (5/16-inch) hex-head nut driver, attach the copper ground wire to the ground terminal, as shown in Figure 4-24.
 Warning When stranded wiring is required, use approved wiring terminations, such as closed-loop or spade-type with upturned lugs. These terminations should be the appropriate size for the wires and should clamp both the insulation and conductor. (For translated versions of this warning, refer to the appendix "Translated Safety Warnings.")
- Step 7 Using an 8-mm (5/16-inch) hex-head nut driver, attach and tighten the positive (+) and negative (--) copper leads to the terminal block, as shown in Figure 4-24. Verify that you are connecting the appropriate leads to the correct terminal block posts.
Figure 4-24 Detail of DC-Input Power Supply Terminal Block
- Step 8 Check the power supply's wiring and color code to verify that they match the wiring and color code at the DC source.
- Step 9 Replace the terminal block cover.
- Step 10 Verify that the power switch is in the OFF (O) position and connect the DC-input power cable to the DC power source.
- Step 11 If you are connecting both power supplies, repeat Steps 1 through 10 for the second power supply.
This completes the power connections.
After you have finished installing your Cisco 7513 hardware and connecting all cables, and before you turn on the power, verify the following:
- All cables are attached, and all cable strain relief is used correctly.
- All processor modules are installed correctly as follows:
- All the ejector levers should be lying flat against the module faceplates.
- All the captive installation screws should be securely tightened.
- If any slots do not have processor modules installed, the fillers, MAS-7KBLANK (for empty interface processor slots) or MAS-RSPBLANK (for an empty RSP slot), must be installed to preserve proper airflow though the chassis.
- The power supplies are fully inserted in the power supply bays, and the power connections are securely attached. If you need more specific information on power attachments, refer to the documentation that accompanied the power supplies.
- If only one power supply is installed, a power supply blank must be installed in the adjacent power supply bay.
Note For complete hardware and network troubleshooting information, refer to the Cisco 7513 Hardware Installation and Maintenance and Troubleshooting Internetworking Systems publications, which are available on Cisco Connection Documentation CD-ROM or as printed copies.
 Caution To prevent damage to the chassis, processor modules, or power supplies, do not turn on power until you are ready to configure the system.
After your hardware installation is complete, and all required cables are connected, proceed to the chapter "Performing a Basic Configuration of the Cisco 7513."
Copyright 1988-1996
©
Cisco Systems Inc.