|
|

This chapter describes basic maintenance procedures for the Cisco 7206. The procedures are presented in the following sections:
For procedures that explain how to replace the main, Flash, and ROM monitor memory, refer to the configuration note Cisco 7206 Memory Replacement Instructions (Document Number 78-3226-xx).
Viewing Your System Configuration
You can use the show version and the show diag commands to view information specific to the hardware configuration of your Cisco 7206.
Use the show version (or show hardware) command to display the system hardware (the network processing engine and number of interfaces installed), the software version, the names and sources of configuration files, and the boot images. The following example shows the output from the show version command:
router> sh version
Cisco Internetwork Operating System Software
IOS (tm) 7200 Software (C7200-J-M), Released Version 11.1(6) [kpfrgiu 100]
Copyright (c) 1986-1996 by cisco Systems, Inc.
Compiled Sun 21-Apr-96 04:10 by
Image text-base: 0x60010890, data-base: 0x605F0000

ROM: System Bootstrap, Version 11.1(6) RELEASED SOFTWARE
ROM: 7200 Software (C7200-J-M), Released version 11.1(6) [gstovall 100]

router uptime is 8 minutes
System restarted by reload
System image file is "c7200-j-mz", booted via tftp from 1.1.10

cisco 7206 (NPE150) processor with 12288K/4096K bytes of memory.
R4700 processor, Implementation 33, Revision 1.0 (Level 2 Cache)
Last reset from power-on
Bridging software.
SuperLAT software copyright 1990 by Meridian Technology Corp).
X.25 software, Version 2.0, NET2, BFE and GOSIP compliant.
TN3270 Emulation software (copyright 1994 by TGV Inc).
4 Ethernet/IEEE 802.3 interfaces.
2 FastEthernet/IEEE 802.3 interfaces.
4 Token Ring/IEEE 802.5 interfaces.
12 Serial network interfaces
1 Compression port adapter
125K bytes of non-volatile configuration memory.
1024K bytes of packet SRAM memory.

20480K bytes of Flash PCMCIA card at slot 0 (Sector size 128K).
4096K bytes of Flash internal SIMM (Sector size 256K).
Configuration register is 0x0
Use the show diag command to determine what type of port adapters and I/O controller (with or without the Fast Ethernet port) are installed in slot 0 through slot 4 of your Cisco 7206. You can also use the show diag slot command to display information about a specific port adapter slot.
The following example shows the output from the show diag command. The I/O controller listed in slot 0 has a Fast Ethernet port.
router> sh diag
Slot 0:
        Fast-ethernet on C7200 I/O card port adapter, 1 port
        Port adapter is analyzed
        Port adapter insertion time 1d18h ago
        Hardware revision 2.0           Board revision A0
        Serial number     3511336       Part number    73-1537-03
        Test history      0x0           RMA number     00-00-00
        EEPROM format version 1
        EEPROM contents (hex):
          0x20: 01 14 02 00 00 35 94 28 49 06 01 03 00 00 00 00
          0x30: 50 00 00 00 FF FF FF FF FF FF FF FF FF FF FF FF

Slot 1:
        Token-ring port adapter, 4 ports
        Port adapter is analyzed
        Port adapter insertion time 1d18h ago
        Hardware revision 1.1           Board revision B0
        Serial number     2825629       Part number    73-1390-04
        Test history      0x0           RMA number     00-00-00
        EEPROM format version 1
        EEPROM contents (hex):
          0x20: 01 05 01 01 00 2B 1D 9D 49 05 6E 04 00 00 00 00
          0x30: 58 00 00 00 FF FF FF FF FF FF FF FF FF FF FF FF


Slot 2:
        Fast-ethernet (TX-ISL) port adapter, 1 port
        Port adapter is analyzed
        Port adapter insertion time 1d18h ago
        Hardware revision 1.0           Board revision A0
        Serial number     3536481       Part number    73-1688-03
        Test history      0x0           RMA number     00-00-00
        EEPROM format version 1
        EEPROM contents (hex):
          0x20: 01 11 01 00 00 35 F6 61 49 06 98 03 00 00 00 00
          0x30: 50 00 00 00 FF FF FF FF FF FF FF FF FF FF FF FF
Slot 3:
        Serial port adapter, 4 ports
        Port adapter is analyzed
        Port adapter insertion time 1d18h ago
        Hardware revision 1.0           Board revision UNKNOWN
        Serial number     2824732       Part number    73-1389-04
        Test history      0xFF          RMA number     255-255-255
        EEPROM format version 1
        EEPROM contents (hex):
          0x20: 01 04 01 00 00 2B 1A 1C 49 05 6D 04 FF FF FF FF
          0x30: 02 FF FF FF FF FF FF FF FF FF FF FF FF FF FF FF

Slot 4:
        Ethernet port adapter, 4 ports
        Port adapter is analyzed
        Port adapter insertion time 1d18h ago
        Hardware revision 1.1           Board revision A0
        Serial number     4294967295    Part number    73-1556-04
        Test history      0x0           RMA number     00-00-00
        EEPROM format version 1
        EEPROM contents (hex):
          0x20: 01 02 01 01 FF FF FF FF 49 06 14 04 00 00 00 00
          0x30: 50 00 00 00 FF FF FF FF FF FF FF FF FF FF FF FF


Slot 5:
        Compression engine 768K port adapter, 0 ports
        Port adapter is analyzed
        Port adapter insertion time 00:11:11 ago
        Hardware revision 255.255               Board revision UNKNOWN
        Serial number     4294967295    Part number    255-65535-255
        Test history      0xFF          RMA number     255-255-255
        EEPROM format version 255
        EEPROM contents (hex):
          0x20: FF 09 FF FF FF FF FF FF FF FF FF FF FF FF FF FF
          0x30: FF FF FF FF FF FF FF FF FF FF FF FF FF FF FF FF

Slot 6:
        Mueslix serial (V.35) port adapter, 8 ports
        Port adapter is analyzed
        Port adapter insertion time 00:11:26 ago
        Hardware revision 255.255               Board revision UNKNOWN
        Serial number     4294967295    Part number    255-65535-255
        Test history      0xFF          RMA number     255-255-255
        EEPROM format version 1
        EEPROM contents (hex):
          0x20: 01 0D FF FF FF FF FF FF FF FF FF FF FF FF FF FF
          0x30: FF FF FF FF FF FF FF FF FF FF FF FF FF FF FF FF
For specific information on the show version, show diag, and other software commands, refer to the publications listed in the section "If You Need More Information" in the chapter "Performing a Basic Configuration of the Cisco 7206."
At some point, you might want to replace a port adapter in your Cisco 7206. The following procedures explain how to remove and install a port adapter.
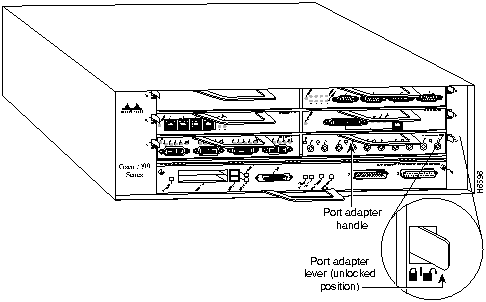
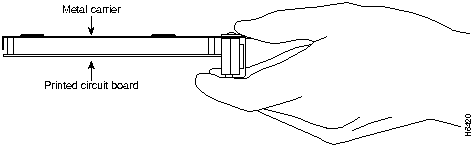
Complete the following steps to remove a port adapter from the Cisco 7206 router:
Figure 6-1 : Placing the Port Adapter Lever in the Unlocked Position
Figure 6-2 : Port Adpater Handling---Side View
This completes the procedure for removing a port adapter from the Cisco 7206 router.
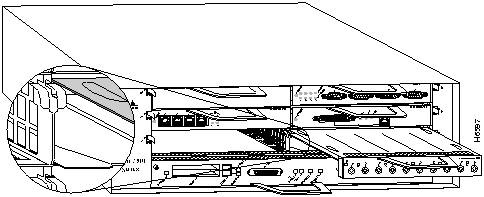
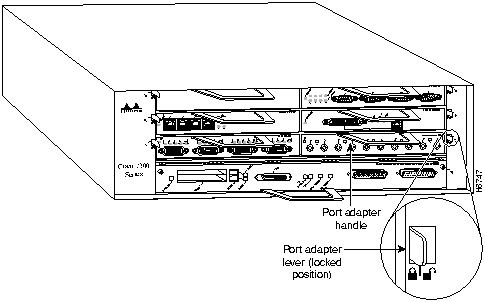
Complete the following steps to install a port adapter in the Cisco 7206 router:
Figure 6-3 : Aligning the Port Adapter Metal Carrier Between the Slot Guides
Figure 6-4 : Placing the Port Adapter Lever In the Locked Position
This completes the procedure for installing a port adapter in the Cisco 7206 router.
Installing and Removing a Flash Memory Card
The I/O controller has two PCMCIA slots for Flash memory cards: slot 0 (lower) and slot 1 (upper). Complete the following steps to insert a Flash memory card in either PCMCIA slot:
Complete the following steps to remove a Flash memory card from either PCMCIA slot:
This completes the steps for inserting and removing a Flash memory card.
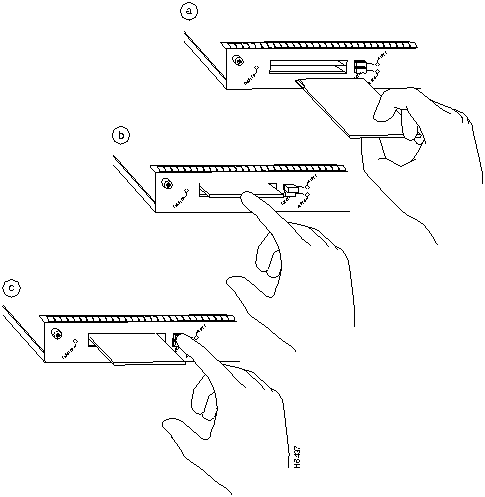
Figure 6-5 : Inserting and Removing a Flash Memory Card
Formatting a New Flash Memory Card
The Flash memory card that shipped with your Cisco 7206 contains the Cisco IOS software image you need to boot your router. In some cases, you might need to insert a new Flash memory card and copy images or backup configuration files onto it. Before you can use a new Flash memory card, you must format it. (Use only Intel Series 2+ Flash memory cards.)
Use the following procedure to format a new Flash memory card:
The new Flash memory card is now formatted and ready to use.
Copying a Bootable Image onto a Flash Memory Card
Once you have formatted a new Flash memory card, you can copy a bootable image onto it. To copy an image, use the following procedure, which assumes the following:
Following is the procedure for copying a bootable file (called new.image in the examples) onto the Flash memory card:
When the system reloads, it will boot the new.image file from the Flash memory card.
Copying Bootable Images between Flash Memory Cards
As future releases of Cisco IOS images become available, you will receive these images either as a file booted from a network server, a file on floppy disk, or a file on a Flash memory card.
The following scenario describes how to use a newly released image on a Flash memory card in a system that has an older image on a Flash memory card in slot 0 and a default boot image in the onboard Flash SIMM.
For this scenario, the filenames are as follows:
You will copy the new image from the new Flash memory card onto the Flash memory card that contains the old image.
When the system reloads, it will boot the file new.image from the Flash memory card in slot 0.
Replacing or Recovering a Lost Password
This section describes how to recover a lost enable or console login password, and how to replace a lost enable secret password on your Cisco 7206 router.
Overview of the Password Recovery Procedure
Following is an overview of the steps in the password recovery procedure:
Details of the Password Recovery Procedure
Complete the following steps to recover or replace a lost enable, enable secret, or console login password:
This completes the steps for recovering or replacing a lost enable, enable secret, or console login password.
Copyright 1988-1996 © Cisco Systems Inc.
![]()
![]()
![]()
Router#
format slot0:
All sectors will be erased, proceed? [confirm]
Enter volume id (up to 30 characters):
MyNewCard
Formatting sector 1
Format device slot0 completed
Router#
Router>
en
Password:
Router#
copy tftp:new.image slot0:new.image
20575008 bytes available on device slot0, proceed? [confirm]
address or name of remote host [1.1.1.1]?
loading new.image from 1.1.1.1 (via Ethernet1/0):!!!!!!!!!!!!!!!!!!

!!!!!!!!!!!!!!!!!!!!!!!!!!!!!!!!!!!!!!!!!!!!!!!!!!!!!!!!!!!!!!!!!!!!!!!!!!!!!!!!!!!!!!!!!!!!!!!!!!!!!!!!!!!!!!!!!!!!!!!!!!!!!!!!!!!!!!!!!!!!!!!!!!!!!!!!!!!!!!!!!!!!!!!!!!!!!!!!!!!!!!!!!!!!!!!!!!!!!!!!!!!!!!!!!!!!!!!!!!!!!!!!!!!!!!!!!!!!!!!!!!!!!!!!!!!!!!!!!!!!!!!!!!!!!!!!!!!!!!!!!!!!!!!!!!!!!!!!!!!!!!!!!!!!!!!!!!!!!!!!!!!!!!!!!!!!!!!!!!!!!!!!!!!!!!!!!!!!!!!!!!!!!!!!!!!!!!!!!!!!!!!!!!!!!!!!!!!!!!!!!!!!!!!!!!!!!!!!!!!!!!!!!!!!!!!!!!!!!!!!!!!!!!!!!!!!!!!!!!!!!!!!!!!!!!!!!!!!!!!!!!!!!!!!!!!!!!!!!!!!!!!!!!!!!!!!!!!!!!!!!!!!!!!!!!!!!!!!!!!!!!!!!!!!!!!!!!!!!!!!!!!!!!!!!!!!!!!!!!!!!!!!!!!!!!!!!!!!!!!!!!!!!!!!!!!!!!!!!!!!!!!!!!!!!!!!!!!!!!!!!!!!!!!!!!!!!!!!!!!!!!!!!!!!!!!!!!!!!!!!!!!!!!!!!!!!!!!!!!!!!!!!!!!!!!!!!!!!!!!!!!!!!!!!!!!!!!!!!!!!!!!!!!!!!!!!!!!!!!!!!!!!!!!!
[OK - 7799951/15599616 bytes]
CCCCCCCCCCCCCCCCCCCCCCCCCCCCCCCCCCCCCCCCCCCCCCCCCCCCCCCCCCCCCCCCCCCCCCCCCCCCCCCCCCCCCCCCCCCCCCCCCCCCCCCCCCCCCCCCCCCCCCCCCCCCCCCCCCCCCCCCCCCCCCCCCCCCCCCCCCCCCCCCCCCCCCCCCCCCCCCCCCCCCCCCCCCCCCCC
Router#
Router#
config terminal
Router(config)#
no boot system
Router(config)#
boot system flash slot0:new.image
Router(config)#
^z
Router#
copy running-config startup-config
Router#
reload
Router>
en
Password:
Router#
Router#
copy slot1:new.image slot0:new.image
Router#
config t
Router(config)#
no boot system
Router(config)#
boot system flash slot0:new.image
Router(config)#
^z
Router#
copy running-config startup-config
Router#
reload
rommon1>
). Proceed to Step 6. If Break is disabled, power cycle the router (turn the router off or unplug the power cord, and then restore power). Then proceed to Step 5.
rommon1>
confreg
rommon2>
reset
--- System Configuration Dialog --
Press RETURN to get started!
Router>
Router#
show startup-config
enable secret 5 $1$ORPP$s9syZt4uKn3SnpuLDrhuei

enable password 23skiddoo

.

.

line con 0

 password onramp
![]()
Router#
configure memory
Hostname#
configure terminal
enable secret
newpassword1
enable password
newpassword2
line con 0

password
newpassword3
interface fast ethernet 0/0

no shutdown
config-register 0x2102
![]()
![]()
![]()
![]()
![]()
![]()
![]()
![]()
![]()