
Table of Contents
Maintaining the Catalyst 5000 Series Switch
Maintaining the Catalyst 5000 Series Switch
This chapter describes maintenance procedures for the Catalyst 5000 series switch and its field-replaceable units (FRUs). Your switch is configured as specified in your order and is ready for installation and startup when it leaves the factory. As your communication requirements change, you may want to upgrade your system, add components, or change the initial configuration. This chapter describes the procedures for installing, replacing, and reconfiguring switching modules, and for adding and replacing internal system components such as the system fan assembly, power supplies, supervisor engine module, switching modules, and backplane components.
Software and microcode component upgrades require specific part numbers and other frequently updated information; therefore, only basic replacement guidelines are included in this publication. Detailed, up-to-date instructions (called configuration notes) are shipped with each replacement part upgrade kit.
Two kinds of replaceable system components are: those that support hot swapping and those that require you to shut down the system power before you replace them. Redundant power supplies and switching modules can be replaced while the system is operating. You must, however, turn off all power supplies before replacing any of the internal components (backplane or system fan assembly).
Access to the internal components in the chassis interior also requires that you remove
the front panels, which exposes the power supply wiring and backplane. If all power supplies are not shut down, the high current (100A) present in the wiring and on the front of the backplane becomes a hazard. Therefore, you should always make sure that all power supply switches are turned off before removing the front chassis panels and exposing the chassis interior.
 Caution All switching modules support hot swapping. The supervisor engine module is a required system component. Removing a supervisor engine module while the system is operating will cause the system to halt.
This chapter contains the following sections:
Warning Read the installation instructions before you connect the system to its power source.
Installing and Configuring Switching Modules
All switching modules support hot swapping, which allows you to install, remove, replace, and rearrange the switching modules without turning off the system power. When the system detects that a switching module has been installed or removed, it automatically runs diagnostic and discovery routines, acknowledges the presence or absence of the switching module, and resumes system operation without any operator intervention.
 Caution All switching modules support hot swapping. The supervisor engine module is a required system component. Removing a supervisor engine module while the system is operating will cause the system to halt. To see this warning in multiple languages, refer to "Translated Safety Warnings."
This section describes the installation and removal procedure for all switching modules. This section also includes instructions for replacing FRUs on the switching modules, for configuring jumpers, and for using basic configuration commands that you may need when setting up new interfaces.
An erasable programmable read-only memory (EPROM) component on the supervisor engine module and each switching module contains a default microcode image. The switch supports downloadable microcode, so it is unlikely that you will ever need to replace the microcode EPROM. However, the replacement procedures are included in this section in case replacement is necessary for any reason.
Hot-Swapping Modules
The hot-swap feature allows you to remove and replace switching modules while the system is operating; you do not need to notify the software or shut down the system power. All switching modules support hot swapping.
Each supervisor engine module and switching module contains a bus-type connector that mates with the system backplane. Each card connector consists of a set of tiered pins, in three lengths. The pins send specific signals to the system as they make contact with the backplane. The system assesses the signals it receives and the order in which it receives them to determine what event is occurring and what task it needs to perform, such as reinitializing new interfaces or shutting down removed ones.
For example, when inserting a switching module, the longest pins make contact with the backplane first, and the shortest pins make contact last. The system recognizes the signals and the sequence in which it receives them. The system expects to receive signals from the individual pins in this logical sequence, and the ejector levers help to ensure that the pins mate in this sequence.
When you remove or insert a switching module, the backplane pins send signals to notify the system, which then performs as follows:
- Rapidly scans the backplane for configuration changes.
- Initializes all newly inserted switching modules, notes any removed interfaces, and places them in the administratively shut-down state.
- Brings all previously configured interfaces on the switching module back to the state they were in when they were removed. Any newly inserted interfaces are put in the administratively shutdown state, as if they were present (but unconfigured) at boot time. If a similar switching module type has been reinserted into a slot, then its ports are configured and brought on line up to the port count of the original switching module.
Hot-swap functionality enables you to add, remove, or replace switching modules with the system online, which provides a method that is seamless to users on the network, maintains all routing information, and ensures session preservation.
When you insert a new switching module, the system runs a diagnostic test on the new interfaces and compares them to the existing configuration. If this initial diagnostic fails, the system remains off line for another 15 seconds while it performs a second set of diagnostic tests to determine whether or not the switching module is faulty and if normal system operation is possible.
If the second diagnostic test passes, which indicates that the system is operating normally and the new switching module is faulty, the system resumes normal operation but leaves the new interfaces disabled.
If the second diagnostic test fails, the system crashes, which usually indicates that the new switching module has created a problem in the bus and should be removed.
 Caution To avoid erroneous failure messages, allow at least 15 seconds for the system to reinitialize and note the current configuration of all interfaces before you remove or insert another switching module.
Note When you install a new supervisor engine, the system is set to the factory default configuration and you may need to reconfigure the system to your requirements. You can do this manually or, if you previously uploaded the original configuration to a server, you can download it to the new supervisor engine.
Avoiding Problems When Inserting and Removing Switching Modules
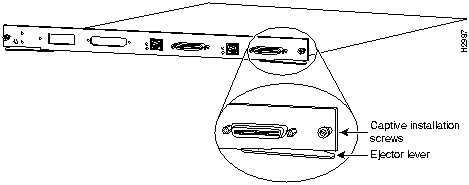
The function of the ejector levers (see Figure 11-1) is to align and seat the card connectors in the backplane. Failure to use the ejector levers and insert the switching module properly can disrupt the order in which the pins make contact with the backplane. Follow the installation and removal instructions carefully, and review the following examples of incorrect insertion practices and results:
- Using the faceplate to force a switching module all the way into the slot can pop the ejector levers out of their springs. If you then try to use the ejector levers to seat the switching module, the first layer of pins (which are already mated to the backplane) can disconnect and then remate with the backplane, which the system interprets as a card failure.
- Using the faceplate to force or slam the switching module all the way into the slot
can also damage the pins on the card connectors if they are not aligned properly with the backplane.
- When using the faceplate (rather than the ejector levers) to seat the switching module in the backplane, you may need to pull the switching module back out and push it in again to align it properly. Even if the connector pins are not damaged, the pins mating with and disconnecting from the backplane will cause the system to interpret a card failure. Using the ejector levers ensures that the card connector mates with the backplane in one continuous movement.
- Using the faceplate to insert or remove a switching module or failing to push the ejector levers to the full 90-degree position, can leave some (not all) of the connector pins mated to the backplane, a state which will suspend the system. Using the ejector levers and making sure that they are pushed fully into position ensures that all three layers of pins are mated with (or free from) the backplane.
It is also important to use the ejector levers when removing a switching module to ensure that the card connector pins disconnect from the backplane in the logical sequence expected by the system. Any supervisor engine module or switching module that is only partially connected to the backplane can hang the bus. Detailed steps for correctly performing hot swap are included with the following procedures for installing and removing switching modules.
 Caution All switching modules support hot swapping. The supervisor engine module is a required system component. Removing a supervisor engine module while the system is operating will cause the system to halt.
Following are detailed steps for removing and replacing switching modules and successfully performing hot swap. Figure 11-1 shows the ejector levers, which you must use when inserting or removing switching modules.
Figure 11-1 : Ejector Levers and Captive Installation Screws (Supervisor Engine Module Shown)
Tools Required
You need a 3/16-inch flat-blade screwdriver to remove any filler (blank) switching modules and to tighten the captive installation screws that secure the switching modules in their slots. Whenever you handle switching modules, you should use a wrist strap or other grounding device to prevent ESD damage. See the section "Preventing Electrostatic Discharge Damage" in the chapter "Installation Overview."
Removing Switching Modules
If you are removing a supervisor engine module, it is recommended that you first upload the current configuration to a server. This saves time when bringing the module back on line because it lets you recover the configuration by downloading it from the server to the nonvolatile memory of the supervisor engine. Take the following steps to remove a switching module:
Step 1 If you do not plan to immediately reinstall the switching module you are removing, disconnect any network interface cables attached to the switching module ports.
Step 2 Use a screwdriver to loosen the captive installation screws at the left and right sides of the switching module.
Step 3 Place your thumbs on the left and right ejector levers and simultaneously push the left lever left and the right lever right to release the switching module from the backplane connector.
Step 4 Grasp the switching module handle with one hand and place your other hand under the carrier to support and guide the switching module out of the slot. Avoid touching the card.
Step 5 Carefully pull the switching module straight out of the slot, keeping your other hand under the carrier to guide it. Keep the switching module at a 90-degree orientation to the backplane.
Step 6 Place the removed switching module on an antistatic mat or antistatic foam, or immediately install it in another slot.
Step 7 If the slot is to remain empty, install a switching module filler plate (part number 800-00292-01) to keep dust out of the chassis and to maintain proper airflow through the switching module compartment.
 Caution Always install the switching module filler plate in empty switching module slots to maintain the proper flow of cooling air across the cards.
Installing Switching Modules
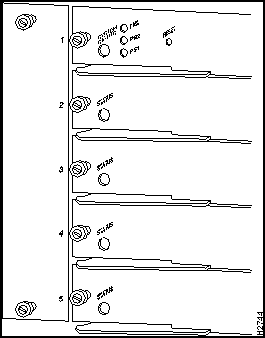
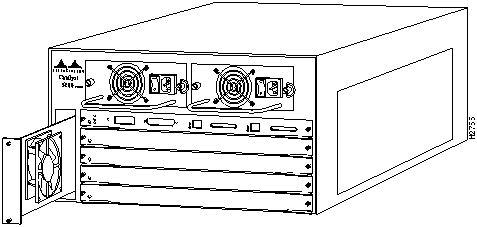
You can install switching modules in any of the four switching module slots, numbered
2 through 5 from top to bottom when viewing the chassis from the rear. (See Figure 11-2.) The top slot contains the supervisor engine module, which is a required system component. Switching module fillers, which are blank switching module carriers, are installed in
slots without switching modules to maintain consistent airflow through the switching module compartment.
Figure 11-2 : Slot Numbers
Following are installation steps for the switching modules, which support hot swapping and can be removed and installed while the system is operating.
 Caution Handle switching modules by the carrier edges only to prevent ESD damage.
Step 1 Choose a slot for the new switching module and ensure that there is enough clearance to accommodate any interface equipment that you will connect directly to the switching module ports. If possible, place switching modules between empty slots that contain only switching module filler plates.
Step 2 Switching modules are secured with two captive installation screws. Use a 1/4-inch flat-blade screwdriver to loosen the captive installation screws and remove the switching module filler (or the existing switching module) from the slot you want to use.
Step 3 Hold the switching module handle with one hand, and place your other hand under the carrier to support the switching module and guide it into the slot. Avoid touching the card.
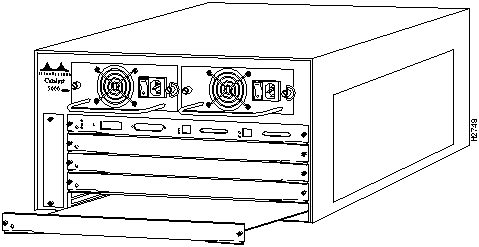
Step 4 Place the back of the switching module in the slot, and align the notch on the sides of the switching module carrier with the groove in the slot. (See Figure 11-3.)
Figure 11-3 : Module Installation
Step 5 While keeping the switching module at a 90-degree orientation to the backplane, carefully slide the switching module into the slot until the switching module faceplate makes contact with the ejector levers.
Step 6 Using the thumb and forefinger of each hand, simultaneously push the left lever and the right lever in to fully seat the switching module in the backplane connector.
 Caution Always use the ejector levers when installing or removing switching modules. A module that is partially seated in the backplane will cause the system to halt and subsequently crash.
Note The console displays the message "Module n has been inserted" if you are performing a hotswap. This message does not appear, however, if your are connected to the Catalyst 5000 through a Telnet session.
Step 7 Use a screwdriver to tighten the captive installation screws on the left and right ends of the switching module.
Step 8 Attach network interface cables or other devices to the interface ports.
Step 9 Check the status of the interfaces as follows:
- If this installation is a replacement switching module, use the show module or show port [mod_num/port_num] command to verify that the system has acknowledged the new interfaces and brought them up.
- If the interfaces are new, use the set module command and the set module name command facility to configure the new interface(s). This does not have to be done immediately, but the interfaces will not be available until you configure them. See the publication Catalyst 5000 Series Configuration Guide and Command Reference for all software instructions and information.

Caution All switching modules support hot swapping. The supervisor engine module is a required system component. Removing a supervisor engine module while the system is operating will cause the system to halt.
Screen Display for Hot-Swapping Procedure Sample
When you remove and replace switching modules, the system provides status messages on the console screen. The messages are for information only. In the following sample display, you can follow the events logged by the system when an Ethernet switching module was removed from slot 2 using the show system and show module commands. If you then use the show ports command to query the module, the system responds, "Module 2 is not installed." When the Ethernet switching module is reinserted, the system marks the module as ready again.
Console> (enable)
Wed Dec 27 1995, 16:24:52  Module 2 has been removed
Console> (enable)
Wed Dec 27 1995, 16:24:55  Module 2 has been inserted
Console> (enable)
Wed Dec 27 1995, 16:25:12  Module 2 is online
Console> (enable)
Note The message "Module n has been removed" does not appear if you are connected to the Catalyst 5000 through a Telnet session.
Verifying the Flashcode Memory Version
When you restart the system, the system loads the system image from Flash memory. You can use the show flash or show version commands to display the current system image version and, if necessary, instruct the system to reload the system image from Flashcode memory without restarting the system.
The show version command displays the current Flashcode version on the first line of the display for the supervisor engine module:
Console> show version
WS-C5001 Software, Version NmpSW: 1.1 McpSW: 1.1
TBD on modules
Copyright (c) 1995 by Cisco Systems, Inc.

Nmp S/W compiled on March 31 1995 09:52:35
Mcp S/W compiled on March 31 1995 09:31:26
TBD on modules

System Bootstrap Version: 1.0

WS-C5001 Hardware Version: 1.0  Model: WS-C5001  Serial #: 000100251
TBD on modules
WS-C5001 uptime is 23 day, 1 hour, 33 minutes
Console>
If the display shows that the system image loading from Flash memory is the wrong version, you can instruct the system to load the new system image using the download command. The download command downloads new Flashcode to the supervisor engine module Flashcode memory.
Take the following steps to verify that the new microcode version is loaded:
Step 1 Verify that the system boots correctly.
Step 2 Check the state of the interfaces by looking at the status LEDs and verify that the interfaces return to the same state they were in before you removed the switching module (some may have been shut down).
Step 3 Enter the show module command to display the interfaces for all switching module types.
Step 4 If the new Flashcode version is displayed, your installation is complete. If a different (older) version is displayed, the old Flashcode is still loading from Flash memory.
The installation procedure is complete. If the status LED fails to go on after a second installation attempt, or if any of the interfaces fail to return to their previous state, refer to the troubleshooting procedures in the section "Troubleshooting Suggestions" in the chapter "Troubleshooting the Installation."
Note When you insert or replace ATM or FDDI modules, use the command clear config mod_num to clear the module configuration information. This allows the Catalyst 5000 series switch to obtain the correct spanning-tree parameters for the modules.
Configuring the Supervisor Engine Module
This section describes how to update the software on the Catalyst 5000 series switch. New software to implement enhancements and maintenance releases will be provided periodically. Following are two methods you can use to update the software:
- The first (also the fastest and easiest) method to update software is to initiate the network download to the switch using a Trivial File Transfer Protocol (TFTP) download server.
- The second method uses Kermit (a popular file-transfer and terminal-emulation program) to network download the software from a PC or workstation attached to the switch using the console port. This public domain software UNIX program is supplied on the software update disk.
Note Software updates are distributed on Sun- and PC-compatible 3.5-inch disks. Use the procedures in this chapter to copy the software from the disks and download the software from the workstation to the switch. For more information on configuration commands, refer to the publication Catalyst 5000 Series Configuration Guide and Command Reference.
Downloading Flash Memory
You might need to copy a new image to Flash memory whenever a new image or maintenance release becomes available. To download a new image into Flash memory, perform the following steps from a console, using TFTP:
Step 1 Make sure the workstation acting as the download server has the TFTP daemon.
Step 2 On Sun workstations, make sure the /etc/inetd.conf file contains the following line:
tftp dgram udp wait root /usr/etc/in.tftpd in.tftpd -p -s /tftpboot
Make sure the /etc/services file contains the following line:
tftp 69/udp
Note You must restart the inetd daemon after modifying the /etc/inetd.conf and /etc/services files. To restart the daemon, either kill the inetd process and restart it, or issue a fastboot command (on the SunOS 4.x) or a reboot command (on Solaris 2.x or SunOS 5.x). Refer to your workstation manual for use of TFTP daemons.
Step 3 Copy the new software from the floppy disks to the home directory specified for the TFTP daemon on the workstation (usually /tftpboot). If this directory does not exist, create it before continuing. The file you copy is c5009_xx.bin, where xx is the software revision number.
Step 4 Log in to the Catalyst 5000 through the command line or through a Telnet session.
Step 5 Use the download host file command. Specify the IP address or host name of the workstation acting as the download server. Also specify the file to download. If you are downloading a software file for an FDDI or ATM module, you must also specify the module number. The following is the command syntax:
download host file [module num]
In the following example, no module number is given, so the file is downloaded to module 1 by default:
Console> (enable) download 190.180.122.40 c5009_11xx.bin
-
Step 6 When the following prompt appears, press y:
Download image filename from IP address to Module 1? (y/n) [n]? y
Note While the software is downloading, the Fan, PS1 and PS2 LEDs on the left side of the supervisor module blink green, and the Catalyst 5000 remains operational.
The Catalyst 5000 erases the Flash code, and reprograms modules on the supervisor card with the downloaded Flash code:
Finished network download.  (1136844 bytes)
Flash erase in progress ... Erase done
Programming Flash:  Flash Programming Complete
Flash erase in progress ... Erase done
Programming Flash:  Flash Programming Complete
Flash erase in progress ... Erase done
Programming Flash:  Flash Programming Complete
Flash erase in progress ... Erase done
Programming Flash:  Flash Programming Complete
Flash erase in progress ... Erase done
Programming Flash:  Flash Programming Complete
Flash erase in progress ... Erase done
Programming Flash:  Flash Programming Complete
Flash erase in progress ... Erase done
Programming Flash:  Flash Programming Complete
The system needs to be reset to run the new image.
Step 7 Reset the Catalyst 5000.
Step 8 Use the show flash command to check the file you have just downloaded. If the version number is the correct number for the new software, the download was successful. If the version number is not the correct number, the download failed, and you must repeat the download procedure. Refer to the troubleshooting procedures below if the download failed.
The system is now ready to be configured to boot from the new image you copied to Flash memory. For more information on the copy tftp flash command and other related commands, refer to the publication Catalyst 5000 Series Configuration Guide and Command Reference.
Installing and Replacing Power Supplies
The switch is configured to your order and is ready for installation and startup when it leaves the factory. As your communication requirements change, you may want to upgrade your system and add or replace a power supply. This section describes the procedures for installing, replacing, and reconfiguring power supplies.
The 376W power supplies (AC-input) used in the switch support redundant hot swapping. When two power supplies are installed, you can install, remove, or replace one of the supplies without affecting system operation. When power is removed from one supply, the redundant power feature causes the second supply to ramp up to full power and maintain uninterrupted system operation. In systems with dual power supplies, connect each power supply to separate input lines so that, in case of a line failure, the second source will most likely still be available and can maintain maximum overcurrent protection for each power connection.
A modular power cord connects each power supply to the separate site power sources.
 Caution Use both hands to remove and install power supplies.
Note Each power supply weighs 11 pounds.
 Caution Keep hands and fingers out of the power supply bays. High current is present on the power backplane when the system is operating.
Tools Required
You will need a 1/4-inch flat-blade screwdriver to remove and install filler plates and to loosen or tighten the captive installation screws on the power supply.
Removing Power Supplies
Take the following steps to remove a power supply:
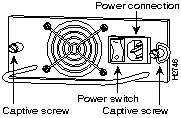
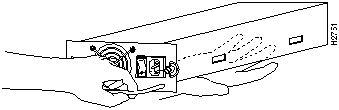
Step 1 Turn OFF the power switch on the power supply you are removing. (See Figure 11-4.)
 Caution Always install a filler plate over an empty power supply bay to protect the connectors from contamination and to prevent possible contact with high energy DC output.
 Warning This unit might have more than one power cord. To reduce the risk of electric shock, disconnect the two power supply cords before servicing the unit. To see the warnings in multiple languages, refer to "Translated Safety Warnings."
 Caution Failure to turn off the power supply could result in equipment damage.
Figure 11-4 : Power Supply Switch and AC Connection
Step 2 Disconnect the power cord from the power source.
Step 3 Remove the power cord from the power inlet.
Step 4 Use a screwdriver to loosen and remove the captive installation screw on the sides of the supply. (See Figure 11-5.)
 Warning Do not touch the power supply when the power cord is connected. For systems with a power switch, line voltages are present within the power supply even when the power switch is off and the power cord is connected. For systems without a power switch, line voltages are present within the power supply when the power cord is connected. To see the warnings in multiple languages, refer to "Translated Safety Warnings."
Figure 11-5 : Power Supply Installation

Step 5 Grasp the power supply handle with one hand and place your other hand underneath to support the bottom of the supply, as shown in Figure 11-6.
Figure 11-6 : Handling a Power Supply
Step 6 Pull the supply out of the bay and put it aside.
Step 7 If the power supply bay is to remain empty, install a blank power-supply filler plate (part number 700-00177-01) over the opening and secure it with the mounting screws. This not only protects the inner chassis from dust, but also the connectors in the rear of the bay, which expose high current levels when the chassis is powered on.
Step 8 Replace the power supply by following Step 1 through Step 5 in reverse.
 Caution Keep hands and fingers out of the power supply bays. High current is present on the power backplane when the system is operating.
Removing and Replacing the Chassis Front Panel
This section describes how to remove and replace the chassis front panel in order to access the internal backplane if it has been damaged.
The front panel is attached to the chassis with four screws.
 Warning Before working on a chassis or working near power supplies, unplug the power cord on AC units; disconnect the power at the circuit breaker on DC units. To see the warnings in multiple languages, refer to "Translated Safety Warnings."
 Warning This unit might have more than one power cord. To reduce the risk of electric shock, disconnect the two power supply cords before servicing the unit. To see the warnings in multiple languages, refer to "Translated Safety Warnings."
Tools Required
You need a 3/16-inch flat-blade screwdriver to remove the front chassis panel.
Removing the Front Panel
Take the following steps to remove the front panel:
Step 1 Use a 3/16-inch flat-blade screwdriver to loosen the eight captive screws at the bottom, top, and sides of the panel. (See Figure 11-7.)
Step 2 With your other hand, grasp the bottom of the panel by inserting your fingers under the front panel. (See Figure 11-7.)
Figure 11-7 : Removing the Front Panel
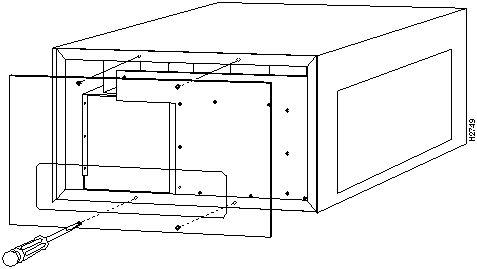
Step 3 When the captive screws are all removed, pull the panel off the chassis. (See Figure 11-7.) Place the panel to one side.
Replacing the Chassis Fan Assembly
This section describes how to replace the fan assembly (the chassis fans in a single unit that draw in cooling air and distribute it across the supervisor engine module and switching modules). It also describes the backplane, which provides the connection between power supplies, supervisor engine module, and switching modules.
Note Each replaceable component ships with installation instructions. Refer to these instructions for updated procedures and information.
 Caution Before performing any procedures in this chapter, review the sections "Safety Recommendations," "Safety with Electricity," and "Preventing Electrostatic Discharge Damage" in the chapter "Installation Overview."
 Warning Do not touch the power supply when the power cord is connected. For systems with a power switch, line voltages are present within the power supply even when the power switch is off and the power cord is connected. For systems without a power switch, line voltages are present within the power supply when the power cord is connected. To see the warnings in multiple languages, refer to "Translated Safety Warnings."
 Warning This unit might have more than one power cord. To reduce the risk of electric shock, disconnect the two power supply cords before servicing the unit. To see the warnings in multiple languages, refer to "Translated Safety Warnings."
The chassis fan assembly draws cooling air in through the right side of the chassis and exhausts it through the left side, facing the rear of the switch, to cool the supervisor engine module and switching modules. The absence of cooling air can cause the interior of the chassis to heat up and may cause an overtemperature condition. Never operate the system if the fan assembly is not functioning properly.
The fan assembly is located at the left of the chassis card cage. (See Figure 11-8.) The fan assembly is secured to the backpanel with two captive installation screws.
 Caution Never operate the system if the fan assembly is not functioning properly or if one is not installed. An overtemperature condition can result in severe equipment damage.
Figure 11-8 : Chassis Fan Assembly (Rear View)
Tools Required
You need a 3/16-inch flat-blade screwdriver to remove the fan assembly.
Removing the Fan Assembly
Take the following steps to remove the existing chassis fan assembly:
Step 1 On each installed power supply, turn OFF the power switch and unplug the power cord from the AC source.
 Warning This unit might have more than one power cord. To reduce the risk of electric shock, disconnect the two power supply cords before servicing the unit. To see the warnings in multiple languages, refer to "Translated Safety Warnings."
Step 2 Locate the fan assembly (see Figure 11-8), which is installed to the left of the card cage, under the power supply.
Step 3 Using a flat-blade screwdriver, loosen each of the two captive installation screws by turning them counterclockwise.
Step 4 When both screws are loosened, unscrew them from the backplane. These captive installation screws are fixed to the fan assembly; do not attempt to completely remove them.
Step 5 Grasp the fan assembly with both hands and pull it outward (toward you and away from the backplane) using steady pressure and jogging it until it frees the backplane.
Step 6 Lift the fan assembly out of the chassis and place it in a safe place.
If the system is inadvertently turned on without the fan assembly installed, the internal chassis components may overheat, which can result in severe equipment damage.
 Caution Never operate the system if the fan assembly is removed or if it is not functioning properly. An overtemperature condition can result in severe equipment damage.
Installing a New Fan Assembly
Take the following steps to install the new fan assembly:
Step 1 Hold the fan assembly with the two fans facing to the right.
Step 2 Place the fan assembly into the front chassis cavity so it rests on the floor of the chassis, then lift the fan assembly up slightly and align the top and bottom guides.
Step 3 Push the fan assembly into the chassis until the screws meet the back panel.
Step 4 Tighten each of the two captive installation screws by turning them clockwise.
Checking the Installation
Perform the following steps to verify that the new fan assembly is installed correctly:
Step 1 Turn ON all power supplies. The AC power LED on the supervisor engine module labeled PS1 or PS2 should go on. If it does not, the power supply has failed. Refer to the troubleshooting procedures in the chapter "Troubleshooting the Installation."
Step 2 Listen for the fan assembly; you should immediately hear it operating. If you do not hear it, turn off the system power and do the following:
- Ensure that the fan assembly power is completely inserted in the chassis and the faceplate is flush with the switch backpanel.
- Turn the power supplies back ON, and listen for the fan assembly.
Step 3 If after several attempts the fan assembly does not operate, or if you experience trouble with the installation (for instance, if the captive installation screws do not align with the backplane holes), contact a Cisco customer service representative for assistance.
This completes the fan assembly replacement.
Copyright 1988-1996 © Cisco Systems Inc.