|
|
This chapter describes the equipment and site requirements for router installation. This chapter includes the cabling requirements for the installation site, descriptions of additional equipment you will need to complete the installation, and the environmental conditions the site must meet to maintain normal operation. Instructions for inspecting the system are included in the section "Inspecting the System." This chapter includes the following preinstallation requirements:
The following guidelines will help to ensure your safety and protect the equipment.
![]()
Follow these guidelines when working on equipment powered by electricity:
In addition, use the guidelines that follow when working with any equipment that is disconnected from a power source, but still connected to telephone wiring or other network cabling.
Electrostatic discharge (ESD) can damage equipment and impair electrical circuitry. It occurs when electronic printed circuit cards are improperly handled and can result in complete or intermittent failures. Always follow ESD prevention procedures when removing and replacing cards. Ensure that the router chassis is electrically connected to earth ground. Wear an ESD-preventive wrist strap, ensuring that it makes good skin contact. Connect the clip to an unpainted chassis frame surface to safely channel unwanted ESD voltages to ground. To properly guard against ESD damage and shocks, the wrist strap and cord must operate effectively. If no wrist strap is available, ground yourself by touching the metal part of the chassis.
![]()
This section describes the requirements your site must meet for safe installation and operation of your system. Ensure that your site is properly prepared before beginning installation.
The router can be used as desktop or rack-mounted equipment in a data processing or lab environment. In addition, the system can be mounted in either a standard or telco rack. Optional rack-mount kits are available.
For desktop mounting, use the rubber feet provided. They protect the chassis and provide a nonskid surface.
The location of individual chassis and the layout of your equipment rack or wiring room are extremely important for proper system operation. Equipment placed too close together, inadequate ventilation, and inaccessible panels can cause system malfunctions and shutdowns, and can make system maintenance difficult.
When planning your site layout and equipment locations, use the following precautions to help avoid equipment failures and reduce the possibility of environmentally caused shutdowns. If you are currently experiencing shutdowns or unusually high errors with your existing equipment, these precautions will help you isolate the cause of failures and prevent future problems.
The following precautions will help you plan an acceptable operating environment for your router and will help you avoid environmentally caused equipment failures:
The following tips will help you plan an acceptable equipment rack configuration:
Following are features of the router power supply:
The Installation Checklist (see Figure 2-1) lists all the procedures for initial hardware installation of new systems. Make a copy of this checklist and mark your entries. Include a copy of the checklist for each system in your Site Log. (See the "Site Log" section later in this section.)
Figure 2-1 Installation Checklist
Installation Checklist
for Site
__________________________________________________________
| Task | Verified by | Date |
|---|---|---|
| Installation Checklist copied for each system | ||
| Background information placed in Site Log | ||
| Environmental specifications verified | ||
| Site power voltages verified | ||
| Installation site prepower check completed | ||
| Required tools available | ||
| Additional equipment available | ||
| Router received | ||
| Printed documentation or Cisco Connection Documentation CD-ROM received (if ordered) | ||
| Product registration (in warranty package) completed and mailed | ||
| Chassis components verified | ||
| Software version verified | ||
| Initial electrical connections established | ||
| ASCII terminal attached to console port | ||
| Signal distance limits verified | ||
| Startup sequence steps completed | ||
| Initial system operation verified |
Router name________________________________
Router serial number__________________________
Notes:
The Site Log provides a historical record of all actions relevant to the router. Keep it in a common place near the chassis where anyone who performs tasks has access to it. Use the Installation Checklist to verify steps in the installation and maintenance of your router. Site Log entries might include the following:
You need the following tools and equipment for the installation of the router:
In addition, you might need the following additional external equipment:
When viewed from the rear, the power cable and power switch appear on the right side of the router chassis. The system console port, auxiliary (AUX) port, and network processor module ports appear to the left of the power cable and switch. (See Figure 2-2.)
Figure 2-2 Router---Rear View Showing Slot Numbering and Interface Ports
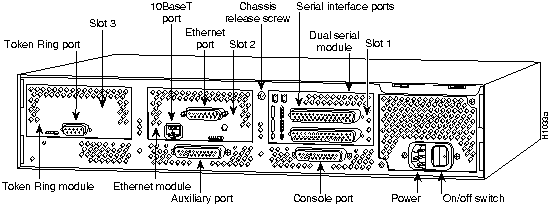
The chassis contains slots for three network processor modules. These slots correspond to the three slot numbers printed on the chassis front panel. (See Figure 1-1.) Slot numbers represent the order in which the system scans the network processor modules. Network processor module location is not slot-dependent. Any module can be moved to any other available slot location. For optimum heat dissipation, use the center slot position, slot 2, for the FDDI module if one is present.
For information on how to remove and replace network processor modules, see the sections "Removing Network Processor Modules" and "Replacing Network Processor Modules" in the chapter "Maintaining and Upgrading the Router."
Unit numbering allows the system to distinguish between two interfaces of the same type. As viewed from the rear of the chassis, the unit numbering of the network processor modules increments from zero counting from the right to left. The system assigns unit number addresses to these network modules by starting with zero for each module interface type and numbering from right to left and from bottom to top. The lowest unit number of that interface type is the module closest to the power supply. (See Figure 2-2.) For example, the unit number addresses for the modules in Figure 2-2 are as listed in Table 2-1.
Table 2-1 Unit Numbering for Dual Serial, Ethernet, and Token Ring Modules
| Slot No. | Interface Type | Unit Address No. |
|---|---|---|
| 1 | Serial Port (Top)Serial Port (Bottom) | 10 |
| 2 | Ethernet | 0 |
| 3 | Token Ring | 0 |
If the Token Ring module in Figure 2-2 was replaced by a second Ethernet module, the unit addresses would be as listed in Table 2-2.
Table 2-2 Unit Numbering Addresses for Dual Serial and Two Ethernet Modules
| Slot No. | Interface Type | Unit Address No. |
|---|---|---|
| 1 | Serial Port (Top)Serial Port (Bottom) | 10 |
| 2 | Ethernet | 0 |
| 3 | Ethernet | 1 |
Figure 2-3 shows a chassis configured with three dual serial modules.
Figure 2-3 Router---Rear View Showing Serial Port Unit Numbering
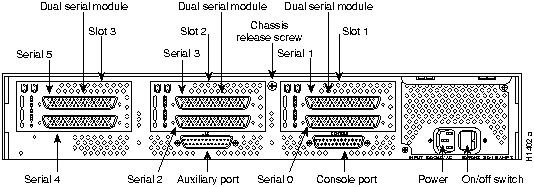
The unit numbering of these modules would be as listed in Table 2-3.
Table 2-3 Unit Numbering Addresses for Three Dual Serial Modules
| Slot No. | Interface Type | Unit Address No. |
|---|---|---|
| 1 | Serial Port (Top)Serial Port (Bottom) | 10 |
| 2 | Serial Port (Top)Serial Port (Bottom) | 32 |
| 3 | Serial Port (Top)Serial Port (Bottom) | 54 |
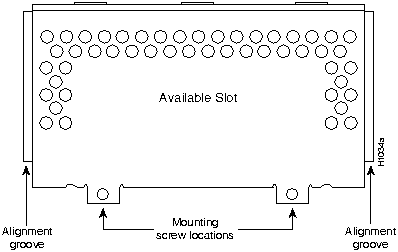
If the router is configured with fewer than three network processor modules, you must place a slot filler panel in the open slot to ensure proper airflow. Figure 2-4 shows a slot filler panel.
The following sections describe the console port and auxiliary port found on all Cisco 4000 series routers.
Each router includes an asynchronous router console port (female DB-25 connector) wired as a data communications equipment (DCE) device. The default parameters for this port follow:
In the appendix "Cabling Specifications," Table A-1 lists the pinout for the Cisco 4000-M console port and Table A-2 lists the pinout for the Cisco 4500-M and Cisco 4700 console port.
A male DB-25 connector auxiliary port (labeled AUX on the chassis rear) is included on all router units. The AUX port is a shared-memory data terminal equipment (DTE) port to which you can attach an EIA/TIA-232 connector from a channel service unit/data service unit (CSU/DSU), a modem, or protocol analyzer for network access. In the appendix "Cabling Specifications," Table A-1 lists the pinout for the Cisco 4000M and Table A-2 lists the pinout for the Cisco 4500-M and Cisco 4700 asynchronous serial auxiliary port.
This section describes the considerations for each type of network connection available for a Cisco 4000 series router.
The following sections describe the two types of Ethernet network processor modules: single-port and dual-port modules.
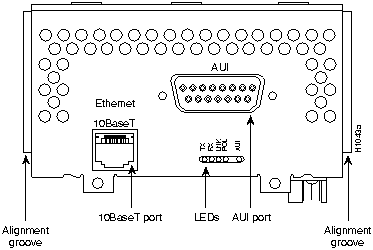
Each single-port Ethernet network processor module has an Ethernet AUI connector and a 10BaseT connector. (See Figure 2-5.) (Only one connector on the module can be used at a time.) Use either an IEEE 802.3 AUI or a 10BaseT cable to make the connection.
The media type connection, AUI or 10BaseT, is selected by the media command. Enter the media command in the router's configuration file to configure your selection of AUI or 10BaseT on the desired interface. The syntax of the media command follows:
The following is an example of configuring the Ethernet 0 interface for a media type AUI connection:
router> enable
Password:
router# configure terminal
Enter configuration commands, one per line.
Edit with DELETE, CTRL/W, and CTRL/U; end with CTRL/Z
interface ethernet 0
media-type aui
^z
router# write memory
Refer to the router software publications for more information on the media command.
Figure 2-5 Ethernet Network Processor Module with AUI and 10BaseT Connectors
An Ethernet transceiver cable with thumbscrew connectors can be connected directly to the router port by replacing the slide latch with a jackscrew (provided in a separate bag). A 10BaseT transition cable can connect directly from the router to your network. (See Figure 2-6.)
Figure 2-6 Single-Port Ethernet Network Processor Module 10BaseT Port Connection
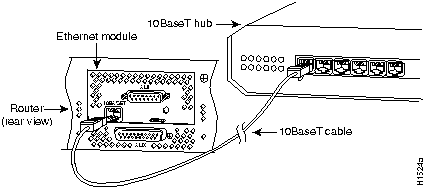
Figure 2-7 shows a single-port Ethernet network processor module with an Ethernet (AUI) connection to a transceiver.
Figure 2-7 Single-Port Ethernet Network Processor Module AUI Port Connection
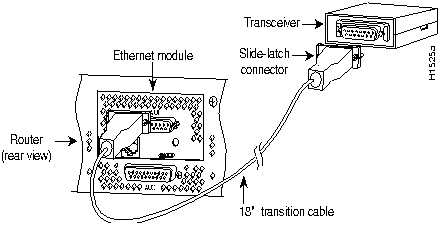
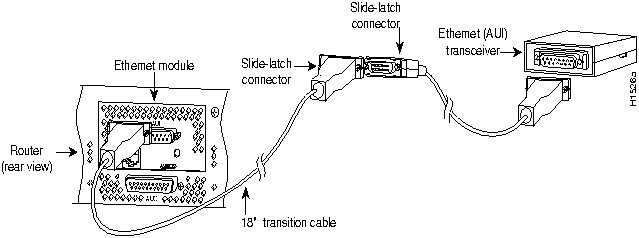
Figure 2-8 shows the transition cable used as a flexible extension of the Ethernet port allowing an Ethernet transceiver cable with a slide-latch connector to mate with the female end of the 18-inch transition cable.
Figure 2-8 Extending the Transition Cable from the Ethernet Port
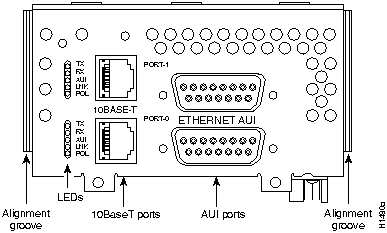
The dual-port Ethernet network processor module has ports for two network connections. (See Figure 2-9.) The top port is marked Port1 on the module, and the lower port is marked Port0. On the dual-port Ethernet network processor module, on a given port, either the Ethernet connector or the 10BaseT connector can be used, but not both. For example, Ethernet port 0 could be attached to either a 10BaseT connector or to an AUI connector, and similarly Ethernet port 1 could be attached to either a 10BaseT connector or to an AUI connector.
Figure 2-9 Dual-Port Ethernet Network Processor Module with AUI and 10BaseT Connectors
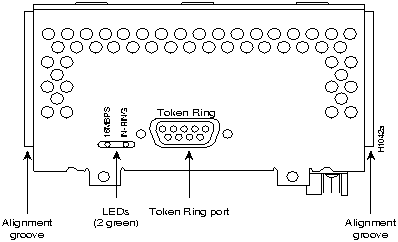
The dual-port Token Ring network processor module has two standard 9-pin connectors. (See Figure 2-10.) The singleport Token Ring network processor module has one standard 9-pin connector. (See Figure 2-11.)
Figure 2-10 Dual-Port Token Ring Module Network Connector
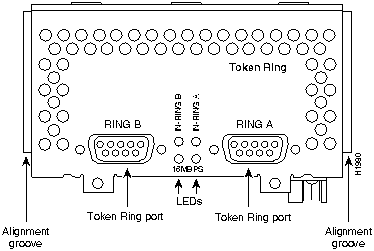
Figure 2-11 Token Ring Module Network Connector
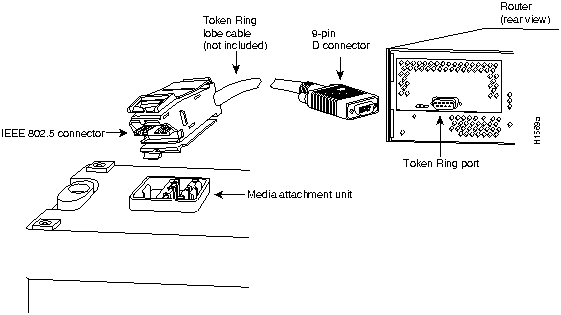
Use a standard 9pin Token Ring lobe cable to connect the router directly to a media attachment unit (MAU). (See Figure 2-12.)
Figure 2-12 Token Ring Cable Connections
When setting up your router, consider distance limitations and potential electromagnetic interference (EMI) as defined in the Electronic Industries Association's (EIA) and Telecommunications Industry Association (TIA) standards, such as EIA/TIA-232.
Serial signals can travel a limited distance at any given bit rate; generally, the slower the baud rate, the greater the distance. All serial signals are subject to distance limits, beyond which a signal degrades significantly or is completely lost. Table 2-4 lists the IEEE-recommended maximum speeds and distances for each serial interface type; however, you may get good results at speeds and distances greater than those listed. For instance, the recommended maximum rate for V.35 is 2 Mbps, but 4 Mbps is commonly used. If you understand the electrical problems that might arise and can compensate for them, you can get good results with rates and distances greater than those shown. However, do so at your own risk.
Table 2-4 IEEE Standard Transmission Speeds and Distances
| EIA/TIA-232 Distance | EIA/TIA-449, X.21, V.35, EIA-530 Distance | ||||
|---|---|---|---|---|---|
| Rate (bps) | Feet | Meters | Feet | Meters | |
| 2400 | 200 | 60 | 4100 | 1250 | |
| 4800 | 100 | 30 | 2050 | 625 | |
| 9600 | 50 | 15 | 1025 | 312 | |
| 19200 | 25 | 7.6 | 513 | 156 | |
| 38400 | 12 | 3.7 | 256 | 78 | |
| 56000 | 8.6 | 2.6 | 102 | 31 | |
| 1544000 (T1) | N/A | N/A | 50 | 15 | |
Balanced drivers allow EIA/TIA-449 signals to travel greater distances than EIA/TIA-232. The recommended distance limits for EIA/TIA-449 shown in Table 2-4 are also valid for V.35, X.21, and EIA-530. However, you can get good results at distances and rates greater than those shown in Table 2-4. Typically, EIA/TIA-449 and EIA-530 support 2-Mbps rates, and V.35 can support 4Mbps rates.
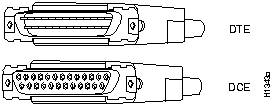
EIA/TIA-232, the most common interface standard in the United States, supports unbalanced circuits at signal speeds up to 64 Kbps. The network end of the adapter cable is a standard 25pin Dshell connector known as a DB25. (See Figure 2-13.) The router Console and Auxiliary ports also use EIA/TIA232 connections; however, the serial module ports support synchronous connections, and the console and auxiliary ports support asynchronous connections.
Figure 2-13 EIA/TIA-232 Adapter Cable Connectors, Network End
EIA/TIA-449, which supports balanced (EIA/TIA-422) and unbalanced (EIA/TIA-423) transmissions, is a faster (up to 2 Mbps) version of EIA/TIA-232 that provides more functions and supports transmissions over greater distances.
The EIA/TIA-449 standard was intended to replace the EIA/TIA-232 standard, but it was not widely adopted primarily because of the large installed base of DB-25 hardware and because of the larger size of the 37pin EIA/TIA-449 connectors, which limited the number of connections possible (fewer than possible with the smaller, 25-pin EIA/TIA-232 connector).
The network end of the EIA/TIA-449 adapter cable provides a standard 37-pin D-shell connector. (See Figure 2-14.) EIA/TIA449 cables are available as either DTE (DB-37 plug) or DCE (DB-37 receptacle).
Figure 2-14 EIA/TIA-449 Adapter Cable Connectors, Network End

The V.35 interface is recommended for speeds up to 48 Kbps (although in practice it is used successfully at 4 Mbps).
The network end of the V.35 adapter cable provides a standard 34-pin Winchester type connector. (See Figure 2-15.) V.35 cables are available with a standard V.35 plug or receptacle in either DTE or DCE mode.
Figure 2-15 V.35 Adapter Cable Connectors, Network End
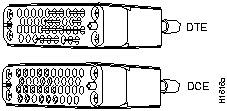
The X.21 interface uses a 15-pin connection for balanced circuits and is commonly used in the United Kingdom to connect public data networks. X.21 relocates some of the logic functions to the DTE and DCE interfaces and, as a result, requires fewer circuits and a smaller connector than
EIA/TIA232.
The network end of the X.21 adapter cable is a standard DB-15 connector. (See Figure 2-16.) X.21 cables are available as either DTE (DB-15 plug) or DCE (DB-15 receptacle).
Figure 2-16 X.21 Adapter Cable Connectors, Network End
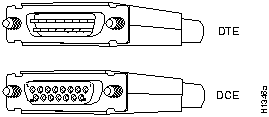
EIA-530, which supports balanced transmission, provides the increased functionality, speed, and distance of EIA/TIA-449 on the smaller, DB-25 connector used for EIA/TIA-232, instead of the 37-pin connectors used for EIA/TIA-449. Like EIA/TIA-449, EIA-530 refers to the electrical specifications of EIA/TIA-422 and EIA/TIA423. Although the specification recommends a maximum speed of 2 Mbps, EIA-530 is used successfully at 4 Mbps or faster speeds over short distances.
The EIA-530 adapter cable is available in DTE mode only. The network end of the EIA-530 adapter cable is a standard DB-25 plug commonly used for EIA/TIA-232 connections. Figure 2-17 shows the DB25 connector at the network end of the adapter cable.
Figure 2-17 EIA-530 Adapter Cable Connector, Network End
![]()
When wires are run for any significant distance in an electromagnetic field, interference can occur between the field and the signals on the wires. This fact has two implications for the construction of terminal plant wiring:
If you use twisted-pair cables in your plant wiring with a good distribution of grounding conductors, the plant wiring is unlikely to emit radio interference. Ground the conductor for each data signal when exceeding the distances listed in Table 2-4.
If you have cables exceeding the distances in Table 2-4, or if you have cables that pass between buildings, then give special consideration to the effect of lightning strikes and ground loops. The electromagnetic pulse caused by lightning and other high-energy phenomena can couple enough energy into unshielded conductors to destroy electronic devices; the potential existence of ground loops are also a threat to electrical components and to safety. If your site has experienced these problems, then consult experts in lightning suppression and shielding.
Most data centers cannot resolve the infrequent but potentially catastrophic problems just described without pulse meters and other special equipment. Take precautions to avoid these problems by providing a properly grounded and shielded environment, with special attention to issues of electrical surge suppression. To predict and remedy strong electromagnetic interference, consult experts in RFI.
The four-port serial network processor module ports are DB-60 connectors; the dual serial network processor module ports are DB-50 connectors. (See Figure 2-18 and Figure 2-20.) These serial ports can be configured as DTE or DCE, depending on the special serial cable used.
Figure 2-18 shows port numbering on the four-port serial module.
Figure 2-18 Four-Port Serial Network Processor Module Ports
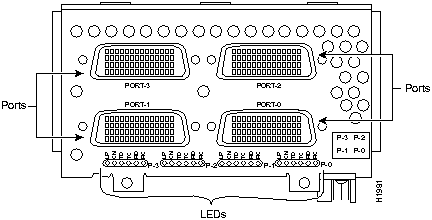
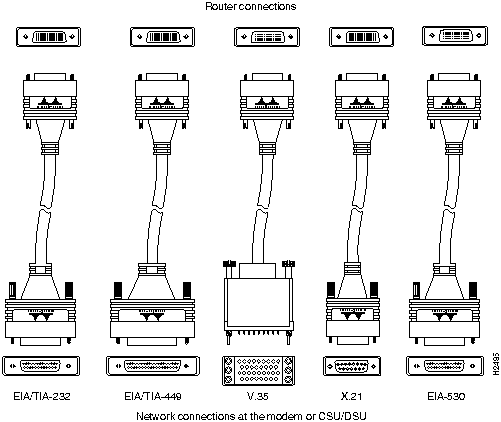
Figure 2-19 shows the network connections of the four-port serial module adapter cables.
Figure 2-19 Four-Port Serial Port Adapter Cables
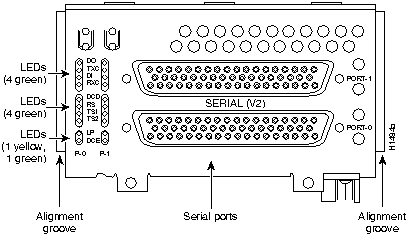
The dual serial ports are DB-50 connectors. (See Figure 2-20.) These serial ports can be configured as DTE or DCE, depending on the type of serial cable being used.
Figure 2-20 Dual Serial Network Processor Module Ports
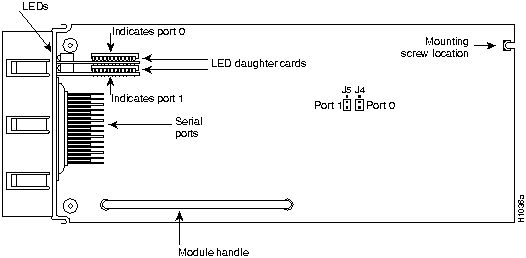
Two LED daughter cards are attached to the front of the dual serial module. (See Figure 2-21.)
Figure 2-21 Dual Serial Network Processor Module---Top View
![]()
The dual serial network processor module contains two jumpers, J4 and J5 (see Figure 2-21), which determine whether the ports are configured for nonreturn to zero (NRZ) or nonreturn to zero inverted (NRZI). J4 configures serial port 0, and J5 configures serial port 1. The factory-configured (default) jumper setting is for NRZ. To configure for NRZI mode on each port, the jumper must connect pins 1 and 2 of the respective jumper locations. (See Figure 2-22.) For NRZ (not NRZI), the jumpers that connect pins 2 and 3 can be removed.
If the network processor module is operating as DTE in NRZI mode, the sense of the dteinverttiming command must be manually changed. For instance, if the command no dteinvert-timing was previously entered in the configuration file, then dte-invert-timing must be configured for the module to operate as DTE in NRZI mode.
To set the jumpers for NRZI, move the jumpers to the position shown in Figure 2-22 using the orientation shown in Figure 2-21.
Figure 2-22 Dual Serial Network Processor Module Jumpers, J4 and J5---NRZI Setting

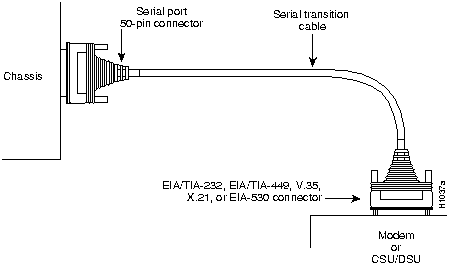
You must use a special serial cable to connect the router to a modem, CSU/DSU, or other device as shown in Figure 2-23. This cable, available from your customer service representative, is normally ordered with the system. See the appendix "Cabling Specifications." Nine different serial cables are available for the two versions of serial modules: both DTE and DCE versions of V.35, EIA/TIA-232, EIA/TIA-449, and X.21; and EIA530 DTE. Note that the cables for the two versions are not interchangeable.
Figure 2-23 Router Serial Cable Connections
The following sections describe the commands for configuring an external clock signal for a DCE interface and for configuring a port for NRZI encoding or 32-bit CRC. Configuration commands are executed from the privileged level of the EXEC command interpreter.
All interfaces support both DTE and DCE mode, depending on the mode of the interface cable attached to the port. To use a port as a DTE interface, connect a DTE adapter cable to the port. When the system detects the DTE mode cable, it automatically uses the external timing signal. To use a port in DCE mode, you must connect a DCE interface cable and set the clock speed with the clockrate configuration command. This section describes how to set the clock rate on a DCE port and, if necessary, how to invert the clock to correct a phase shift between the data and clock signals.
All DCE interfaces require a noninverted internal transmit clock signal, which is generated by the serial module. The default operation on a DCE interface is for the DCE device to generate its own clock signal (TXC) and send it to the remote DTE. The remote DTE device returns the clock signal to the DCE. The clockrate command specifies the rate as a bits-per-second value. In the following example, the clock rate for the top serial interface on a dual serial module is defined as 72 Kbps:
interface serial 1

clockrate 72000
Use the no clockrate command to remove the clock rate for DTE operation. Following are the acceptable clockrate settings:
| 1200 | 2400 | 4800 | 9600 | 19200 | 38400 | 56000 | 64000 | 72000 |
| 125000 | 148000 | 500000 | 800000 | 1000000 | 1300000 | 2000000 | 4000000 |
Speeds above 64 Kbps (64000) are not supported for EIA/TIA-232. On all interface types, if your cable lengths exceed the standard recommendations, faster speeds might not work.
Systems that use long cables may experience high error rates when operating at the higher transmission speeds. Slight variances in cable construction, temperature, and other factors can cause the clock and data signals to shift out of phase. If a DCE port is reporting a high number of error packets, suspect a phase shift. Inverting the clock can often correct this shift.
When a port is operating in DCE mode, the default operation is for the attached DTE device to return the clock signal (SCTE) to the DCE port. The DCE sends SCT and SCR clock signals to the DTE, and DTE returns an SCTE clock signal to the DCE. If the DTE device does not return SCTE, you must use the dce-terminal-timing-enable command to configure the DCE port to use its own clock signal in place of the SCTE signal that would normally be returned from the DTE device.
To configure an interface to accept the internal clock generated by the serial module in place of the SCTE clock that is normally returned by the DTE device, specify the interface followed by the dceterminaltimingenable command. In the example that follows, the serial 0 port is configured to accept the internal clock signal:
interface serial 0

dce-terminal-timing-enable
To turn off this command, use the no dce-terminal-timing-enable command.
When the serial port is a DTE, the invert-txc command inverts the TXC clock signal it receives from the remote DCE. When the serial port is a DCE, this command inverts the clock signal to the remote DTE port. Use the no invert-txc command to change the clock signal back to its original phase. The no invert-txc command is redundant with the four-port serial module because the module will automatically discover the polarity of the clock and invert the signal.
All interfaces support both nonreturn to zero (NRZ) and nonreturn to zero inverted (NRZI) formats. Both formats use two different voltage levels for transmission. NRZ signals maintain constant voltage levels with no signal transitions (no return to a zero voltage level) during a bit interval and are decoded using absolute values (0 and 1). NRZI uses the same constant signal levels but interprets the presence of data at the beginning of a bit interval as a signal transition and the absence of data as no transition. NRZI uses differential encoding to decode signals, rather than determining absolute values.
NRZ format, which is the factory default on all interfaces, is commonly used for EIA/TIA-232 connections in IBM environments. To enable NRZI encoding on any interface, specify the port address of the interface followed by the command nrzi-encoding. In the example that follows, serial port 0 is configured for NRZI encoding:
router# configure terminal
interface serial 0
nrzi-encoding
^Z
To disable NRZI encoding on a port, specify the port and use the no nrzi-encoding command. For complete command descriptions and instructions, refer to the related software documentation.
All Cisco 4000 series router serial interfaces support CRC-CCITT, a 16-bit cyclic redundancy check (CRC). CRC is an error-checking technique that uses a calculated numeric value to detect errors in transmitted data. The sender of a data frame divides the bits in the frame message by a predetermined number to calculate a remainder or frame check sequence (FCS). Before it sends the frame, the sender appends the FCS value to the message so that the frame contents are exactly divisible by the predetermined number. The receiver divides the frame contents by the same predetermined number that the sender used to calculate the FCS. If the result is not 0, the receiver assumes that a transmission error occurred and sends a request to the sender to resend the frame.
The designator 16 indicates the number of check digits per frame that are used to calculate the FCS. CRC-16, which transmits streams of 8-bit characters, generates a 16-bit FCS. Both the sender and the receiver must use the same setting of 16.
The default for all serial interfaces is for 16-bit CRC.
After configuring your serial interfaces, use the show interface command to check the network interface statistics. Options to the show interface command include interface, the type of interface (for example, serial), and unit, the unit number of the interface. The following example shows the output of show interface serial 0:
router> show interface s 0
Serial 0 is up, line protocol is up
  Hardware is HD64570
  Internet address is 193.195.74.236, subnet mask is 255.255.255.248
  MTU 1500 bytes, BW 1544 Kbit, DLY 20000 usec, rely 255/255, load 1/255
  Encapsulation HDLC, loopback not set, keepalive not set
  Last input 0:00:01, output 0:00:10, output hang never
  Last clearing of "show interface" counters never
  Output queue 0/40, 0 drops; input queue 0/75, 0 drops
  Five minute input rate 0 bits/sec, 0 packets/sec
  Five minute output rate 0 bits/sec, 0 packets/sec
     2922 packets input, 5844 bytes, 0 no buffer
     Received 0 broadcasts, 0 runts, 0 giants
     0 input errors, 0 CRC, 0 frame, 0 overrun, 0 ignored, 0 abort
     145 packets output, 185562 bytes, 0 underruns
     0 output errors, 0 collisions, 1 interface resets, 0 restarts
     880 carrier transitions
The field underrun, in the output of the show interface command, may be nonzero in approximately one of 250,000 packets.
To display the current internal status of an interface module, use the show controller command with the interface unit options. (Note in the example that universal serial means the four port serial module.) The following example shows the output of the show controller serial 2 command:
router# show controller s 2
HD unit 2, idb 0x246AAC, ds 0x248240
buffer size 2108  Universal Serial: No cable
DCD=0  DSR=0  DTR=0  RTS=0  CTS=0
cpb = 0x4, eda = 0xDA18, cda = 0xD798
RX ring with 32 entries at 0x604D798
00 bd_ptr=0xD798 pak=0x604E728 ds=0x604E87C status=80 pak_size=0
01 bd_ptr=0xD7AC pak=0x604EEAC ds=0x604F000 status=80 pak_size=0
02 bd_ptr=0xD7C0 pak=0x604F630 ds=0x604F784 status=80 pak_size=0
(some screen output deleted)
32 bd_ptr=0xDA18 pak=0x605D7A8 ds=0x605D8FC status=80 pak_size=0
cpb = 0x4, eda = 0xE1E0, cda = 0xE1E0
TX ring with 8 entries at 0x604E1E0
00 bd_ptr=0xE1E0 pak=0x000000 ds=0x000000 status=80 pak_size=0
01 bd_ptr=0xE1F4 pak=0x000000 ds=0x000000 status=80 pak_size=0
02 bd_ptr=0xE208 pak=0x000000 ds=0x000000 status=80 pak_size=0
03 bd_ptr=0xE21C pak=0x000000 ds=0x000000 status=80 pak_size=0
04 bd_ptr=0xE230 pak=0x000000 ds=0x000000 status=80 pak_size=0
05 bd_ptr=0xE244 pak=0x000000 ds=0x000000 status=80 pak_size=0
06 bd_ptr=0xE258 pak=0x000000 ds=0x000000 status=80 pak_size=0
07 bd_ptr=0xE26C pak=0x000000 ds=0x000000 status=80 pak_size=0
08 bd_ptr=0xE280 pak=0x000000 ds=0x000000 status=80 pak_size=0
0 missed datagrams, 0 overruns, 0 bad frame addresses
0 bad datagram encapsulations, 0 memory errors
0 transmitter underruns
Note that in the previous example, the cable type is shown as no cable. If a cable is attached to the port, the cable type would be shown, as in the following example:
buffer size 2108 Universal Serial: DTE V.24 (RS-232) cable
If the cable is DCE, the output of the show controller command displays the clock rate. For complete command descriptions and instructions, refer to the appropriate software publications.
Multimode FDDI network processor modules provide either a dual-attachment station (DAS) or a single-attachment station (SAS). Single-mode FDDI network processor modules provide a DAS. Following are the available FDDI module options:
The multimode FDDI network processor module consists of two cards, each with a multimode transceiver, with one card fitting on top of the other. The bottom card is the SAS and contains the PHYA port. If the DAS option is included, the PHYB port is located on the module's top card.
The distance limitations for single-mode and multimode FDDI stations are shown in Table 2-5. If the distance between two connected stations is greater than the maximum distance shown, significant signal loss can result. The single-mode transmitter and the multimode transceiver each provide 11 dB of optical power.
Table 2-5 FDDI Maximum Transmission Distances
| Transceiver Type | Maximum Distance Between Stations |
|---|---|
| Single-mode | Up to 6 miles (10 kilometers) |
| Multimode | Up to 1.2 miles (1.9 kilometers) |
The XMTR and RCVR ports of the single-mode network processor module (see Figure 2-24) use simplex FC-type connectors (see Figure 2-25). The ports accept standard 8.7 to 10/125micron single-mode fiber-optic cable, supporting connections at distances up to 6 miles (10 kilometers).
Figure 2-24 Dual-Attachment Single-Mode FDDI Module---End View
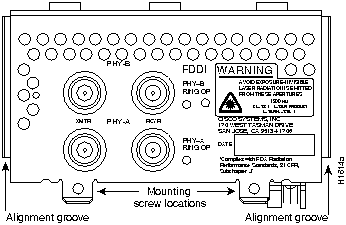
Figure 2-25 Single-Mode FDDI Network Interface Connectors, FC Type
![]()
The single-mode transmitter uses a small laser to transmit the light signal to the ring. Keep the transmit port covered whenever a cable is not connected to it. Although multimode transceivers typically use LEDs (not lasers) for transmission, keep open ports covered and avoid staring into open ports or apertures.
![]()
The multimode network processor module connectors are FDDI-standard physical sublayer (PHY) connectors. The media interface connector (MIC) connects to FDDI standard 62.5/125 micron multimode fiber-optic cable.
Figure 2-26 shows the MIC typically used for network and chassis connections in multimode FDDI applications.
Figure 2-26 Multimode FDDI Network Interface Connector, MIC Type

A dual-attachment module configuration requires two connections: one to the primary ring and one to the secondary ring. The PHYA port is the bottom port (see Figure 2-24 and Figure 2-27), and PHYB is the top port on both the multimode and single-mode modules. To connect to another dual-attachment station, connect PHYA on the module to PHYB on the other DAS and PHYB on the module to PHYA on the other DAS.
Figure 2-27 Dual-Attachment Multimode FDDI Module---End View
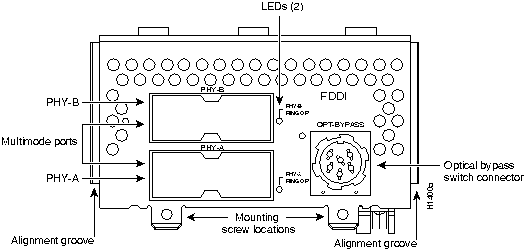
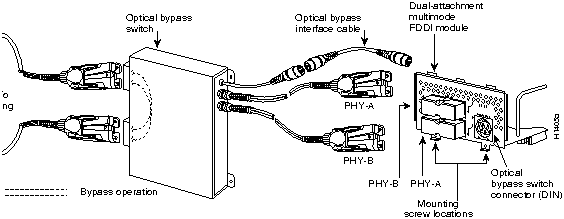
The standard connection scheme for a dual-attachment station dictates that the primary ring signal enters the router on the PHYA RCVR port and returns to the primary ring from the PHYB XMTR port. (See Figure 2-28.) The secondary ring signal comes into the router on the PHYB RCVR port and returns to the primary ring from the PHYA XMTR port. Failure to observe this relationship in making your network connections will prevent the FDDI interface from initializing.
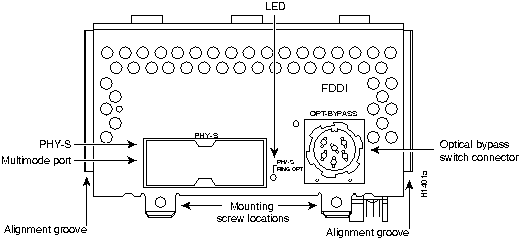
The single-attachment module's PHYS port can be connected through a concentrator to a single-attachment ring, or can be connected point-to-point directly to another device.
Figure 2-28 Dual-Attachment FDDI Optical Bypass Switch and PHY Connections
The single-attachment module's PHY-S port (as shown in Figure 2-29) can be connected through a concentrator to a single-attachment ring or directly to another device.
Figure 2-29 Single-Attachment Multimode FDDI Module---End View
Both the dual-attachment and single-attachment FDDI modules have an optical bypass switch connector. An optical bypass switch is a passive optical device powered by the FDDI module. If a fault in the router occurs, or if power is lost, the optical bypass switch is enabled, and the ring will be unaffected. The optical bypass switch is automatically enabled if power is lost. In addition, the system software can enable the optical bypass switch if a problem is detected or if the operator chooses to take the router out of the ring.
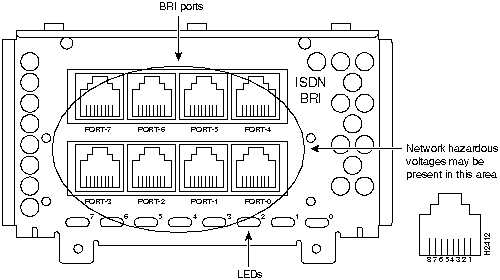
The BRI network processor module (see Figure 2-31 and Figure 2-30) supports 8 Basic Rate Interface (BRI) ports. Each BRI port is an RJ-45 8-pin connector. Use an appropriate cable to connect the BRI module directly to an Integrated Services Digital Network (ISDN) through an ISDN channel service unit/digital service unit (CSU/DSU) called the NT1. The common carrier will provide the NT1 connection, except in North America, where the NT1 is customer owned.
Figure 2-30 4-Port BRI Network Processor Module
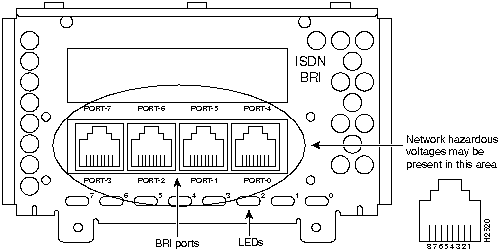
Figure 2-31 8-Port BRI Network Processor Module
![]()
The specifications for the BRI cable are given in Table 2-6.
Table 2-6 BRI Cable Specifications
| Parameter | High-Capacitance Cable | Low-Capacitance Cable |
|---|---|---|
| Resistance (@ 96 kHz(1)) | 160 ohms/km | 160 ohms/km |
| Capacitance (@ 1 kHz) | 120 nF/km(2) | 30 nF/km |
| Impedance (@ 96 kHz) | 75 ohms | 150 ohms |
| Wire diameter | 0.024" (0.6 mm) | 0.024" (0.6 mm) |
| Distance limitation | 32.8' (10 m) | 32.8' (10 m) |
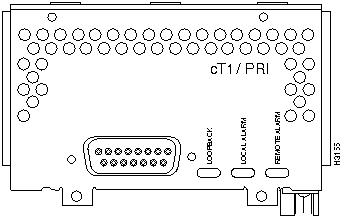
The Cisco 4000 series router supports a channelized T1 (CT1) network processor module with one T1 interface.The CT1 provides one channelized T1 connection via a serial cable to a channel service unit (CSU). On the CT1, the controller provides up to 24 virtual channels. Each virtual channel is presented to the system as a serial interface that can be configured individually. This interface is the physical media that supports ISDN PRI.
The CT1, shown in Figure 2-32, provides a controller for transmitting and receiving data bidirectionally at the T1 rate of 1.544 Mbps. For wide-area networking, the CT1 can function as a concentrator for a remote site.
Figure 2-32 Channelized T1 Network Interface Processor
Following are the T1 specifications:
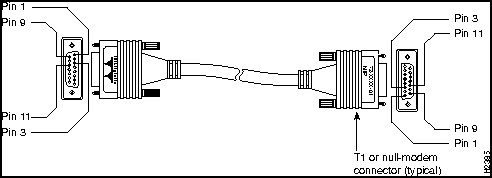
For the CT1, two standard T1 serial cables are available from Cisco Systems: null-modem and straight-through. A straight through cable connects your router to an external CSU. Null modem cables are used for back-to-back operation and testing.
The cables have male 15-pin DB connectors at each end to connect the CT1with the external CSU.
The T1 interface cable has two 15-pin DB connectors at each end to connect the CT1with the external T1 CSU. Figure 2-33 shows the T1 interface cable, connectors and pin-outs.
Figure 2-33 T1 Interface Cable
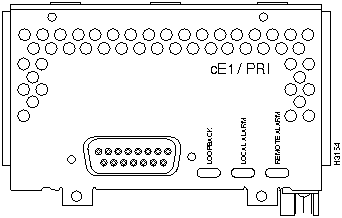
The Cisco 4000 series router supports a channelized E1 (CE1) network processor module with one E1 interface.The CE1 provides one channelized E1 connection via a serial cable to a channel service unit (CSU). On the CE1, the controller provides up to 24 virtual channels. Each virtual channel is presented to the system as a serial interface that can be configured individually. This interface is the physical media that supports ISDN PRI.
The CE1, shown in Figure 2-34, provides a controller for transmitting and receiving data bidirectionally at the E1 rate of 2.048 Mbps. For wide-area networking, the CE1 can function as a concentrator for a remote site.
Figure 2-34 Channelized E1 Network Interface Processor
Following are the E1 specifications:
The jumpers on the CE1 module set capacitive coupling between the transmit or receive shield and chassis ground, and the cable resistance (120-ohm or 75-ohm).
By default, the CE1 module is set with capacitive coupling between the receive (Rx) shield and chassis ground. This provides direct current (DC) isolation between the chassis and external devices, as stated in the G.703 specification. Jumper J2 (see Figure 2-35) controls this function. To set capacitive coupling between the transmit (Tx) shield and chassis ground, set jumper J2 as described in Table 2-7.
Figure 2-35 also shows the location of jumpers J1, J3, J4, J5, and J7. These jumpers set the cable impedance to 120-ohm or 75-ohm. The figure shows the cable impedance set to 120-ohm.
Figure 2-35 Location of Jumpers on the CE1 Module
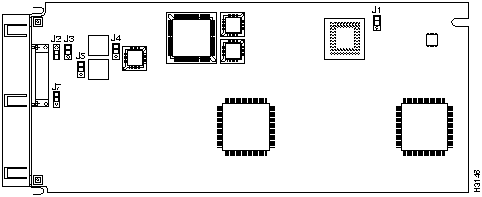
Table 2-7 Jumper Settings a nd Functions
| Jumper | Position | Function |
|---|---|---|
| J2 | 1 and 2 2 and 3 | Connects the Rx shield to chassis ground.Connects the Rx shield through capacitive coupling to chassis ground. |
| J1, J3, J4, J5, J7(1) | 1 and 22 and 3 | Sets cable impedance to 120-ohmSets cable impedance to 75-ohm |
![]()
For the CE1 module, four serial cables are available from Cisco Systems. All three have DB-15 connectors on the CE1end and either BNC, DB-15, Twinax, or RJ-45 connectors on the network end. Figure 2-36, Figure 2-37, Figure 2-38, and Figure 2-39 show the E1 interface cables (respectively).
Figure 2-36 E1 Interface Cable for 75-Ohm, Unbalanced Connections (with BNC Connectors)

Figure 2-37 E1 Interface Cable for 120-Ohm, Balanced Connections (with DB-15 Connectors)

Figure 2-38 E1 Interface Cable for 120-Ohm, Balanced Connections (with Twinax Connectors)

Figure 2-39 E1 Interface Cable for 120-Ohm, Balanced Connections (with RJ-45 Connector)

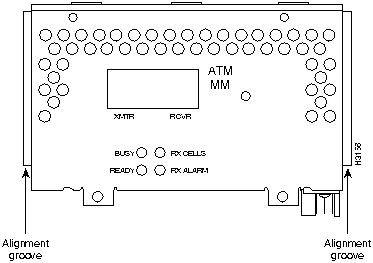
The ATM processor module for a Cisco 4000 series router provides a user network interface (UNI) between the router and an ATM network.
The ATM module provides an interface to ATM switching fabrics for transmitting and receiving data at rates of up to 155 Mbps in each direction (Rx and Tx); the actual rate is determined by the PLIM and ATM network technology (i.e., by the specific physical layer). The ATM processor module supports PLIMs that connect to the following physical layers:
All ATM interfaces are full-duplex. You must use the appropriate ATM interface cable and accessories to connect the ATM processor module with an external ATM network. The ATM interface cable is used to connect your router to an ATM switch, or to connect two router ATM interfaces in a back-to-back manner.
An ATM processor module can be installed in any available network processor slot. If the middle slot is not occupied by an FDDI NPM, use this slot for the ATM NPM.
Figure 2-40 ATM Network Processor Module with STS-3c/STM-1 Single Mode PLIM
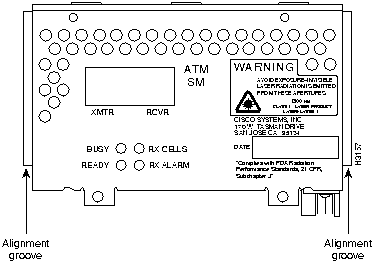
Figure 2-41 ATM Network Processor Module with STS-3c/STM-1 Multimode PLIM
For single- or multi-mode SONET connections, connect the fiber cable to the SC-style receptacle on the module front panel. The SONET SC-duplex connector is shipped with a dust plug. Remove the plug by pulling on the plug as you squeeze the sides of the connector.
![]()
Before unpacking the system, make certain that you are prepared to install it. If the final installation site is not ready, keep the chassis in its shipping container to prevent accidental damage. After determining where you want the system installed, proceed with the unpacking.
The router, cables, publications, and any optional equipment you ordered might be shipped in more than one container. When you unpack each shipping container, check the packing list to ensure that you received all of the following items:
Inspect all items for shipping damage. If anything appears damaged, or if you encounter problems when installing or configuring your system, contact a customer service representative. Also, please complete and mail your Product Registration (found in the Warranty Package).
|
|
Copyright 1988-1995 © Cisco Systems Inc.