Banner
HomeTOCPrevNextGlossSearchHelp

PDF

Table of Contents

Maintaining the Cisco 2500 Series Access Server


Maintaining the Cisco 2500 Series Access Server

Maintaining the Cisco 2500 Series Access Server

This appendix contains information about maintenance procedures you might need to perform on the Cisco 2500 series access server as your internetworking needs change. If any upgrades requiring hardware or software replacement are necessary, a related publication called a configuration note will ship to you automatically with the parts.

This appendix contains the following sections:

Caution Before opening the chassis, ensure that you have discharged all static electricity from your body and be sure the power is off. Before performing any procedures described in this appendix, review the sections "Safety Recommendations," "Maintaining Safety with Electricity," "Preventing Electrostatic Discharge Damage," and "General Site Requirements" in the chapter "Preparing to Install the Cisco 2500 Series Access Server."

fig_4.gif Warning Before working on a chassis or working near power supplies, unplug the power cord on AC units; disconnect the power at the circuit breaker on DC units. (To see translated versions of this warning, refer to the appendix "Translated Safety Warnings.")


Opening the Chassis

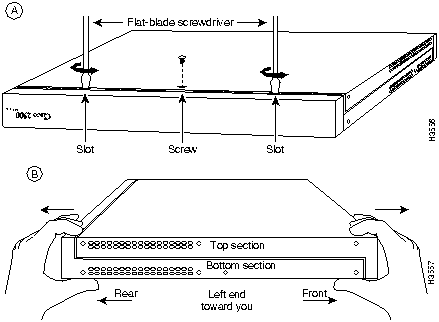
This section describes the procedure for opening the chassis by removing the chassis cover.

fig_5.gif Warning Do not touch the power supply when the power cord is connected. For systems with a power switch, line voltages are present within the power supply even when the power switch is off and the power cord is connected. For systems without a power switch, line voltages are present within the power supply when the power cord is connected. (To see translated versions of this warning, refer to the appendix "Translated Safety Warnings.")

fig_11.gif Warning Do not work on the system or connect or disconnect cables during periods of lightning activity. (To see translated versions of this warning, refer to the appendix "Translated Safety Warnings.")


Tools Required

The following are the tools you will need to open the chassis:


Removing the Cover

You must open the access server chassis to gain access to its interior components: the system card, system code single inline memory modules (SIMMs), and dynamic random access memory (DRAM) SIMMs. Following are the steps required to remove the chassis cover. When opening the chassis, use Parts A and B in Figure B-1 as guides.
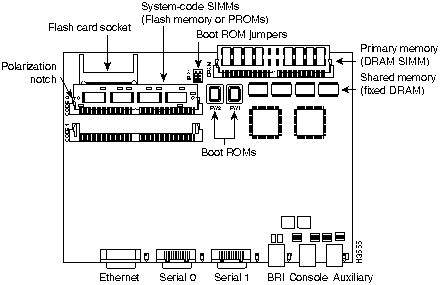
Step 1 Turn OFF the power but, to channel electrostatic discharge (ESD) voltages to ground, do not unplug the power cable.

Step 2 Remove all interface cables from the rear panel of the access server.

Step 3 Turn the unit upside down so that the top of the chassis is resting on a flat surface, and the front of the chassis is toward you. (See Figure B-1, Part A.)

Step 4 Remove the single screw located on the bottom of the chassis (on the chassis side closest to you). Note that the chassis is comprised of two sections: top and bottom.

Step 5 If required, insert a medium-size flat-blade screwdriver into the slots shown in Figure B-1, Part A, and gently rotate the blade so that the top and bottom sections separate slightly.

Step 6 Holding the chassis with both hands, position it as shown in Figure B-1, Part B.

Step 7 Gently pull the top section away from the bottom section. (See Figure B-1, Part B.) The fit is very snug, so it may be necessary to work the chassis sections apart at one end and then the other, working back and forth.

Figure B-1 : Chassis Cover Removal

h3557.gif

Step 8 When the top cover is off, set it aside. Figure B-2 shows the layout of the system card, which is attached to the bottom section of the chassis.

Figure B-2 : System Card Layout---Model 2509

h3555.gif


Upgrading the Boot PROMs

To replace the boot programmable read only memory (PROM) software with a new software image, you need to replace the existing boot PROMs. Table B-1 lists the part numbers you need and indicates their installation socket. The part number is printed on a label attached to the boot PROM.

Table B-1 : Boot PROM Part Numbers and Installation Sockets

Boot PROM Part Number Installation Socket
17-1610-03 FW1
17-1611-03 FW2


Tools and Equipment Required for Replacing the Boot PROMs

The following tools and equipment are required to replace the boot PROMs:


Replacing the Boot PROMs

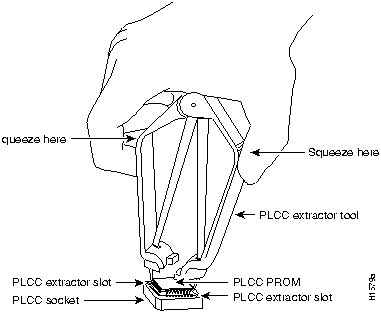
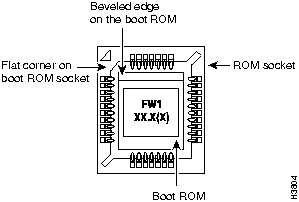
Take the following steps to replace the boot PROMs:

Step 1 To open the chassis and expose the boot PROMs, follow the procedures in the section "Opening the Chassis" earlier in this appendix.

Step 2 Locate the boot PROMs FW1 and FW2 (see Figure B-2).

fig_7.gif Caution The correct placement of the boot PROMs is crucial. If the PROMs are installed in the wrong sockets, they could be damaged when the system is powered on. To prevent damage to the PROMs from ESD (when handling the system and its components), follow the ESD procedures described in the section "Preventing Electrostatic Discharge Damage" in the chapter "Preparing to Install the Cisco 2500 Series Access Server." Also, be careful not to damage or scratch the printed circuit card under the PROMs.

Step 3 Using an EPROM extraction tool or a small flat-blade screwdriver, gently remove the boot PROMs (see Figure B-3) and set them aside on a nonconductive surface.

Figure B-3 : Extracting and Inserting Boot PROMs

h1579.gif

Step 4 Insert each new boot PROM in its socket in the orientation shown in Figure B-4. Insert the new boot ROMs in their respective sockets so that the beveled edge of the ROM chip is on the same side as the flat corner on the ROM socket.

fig_1.gif Caution Boot PROMs should be installed with the printed label side up. Installing boot PROMs with the label side down will result in damage to the PROM (see Figure B-4).

Figure B-4 : Orienting the Boot PROMs to the Socket

h3804.gif

Step 5 Replace the tray assembly and cover following the instructions in the section "Closing the Chassis" later in this appendix.


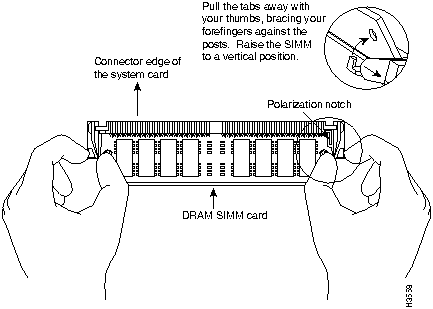
Installing Primary-Memory DRAM SIMMs

The access server contains primary and shared (or packet) memory. Primary memory size, in kilobytes (KB), is displayed in the system banner on the console screen. Primary and shared memory are 1 MB each of the DRAM on the system card.

After booting up, your system will indicate in the system banner the amount of primary memory it has. The following example shows a system with 4 MB (4,096 KB) of primary memory. (The system does not display shared memory.)

System Bootstrap, Version 4.14(8), SOFTWARE
Copyright (c) 1986-1995 by Cisco Systems
2500 processor with 4096 Kbytes of main memory

If you use very large routing tables or many protocols, you might need to expand primary memory. This expansion might be necessary with configurations in which the access server is set up as a connection device between large external networks and your internal network.


Tools and Equipment Required

The following lists the tools required to remove and replace the DRAM SIMMs on the access server:


Primary Memory Configurations

You can upgrade to 4- or 16-MB DRAM; the 4-MB upgrade kit includes one 1 MB x 36 DRAM SIMM, and the 16 MB kit includes one 4 MB x 36 DRAM SIMM. As primary memory is expanded to 4- or 16-MB SIMMs, the 2 MB of permanent memory is allocated as shared memory.


DRAM SIMM Installation

Following is the procedure for installing DRAM SIMMs:

Step 1 Turn OFF power but, to channel ESD voltages to ground, do not unplug the power cord.

Step 2 Attach an ESD-preventive wrist strap.

Step 3 Open the cover according to the procedure in the section "Opening the Chassis" earlier in this appendix.

Step 4 Turn the chassis so the system card is opposite the position shown in Figure B-2, with the primary-memory DRAM SIMM socket toward you.

Step 5 Remove the existing DRAM SIMM by pulling outward on the connectors to unlatch them, as shown in Figure B-5. Be careful not to break the holders on the SIMM connector.

fig_8.gif Caution To prevent damage, do not press on the center of the SIMMs. Handle each SIMM carefully.

Figure B-5 : Removing and Replacing the DRAM SIMM

h3558.gif

Step 6 Using the system card orientation shown in Figure B-5, position the new SIMM so that the polarization notch is located at the right end of the SIMM socket. Note that the orientation of the system card is opposite that shown in Figure B-2.

Step 7 Insert the new DRAM SIMM by sliding the end with the metal fingers into the SIMM connector socket at approximately a 45-degree angle to the system card. Gently rock the SIMM back into place until the latch on either side snaps into place. Do not use excessive force because the connector could break.

Step 8 Replace the access server cover using the procedure in the section "Closing the Chassis" later in this appendix.

Step 9 Connect the access server to a console terminal.

Step 10 Turn on the power to the chassis. If error messages relating to memory are displayed, repeat these steps, taking care to firmly seat the SIMM in its socket.


Replacing System-Code SIMMs

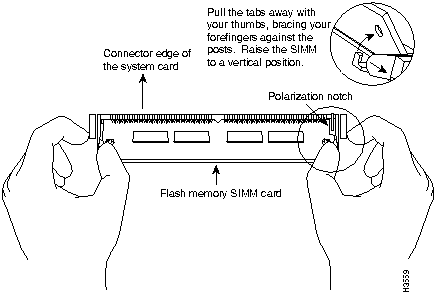
The system code (software) is stored on Flash memory or PROM SIMMs. The 80-pin Flash memory and PROM SIMMs must be purchased from us. Contact a customer service representative for more information.


Note The system code for all the access server models can be contained on either one or two 80-pin Flash memory or PROM SIMMs. If only one 80-pin SIMM socket is populated, it must be the SIMM socket indicated in Figure B-2 (CODE 0).


Tools and Equipment Required

The following lists the tools required to remove and replace the system-code SIMMs on the access server:

Flash memory and PROM SIMMs for the access server are available only from us. Contact a customer service representative for more information.


System-Code SIMM Replacement

Following is the procedure for upgrading the system-code Flash memory or PROM SIMMs:

Step 1 Turn OFF power but, to channel ESD voltages to ground, do not unplug the power cord.

Step 2 Attach an ESD-preventive wrist strap.

Step 3 Open the chassis cover using the tools and procedures in the section "Opening the Chassis" earlier in this appendix.

Step 4 Turn the chassis so that the system card is opposite the position shown in Figure B-2, with the system-code SIMMs toward you.

Step 5 Locate the system-code SIMMs on the system card. The SIMM sockets are labeled CODE 0 and CODE 1 (shown in Figure B-2).

Step 6 Remove the existing system-code SIMM by pulling outward on the connector holders to unlatch them. The connector holds the SIMM tightly, so be careful not to break the holders on the SIMM connector. (See Figure B-6.)

fig_9.gif Caution To prevent damage, do not press on the center of the SIMMs. Handle each SIMM carefully.

Step 7 Repeat these steps for all the system-code SIMMs to be replaced.

Figure B-6 : Removing and Replacing the System-Code SIMM

h3559.gif

Step 8 Using the system card orientation shown in Figure B-6, position the new SIMM so that the polarization notch is located at the right end of the SIMM socket. Note that the orientation of the system card is the opposite of that shown in Figure B-2.

fig_2.gif Caution To prevent damage, note that some Flash SIMMs have the components mounted on the rear side; therefore, when inserting the SIMM, always use the polarization notch as a reference and not the position of the components on the SIMM.

Step 9 Insert the new SIMM by sliding the end with the metal fingers into the appropriate SIMM connector socket (CODE 0 or CODE 1 shown in Figure B-2) at approximately a 45-degree angle to the system card. Gently rock the SIMM back into place until the latch on either side snaps into place. Do not use excessive force because the connector could break.

Step 10 Replace the access server cover using the procedure in the following section, "Closing the Chassis."

Step 11 Connect the access server to a console terminal.

Step 12 Turn on the power to the chassis.

If error messages relating to memory display, repeat these Steps, taking care to firmly seat the SIMM in the socket.


Closing the Chassis

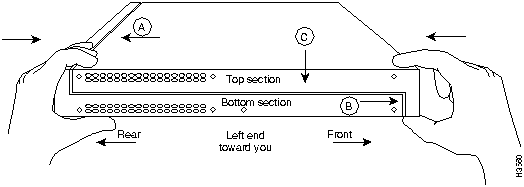
This section describes the procedure for closing the chassis.


Tools Required

Following are the tools required for replacing the cover:


Replacing the Cover

After you perform the maintenance for your system, take the following steps to replace the cover:

Step 1 Position the two chassis sections as shown in Figure B-7.

Step 2 Referring to Figure B-7, press the two chassis sections together and ensure the following:

Caution To fit the two sections together, it may be necessary to work them together at one end and then the other, working back and forth; however, use care to prevent bending of the chassis edges.

Figure B-7 : Replacing the Chassis Cover

h3560.gif

Step 3 When the two sections fit together snugly, turn the chassis so that the bottom is facing up, with the front panel toward you.

Step 4 Replace the cover screw. Tighten the screw to no more than 8 or 9 inch/pounds of torque.

Step 5 Reinstall the chassis on the wall, rack, desktop, or table.

Step 6 Replace all cables.


Recovering a Lost Enable Password

This section describes in outline and then in detail how to recover a lost enable password.


Note Recovering a lost password is possible on the enable password. Systems running Cisco IOS Release 10.3(2) or later use the enable secret password, which is encrypted and must be replaced with a new enable secret. See the section "Hot Tips" on CIO for information on replacing enable secret passwords.

  • Enter the command show version to note the existing virtual configuration register value.

  • Break to the bootstrap program prompt (ROM monitor). This will require a reload of the image.

  • Change the configuration register to 0x142 (ignore break; ignore NVRAM; boot from Flash memory).


Note A key to recovering a lost enable password is to set the configuration register so that the contents of NVRAM are ignored (0x0040), allowing you to see your password.

  • Enter privileged mode in the system bootstrap program.

  • Enter the command show configuration to display the enable password.

  • Change the configuration register value back to its original setting.


Note To recover a lost enable password if Break is disabled on the router, you must have physical access to the access server.

Take the following steps to recover a lost enable password:

Step 1 Attach an ASCII terminal to the access server console port, which is located on the rear panel.

Step 2 Configure the terminal to operate at 9600 baud, 8 data bits, no parity, 2 stop bits.

Step 3 Enter the command show version to display the existing configuration register value.

Step 4 If Break is disabled, power cycle the access server. (Turn the access server off, wait five seconds, and then turn it on again.) If Break is enabled on the access server, send a Break and then proceed to Step 6.

Step 5 Within 60 seconds of turning on the access server, press the Break key. This action causes the terminal to display the bootstrap program prompt (>).

Step 6 To reset the configuration register to boot from the boot ROMs and ignore NVRAM, enter o/r at the bootstrap prompt as follows:


> o/r 0x042

Step 7 Initialize the access server by entering the command initialize as follows:


> i

The access server will power cycle; the configuration register will be set to 0x142; and the access server will boot the boot ROM system image and prompt you with the system configuration dialog as follows:

--- System Configuration Dialog ---

Step 8 Enter no in response to the system configuration dialog prompts until the following system message is displayed:


Press RETURN to get started!

Step 9 Press Return. The boot ROM prompt appears as follows:


Router>

Step 10 Enter the enable command to enter the EXEC mode in the boot ROM image. Then enter the command configure memory as follows:


Router# configure memory

Step 11 Enter the EXEC command configure terminal to display the enable password in the configuration file and to display any boot system commands.


Router# configure terminal

Step 12 Enter the new passwords:


The enable secret is a one-way cryptographic secret used
instead of the enable password when it exists.

Enter enable secret : shovel

The enable password is used when there is no enable secret
and when using older software and some boot images.

Enter enable password : trowel

Step 13 Set the configuration register to boot from Flash memory and to ignore the break key:


config-reg 0x2102

Step 14 Exit configuration mode by pressing Ctrl-Z.

Step 15 Reboot the access server and enter the recovered password.


Virtual Configuration Register Settings

The access server has a 16-bit virtual configuration register, which is written into NVRAM. You might want to change the virtual configuration register settings for the following reasons:

  • Set and display the configuration register value

  • Force the system into the ROM monitor or boot ROM.

  • Select a boot source and default boot filename

  • Enable or disable the Break function

  • Control broadcast addresses

  • Set the console terminal baud rate

  • Recover a lost password (ignore the NVRAM startup-config)

  • Enable booting from a Trivial File Transfer Protocol (TFTP) server

Table B-2 lists the meaning of each of the virtual configuration memory bits and defines the boot field names.

fig_10.gif Caution To avoid confusion and possibly halting the access server, remember that valid configuration register settings might be combinations of settings and not just the individual settings listed in Table B-2. For example, the factory default value of 0x2102 is a combination of settings.

Table B-2 : Virtual Configuration Register Bit Meanings

Bit No.1 Hexadecimal Meaning
00--03 0x0000--0x000F Boot field
06 0x0040 Causes system software to ignore the contents of NVRAM (startup-config)
07 0x0080 OEM bit is enabled
08 0x0100 Break is disabled
10 0x0400 IP broadcast with all zeros
11--12 0x0800--0x1000 Console line speed
13 0x2000 Load the boot ROM software if a Flash boot fails five times
14 0x4000 IP broadcasts do not have network numbers
15 0x8000 Enable diagnostic messages and ignore the contents of NVRAM

1 The factory default value for the configuration register is 0x2102. This value is a combination of the following: bit 13 = 0x2000, bit 8 = 0x0100, and bits 00 through 03 = 0x0002.


Changing Configuration Register Settings

You might want to modify the value of the virtual configuration register for the following reasons:

  • Recover a lost password.

  • Change the console baud rate.

  • Enable or disable Break.

  • Allow you to manually boot the operating system using the b command at the bootstrap program (ROM monitor) prompt.

  • Force the access server to boot automatically from the system bootstrap software (boot ROM image) or from its system image in Flash memory, and read any boot system commands that are stored in the configuration file in NVRAM. If the access server finds no boot system commands, it uses the configuration register value to form a filename from which to boot a default system image stored on a network server.

To change the configuration register while running the system software, take the following steps:

Step 1 Enter the enable command and your password to enter privileged mode:


router> enable
Password:
router#

Step 2 At the privileged-level system prompt (access server #), enter the command configure terminal. You will be prompted as shown in the following example:


router# conf term
Enter configuration commands, one per line.
Edit with DELETE, CTRL/W, and CTRL/U; end with CTRL/Z

Step 3 To set the contents of the configuration register, enter the configuration command config-register value where value is a hexadecimal number preceded by 0x (see Table B-2 and Table B-3):


config-register 0x value

(The virtual configuration register is stored in NVRAM.)

Table B-3 : Explanation of Boot Field (Configuration Register Bits 00 to 03)

Boot Field Boot Process
0x0 Stops the boot process in the ROM monitor
0x1 Stops the boot process in the boot ROM monitor
0x3--0xF Specifies a default filename for booting over the network from a TFTP server
Enables boot system commands that override the default filename for booting over the network from a TFTP server
0x2 Full boot process, load Cisco IOS software in Flash memory

Step 4 Exit configuration mode by pressing Ctrl-Z. The new settings will be saved to memory; however, the new settings do not take effect until the system software is reloaded by rebooting the access server.

Step 5 To display the configuration register value currently in effect and the value that will be used at the next reload, enter the EXEC command show version. The value will be displayed on the last line of the screen display:


Configuration register is 0x142 (will be 0x102 at next reload)

Step 6 Reboot the access server. The new value takes effect. Configuration register changes take effect only when the server restarts, which occurs when you switch the power off and on or when you issue a reload command from the console.


Virtual Configuration Register Bit Meanings

The lowest four bits of the virtual configuration register (bits 3, 2, 1, and 0) form the boot field. (See Table B-3.) The boot field specifies a number in binary form. If you set the boot field value to 0, you must boot the operating system manually by entering the b command at the bootstrap prompt, as follows:

> b [tftp] flash filename

The b command options are as follows:

  • b---Boots the default system software from ROM

  • b flash---Boots the first file in Flash memory

  • b filename [host]---boots from the network using a TFTP server

  • b flash [filename]---Boots the file filename from Flash memory

For more information about the command b [tftp] flash filename, refer to the publication Router Products Configuration Guide.

If you set the boot field value to a value of 0x2 through 0xF, and there is a valid system boot command stored in the configuration file, then the access server boots the system software as directed by that value. If you set the boot field to any other bit pattern, the access server uses the resulting number to form a default boot filename for booting from the network using a TFTP server. (See Table B-4.)

Table B-4 : Default Boot Filenames

Action or Filename Bit 3 Bit 2 Bit 1 Bit 0
bootstrap mode 0 0 0 0
ROM software 0 0 0 1
cisco2-igs 0 0 1 0
cisco3-igs 0 0 1 1
cisco4-igs 0 1 0 0
cisco5-igs 0 1 0 1
cisco6-igs 0 1 1 0
cisco7-igs 0 1 1 1
cisco10-igs 1 0 0 0
cisco11-igs 1 0 0 1
cisco12-igs 1 0 1 0
cisco13-igs 1 0 1 1
cisco14-igs 1 1 0 0
cisco15-igs 1 1 0 1
cisco16-igs 1 1 1 0
cisco17-igs 1 1 1 1

In the following example, the virtual configuration register is set to boot the access server from Flash memory and to ignore Break at the next reboot of the access server:

router# conf term
Enter configuration commands, one per line.
Edit with DELETE, CTRL/W, and CTRL/U; end with CTRL/Z 
config-register 0x102
boot system flash [filename]
^Z
router# 

The server creates a default boot filename as part of the automatic configuration processes. To form the boot filename, the server starts with cisco and links the octal equivalent of the boot field number, a dash, and the processor-type name.


Note A boot system configuration command in the access server configuration in NVRAM overrides the default boot filename.

Bit 8 controls the console Break key. Setting bit 8 (the factory default) causes the processor to ignore the console Break key. Clearing bit 8 causes the processor to interpret the Break key as a command to force the system into the bootstrap monitor, thereby halting normal operation. A break can be sent in the first 60 seconds while the system reboots, regardless of the configuration settings.

Bit 10 controls the host portion of the IP broadcast address. Setting bit 10 causes the processor to use all zeros; clearing bit 10 (the factory default) causes the processor to use all ones. Bit 10 interacts with bit 14, which controls the network and subnet portions of the broadcast address. (See Table B-5.)

Table B-5 : Configuration Register Settings for Broadcast Address Destination

Bit 14 Bit 10 Address (<net> <host>)
Off Off <ones> <ones>
Off On <zeros> <zeros>
On On <net> <zeros>
On Off <net> <ones>

Bits 11 and 12 in the configuration register determine the baud rate of the console terminal.
Table B-6 shows the bit settings for the four available baud rates. (The factory-set default baud rate is 9600.)

Table B-6 : System Console Terminal Baud Rate Settings

Baud Bit 12 Bit 11
9600 0 0
4800 0 1
1200 1 0
2400 1 1

Bit 13 determines the server response to a bootload failure. Setting bit 13 causes the server to load operating software from ROM after five unsuccessful attempts to load a boot file from the network. Clearing bit 13 causes the server to continue attempting to load a boot file from the network indefinitely. By factory default, bit 13 is set to 1.


Enabling Booting from Flash Memory

To disable break and enable the boot system flash command, enter the config-register command with the value shown in the following example:

router# config term
Enter configuration commands, one per line.
Edit with DELETE, CTRL/W, and CTRL/U; end with CTRL/Z
config-reg 0x2102
^Z
router#


Copying to Flash Memory

Copying a new image to Flash memory might be required whenever a new image or maintenance release becomes available. To copy a new image into Flash memory (write to Flash), you must first reboot from ROM and then copy the new image into Flash memory. You cannot copy a new image into Flash memory while the system is running from Flash memory. Use the copy tftp flash command for the copy procedure.

Following is the sample output for reloading the access server and then copying a file (called IJ09140Z) to Flash memory from a TFTP server (called server1):

router# configure terminal
Enter configuration commands, one per line.
  Edit with DELETE, CTRL/W, and CTRL/U; end with CTRL/Z
config-reg 0x2101 
^Z

The configuration register setting 0x2101 tells the system to boot from ROM, but does not reset the break disable or check for a default netboot filename.

router# reload
...
router(boot)# copy tftp flash

IP address or name of remote host [255.255.255.255]? server1
Name of tftp filename to copy into flash []? IJ09140Z
copy IJ09140Z from 131.131.101.101 into flash memory? [confirm] <Return>
xxxxxxxx bytes available for writing without erasure.
erase flash before writing? [confirm] <Return>
Clearing and initializing flash memory (please wait)####...
Loading from 101.2.13.110: !!!!!!!!!!!!!!!!!!!!!!!!!!!!!!!!!!!!
!!!!!!!!!!!!!... [OK - 324572/524212 bytes]
Verifying checksum...
VVVVVVVVVVVVVVVVVVVVVVVVVVVVVVVVVVVVVVVVVVVVVVVVVVVVVVVVVVVVVVVVVVVVVVVV
VVVVVVV...
Flash verification successful. Length = 1204637, checksum = 0x95D9

router(boot)# config term
Enter configuration commands, one per line.
  Edit with DELETE, CTRL/W, and CTRL/U; end with CTRL/Z
config-reg 0x2102 
^Z

The configuration register setting 0x2102 tells the system to boot from ROM if netboot fails, disable break, and check for a default netboot filename.

router(boot)# reload
...

The system is now ready to be configured to boot from the new image you copied to Flash memory. For more information on the copy tftp flash command and other related commands, refer to the publication Access and Communication Servers Configuration Guide.

HomeTOCPrevNextGlossSearchHelp
-

Copyright 1988-1996 © Cisco Systems Inc.