|
|

This appendix gives an introduction to the technologies used in internetworking. It also includes basic information about designing and implementing an internetwork with a Cisco 2500 series access server.
The appendix includes primers on the following topics:
These primers give a brief introduction to the technologies involved in building an internetwork solution. For more information, see the following publications:
This primer will help you become familiar with using Cisco Internetwork Operating System (Cisco IOS) software, including the following features:
Refer to the chapters "Understanding the User Interface," "Loading System Images and Configuration Files," "Configuring Terminal Lines and Modem Support," and "Managing the System" in the publication Access and Communication Servers Configuration Guide.
The Cisco 2500 series access server has several kinds of memory---read-only memory (ROM), Flash memory, nonvolatile random access memory (NVRAM), random access memory (RAM), and shared-packet memory. System software images, configuration files, and transient data structures such as routing tables and packets are stored in memory. Table A-1 lists the different kinds of memory and indicates what they are used for.
Table A-1 Internal Memory Components
| Memory | Purpose |
|---|---|
| ROM | Stores the ROM Monitor, and boot ROM |
| Flash memory | Stores the system image (Cisco IOS) |
| NVRAM | Stores the configuration file (startup-config) |
| RAM | Stores the operating configuration (for example, running-config), routing tables, caches, queues, packets, and so forth |
| Shared packet memory | Stores incoming and outgoing packets |
The show version command displays the capacity of each kind of memory.
Proper operation of the access server requires the following memory configuration:
The access server has three distinct operating environments (see Table A-2).
Table A-2 Cisco IOS Operating Environments
| Operating Environment | Prompt | Configuration Register | Usage |
|---|---|---|---|
| ROM monitor | > | 0x0 | Failure or password recovery |
| Boot ROM | Router(boot)> | 0x1 | Flash image upgrade |
| Cisco IOS | Router> | 0x2102 | Normal operation |
The startup process of the access server normally loads and executes each of the operating environments in turn.
The configuration register can be used by system administrators to control some very low level operations of the access server. When the configuration register is set to specific values (shown in Table A-2), the access server can be instructed to stop the boot process in any of the three operating environments. You modify the configuration register value by using the configuration command config-reg [value].
ROM monitor performs the bootstrap process and provides low-level diagnostics. You cannot use ROM monitor to operate any of the interfaces. You can only access ROM monitor via the console port. Setting the configuration register value to 0x0 and reloading causes the access server to operate in the ROM monitor environment. The ROM monitor is used to recover from system failures, and to recover a lost password.
Boot ROM is used primarily to modify the Cisco IOS image that is loaded into Flash memory. Flash memory is read-only when you are running the Cisco IOS software from Flash memory; boot ROM allows write operations to Flash memory. If you are running in boot ROM, only a limited subset of the Cisco IOS feature set is available. For example, boot ROM does not support IP routing or subinterfaces. You can set the configuration register value to 0x1 and reload to cause the access server to operate in the boot ROM environment.
![]()
You can modify the Cisco IOS image if you are running in boot ROM by entering the command copy tftp flash. You can also modify Flash memory while running from Flash memory by entering the command partition flash or using Flash Load Helper. See the publication Access and Communication Servers Configuration Guide for more information.
Normal operation of your access server requires the Cisco IOS image to be stored and executing in Flash memory. A recommended setting for the configuration register value is 0x2102, which instructs the access server when it boots to do the following:
Enter the command show version to display the Cisco IOS image and version that the access server is running:
Router#show version
Cisco Internetwork Operating System Software
Cisco IOS (tm) 3000 Software (IGS-C-L), Version 10.2(6), RELEASE SOFTWARE
(fc2)
...
The Cisco IOS user interface provides several different command modes. Each command mode provides a group of related commands. Table A-3 summarizes the key command modes and their purpose.
Table A-3 Key Command Modes and Their Purpose
| Command Mode | Prompt | Purpose | How |
|---|---|---|---|
| User EXEC | Router> | User access | First level accessed |
| Privileged EXEC | Router# | System administration | Enter the command enable |
| Configuration mode | Router(config)# | Modify configuration | Enter the command config |
| Setup | Prompted dialog | Create the initial configuration | Enter the command setup |
The command interpreter of Cisco IOS software is called the EXEC. The EXEC interprets the commands you type and carries out the corresponding operations. You must log in to the access server before you can enter an EXEC command. For security purposes, the EXEC has two basic levels of access to commands, user EXEC mode and privileged EXEC mode.
In both EXEC modes, you can find what commands are currently available by entering a question mark (?), as follows:
Router>?
EXEC commands:
  connect          Open a terminal connection
  disconnect       Disconnect an existing network connection
  enable           Turn on privileged commands
  exit             Exit from the EXEC
  help             Description of the interactive help system
...
To display more detail about a command, enter the command followed by a ?, as follows:
Router>connect ?
  WORD  IP address or hostname of a remote system
When you connect to the access server (through a console, a Telnet connection, or a dial-in connection) you are started in user EXEC mode. In general, the user EXEC commands allow you to connect to other network devices, change terminal settings on a temporary basis, perform basic tests, and list system information. The user EXEC commands are a subset of the privileged EXEC commands.
From user EXEC mode, enter the EXEC command enable to enter privileged EXEC mode.
The privileged command set includes all the commands that are available in user EXEC mode plus the configure command, debugging commands, and the setup command. Because many of the privileged commands allow you to set operating system parameters, privileged EXEC mode should be password-protected to prevent unauthorized use (see the section "Using the Enable Secret and the Enable Password," in the chapter "Configuring the Cisco 2500 Series Access Server"). Enter ? to display the privileged commands. Privileged commands include the following:
Enter the command disable to exit from the privileged EXEC mode and return to user EXEC mode.
You use configuration mode to configure the access server. You can use configuration mode for initial setup of the system (using the subcommand setup), as well as to change settings after initial setup, either permanently or temporarily.
Configuration mode has a set of submodes that you use for modifying interface settings, routing protocol settings (such as Interior Gateway Routing Protocol (IGRP), or Open Shortest Path First (OSPF)), line settings, and so forth. Use caution with configuration mode because all changes you enter take effect immediately.
Enter the command configure terminal to enter configuration mode and exit by pressing Ctrl--Z. The following is a sample configuration session:
Router#conf terminal
Enter configuration commands, one per line.  End with CNTL/Z.
Router(config)#hostname RouterA
RouterA(config)#interface e 0
RouterA(config-if)#description Floor 2 LAN
RouterA(config-if)#^Z
RouterA#
You use the setup facility of Cisco IOS software to streamline the creation of configuration files. If Cisco IOS software determines that there is no configuration file stored in NVRAM, it will automatically enter setup mode when the access server boots. (See the section "Configuring the Access Server Manually Using the Setup Facility" in the chapter "Configuring the Cisco 2500 Series Access Server" for more information about the setup command.)
You need to create and store a configuration file in order to use the access server. The configuration file contains commands that enable protocol routing, assign addressing, perform security, and so forth. Use the following privileged mode commands to work with configuration files on the access server:
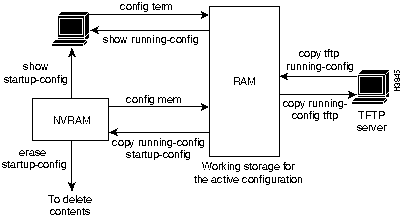
The interaction of the configuration commands is illustrated in Figure A-1.
Figure A-1 Configuration Command Interaction with Cisco IOS Release 11.0
This section briefly describes the common local-area network (LAN) and wide-area network (WAN) technologies you may encounter when you are building an internetwork. An important function of an access server is to interconnect LANs and WANs.
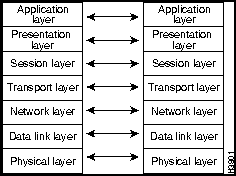
To understand LANs and WANs, you should be familiar with the Open System Interconnection (OSI) reference model of networks. The OSI reference model is a seven-layer model designed by the International Organization for Standardization (ISO) and the International Telecommunications Union Standardization Sector (ITU-T) to aid in the development and understanding of computer networking and communications. The OSI reference model divides the issue of moving information between computers into seven layers.
Each layer of the OSI reference model specifies particular network functions such as addressing, flow control, error control, encapsulation, reliable message transfer, and data representation. The upper layer (the application layer) is closest to the user; the lowest layer (the physical layer) is the closest to the cables and wires.
Each layer of the OSI reference model relies on the layers below, and offers its services to the layers above.Table A-4 summarizes the layers and their functionality.
Table A-4 OSI Reference Model of Networks
| Layer | Title | Purpose | Example |
|---|---|---|---|
| 7 | Application | Services to users | File transfer, e-mail, virtual terminals |
| 6 | Presentation | Data representations | ASCII text, EBCDIC(1), ASN.1 |
| 5 | Session | Control of sessions | Printing, file sharing |
| 4 | Transport | Reliable delivery of packets over networks | TCP(2), SPX(3), ATP(4), and ADSP(5) |
| 3 | Network | Logical addressing, routing | IP, IPX(6), AppleTalk DDP(7) |
| 2 | Data link | Physical addressing, topology (bus or ring), line access method | Ethernet, Token Ring, HDLC(8), PPP(9) |
| 1 | Physical | Electrical, mechanical | 10BaseT, 10Base2 |
LANs and WANs are generally defined by the lower two layers of the OSI reference model. Higher layer protocols (such as TCP/IP, IPX, or AppleTalk) can use the foundation laid at the lower layers to transport data between network devices.
For example, the IEEE standard 802.3 (Ethernet) defines the physical layer (connectors, voltages, and binary logic to enable communication) as well as the data link layer (framing data structures, addressing packets for local delivery, and error checking).
Once the physical and data link layers are installed in a network and working correctly, the network layer and its associated devices can use these services to route packets efficiently across the room or around the world.
Building a network involves understanding the OSI reference model in each portion of the network. Sketching the model out on paper is a great help in designing, administering, and troubleshooting networks. (See Figure A-2.)
Figure A-2 The OSI Reference Model
LANs operate at Layer 1 (the physical layer) and Layer 2 (the data link layer) and are usually used to connect computing devices within a single building. For example, a LAN in a small office may include three PCs, a print server, and a file server.
The three most common physical LAN implementations are Ethernet, Token Ring, and Fiber Distributed Data Interface (FDDI). These implementations have been standardized by Institute of Electrical and Electronic Engineers (IEEE) and the American National Standards Institute (ANSI).
The IEEE has established Ethernet as standard 802.3. Ethernet uses a 10-Mbps bus. Ethernet LANs use carrier sense multiple access collision detect (CSMA/CD) for bus access control. Several physical layer implementations have been established for Ethernet; the more common implementations are as follows:
Special configuration commands are not required for the Ethernet interface on the Cisco 2500 series access server. The Ethernet configuration commands are as follows:
The IEEE has established Token Ring as standard 802.5. Different physical implementations of Token Ring are available, including variations on shielded twisted-pair (STP) and UTP cabling. Token Ring is very common in IBM environments.
Token Ring can operate at two different ring speeds: 4 Mbps and 16 Mbps. All devices on the ring must agree on the operating speed.
The only option you must configure Token Ring interfaces is the ring speed. The following example shows the commands you typically enter to configure the ring speed on a Token Ring network:
Router(config)#         interface tokenring 0
Router(config-if)# ring-speed 16
Other useful commands are:
![]()
The data link layer defines an addressing scheme that is used by all LAN devices. A device's address is generally burned into the chips on the network interface components that connect the device to the LAN. These addresses are 48-bits in length, which is represented by a hexadecimal string (for example, 0000.0C0A.3E2E).
The IEEE provides each manufacturer of network interface cards with a block of addresses, and the manufacturers program the cards they make with these unique addresses. These addresses are called Media Access Control (MAC) addresses, since MAC is a sublayer within Layer 2 of the OSI reference model.
Cisco products use addresses from the pool 0000.0Cxx.xxxx for all devices and all interfaces. Enter the EXEC command show interface to see the Layer 2 address:
Router# show interface
Ethernet0 is up, line protocol is up
  Hardware is Lance, address is 0000.0c14.2622 (bia 0000.0c14.2622)
In addition to data link layer addressing, network protocols (Layer 3) were developed to allow more precise delivery of packets (or routing), within a larger internetwork. This strategy is similar to the post office's method of delivering mail. Everyone has a name (like a MAC address), but that is not enough information to route letters efficiently. Zip codes (like Layer 3 addresses) help mail reach its exact destination more efficiently by routing them through the national mail infrastructure.
You can use data link layer bridges to extend the physical distance limitations of LANs. (See Figure A-3.) It is important to note that the network layer logical addressing is not affected by bridges, and network layer devices (such as access servers and routers) treat a bridged Ethernet or bridged Token Ring as one data link for addressing purposes. The two common kinds of bridges are transparent and source-route bridges.
Figure A-3 Two LANs Connected with a Bridge to Form Network 2

Translational bridging between two dissimilar LANs such as a Token Ring LAN and an Ethernet LAN can cause problems for some Layer 3 protocols like AppleTalk and IPX. Translational bridging should only be implemented after careful design consideration.
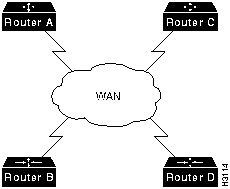
WANs connect networks together across longer distances, such as between cities, or across continents. Figure A-4 illustrates a typical WAN architecture.
Figure A-4 A Typical WAN Architecture

Most WANs require an interconnection that is provided by a communications service provider, such as a phone company. This physical layer uses many of the technologies that have evolved over the last few decades for carrying voice communications. The service provider circuit typically terminates at a channel service unit (CSU) at the customer site.
Two communicating devices on a synchronous serial cable, such as a CSU and an access server, must agree on which device will provide the clocking for data transmission timing. That device (typically an external channel service unit/data service unit [CSU/DSU]) is called data circuit-terminating equipment (DCE). The other device will be data terminal equipment (DTE), and is usually an access server or router. The physical layer connectors (such as EIA/TIA-232 or V.35) together with the mode (DTE or DCE) will determine the required pinout on the cable connecting the two devices. (See Figure A-5.)
Figure A-5 Master Clock Timing
![]()
Some WAN technologies, such as Frame Relay, Switched Multimegabit Data Service (SMDS), or X.25, reuse the DTE and DCE terminology at Layer 2. The DTE/DCE mode at Layer 1 is independent of the DTE/DCE mode at Layer 2. For example, It is possible for a single device to be a V.35 DTE and a Frame Relay DCE concurrently.
If the access server is configured as a DTE (default) and is correctly receiving clocking and Carrier Detect (CD) signals from the CSU, the command show interface will display the following information:
Router#         sh interface
Serial0 is up, line protocol is down
The WAN data link layer (Layer 2), defines how data is formatted, or framed, for transmission to remote sites. This formatting is referred to as encapsulation. Common WAN encapsulations include High-Level Data Link Control (HDLC), Point-to-Point protocol (PPP), Frame Relay, and SMDS.
WAN Layer 2 technologies can be grouped into two categories: point-to-point HDLC and PPP) and multipoint (Frame Relay, SMDS, X.25, and Asynchronous Transfer Mode (ATM)). Each category has its own specific design considerations. Multipoint technologies can also be used in point-to-point topologies.
Point-to-point WANs only allow two endnodes on the WAN connection (as shown in Figure A-6). The two common point-to-point WAN encapsulations are HDLC and PPP. Because there are only two devices, there is no need for addressing at the data link layer. Point-to-point encapsulations are generally used on leased WAN lines.

If both ends of a leased-line connection are routers or access servers running Cisco IOS software, HDLC encapsulation is typically used. As HDLC encapsulation methods may vary, use PPP with devices that are not running Cisco IOS software.
HDLC is a bit-oriented, data link layer protocol derived from the Synchronous Data Link Control (SDLC) encapsulation protocol. HDLC provides an encapsulation method for synchronous serial links with a 32-bit checksum.
The serial interface on the access server does not require special configuration because HDLC encapsulation is configured as the default.
PPP encapsulation provides Cisco IOS software to devices that are not running Cisco IOS software, connectivity over leased WAN lines. PPP uses a more complex model than HDLC to ensure interoperability between networking vendors. This interoperability involves several additional protocols, including the following:
When the PPP link is negotiated, a link control protocol is negotiated to establish the link and then additional network control protocols are negotiated. If IP, AppleTalk, or IPX, are configured on the serial line, IP control protocol (IPCP), AppleTalk control protocol (ATCP), or IPX control protocol (IPXCP), respectively, is negotiated to conform to the protocols requirements.
Enter the command show interface to check the status of the link control protocol and the network control protocol, and test the interoperability of the network layers. There are also excellent debug ppp commands for troubleshooting. (See the publication Access and Communication Servers Command Reference.)
To configure the serial line to use PPP, enter the interface subcommand encapsulation ppp as follows:
Router(config)# interface s0
Router(config-if)# encapsulation ppp
Advances in technology over the last decade have resulted in a number of additional WAN solutions being available to network designers. These sections include multipoint WAN technologies such as Frame Relay, SMDS, X.25, and ATM. (See Figure A-7.)
Selection of an appropriate WAN solutions should involve a discussion of the costs and benefits of each with your network designer and service providers.
Frame Relay is a packet-switching data communications technology that can connect multiple network devices on a multipoint WAN. The design of Frame Relay WANs can have impact on aspects of higher layer protocols such as IP, IPX, and AppleTalk (for example, the split-horizon aspect of routing protocols). Frame Relay is called a nonbroadcast multiaccess technology, because there is no broadcast channel. Broadcasts are transmitted by sending packets to all network destinations.
Two common topologies that can be used in a Frame Relay solution:
Frame Relay WANs should be carefully designed with the above considerations in mind. (see the publication Internetwork Design Guide).
Dial-on-demand routing (DDR) enables you to make a standard telephone connection or an Integrated Services Digital Network (ISDN) connection only when required by the volume of network traffic. DDR may be less expensive than a leased-line or multipoint solutions.
See the publication Access and Communication Servers Configuration Guide for assistance in selecting, designing, and configuring dial-on-demand solutions.
Desktop protocols are the network layer protocols that are commonly used by desktop workstations and are supported by the Cisco 2500 series access server. This section briefly describes the three most common desktop protocols---IP, IPX, and AppleTalk.
Network designers and administrators should be familiar with which networking functions are performed by the data link layer (Layer 2) and which are performed by the network layer (Layer 3) of the OSI reference model. For more information about the OSI reference model, see the section "LANs and WANs" earlier in this appendix.
IP, IPX, and AppleTalk are all defined as routed (or routable) protocols. The unique numbering of each network (data link) and the addressing of each data packet based on this numbering allow efficient packet routing through the internetwork. This is similar to the use of zip codes to allow efficient routing of mail through the national mail infrastructure.
This section includes the following information:
Each of these three desktop protocols was designed with a common set of goals---unique network numbering, node addressing, and data link address resolution, routing protocols, and directory services. Understanding these goals, and how each desktop protocol solves each goal, aids in the understanding, building, and administration of internetworks.
Every data link in your internetwork is given a unique network number. Every LAN (Ethernet or Token Ring), and WAN is assigned its own unique network number for identification. A bridged or switched LAN is only one network from the perspective of a network protocol. Routers and access servers use these network numbers to route packets within an internetwork. IP, IPX, and AppleTalk all use a similar model for assigning each distinct network a unique network number. Network administrators must develop a numbering plan for each protocol and control assignment of the unique network numbering. Duplicate network numbers in a routed network will cause loss of connectivity.
More than one protocol can be implemented on a network. The numbering plan for each network protocol is independent of the numbering plan used by other network protocols.
Figure A-8 illustrates a numbering plan for IP, IPX, and AppleTalk networks.
Figure A-8 Network Numbering Plan for IP, IPX, and AppleTalk
Each network protocol needs to able to uniquely address each node on a network. This network layer node address may be the same as, or independent of, the already unique data link layer address.
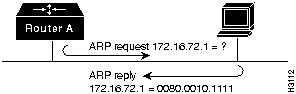
Once a packet has been routed to the correct network (data link), based on the network number, it must be delivered to the correct node. Delivery of the packet on a network is done using the Layer 2 (data link layer) address. A companion protocol performs resolution of Layer 3 node address to the Layer 2 data link address. This companion protocol is called the Address Resolution Protocol (ARP) for IP and AppleTalk Address Resolution Protocol (AARP) for AppleTalk. IP and AppleTalk both use ARPs but IPX does not, because the IPX 48-bit node address is always the same as the 48-bit data link address. The ARP must be working correctly in order to maintain connectivity between the devices in an internetwork.
The ARP (or AARP) address mapping process is illustrated in Figure A-9 and works as follows:
Figure A-9 Address Resolution Protocol Mapping Process
Each network protocol has associated routing protocols that access servers and routers use to share information about network topologies. Over time, a number of routing protocol choices have evolved for each network protocol. Network designers should select the routing protocol for each network protocol.
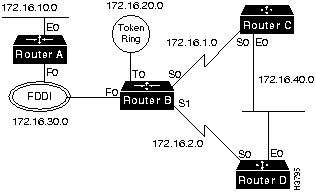
The function of the routing protocol is to build a complete routing table in each access server or router. The routing table is a pointer to every network in an internetwork. For example, the IP routing table for Router B in Figure A-8 might look as follows:
network       cost       next hop      interface
172.16.10.0   01         RouterA       f0
172.16.20.0   00         connected     t0
172.16.30.0   00         connected     f0
172.16.1.0    00         connected     s0
172.16.2.0    00         connected     s1
172.16.40.0   01         RouterC       s0
172.16.40.0   01         RouterD       s1
In order to achieve two-way connectivity between two end nodes and therefore the ability to exchange packets on an internetwork, every access server or router in the path between the nodes must have a routing table entry that describes how to forward a packet addressed to both nodes. Connectivity also depends on the correct operation of ARP to deliver the packet within the networks at either end of the packet's path.
Nodes on an internetwork use directory services to locate specific services such as file servers, printers, and e-mail servers. Each protocol (IP, IPX, and AppleTalk) has a unique way of doing this. For IPX and AppleTalk, support of directory services is a critical part of the design considerations.
IP is used by the Internet (the world's largest internetwork, which connects thousands of networks worldwide) and within many companies. Its addressing scheme scales well for global addressing although, like the telephone industry, address space is running out.
IP uses centrally administered major network numbers to allow internetworks to connect to the Internet. If you require Internet connectivity, you will need to get network address space from an organization called the InterNIC (the InterNIC controls address allocation for the Internet). If you do not plan to have Internet connectivity, or if you have limited assigned address space, see RFC 1597 for numbering suggestions.
Design and administration of an IP network requires an understanding of IP subnetting. Review the document Beginning IP for New Users which is available on CCO to ensure basic familiarity with the concepts of IP subnetting.
The IP address space is 32 bits long and is used to represent both the network and the node. An IP address is written as four decimal numbers separated by dots (called dotted decimal notation); for example, 172.16.10.1. Each of the four numbers is called an octet because it represents 8 bits, and each octet has a maximum value of 255. For routing purposes, the IP address is broken into three parts: major network, subnet, and node. (See Figure A-10.)
Figure A-10 IP Address Broken into Network, Subnet, and Node Fields
![]()
Major networks are allocated by the InterNIC to identify different internetworks that are connecting to the Internet. Subnets are used to number each data link (network) within an internetwork, and the bits to the right of the subnet field are used for the node address.
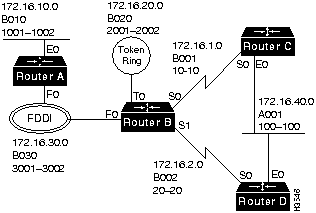
In Figure A-11, the major network is the class B network, 172.16.0.0. The subnet mask is 255.255.255.0. Networks are uniquely numbered at the third octet. In Figure A-11, subnets 1, 2, 10, 20, 30, and 40 have been assigned to the distinct networks.
Figure A-11 IP Subnetting Plan
IP uses the bits to the right of the subnet mask to uniquely number each node on the network. These addresses are configured manually by the system administrator. Access servers and routers are also nodes, and require unique node addresses. In Figure A-11, the fourth octet is used to number the nodes on a subnet, which permits up to 254 nodes on each subnet (0 and 255 are reserved numbers).
IP ARP requires no special configuration, and will automatically perform Layer 2 address resolution for IP. Enter the command show arp to check the ARP table on the access server.
There are several routing protocol options for IP. Network designers should select which routing protocol to use, taking into consideration such factors as interoperability, convergence, performance, support of variable length subnet masks (VLSMs), and protocol overhead.
The IP routing protocol options are as follows:
Enter the command show ip route to examine the IP routing table.
The directory service used with IP is called Domain Name System (DNS). DNS resolves names into IP addresses. Some useful configuration commands used with DNS are as follows:
The IP configuration of Router C in Figure A-11 is as follows:
interface ethernet 0
ip address 172.16.40.1 255.255.255.0
!
interface serial 0
ip address 172.16.1.1 255.255.255.0
!
router igrp 1
network 172.16.0.0
!
ip name-server 172.16.10.100
Because Router D and Router C share a data link, they must agree on the IP network and the subnet used on that data link, but they must have unique node numbers. The serial link used by Router D is distinct from the serial link used by Router C, so it uses a unique subnet number.
The IP configuration of Router D in Figure A-11 is as follows:
interface ethernet 0
ip address 172.16.40.2 255.255.255.0
!
interface serial 0
ip address 172.16.2.1 255.255.255.0
!
router igrp 1
network 172.16.0.0
!
ip name-server 172.16.10.100
Internetwork Packet Exchange (IPX) is the Layer 3 protocol developed by Novell to deliver packets within a Novell internetwork.
The configuration command ipx routing is used to enable IPX routing on the Cisco IOS software.
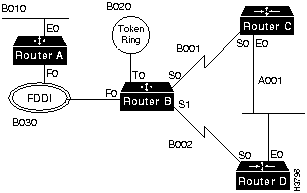
IPX uses 32-bit network numbers to uniquely identify each data link in an IPX internetwork. An example Novell network numbering plan is shown in Figure A-12.
Figure A-12 IPX Network Numbering Plan
IPX uses a 48-bit address for the node. The IPX device will use the data link address of one interface as its IPX node address. Because the Layer 3 address is the same as the Layer 2 address, there is no need for an ARP process to perform network-to-data link layer address resolution.
Cisco IOS software supports the following IPX routing protocols:
IPX RIP is enabled by default. Enter the EXEC command sh ipx route to examine the IPX routing table in an access server running Cisco IOS software.
Novell servers advertise their presence throughout the IPX internetwork with the Service Advertisement Protocol (SAP). Novell servers include file servers, print servers, and directory servers. Each type of server is advertised by a SAP type number as well as its IPX address.
SAP works like a distance vector routing protocol. Access servers and routers running IPX build server tables based on the SAPs they have received, and they advertise the servers they know to others with SAPs. Enter the command show ipx servers to see the server table in an access server running Cisco IOS software.
When an IPX client starts up, it sends a Get Nearest Server (GNS) request on its connected data link to locate the nearest Novell server. If there are no Novell servers on that data link, the access server responds with the best available server (based on cost) in its server table.
Cisco IOS software has many features to control SAP overhead and GNS functionality. No special configuration is required for standard SAP and GNS support.
Novell has defined four distinct encapsulations, or formats, for placing frames on a data link such as Ethernet. In order for two or more IPX devices on a data link to communicate, they must use the same encapsulation. Encapsulation on distinct data links do not have to agree in order to maintain connectivity. You must determine the encapsulation that will be used on each data link and network.
Table A-5 shows the four kinds of encapsulation available on Ethernet networks.
Table A-5 Ethernet Encapsulation Keywords
| Novell Term | Cisco Term | Common Term |
|---|---|---|
| Ethernet_II | arpa | Ethernet |
| Ethernet_802.3 | novell-ether | raw |
| Ethernet_802.2 | sap | 802.2 |
| Ethernet_SNAP | snap | snap |
For Novell NetWare 3.x and earlier versions, the default encapsulation was Ethernet_II. As of Netware 4.x, the default encapsulation is Ethernet_802.2.
In the example in Figure A-12, all Novell networks use SAP, or 802.2, except B010 which uses ARP for compatibility with older devices on the LAN links. These encapsulation issues do not apply to the WAN links.
The IPX configuration of Router C in Figure A-12 is as follows:
ipx routing
!
interface ethernet 0
ipx network A001 encapsulation sap
!
interface serial 0
ipx network B001
The IPX configuration of Router D in Figure A-12 is as follows:
ipx routing
!
interface ethernet 0
ipx network A001 encapsulation sap
!
interface serial 0
ipx network B002
The AppleTalk protocol uses Datagram Delivery Protocol (DDP) at the network layer for addressing. Enter the configuration command appletalk routing to enable AppleTalk. Cisco IOS support of AppleTalk has extensive features and functionality that are not covered in this appendix.
AppleTalk uses a 16-bit number to uniquely identify networks. There are two kinds of AppleTalk networks, extended and nonextended. Extended networks are used for all LANs and most WANs.
A single network number, such as 200, identifies a nonextended AppleTalk network. Nonextended networks can have a maximum of 253 nodes and a single zone name. See the section "AppleTalk Directory Services" later in this appendix for information on zones.
Nonextended networks are rarely used unless they are required for such support as a Phase 1 Ethernet (which is now obsolete), X.25, or LocalTalk.
Extended networks allow a cable range that consists of one or more network numbers, such as 200-201, to be defined and used by nodes on that network.
The access server plays no role in routing packets between network numbers in a range as all the nodes know the full range of numbers that define the local data link.
![]()
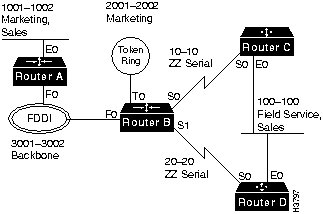
Figure A-13 shows a sample AppleTalk network numbering and zone naming plan. Zones are described in the section "AppleTalk Directory Services" later in this appendix.
Figure A-13 AppleTalk Numbering and Zone Naming Plan
The AppleTalk node address is an eight-bit number. AppleTalk devices will dynamically find a free node address on startup using an extension of the AARP. You do not need to perform any node address adminstration.
When you are using dialer maps (for dial-on-demand routing) or some multipoint WAN data links, it is useful to tell the access server what node address to use. This can be done using an optional field on the appletalk cable-range command as follows:
appletalk cable-range 3-4 1.129
AARP is used to resolve network layer node addresses with data link addresses. Enter the command show apple arp to examine the AARP table.
Several AppleTalk routing protocols are available, including the following:
The default AppleTalk routing protocol on the access server is RTMP. RTMP is a distance vector algorithm that advertises known extended and nonextended networks in the internetwork at ten-second intervals. AppleTalk nodes expect to see RTMP packets on the LAN in order to locate access servers and routers that are routing AppleTalk. Enter the command show apple route to examine the AppleTalk routing table.
AppleTalk directory services account for a significant portion of the functionality and usability of AppleTalk. AppleTalk directory services work as follows:
When an AppleTalk node needs directory services, it will ask a local access server or router routing AppleTalk to execute a lookup. For example, to find LaserWriters in the zone Marketing, the access server or router will create a packet destined for each network that has the zone Marketing assigned. Any device that matches this criterion will reply with its address. Once the device is selected and the address is obtained, the routing takes place on the network layer addresses, and the zone name is no longer involved in the connection.
In order to configure AppleTalk correctly, all AppleTalk access server or router interfaces on a data link must agree on the assigned cable range, default zone, and any additional zones. If there are any conflicts when a new router or access server using AppleTalk attempts to connect to the network, the interface will not enable AppleTalk and will report a port configuration mismatch. Enter the EXEC command show apple interface to confirm correct startup.
Zones should be named for ease of use. Zone names are logical and do not need to be unique, allowing logical groupings of users across diverse geographic locations. Because WAN links offer no AppleTalk services, you should name them to appear at the bottom of the Macintosh Chooser with a name such as "ZZ Serial."
For example, in Figure A-13, the following zone name assignments are used:
| cable-range | default zone | additional zones |
| 100--100 | Field Service | Sales |
| 1001--1002 | Marketing | Sales |
| 2001--2002 | Marketing | |
| 3001--3002 | Backbone | |
| 10--10 | ZZ Serial | |
| 20--20 | ZZ Serial |
Using the zone name assignments above will cause each access server or router in the AppleTalk internetwork to build a zone information table that looks like this:
| Marketing | 1001--1002 | 2001--2002 |
| Sales | 1001--1002 | 100--100 |
| Backbone | 3001--3002 | |
| Field Service | 100-100 | |
| ZZ Serial | 10--10 | 20--20 |
Enter the command show apple zone to look at the zone information table of the access server or router.
When a node lookup request comes in for the zone Marketing, the device routing AppleTalk will create two packets for forwarding, one for network 1001--1002 and one for network 2001--2002.
The AppleTalk configuration of Router C in Figure A-13 is as follows:
appletalk routing
!
interface ethernet 0
appletalk cable-range 100-100
appletalk zone Field Office
appletalk zone Sales
!
interface serial 0
appletalk cable-range 10-10
appletalk zone ZZ Serial
The AppleTalk configuration of Router D in Figure A-13 is as follows:
appletalk routing
!
interface ethernet 0
appletalk cable-range 100-100
appletalk zone Field Office
appletalk zone Sales
!
interface serial 0
appletalk cable-range 20-20
appletalk zone ZZ Serial
Modems are used with access servers to allow remote nodes and remote LANs to connect to internetworks across Public Switched Telephone Networks (PSTNs). (See Figure A-14.) This section contains the following sections:
Dialup access to an internetwork is achieved via modems connected to the asynchronous port of the access server. Before services such as remote node, remote LAN, and terminal services can be utilized by a remote device, the modem and access server must be configured to provide a reliable point-to-point WAN link. This section provides the background information the is required to resolve modem configuration issues, and step you through a modem setup.
Figure A-14 Connection Between an Access Server and a Modem

This section discusses the EIA/TIA-232 implementation in detail as it applies to connecting the access server with the modem. On an EIA/TIA-232 connection between an access server and a modem, the access server is defined as data terminal equipment (DTE) and the modem is defined as data circuit-terminating equipment (DCE).
The access server uses high-density, 68-pin connectors with an 8-connector breakout cable (with RJ-45 connectors) for its asynchronous ports. To connect to a modem, an MMOD type RJ-45-to-DB-25 adapter is used. The MMOD adapter is labelled "MODEM." (For connecting a modem on the auxiliary port, use an RJ-45 roll-over cable and an MMOD adapter.) For additional information about supported cabling configurations, see the appendix "Cable Specifications."
The EIA/TIA-232 cabling uses three pairs of wires (plus grounding) to connect the modem (DCE) to the access server (DTE). In each pair, one wire is used as output and one as input on each end. The three wire pairs are used for the following purposes:
Table A-6 lists the signal flow between the two devices and their function for modem communications.
Table A-6 EIA/TIA-232 Signals and Functions
| Signal Name | Asynchronous Port (DTE) | Modem (DCE) | Function |
|---|---|---|---|
| Transmit Data (TX) | Output | Input | DTE transmits data to DCE. |
| Receive Data (RX) | Input | Output | DCE transmits received data to DTE. |
| Request To Send (RTS) | Output | Input | DTE signals to DCE it can continue to accept data into its buffers. |
| Clear To Send (CTS) | Input | Output | DCE signals to DTE that it can continue to accept data into its buffers. |
| Data Terminal Ready (DTR) | Output | Input | DTE indicates to DCE that it can accept a call. Lowering and raising instructs DCE to drop the active call and return to the stored configuration. |
| Data Carrier Detect (DCD) (Connected to DSR input on access server.) |
Input | Output | DCE indicates to DTE that a call is now present and established with a remote modem. Dropping DCD terminates the session. |
Both the access server and the modem must be configured for correct operation on each of the pairs of wires. Understanding the configuration concerns for these signals simplifies modem setup and troubleshooting.
The data transfer wire pair is used for the transmission of user data (characters and packets) between the access server and the modem. The conditions that must be met when setting data transfer speeds are as follows:
Hardware flow control is used between the access server and the modem to start and stop data transfer on the TX/RX wire pair. Hardware flow control is used to prevent the loss of data when buffers are full. Hardware flow control is controlled on the RTS/CTS wire pair. The conditions that must be met when setting hardware flow control are as follows:
Modem control is used between the access server and the modem to initiate and end calls. Modem control is performed on the DTR/DCD wire pair. The conditions that must be met when setting modem control are as follows:
This section describes how to configure the Cisco 2500 series access server for use with a modem, and includes information on configuring the line and security commands.
Full configuration of an access server asynchronous port requires the configuration of two entities---the line and the asynchronous interface. The asynchronous interface is created and configured for support of Serial Line Internet Protocol (SLIP) and PPP. (See the section "Asynchronous Protocols" later in this appendix.)
The goal of line configuration is to prepare the line to test dial-in access to an EXEC session. In the following example, lines 1 through 8 are configured:
Router# conf terminal
Enter one configuration command per line.  End with CNTL-Z.
Router(config)# line 1 8
Router(config-line)#
Router(config-line)# speed 57600
Router(config-line)# flowcontrol hardware
Router(config-line)# modem inout
Router(config-line)#
Setting the speed at 115200 may offer higher throughput depending on modem speed and compression achieved. Troubleshooting should include testing at lower speeds.
The command modem ri-is-cd can be used instead of the command modem inout to enhance security by not allow outgoing connections from the access server to the modem. Enter the command modem inout during setup to allow configuration of the modem from the access server, changing to the command modem ri-is-cd when testing is completed, if desired.
Security allows you to control access to the access server and its services. Each line should be configured with security. The following are some of the available security commands for protection of the EXEC sessions:
The command username name password password is used for local login (using the command loginlocal), and protocol-specific (AppleTalk Remote Access (ARA), CHAP, and so forth) security.
The login tacacs command allows for centralized and enhanced security with a Terminal Access Controller Access System (TACACS) server.
Use one of the login line subcommands from Table A-7 to control access to your EXEC session.
Table A-7 Login Line Subcommand Options
| Line subcommand | Security Prompts | Function |
|---|---|---|
| no login | None | No security |
| login | Password: | Check the line subcommand password |
| login local | Username:Password: | Check the global username/password database in configuration mode |
| login tacacs | Username:Password: | Check the TACACS server(1) |
Configure security as follows:
Router(config)#username meredith password 123xyz
Router(config)#line 1 8
Router(config-line)#login local
With this configuration, the sign-on dialog from the remote PC appears as follows:
atdt5551234
CONNECT 14400/ARQ/V32/LAPM/V42BIS
User Access Verification
Username: meredith
Password:
Router>
You must establish communication with your modem before you can configure it, which requires terminal access to the modem's command environment. The access server's reverse Telnet feature is used to communicate with the modem. This section explains how to use reverse Telnet to access the modem.
To initiate a reverse Telnet, determine the IP address of your LAN (Ethernet) interface, then enter a Telnet command to port 2000 + n on the access server, where n is the line number for the modem to be configured. For example, to connect to the modem on line 1, enter the following command from an EXEC session on the access server:
Router# telnet 172.16.1.10 2001
Trying 172.16.1.10, 2001 ... Open
You can now communicate with the modem on line 1 using the at command set as defined by the modem vendor.
![]()
If you are unable to connect to the modem, check the following:
Modem state: Idle
Modem hardware state: CTS noDSR  DTR RTS
After connecting to the modem with a reverse Telnet, you need to test the connection. Send the modem the at command to request its attention. It should respond with OK:
at
OK
If the modem does not reply to the at command, check the following:
The reverse Telnet must be terminated before the line can accept incoming calls. If you don't terminate the session, it will be indicated in the output of the command show users, when it returns a modem state of ready if the line is still in use. If the line is no longer in use, the output of the command show line value will return a state of idle.
Terminating the Telnet session requires first suspending it, then disconnecting it. To suspend a Telnet session, enter the escape sequence Ctrl-Shift-6-x. You can then enter the EXEC command disc to terminate the telnet session.
An example of how to use reverse Telnet to communicate with a modem follows:
Router#telnet 172.16.1.10 2001
Trying 172.16.1.10, 2001 ... Open
at
OK
- suspend keystroke -
Router#
Router#where
Conn Host                Address             Byte  Idle Conn Name
*  1 172.16.1.10         172.16.1.10            0     0 172.16.1.10
Router#disc
Closing connection to 172.16.1.10 [confirm]y
Router#
After you have established and tested the connection to the modem, you can proceed with configuring the modem.
A modem initialization string is a series of parameter settings that is sent to your modem to configure it for the desired operation. In this section, you will determine the correct initialization string for your modem and configure your modem with it.
Modem command sets vary widely. Although most modems use the Hayes command set (prefixing commands with at), Hayes-compatible modems do not use identical at command sets.
Refer to your modem manufacturer's documentation to learn how to examine the current and stored configuration of the modem you are using. Normally, you enter at commands such as &v, i4, or *o to view, inspect, or observe the settings.
The initialization string is used to configure the modem for use. A sample modem initialization string for a US Robotics Courier modem would be as follows:
&b1&h1&r2&c1&d3&m4&k1s0=1
![]()
Lock the EIA/TIA-232 port speed of the modem to the port speed of the Cisco 2500 series access server. This speed must not change when a session is negotiated with a remote modem. If the speed of the port on the access server is changed, you must perform a reverse Telnet to the modem and send an at command for the modem to learn the new speed.
Modems differ in the method they use to lock the EIA/TIA-232 speed. In the modem documentation, vendors use terms such as, port-rate adjust, speed conversion, or buffered mode. Enabling error correction will often put the modem in the buffered mode. Refer to your modem documentation (check the settings &b, \j, &q, \n, or s-register settings).
RTS and CTS must be used between the modem and the access server to control the flow of data. Misconfiguring flow control for software or setting no flow control, can result in hung sessions and loss of data.
Modems differ in the method they use to enable hardware flow control. Refer to your modem documentation (check the settings ', &e, &k, &h, &r, or s-register).
The modem must use the DCD wire to indicate to the access server when a session has been negotiated and is established with a remote modem. Most modems use the setting &c1. Refer to your modem documentation for the settings used with your modem.
The modem must interpret a toggle of the DTR signal as a command to drop any active call and return to the stored settings. Most modems use the settings &d2 or &d3. Refer to your modem documentation for the settings used with your modem.
This section defines other settings that may be needed or desirable depending on your modem. For these settings refer to your modem documentation.
Error correction can be negotiated between two modems to ensure a reliable data link. Error correction standards include LAPM and MNP4. V.42 error correction will allow either LAPM or MNP4 error correction to be negotiated.
Modems differ in the way they enable error correction. Refer to your modem documentation for the settings used with your modem.
![]()
Data compression can be negotiated between two modems and will allow for greater data throughput. Data compression standards include V.42 bis and MNP5.
Modems differ in the way they enable data compression. Refer to your modem documentation for the settings used with your modem.
If a modem will be used to service incoming calls, it must be configured to answer the phone after a specific number of rings.
Most modems use the setting s0=1 to answer the call after one ring. Refer to your modem documentation for the settings used with your modem.
Once the modem initialization string has been determined, take the following steps to configure the modem. (This example configures a U.S. Robotics Courier modem on line 1):
Router#telnet modem1
Trying modem1 (172.16.1.10, 2001)... Open
        at&f
OK
        at&b1&h1&r2&c1&d3&m4&k1s0=1
OK
        at&w
OK
- suspend keystroke -
Router#disc
Closing connection to modem1 [confirm]y
Router#
![]()
The access server and modem are now correctly configured for dial-in access. Before configuring any additional protocols for the line (such as SLIP, PPP, or ARA), test the dial-in connection.
The following is an example of a successful connection from a PC using a U.S. Robotics Courier modem to dial into a Cisco 2500 series access server:
        at&f&c1&d3&h1&r2&b1&m4&k1&w
OK
atdt9,5551234
CONNECT 14400/ARQ/V32/LAPM/V42BIS
User Access Verification
Username:
The Cisco 2500 series access server supports a number of popular asynchronous protocols for remote node connectivity. This section provides background information and configuration guidance for accessing EXEC sessions and the asynchronous protocols PPP, SLIP, and ARA.
When a dial-in user connects to an asynchronous line on the access server, the session received after the security dialog is called an EXEC session. From an EXEC session, you can use terminal services (such as Telnet or rlogin), run an asynchronous protocol over the line, or use one of many other access server services. For example, you can enter the command ppp to initiate a PPP session.
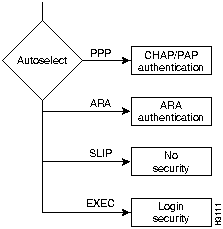
The access server can launch three asynchronous protocols (PPP, SLIP, or ARA) automatically if it detects that the remote device is using one of these protocols. The automatic detection of the asynchronous protocol is called autoselect. Autoselect will bypass the EXEC security dialog. If you use autoselect, we strongly recommend that you use the authentication techniques built into the asynchronous protocols. (See Figure A-15.)
Figure A-15 Flowchart for EXEC and AutoSelect Authentication Options
Cisco 2500 series access servers have 8 or 16 asynchronous ports (plus an asynchronous auxiliary port). These ports use RJ-45 connectors and the EIA/TIA-232 signaling standard. In the access server configuration, there are two configuration submodes associated with any asynchronous port---lines and asynchronous interfaces.
The line configuration subcommands are used to configure the asynchronous port for many options, including the following:
Asynchronous interfaces are created and configured in Cisco IOS software to support PPP and SLIP connections. The creation of an interface structure also allows Cisco IOS software to use routing functions on the lines as it would with other interfaces. To support SLIP or PPP on a given port, you must create and configure an asynchronous interface with the same number as the line. Typically, the asynchronous interface would be configured for the following features:
See the section "Modems" earlier in this appendix for assistance in configuring your access server and modem for proper operation. This section will involve configuring the line for EIA/TIA-232 options, and EXEC security.
Testing for access to EXEC functionality is a critical step in the configuration of the Cisco 2500 series access server ports. The successful access to an EXEC session can help ensure that the cabling, modem, and lines have correct configurations. A client should be able to connect to the line and receive a hostname> prompt. Further testing might include stress testing flow control and testing error correction.
The following sections discuss configuration options for PPP, SLIP and ARA
PPP allows a remote device to connect to the access server for multiple network (Layer 3) protocols simultaneously. For example, a PPP user could request IP, IPX, or Appletalk.
You configure PPP by configuring the asynchronous interface associated with the line.
In the following example, asynchronous port 1 is being configured for PPP. These steps are performed in configuration mode, as follows:
Router(config)#interface async 1
Router(config-if)#ip unnumbered ethernet 0
Router(config-if)#ipx network B011
Router(config-if)#encapsulation ppp
Router(config-if)#async mode interactive
Router(config-if)#async default ip address 172.16.1.12
You can also enter the following additional configuration commands:
| asynchronous dynamic address(interface subcommand) | Allows you to dynamically select your own IP address when dialing in. Use caution to ensure that only valid IP addresses are used by the client. |
| ip tcp header compression passive(interface subcommand) | Instructs the access server port to perform compression of TCP headers if requested by the client. |
| autoselect ppp(line subcommand) | Automatically launches a PPP session if the client starts sending PPP packets after the modems have connected. If you use autoselect, You should use PPP authentications to prevent unauthorized access. |
| ppp authen chapppp authen pap(interface subcommand) | Use CHAP or PAP to authenticate PPP sessions. Recommended for use with autoselect. |
Serial line internet protocol (SLIP) is an older protocol that supports IP only. Configuring SLIP is similar to configuring PPP for IP. To support SLIP, follow the basic configuration for PPP in the previous section, and ensure that one or both of the following (interactive asynchronous mode or SLIP encapsulation) is configured:
        async mode interactive
encapsulation slip
AppleTalk Remote Access Protocol (ARA protocol) is used by remote Macintoshes to connect to an AppleTalk network. The ARA Protocol can only be used for AppleTalk, and does not support routing. The ARA protocol performs as a single-node bridge for connecting a single Macintosh to a remote network.
The ARA protocol is configured with global and line commands only. The ARA protocol does not use any asynchronous interface configuration.
A typical configuration for the ARA protocol would look as follows:
arap network 100 ARA Dialin
username xx password yy
!
line 1
arap enable
arap noguest
autoselect arap
The nonextended AppleTalk network number used with the command arap network must be unique within the AppleTalk internetwork.
You can use the line configuration command autoselect arap to launch ARA protocol automatically. The person logging into an access server that is using the ARA protocol, is authenticated against either the username and password database in the configuration of the access server, or against a TACACS server. To store the ARA protocol username database on a TACACS server may require that the tacacs server be enabled with the supplementary file. The following line command and the tacacs commands are entered to enable the supplementary file:
arap use-tacacs (single-line)
The ARA protocol negotiates MNP4 error correction between the two ARA devices (remote ARA client and Cisco IOS). MNP4 requires special support considerations for ARA v1.0 clients. Turning off MNP4 support on the access server modem can eliminate this problem. Refer to the publication ARA Setup and Troubleshooting which is available on CCO for additional information.
The following is an example of asynchronous protocol configuration. In this example, the access server is configured to allow dial-in clients to launch ARA, SLIP, and PPP on line 1. All the connected modems are U.S. Robotics V.34 Courier modems.
hostname cs
!
appletalk routing
ipx routing
arap network 100 ARA Dialin
!
username Meredith password 7 ASD@#$ASD
chat-script usrv34 at&f1&D2SO=1
!
interface ethernet 0
ip address 172.16.1.10 255.255.255.0
ipx network B010
appletalk cable-range 1001-1002
appletalk zone Marketing
appletalk zone Sales

!
interface asynchronous 1
ip unnumbered ethernet 0
ipx network B011
encapsulation ppp
ip tcp header compression passive
asynchronous mode interactive
asynchronous default ip address 172.16.10.101
!
!
line 1 16
login local
modem inout
flow hardware
speed 115200
arap enable
arap noguest
autoselect arap
reset-script usrv34
|
|
Copyright 1988-1995 © Cisco Systems Inc.