|
|

The sections that follow describe how to make connections for T1, E1, ATM-T3/E3, data, frame relay, voice, alarms, and external clocks.
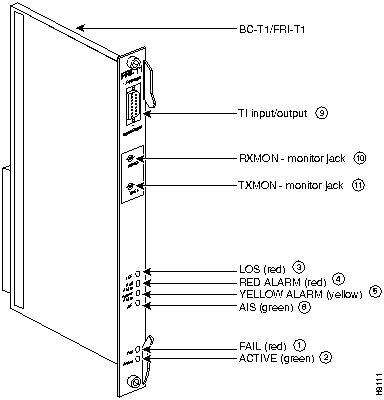
Three distinct card sets are available for terminating T1 connections. Circuit line T1 connections use the CDP front card, the BC-T1 back card, and the LB bus. T1 trunk connections use the NTC front card, the BC-T1 back card, and the LB bus. The third card set uses an FRP Model E front card and an FRI-T1 back card for Frame Relay T1 applications. Figure 2-19 shows an FRI-T1 backcard.
Figure 2-19 : FRI-T1 Faceplate Detail
Make the T1 connections as follows:
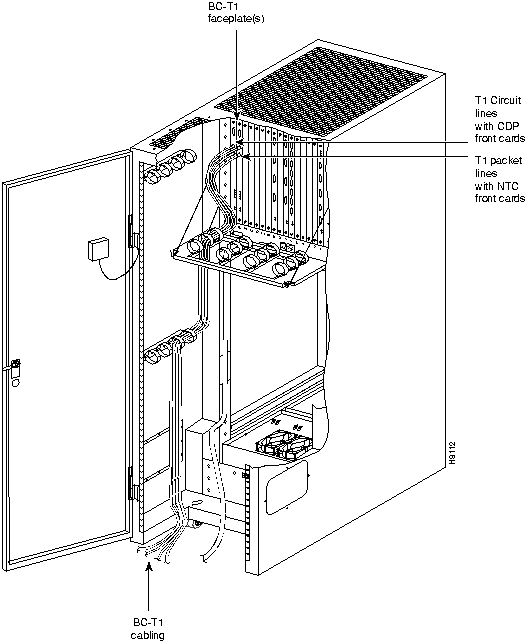
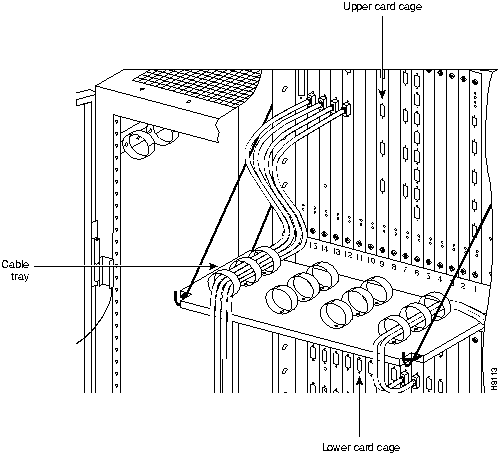
Figure 2-20 : Running T1 Cables to BC-T1s Figure 2-21 : Running T1 Cables through an IPX 32 Cable Tray Back slot line numbers correspond to the back slot numbers in which the BC-T1 cards reside. Record the back slot number for each line for network configuration.
The instructions for making signal connections and the initial start-up of the IPX 8 are the same as the corresponding instructions in this chapter for the IPX 16/32.
Three Velcro strips are located at the rear of the IPX 8 cabinet for routing and gathering the various signal cables attached to the back cards. Route the cables down and out the cutout provided at the bottom, rear of the cabinet (Figure 2-22). Always secure the cable connectors to the back card receptacles with the provided screws.
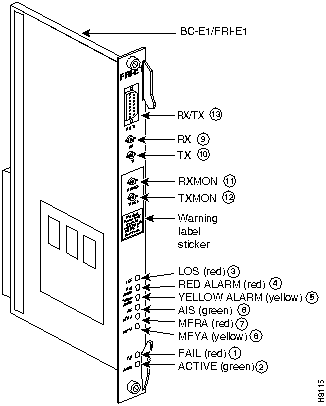
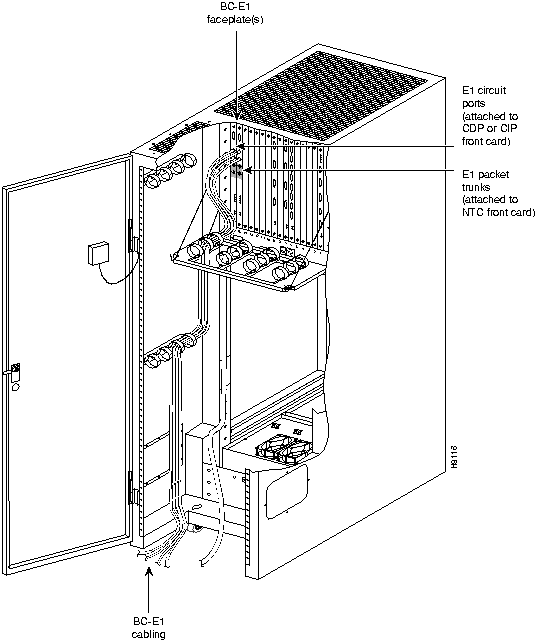
Figure 2-22 : Routing Signal Cables (IPX 8) Three distinct card sets are available for E1 connections. A subset of these is available for Subrate E1. Circuit line E1 connections use the CDP or CIP front card, the BC-E1 back card, and the LB bus. E1 trunk connections use the NTC front card, the BC-E1 back card, and the LB bus. Subrate E1 connections use the NTC front card, the BC-SR back card, and the LB bus. Frame Relay E1 applications use an FRP Model E front card with an FRI-E1 back card.
The FRI-E1 back card has the same connectors as the BC-E1 card. The E1 Trunk Interface Cards BC-E1/FRI-E1 (Figure 2-23) contain the E1 trunk connector (G.703 Input/Output), which is located at the top of the back card. There are four 75 Ohm BNCs on the BC-E1/FRI-E1 faceplate.
Figure 2-23 : BC-E1 /FRI-E1 Faceplate Detail (Typical) Make the E1 connections as follows:
Figure 2-24 : Running E1 Cables to BC-E1s Figure 2-25 : Running E1 Cables through the Cable Tray The back slot line number corresponds to the back slot number in which the BC-E1 card resides. Record the back slot number associated with each line. These numbers are necessary for configuring the network.
The IPX has Velcro loops inside the cabinet to hold cabling in place. Pull the Velcro hooks apart as needed and place the routed cable in position. Wrap the Velcro around the cable and remake the loops by pressing the two Velcro pieces together.
ATM Trunk cables connect the ATM back card to either a DSX-3 cross connect point, another ATM back card in a co-located node, or a BPX node at the LM-3T3 back card.
The ATM back card has female BNC connectors for transmit and receive trunk connections. Use 75-ohm coax cable RG-59 B/U for short runs and AT&T 734A for longer runs. Each T3/E3 trunk has an XMT cable and an RCV cable.
The LDP and SDP front cards operate in conjunction with a variety of data interface back cards to provide data connections.
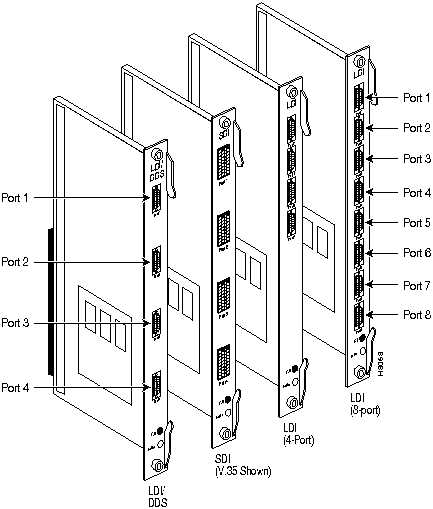
The LDP front card is used with the 4-port and 8-port versions of the LDI back card for RS-232C/D (V.24) connections and with the LDI4/DDS back card for DDS (Digital Data Service) connections. The four-port LDI has four data connection ports whose labels are PORT 1 through PORT 4 (Figure 2-26). The eight-port LDI has eight data connection ports labeled PORT 1 through PORT 8 (Figure 2-26). The four-port LDI4/DDS has four data connection ports labeled PORT 1 through PORT 4 (Figure 2-26).
Four types of SDI back cards work with the SDP front card. An SDI back card supports V.35, RS-449/422, RS-232D, or RS-232C (V.24). (X.21 requires RS-449 plus an adapter cable.) Each SDI has four connection ports labeled PORT 1 through PORT 4 (Figure 2-26).
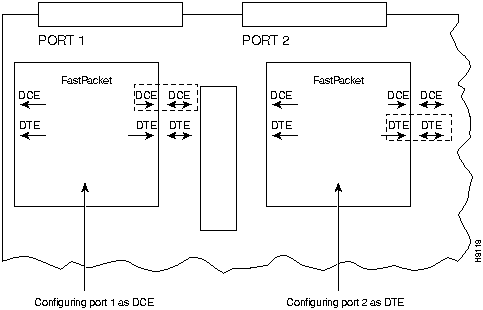
Three types of LDI back cards exist. These are: a four-port RS-232C/D LDI (for V.24), an eight-port RS-232C/D LDI (for V.24) and a four port DDS LDI. Attach the data lines to the SDI, LDI, and DDS port by connecting as short a cable as necessary to reach the ports. The four-port and eight-port LDI cards use one of two special cable types. The cable is either a StrataCom DTE or StrataCom DCE cable. Refer to Configuring the SDI Cards for instructions on configuring the cards for operation as a DTE or DCE.
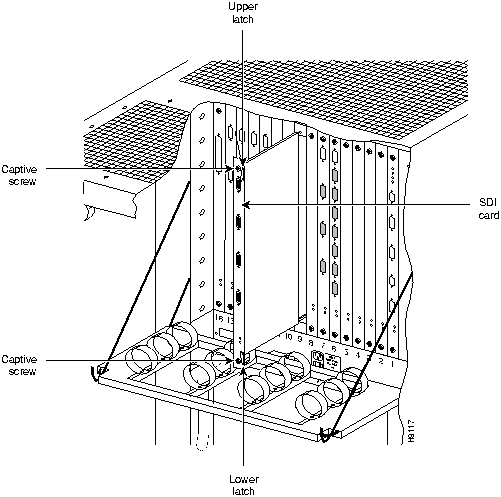
Figure 2-26 : SDI, LDI and DDS Connectors If the system includes SDP cards with attached SDI cards, the SDI ports are factory-configured as DCE interfaces. To change the interface configuration, reposition the jumper board for the SDI ports as follows:
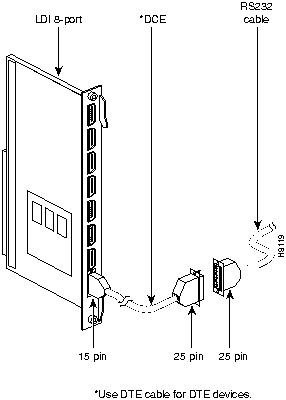
Figure 2-27 : Removing an SDI Card Figure 2-28 : Positioning a DTE/DCE Block on an SDI If the system includes Low-Speed Data Pad (LDP) card sets, each port on the LDI card requires either a special StrataCom DCE or DTE adapter cable for proper port configuration (Figure 2-29). Removing the card from its slot to attach these special cables is unnecessary. Logic circuits on the card check the identifying pins on the special cables and configure the ports as DTE or DCE, as applicable.
Figure 2-29 : Connecting a DTE or DCE Adapter Cable to an LDI The four different types of frame relay interfaces are:
The T1 line terminates on the FRI-T1 card to a DB15 sub miniature connector. The FRI card has a female connector. A BNC-type connector is used for the unbalanced connection.
The FRI-E1 card provides for a 75-ohm unbalanced coax line termination or a balanced 100-120-ohm twisted pair termination. A DB15 connector is used for the balanced connection. The FRI card has a female connector.
The V.35 connection uses a standard 34-pin female MRAC-type connector with a standard V.35 cable.
The FRI-X.21 has female DB15 sub miniature connectors.
For detailed cabling requirements, see the IPX Reference Manual.
All voice connections are made using the CDP front card with either a T1 back card or an E1 back card.
For detailed cabling requirements, see the IPX Reference Manual.
The AIT back card uses BNC coax connectors and cabling for either T3 or E3 operation.
For detailed cabling requirements, see the IPX Reference Manual.
Copyright 1988-1996 © Cisco Systems Inc.

![]()
![]()
![]()
![]()
![]()
![]()
![]()
![]()
![]()
![]()