|
|

IPX nodes are available in both AC-powered and DC-powered versions and may be provisioned with redundant power supplies.
The paragraphs that follow provide information on making power connections for both the AC and DC powered versions of the IPX 16/32 and IPX 8 nodes. Note that differences exist in the power supply designed before and after August, 1994.
AC Power Connections (IPX 16/32)
Figure 2-13 shows the location and connections to the AC Power Distribution Unit (PDU). An easily accessible socket outlet should be installed near the equipment. Installing a power outlet strip inside or near the cabinet for test equipment and modems is recommended.
Figure 2-13 : AC Power Distribution Unit
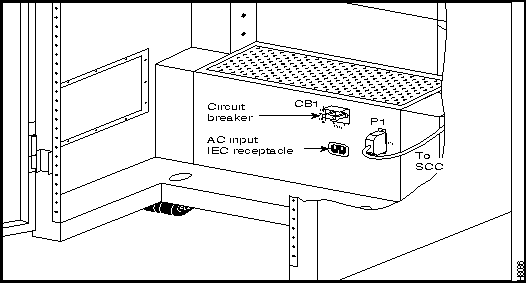
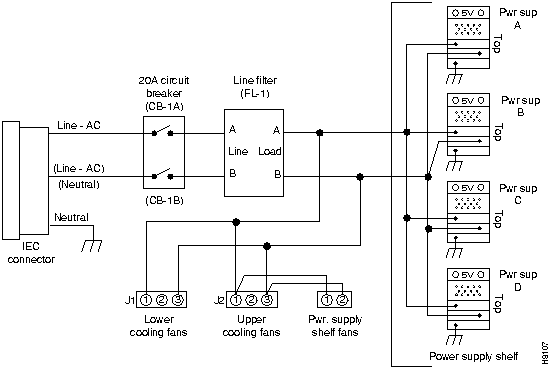
Figure 2-14 shows the wiring of the AC PDU. This PDU is installed in all cabinets configured for AC operation. To support power connections in a variety of countries, six different power cords are available for the IEC connector.
Figure 2-14 : 208/220/240 VAC Power Distribution (AC Cabinets after August 1994)
DC Power Connections (IPX 16/32)
For a DC IPX 16/32 node, the positive, negative, and safety ground wires are connected from a -48 VDC power source to the IPX 16/32 power distribution unit. The -48 VDC source must be connected to earth and electrically isolated from the main AC source. Wiring must be attached to the IPX 16/32 with the correct size ring-lug for the wire gauge.
For power and ground connections to a an IPX 16/32, a minimum 6 AWG (or equivalent for CEPT E1 systems) conductor must be used. The conductors should have double-crimped spade or closed-loop connectors suitable for the size of conductor used. A 50-amp DC circuit breaker is recommended for the power source supplying -48 VDC power to an IPX 16/32. An easily accessible disconnect device should be included in the facility wiring.
To connect the wiring to a DC IPX 16/32 unit, proceed as follows:
Figure 2-15 : DC System, Making DC Connections (IPX 16/32) Making Power Connections (IPX 8)
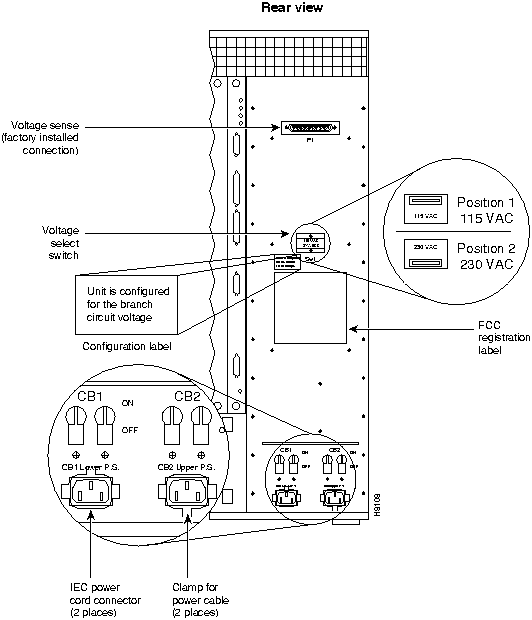
IPX 8 nodes with redundant AC power supplies are equipped with a power cord for each power supply. This provides extra protection but does require the installer and maintenance personnel to be sure that power is off on both supplies when working with the node's power. The AC-powered IPX 8 differs from the IPX 16/32 in that it has a voltage selector switch that is used to set the power supply input to match the branch voltage.
An AC Power Distribution Unit (AC PDU), located at the rear of the IPX 8 cabinet (Figure 2-16), protects the system and distributes the AC voltage. The voltage selector switch, two circuit breakers, two AC receptacles, and a voltage sense connector are mounted on the rear panel of the AC PDU.
The left-most AC connector supplies input power to power supply number 1 (the lower supply), which is always present. The right-most connector supplies power to power supply number 2 (the upper supply), which is the optional, redundant power supply. Clamp the power cord in the receptacle using the attached cable clamp.
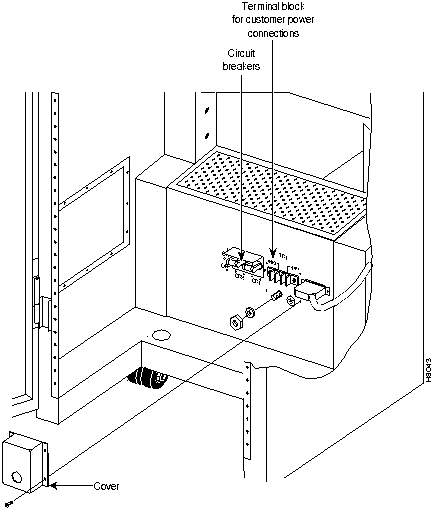
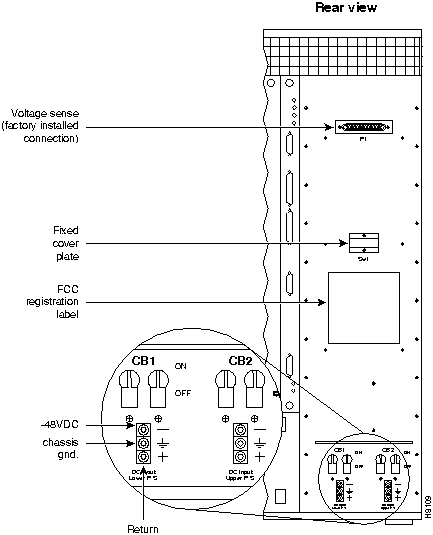
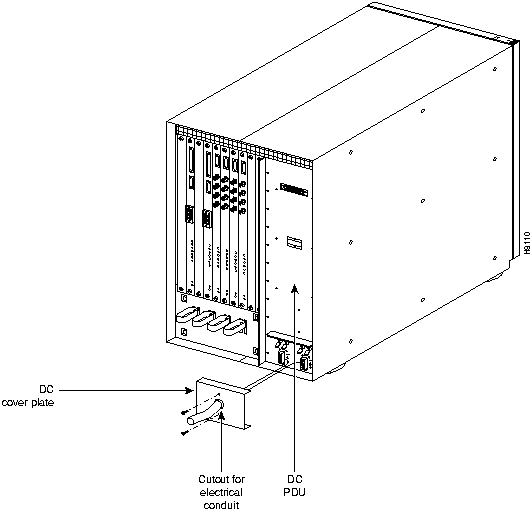
Figure 2-16 : AC Power Distribution Unit (IPX 8) The DC power-type IPX8 cabinets are equipped with a DC Power Distribution Unit (DC PDU). The DC PDU has two 3-connector terminal blocks (Figure 2-17). Input power connections for power supply number 1 (lower) are made to the terminal block located immediately below CB1. Input power connections for power supply number 2 (upper) are made to the terminal block located immediately below CB2. The user supplies the input power cabling for DC-powered systems. The terminal blocks are protected against accidental contact by a cover plate that has a punch-out hole for wiring conduit (see Figure 2-18).
Figure 2-17 : DC Power Distribution Unit (IPX 8) In Figure 2-17, carefully note the polarity of the terminal block connections. The middle terminal is used for chassis ground. Use a wire gauge suitable for carrying up to 10A for the power and power return leads (14 AWG or 2.5 sq. mm).
Copyright 1988-1996 © Cisco Systems Inc.
![]()
![]()
![]()
![]()
![]()
![]()
![]()
![]()
![]()
![]()
![]()
![]()
![]()
![]()
![]()