|
|

The following paragraphs contain general safety information.
For safe operation, observe the following:
Consider the CEPT requirements prior to connecting a private network to the public switched networks in certain international service areas, as follows:
Compliance with Emission requirements depends upon adherence to the installation steps in this manual, including installation of faceplates for all slots and the use of shielded cables between systems.
Before proceeding, go through the parts checklists that follow to verify that all ordered parts are present and in good condition. If anything is missing or damaged, report it to your StrataCom Order Administration representative.
Check the cabinet for the following:
Verify that all cards are present for the ordered configuration.
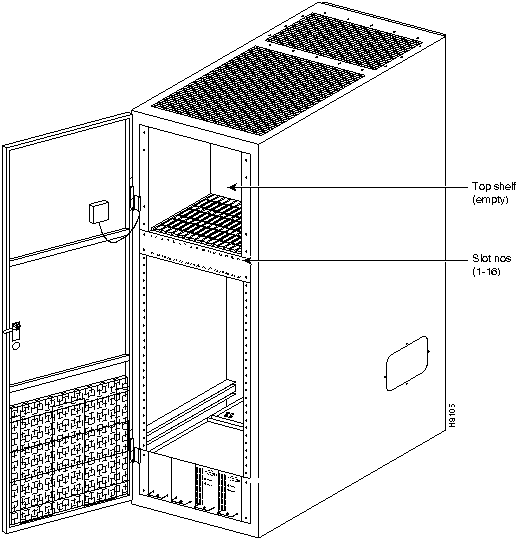
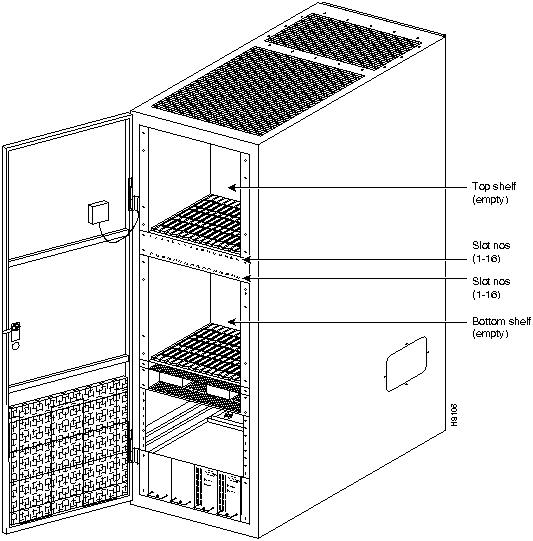
The IPX 16 has one (upper) card shelf. Its card slot numbers are 1 through 16 (left to right when viewed from the front of the cabinet). In addition to an upper card shelf, the IPX 32 contains a bottom shelf with card slots numbered 17 through 32. A front view of the IPX 16 and the IPX 32 appear in Figure 2-9 and Figure 2-10, respectively.
The locations of the system cards in an IPX depend on the configuration. The only cards that are always in the same locations are the NPCs, the SCC, and the LEC. The locations of these cards for an IPX 16 and an IPX 32 are as follows:
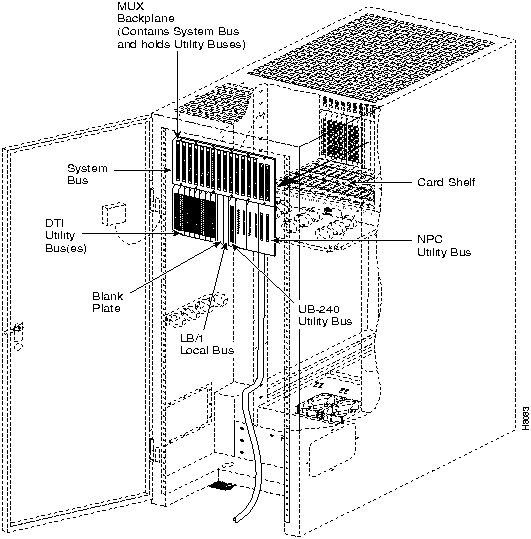
Figure 2-9 : IPX 16 Card Shelf, Front View Figure 2-10 : IPX 32 Card Shelves, Front View Use of the remaining slots depends on the node configuration. The position of the various utility buses installed on the System Bus backplane determines in which slots the cards can be installed. Figure 2-11 shows the six types of utility buses as viewed from the back of the cabinet. These are the NPC-UB, LB/1, and UB 240 utility buses. Except for the NPC bus, the locations of these buses can vary from node to node.
Figure 2-11 : Typical Locations of Utility Buses (Rear View) The use of the MUX backplane, system bus, and utility buses is as follows:
IPX 8 Card Shelf Configuration
The IPX 8 cabinet contains one card shelf with front and back slots for card access. Figure 2-12 illustrates the slot numbering.
Front slots 1 and 2 are reserved for the primary and redundant NPC controller cards. The accompanying SCC is factory-installed in rear slot 1. If the system has a redundant PCC/NPC, it resides in front slot 2, and rear slot 2 remains empty.
Various cards can reside in card slots other than 1 and 2. These include the NTC, CDP, FRP, SDP, LDP, ARC, and AIT. The cards in the back slots are the network and user interface cards. These include the BC-E1, BC-T1, BC-SR, FRI, SDI, ARI, ATM-T3/E3 and LDI. Most card types can reside anywhere a vacant slot and the appropriate utility bus exists. Only the controller card and power supply have assigned slots for primary and redundant units.
System assemblies indicated as T1 are configured with a BC-T1 as the back card associated with the NTC and CDP. Assemblies indicated as E1 are configured with a BC-E1 as the back card associated with the NTC and CDP. System assemblies indicated as J1 are configured with a BC-J1 as the back card associated with the NTC card and a BC-Y1 as the back card associated with the CDP.
Installing IPX 8 Plug-In Cards
The IPX 8 has one card shelf. The card slot numbers are 1 through 8 (left to right from the front of the cabinet). Figure 2-12 shows a front view of the card shelf. The locations of the system cards in an IPX depend on the configuration. The NPCs, and SCC occupy reserved card slots.
Figure 2-12 : IPX 8 Card Shelf (Front View) The locations for the NPCs, the SCC, and the power supplies are as follows:
Installing a Redundant IPX 8 Power Supply
If a second power supply is later added for redundancy, it is used as a hot backup. Remove the front top blank panel and install it in the upper power supply slot in place of the blank panel (Figure 2-12).
Use of the remaining empty slots in the cabinet depends on the node configuration. Each slot requires a utility bus to provide an electrical interface between the front card and the back card. You must not randomly install a card in an empty slot because the card may require a specific utility bus that may or may not be installed.
For the IPX 8, the choice of utility buses for the last several slots narrows down to either Local Bus 1 (LB/1) for the CDP, NTC, AIT, and LDP cards or the UB-240 bus for the SDP card.
Copyright 1988-1996 © Cisco Systems Inc.
_____
[IPX 16/32] The unit has the correct number of shelves (1 or 2).
_____
The unit has the correct power supply type (AC or DC). For IPX 16/32: open the back door. For IPX 8: look on the back. The words "AC (or DC) PWR DISTRIBUTION" are on the back panel of the Power Distribution Unit.
_____
The unit has the correct number of power supplies (1, 2, 3, or 4).
_____
Correct number of NPCs
_____
Correct number of LDIs
_____
Correct number of SCCs
_____
Correct number of BC-T1s
_____
Correct number of SCC-Bs
_____
Correct number of BC-E1s
_____
Correct number of CDPs
_____
Correct number of BC-SRs
_____
Correct number of NTCs
_____
Correct number of BC-J1s
_____
Correct number of FRPs
_____
Correct number of BC-Y1s
_____
Correct number of FRIs
_____
Correct number of LECs1
_____
Correct number of SDPs
_____
Correct number of AITS
_____
Correct number of SDIs
_____
Correct number of BC-AIT-T3s
_____
Correct number of LDPs
_____
Correct number of BC-AIT-E3s
_____
Blank covers for all unused back slots
_____
1 Used in IPX 32 nodes only.
![]()

![]()
![]()
![]()
![]()
![]()
![]()
![]()
![]()