
Table of Contents
Installation
Installation
This chapter explains how to install an IPX 8/16/32.
Site Preparation
The IPX 8/16/32 site must meet the following requirements:
- Space
Each IPX 16/32 cabinet requires a floor space of 22 inches (55.9 cm) wide and 80 inches (203.2 cm) deep. Each IPX 8 cabinet requires a floor space 19 inches (48.25 cm) wide and 24 inches (61.0 cm) deep. This depth measurement allows for opening the front and back cabinet doors. Sufficient clearance around the cabinet is also necessary to allow access to the front and back of the cabinet while the doors are open.
- Power
An AC or DC power source must be available within six feet of the IPX 16/32 cabinet. At 180 to 264 VAC, an IPX 16 may require up to 9.2 A maximum (1700 VA) and an IPX 32 up to 17 A maximum (3100 VA). At --42 to -56 VDC, an IPX 16 may require up to 28 A maximum (1200 W) and an IPX 32 up to 50 A maximum (2100 W).
- Cooling
The site must be capable of maintaining an ambient temperature of 40°C (max.) while the system is operating (recommended range is 20°C to 30°C). Each fully loaded IPX 8 node dissipates approximately 1300 BTUs (0.38 KW hour) to the room; the IPX 16 cabinet, 3419 BTUs (1 KW hour), and the IPX 32 cabinet, 6836 BTUs (2 KW hour).
- Weight
Each fully loaded IPX 32 cabinet can weigh up to 700 lbs (318 kgs). A fully loaded IPX 16 cabinet can weigh up to 400 lbs (182 kgs). Each fully loaded IPX 8 cabinet can weigh up to 125 lbs. (55 kgs).
- Flooring
Raised flooring with sufficient under-floor space to house the cables is recommended.
- Mounting
The IPX 8 cabinet can be mounted in a rack or be left free-standing. The location of the IPX should give consideration to the routing of the data cables and the termination of the telephone company or common carrier circuits.
Seismic Considerations
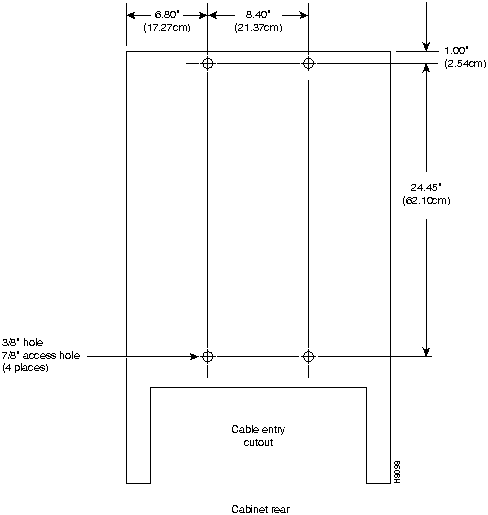
To provide protection against seismic activity, the IPX 16/32 cabinet is equipped with holes that permit the cabinet to be bolted to a concrete floor or to a structural member in the floor. The cabinet base has four sets of holes (two sets at the lower front and two sets at the lower rear). Each set consists of a large socket access hole above a smaller hole. The lower, smaller hole accepts the bolt that is attached to the floor. The upper, larger hole provides access for a socket wrench to tighten the bolt (see Figure 2-1 and Figure 2-2).
Figure 2-1 : Bolting the IPX16/32 to the Floor (Rear View of Cabinet)
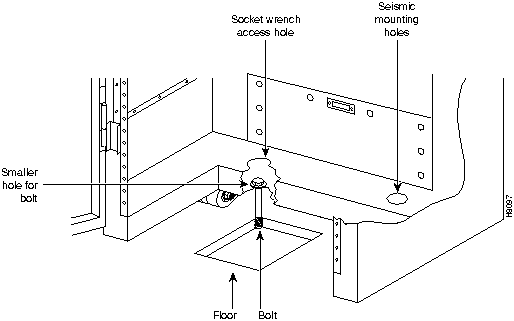
Figure 2-2 : Floor Mounting Hole Pattern (IPX 16/32)
Required Tools and Equipment
The following tools and equipment are required to install the IPX:
- Flat blade screwdriver set
- Phillips screwdriver set
- Grounding wrist strap
- DVM (digital voltmeter)
- Wrench (1") for raising and lowering cabinet feet
Multi-Cabinet Installations (IPX 16/32)
For installations in which multiple IPX 16/32 cabinets stand next to each other, an optional kit is available from StrataCom that provides brackets and screws for clamping the cabinets together.
The Cabinet Side by Side Mounting Kit (Part No. 210372-00) consists of two top-mounting brackets, two bottom-mounting brackets, and two screws. The kit provides the necessary hardware to attach two cabinets at the top front, top rear, bottom front, and bottom rear.
Top Attachment
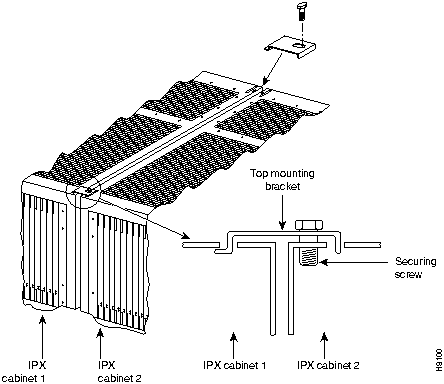
The front and rear corners on the top surface of the cabinet are equipped with a small slot and small screw hole. To attach two cabinets at the top (front and rear), do the following:
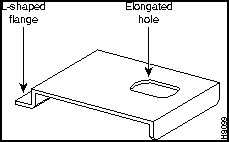
Step 1 Place the "L" shaped flange of one of the top mounting brackets into one of the slots in the top surface of the cabinet (Figure 2-3 and Figure 2-4).
Figure 2-3 : Top Mounting Bracket
Step 2 Rotate the top mounting bracket towards the second cabinet so that the flange at the other end of the top mounting bracket fits into the slot on the top surface of the second cabinet (Figure 2-4).
Step 3 Secure the mounting bracket by inserting the provided screw into the elongated hole in the mounting bracket and screwing it in the hole in the cabinet (Figure 2-4).
Step 4 Perform this procedure for both the front and rear of the cabinets.
Bottom Attachment
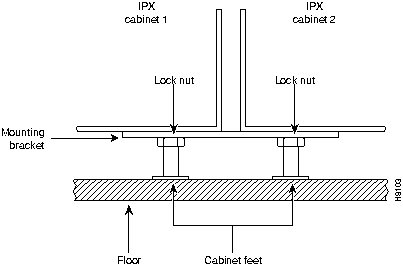
The bottom mounting bracket, shown in Figure 2-5, uses the cabinet feet and the securing nuts to attach the two cabinets together at the bottom.
To attach two cabinets at the bottom (front and rear), do the following:
Step 1 On the front corners where the two cabinets are to be joined, loosen the lock nuts securing the cabinet feet enough to slide the bottom mounting bracket between the nut and the bottom surface of the cabinet.
Figure 2-4 : Cabinets Joined at the Top
Step 2 Insert the mounting bracket between the underside of the cabinet and the lock nut so that the screw supporting the cabinet foot slides into the L shaped recess.
Step 3 Rotate the mounting bracket towards the second cabinet so that the straight recess slides around the screw in the second cabinet (Figure 2-6).
Step 4 Tighten the lock nuts to secure the mounting bracket in place (Figure 2-7).
Step 5 Perform this procedure for both the front and the rear of the cabinet.
Figure 2-5 : Bottom Mounting Bracket (IPX 16/32)
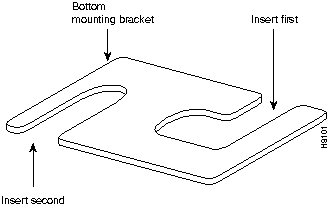
Figure 2-6 : Positioning the Bottom Mounting Bracket (IPX 16/32)
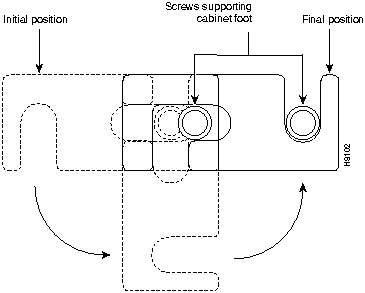
Figure 2-7 : IPX 16/32 Cabinets Joined at the Bottom
IPX 8 Cabinet Installation
The IPX 8 cabinet can be mounted either in an equipment rack or left free-standing. It is self-contained and small enough to stand on a flat support such as a table or bench. For rack-mounting the IPX 8, the appropriate, optional rack-mounting kit should be ordered to obtain the appropriate mechanical mounting hardware. The paragraphs that follow describe the common mounting procedures.
Free-Standing Installation
For free-standing installation, move the IPX 8 cabinet into position. It rests on four fixed position rubber feet.
Installation in a Rack
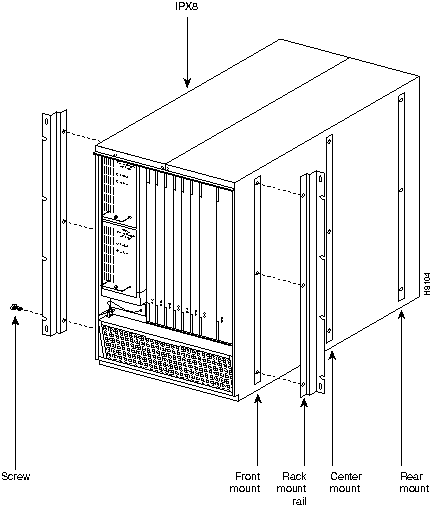
If an IPX 8 is ordered with the rack mounting hardware, it comes with two rack-mounting rails strapped to the top packing plate. To install the IPX 8 in a rack by using these rails, refer to Figure 2-8 and proceed as follows:
Step 1 Remove the rack mounting rails from the packaging along with the package of mounting hardware.
Step 2 Locate the tapped holes on the side of the IPX 8 cabinet. One set of holes is for front-mounting of the cabinet, the other set is used for center-mounting.
Step 3 Attach the rails to the cabinet by using the #10-32 machine screws.
Step 4 Identify the locator studs provided with the kit (threaded on one end, smooth on the other end).
Step 5 Secure locator studs into the rack holes that correspond to the top holes in the rack mounting rails.
Step 6 Lift the IPX 8 and temporarily hang it from the locator studs.
Step 7 Screw in the rack mounting screws then remove the locator studs.
Figure 2-8 : Installing Rack Mounting Kit
Copyright 1988-1996 © Cisco Systems Inc.