|
|

Setting Configuration Attributes
This chapter describes how to change configuration attributes using the CLI. Normally, these changes are made to run-time memory only. If the switch is reset, the changes are overwritten by the attribute settings in the configuration database.
Changing Default Modem Password and Modem Initialization String
The modem password and the modem initialization string are stored in EEPROM in the midplane. The default modem password is
atmhiway
the default modem initialization string is
AT&F&D2&C1&Q0S0=1S2=128S7=30S36=7S95=44
You may retain these default values. If you change them, the changes you make are permanent and remain in effect unless you change them again. Rebooting the system or restarting the CLI does not change the modem password or the modem initialization string.
If you change the modem password or the modem initialization string for one switch card slot, make the same change for the other. This is especially important for a two-card system because the backup switch card takes over if the active switch card fails. It is also important for a single switch card system because you may want to add an additional switch card later or you may decide to move the single switch card to the other slot.
You must have a switch card in the switch card slot to change the modem password or the modem initialization string. Therefore, if you have only one switch card, move it from one switch card slot to the other as you effect the change for both slots.
To change the default modem password and the modem initialization string, follow these steps:
Changing the Protected Mode and npadmin Password
You can change this password from within protected mode only.
To change the protected mode and npadmin password, follow these steps:
Inform all authorized users of the changes you make.
Each SNMP manager (the CLI, for example) and each managed system (the MMA in an LS2020 switch, for example) has a community name. The SNMP manager specifies a community name in each command it sends. The managed system validates the commands before executing them by comparing the community name in the command against its own community name.
Before you can set attributes or use the CLI control commands, you must set the SNMP community to a community that has read/write access privileges. The read/write community provided with the system is named write. (A switch can have several SNMP community names with read/write privileges.) The read-only community provided with your system is named public.
To prevent unauthorized access to your system, you should set the SNMP community names that the LS2020 switch uses to validate the commands before it executes them. Follow the procedure below to set the SNMP community name that the CLI puts in commands.
Setting the SNMP Community Name
The SNMP community reverts to the read-only community when you log out of the CLI. However, if you leave your terminal without logging out of the CLI, be sure to change the SNMP community back to the read-only community to prevent unauthorized access to your system.
Modifying Spanning Tree Bridging
The LS2020 switch uses the spanning tree protocol to detect loops within a bridged network. When a loop is detected, one port on the bridge performs a blocking function to break the loop. All bridging traffic on that port is discarded and MAC address learning is not performed. This section provides the steps to define and display spanning tree bridging parameters and static filters using the CLI show and set commands.
Defining and Displaying Spanning Tree Bridge Parameters
To define and display spanning tree bridge parameters, follow these steps:
Defining Spanning Tree Static Filters
To make entries into the bridge filtering database, follow these steps:
LS2020 custom filtering allows you to define filters to block or forward incoming packets for specific ports. A filter is a set of conditions that is compared to information in the header of incoming packets. As an incoming packet is received, its level 2 and level 3 headers are broken into components. The header information is evaluated against all filters (in priority order) associated with the receiving port. If a filter condition matches the header information, the action specified by that filter is taken. If the filter condition does not match the packet header information, the next filter is evaluated. If no filter conditions match the packet header information, the default action for the port is taken.
You must first define the traffic filter (bridge filter, IP filter, or IPX filter) and then assign the filter with a port or ports. Optionally, you can associate a multicast group and traffic profile to a filter or a port. You must define a filter, a multicast group, and a traffic profile before you can assign that filter to a specific port.
To define a custom traffic filter, you assign a number to the filter and write the filter expression. The next sections discuss defining traffic filters, multicast groups, and traffic profiles and assigning filters to a specific port.
For a description of filter attributes, construction, and examples, see the LightStream 2020 CLI Reference Manual.
Procedures for Defining Traffic Filters
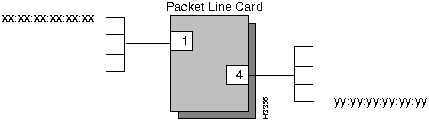
The following steps define sample traffic filters that block the LAN end stations in Figure 5-1 from communicating with each other. To successfully block the communications, filters must be created for the ports (1 and 4) supporting each LAN.
Figure 5-1 : Connections to be Filtered A multicast group is a list of destination ports on nodes in the network. Traffic that matches an associated filter condition is sent to each member of the group. Only one multicast group may be associated with any given filter on a given port, and the action of the filter must be forward. These steps describe how to define the multicast group parameter for a filter:
A traffic profile is a set of type-of-service attributes that can be applied to traffic flows by associating the profile with a filter. Only one profile can be associated with any given filter on any given port, and the action of the filter must be forward. These steps describe how to define the traffic profile parameter for a filter:
Assigning a Filter to a Specific Port
Any filter can be assigned to any port (which is up and running) at any time. Incoming packets for that port are subsequently compared with the filter conditions. If the value of a specific field in the packet header matches the value of the filter, the action specified by the filter condition is taken.
To associate a filter with a specific port or ports, follow these steps:
Defining the Default Filter Action
This procedure describes how to define the default filter action for a specific port. This determines the action to take with incoming traffic (forward or block) when incoming traffic matches none of the defined filter conditions.
Defining the Default Broadcast Limit
This procedure describes how to define the default broadcast limit parameter for a specific port. It applies only to bridge filters.
Deleting the Association Between a Filter and a Port
To disassociate a filter from a specific port or ports, follow these steps:
This procedure describes how to delete a filter. You cannot delete a filter that is associated with a port. You must first perform the procedure "Deleting the Association Between a Filter and a Port" as previously described.
Configuring Virtual LAN Internetworking
Virtual LAN Internetworking (VLI) allows you to transcend the physical limitations of LAN internetworking. The LS2020 configurator lets you arrange stations in distinct workgroups and to restrict access between workgroups. Stations on different physical segments can belong to the same workgroup, and they can belong to more than one workgroup. For further information, see the LightStream 2020 Configuration Guide.
Establishing the Default Workgroup
You establish the default workgroup by having no workgroup IDs at all in an exclude list; that is, excluding no one. An exclude list that is not empty includes everybody except those that have at least one of the listed workgroup IDs in their include list. An include list admits only those that have at least one of the listed workgroup IDs in their include list. An empty include list blocks all communications.
Adding a Workgroup to a Port List
To add a workgroup ID to a list for a specific port, follow these steps:
Removing a Workgroup from a Port List
To delete a workgroup from a list for a specific port, follow these steps:
Configuring Virtual Path Switching
In ATM processing, a virtual channel transports ATM cells belonging to a single data flow between two network nodes. Similarly, a virtual path (VP) supports multiple virtual channels and, thus, is able to transport numerous data flows between two network nodes.
The VP switching function in an LS2020 network lets you configure and remove multiple, point-to-point permanent virtual path connections (VPCs) through a single LS2020 switch or across a network of LS2020 switches. The LS2020 supports both the user-network interface (UNI) and the network-to-network interface (NNI) in configuring point-to-point permanent virtual paths (PVPs).
The ATM UNI cell header format defines an 8-bit VPI field, allowing a maximum of 256 PVPs to be defined for a single UNI interface. Similarly, the ATM NNI cell header format defines a maximum of 12 bits in the VPI field, allowing a maximum of 4096 PVPs to be defined for a single NNI interface (or trunk) in a network.
The LS2020 supports the simultaneous establishment and management of permanent, bidirectional, point-to-point VPCs and VCCs over the same interface.
For more information about VP switching commands and configuration, see the LightStream 2020 CLI Reference Manual and the LightStream 2020 Configuration Guide, respectively.
Creating a Permanent Virtual Path
To create an ATM UNI permanent virtual path (PVP) on a specified port, you use the set port <c.p> vpi commands. The VPI number must be in the range of 0 to 255. (This range may be further restricted depending on the type of interface module. The software informs you of such restrictions.) A typical command sequence would be as follows:
You could use the insured-rate, max-rate, and transmit-priority arguments in addition to these commands, but most users accept the default values for these three parameters. It is recommended that you accept the defaults for the insured burst and maximum burst parameters.
If you want a bidirectional PVP, you must configure the circuit for the port at the other end of the PVP. Using the same VPI number at both ends of the PVP is administratively convenient, but not necessary. All other PVP parameters should be configured the same at both ends of the PVP.
For more information about the set port <c.p> vpi vpi# commands, see the LightStream 2020 CLI Reference Manual.
Activating a Permanment Virtual Path
Before you activate the circuit, you must configure both directions of an ATM UNI PVP. The destination node, destination port, and destination VPI number may not be altered after activating the PVP. After setting the parameters listed in the section on Creating a Permanent Virtual Path, follow these steps:
Deleting a Permanent Virtual Path
To deactivate and delete the specified ATM UNI PVP from the specified port, follow these steps:
Enabling or Disabling Virtual Path (VP) Switching
VP switching is supported only on 4- and 8-port T3 and E3 modules and OC-3c modules. By default, VP switching is enabled on the interfaces which support it and by the setting of the vpt-vpi value. Typically, the vpt-vpi value is zero. If the vpt-vpi value is not set to zero, VP switching is not enabled.
Establishing ATM UNI Signaling
In an ATM network, the user-network interface typically interconnects an ATM user (such as a router) with an ATM switch. The messages and protocols used to establish, maintain, and clear virtual connections over the UNI are referred to as switched virtual connection (SVC) signaling or UNI signaling. The LS2020 supports point-to-point and point-to-multipoint SVCs. It also lets you provision PVCs concurrently with SVCs.
For this release, two interswitch signaling protocols apply to ATM switches in an LS2020 network:
You can configure the LS2020 on a per-port basis to support UNI 3.0, UNI 3.1, IISP 3.0, or IISP 3.1. By default, the LS2020 uses UNI 3.0.
Before you can establish ATM UNI signaling, you need to enter the correct community password string and establish
In many cases, "establishing" simply means verifying that pre-existing defaults are acceptable. The next sections provide the CLI set port commands you enter to establish ATM UNI signaling. For more information about CLI commands and their syntax, refer to the LightStream 2020 CLI Reference Manual.
Establishing UNI Port Characteristics
The set port commands listed here are typically the commands used to establish UNI port characteristics.
To establish these characteristics, enter the following commands at the Where
<c.p> is the card and port number in card.port format (card = 2 to 10; port = 0 to 7).
{private | public} are the options to configure the port as either a private or public UNI.
{network | user} are the options to configure the port as either the network side or the user side of the UNI.
{uni3.0 | uni3.1 | iisp3.0 | iisp3.1} are the options you can select to configure the port to conform to one of the following standards: UNI 3.0, UNI 3.1, IISP 3.0, or IISP 3.1.
The following set port commands (although used less frequently than other set port commands) are also used to establish UNI port characteristics:
Where
<c.p> is the card and port number in card.port format (card = 2 to 10; port = 0 to 7).
{enable | disable} are the options to enable or disable ILMI for a port.
Establishing Signaling Characteristics
To establish signaling characteristics, enter the following commands at the Where
<c.p> is the card and port number in card.port format (card = 2 to 10; port = 0 to 7).
{nsap | e164 | both} are the options you can use to specify the format expected for ATM addresses: standard nsap for private ATM addresses, e164 for public E.164 networks addresses, and both to admit addresses of both types.
{yes | no} are the options for determining whenever an LS2020 port will route a SETUP message based on the called party subaddress (if any). This is typically set to "yes" in private networks, and "no" in public networks.
The following set port commands (although used less frequently than other set port commands) are also used to establish UNI signaling characteristics:
Where
<c.p> is the card and port number in card.port format (card = 2 to 10; port = 0 to 7).
{cps} specifies the peak cell rate of the signaling channel (in cells/sec).
Establishing ILMI Characteristics
The Interim Local Management Interface (ILMI) protocol provides the mechanism for establishing addresses. If the ILMI is disabled, then you have to configure the ATM address . However, you need not configure the address yourself, you can let the chassis use default values. Typically, you use the default of VCI 16 on VPI 0.
To change the number of the VCI to be used for the ILMI, enter the following commands at the Where
<c.p> is the card and port number in card.port format (card = 2 to 10; port = 0 to 7).
<1--32767> is the range of VCI values that you can specify for the ILMI.
Establishing Address Information
In many cases, "establishing" address information consists simply of verifying that the Cisco-supplied defaults are acceptable.
If you do not use the Cisco-supplied defaults to establish address information, you must establish the following parameters:
When you enter ASCII address information, you must follow these format rules:
Default Address Information Supplied by Cisco
Cisco supplies defaults for many of the types of ATM address information needed by the LS2020. Use these defaults when the corresponding information has not been configured.
When you use private addresses, you need a per-chassis network prefix. The chassis default is a 13-byte long network prefix, which applies to all UNI ports. If a network prefix is not configured, the default takes the following form:
Where
<chassis MAC address> is the MAC address of the midplane (6 hexadecimal digits).
When a port assumes the user-side role and ILMI is enabled, an ESI is required. If one is not configured, the default takes the following form:
Where
<chassis id> is the chassis identification (6 hexadecimal digits)
<card #> is the card number (2 hexadecimal digits)
<port #> is the port number (2 hexadecimal digits)
If ILMI is disabled on a port, an ATM address for that port must be established. The default ATM address consists of the default network prefix followed by the default ESI. The following example shows a complete ATM address (13-byte network prefix and 6-byte ESI):
Establishing Network Prefix Information
The chassis network prefix identifies the switch and it must be unique to that switch. When you use private addresses, you need a per-chassis network prefix for the node. This means overriding the default. To override the default, enter the following command at the
When you are using public addresses, you need a per-port network prefix for each port. The network prefix is the E.164 address. To set the per-port network prefix, enter the following command at the Where
<c.p> is the card and port number in card.port format (card = 2 to 10; port = 0 to 7).
<idx> specifies the position in the list of per-chassis network prefixes for this node.
<netprefix> specifies the 13-byte-long network prefix for the node.
The end station identifier (ESI) identifies the individual port within the switch (for example, a MAC address). When an LS2020 port assumes the user role and ILMI is enabled, an ESI is required (you can have several ESIs). You can override the default by entering the following command at the Where
<c.p> is the card and port number in card.port format (card = 2 to 10; port = 0 to 7).
<idx> specifies the position in the list of ESIs for the port.
<esi> specifies the ESI for the port.
Establishing Internal Addresses
The internal ATM address is directly associated with a port that is part of a domain (provided that port is a network port). When the ILMI is disabled on a port, an ATM address is required. You can override the default by entering the following command at the Where
<c.p> is the card and port number in card.port format (card = 2 to 10; port = 0 to 7).
<idx> specifies the position in the list of ATM addresses for the port.
<addr> is a complete ATM address.
Establishing External Addresses
You configure external addresses to inform the LS2020 switches in a domain about ATM addresses, that are not directly associated with LS2020 ports but that are reachable through those ports.
Configuring individual external addresses is almost always unnecessary; instead, if a given set of addresses are reachable through a port, you can take advantage of the hierarchical nature of ATM addresses by configuring only the "partial address" which is common to that set of addresses as an external address for the port.
For example, on a private network switch, all ATM addresses associated with that switch typically begin with a common network prefix. If all addresses on that switch are reachable through an LS2020 port, you need only configure the common network prefix as an external address for the port.
If an external address is reachable through more than one LS2020 egress port, it may be associated with these ports through multiple external address configuration commands. In this case, an "order" attribute associated with each port determines the order in which the egress ports will be tried when the network tries to establish a connection to the address.
To establish external addresses, enter the following commands:
Where
<idx> specifies a positiion in the list of external addresses for the port.
<c.p> is the card and port number in card.port format.
<addr> is the partial ATM address.
<order> specifies the order in which multiple egress ports for an address will be tried. The default is 100, with a range of 1 to 255.
If all external addresses are reachable through a port (or set of ports), or if all external addresses not explicitly configured are reachable through a port or ports, you may configure a default egress port (or ports) by entering the following at the
Where
<c.p> is the card and port number in card.port format.
<order> specifies the order in which multiple default ports will be tried.
Any standards-based LANE device can be connected to an LS2020 UNI port so that LANE traffic can be transparently passed between the LAN emulation configuration server (LECS), LAN emulation client (LEC), and broadcast-and-unknown server (BUS). An edge device requiring the address of the LECS can request the address by querying the MIB, which is accessible through the ILMI. The LECS address, which is stored in the MIB, is determined by configuration.
The configured address of the LECS applies to all UNI ports and is configured through the CLI by entering the following command:
Where
<idx> specifies a position in the list of LECS addresses for the node.
<addr> is the ATM address of the LAN Emulation Configuration Server.
Copyright 1988-1996 © Cisco Systems Inc.
cli>
prompt.
Enter password:
*
cli>
prompt.
cli>
prompt:
*cli>
set modem <slot #> password <password>
*
cli
>
prompt:
*cli>
set modem <slot #> initstring <initstring>
*
cli>
prompt:
*cli>
show modem <slot #> all
cli>
prompt.
Enter password:
*
cli>
prompt appears to indicate that you are in protected mode.
*cli>
prompt.
Changing password for npadmin
Enter current password:
Enter new password:
Retype new password:
*
cli>
prompt.
Please use a longer password.
Password unchanged.
Please use a less obvious password.
Passwords don't match, try again.
cli>
prompt, enter
cli>
set snmp community <name>
cli>
prompt.
cli>
prompt.
cli>
prompt:
cli>
show stb general
cli> show stb general
Bridge Max Age:  2000

Bridge Hello Timer:  200

Bridge Forward Delay:  1500

Priority:  0
cli>
prompt:
cli>
set stb maxage <maxagevalue>
cli>
set stb hellotimer <hello-timer-val>
cli>
set stb forwdelay <fwd-delay-val>
cli>
set stb priority <priority>
cli>
prompt
cli>
show stb general
cli>
prompt.
cli>
prompt:
cli>
show stb static
cli>
prompt:
cli>
set stb static <MACaddr> rcv <rcv-port> xmit <xmit-port(s)>
cli>
prompt:
cli>
show stb static
cli>
prompt:
cli>
show stb fwd
cli>
prompt:
cli>
show stb ports
cli>
prompt:
cli>
show port <c.p> {bflt|ipflt|ipxflt} [ID]
(card = 2 to 10; port = 0 to 7)
cli>
prompt:
cli>
show {bflt|ipflt|ipxflt} [ID]
cli>
prompt:
cli>
define bflt <ID> (macDst == yy:yy:yy:yy:yy:yy) && (macScr == xx:xx:xx:xx:xx:xx)
cli>
prompt:
cli>
define bflt <ID> (macDst == xx:xx:xx:xx:xx:xx) && (macSrc == yy:yy:yy:yy:yy:yy)
cli>
prompt:
cli>
set port <c.p> {bflt|ipflt|ipxflt} <ID> {block|forward} <priority>
[tprof <ID>] [mcast <ID>]
(card = 2 to 10; port = 1).
cli>
prompt:
cli>
set port <c.p> bflt [ID] block <priority>
(card = 2 to 10; port = 4).
cli>
prompt:
cli>
show bflt
cli>
show port <c.p> {bflt|ipflt|ipxflt}
(card = 2 to 10; port = 0 to7).
cli>
prompt:
cli>
show mcast [ID]
cli>
prompt:
cli>
define mcast ID [node:]c.p [[node:]c.p...]
cli>
prompt:
cli>
show tprof [ID]
cli>
prompt:
cli>
define tprof ID arguments
cli>
prompt:
cli>
show <c.p> {bflt|ipflt|ipxflt}
(card = 2 to 10; port = 0 to 7).
cli>
prompt:
cli>
set port <c.p> {bflt|ipflt|ipxflt}
<filter ID> {block|forward} <priority>
cli>
prompt:
cli>
show port <c.p> {bflt-def|ipflt-def|ipxflt-def}
<c.p>
is the card and port number in card.port format
(card = 2 to 10; port = 0 to 7).
cli>
prompt:
cli>
set port <c.p> {bflt-def|ipflt-def|ipxflt-def} {block|forward}
(card = 2 to 10; port = 0 to 7).
cli>
prompt:
cli>
show port <c.p> {bflt-def|ipflt-def|ipxflt-def}
cli>
prompt:
cli>
show port <c.p> bcast-limit
(card = 2 to 10; port = 0 to 7).
cli>
prompt:
cli>
set port <c.p> bcast-limit {discard-all|forward-all|packets/sec}
(card = 2 to 10; port = 0 to 7).
cli>
prompt:
cli>
show port <c.p> {bflt|ipflt|ipxflt}
cli>
prompt:
cli>
set port <c.p> {bflt|ipflt|ipxflt} <filter ID> delete
(card = 2 to 10; port = 0 to 7).
cli>
prompt:
cli>
show port <c.p> {bflt|ipflt|ixpflt}
cli>
prompt:
cli>
show {bflt|ipflt|ipxflt}
cli>
prompt:
cli>
show port <c.p> {bflt|ipflt|ipxflt} <filter ID>
(card = 2 to 10; port = 0 to 7).
cli>
prompt:
cli>
delete {bflt|ipflt|ipxflt} <filter-id>
cli>
prompt:
cli>
show {bflt|ipflt|ipxflt}
cli>
prompt:
cli>
set port <c.p> wgrp include
(card = 2 to 10; port = 0 to 7).
cli>
prompt:
cli>
set port <c.p> wgrp exclude
cli>
prompt.
cli>
prompt:
cli>
set port <c.p> wgrp add <wgrp#>
(card = 2 to 10; port = 0 to 7).
cli>
prompt:
cli>
show port <c.p> wgrp
cli>
show port <c.p> wgrp
WorkGroup List
______________
Card Port WgrpId Mode
____ ____ ______ ____
5 7 1 Include
cli>
prompt:
cli>
show port <c.p> wgrp
(card = 2 to 10; port = 0 to 7).
cli>
prompt:
cli>
set port <c.p> wgrp del <wgrp#>
cli>
prompt:
cli> show port <c.p> wgrp
cli>
show port 5.7 wgrp
WorkGroup List
______________
Card Port WgrpId Mode
____ ____ ______ ____
5 7 1 Exclude
cli>
cli> set port <c.p> vpi vpi# destnode {chassisID | chassisIPaddress | chassisname}
cli> set port <c.p> vpi vpi# destport <c.p>
cli> set port <c.p> vpi vpi# destvpi destvpi#
cli> set port <c.p> vpi vpi# activate
cli>
prompt:
cli>
set port <c.p> vpi VPI# activate
(card = 2 to 10; port = 0 to 7).
cli>
prompt:
cli>
show port <c.p> vpi VPI#
cli>
prompt:
cli>
set port <c.p> vpi VPI# del
(card = 2 to 10; port = 0 to 7).
cli>
prompt:
cli>
show port <c.p> vpi VPI#
(card = 2 to 10; port = 0 to 7).
cli>
prompt:
cli> set port <c.p> uni {private | public}

cli> set port <c.p> uni {network | user}
cli> set port <c.p> uni {uni3-0 | uni3-1 | iisp3-0 | iisp3-1}
cli> set port <c.p> uni signalling {enable | disable}

cli> set port <c.p> uni ilmi { enable | disable}

cli> set port <c.p> uni active-vci-bits <0-15> (the default is 15)

cli> set port <c.p> uni active-vpi-bits <0-8>  (the default is 0)
cli>
prompt:
cli> set port <c.p> signalling-uni address-format { nsap | e164 | both }

cli> set port <c.p> signalling-uni subaddress-route { yes | no}
cli> set port <c.p> signalling-uni vci-range min <32-32767> (the default is 48)
cli> set port <c.p> signalling-uni vci-range max <32-32767> (the default is 32767)
cli> set port <c.p> signalling-uni max-rate <cps> (the default is 4% of line rate)
cli> set port <c.p> signalling-uni vci <1-32767> (the default is 5)
cli>
prompt:
cli> set port <c.p> ilmi-uni vci <1-32767>(the default is 16)
"+1.508.555.1212"
"47.0091.81.000000.010203040506.0a0b0c0d0e0f"
"47.0091.81.000000.010203040506.0a0b0c0d0e0f00"
47.0091.81.000000.<chassis MAC address>
42.<chassis id>.<card #>.<port #>
Network Prefix
ESI
47.0091.81.000000.<chassis MAC address>
42.<chassis>.<card>.<port> (optional SEL byte)
cli>
prompt:
cli> set chassis atm-netprefix add <idx> <netprefix>
cli>
prompt:
cli> set port <c.p> atm-netprefix add <idx> <netprefix>
cli>
prompt:
cli> set port <c.p> atm-esi <idx> <esi>
cli>
prompt:
cli>
set port local-atm-address add <idx> <addr>
cli> set port <c.p> extern-atm-address add <idx> <addr>
cli> set port <c.p> extern-atm-address order <idx> <order>
cli> set port <c.p> extern-atm-address validate <idx>
cli>
prompt:
cli> set chassis atm-default-port add <c.p> <order>
cli> set chassis lecs-address add <idx> <addr>
![]()
![]()
![]()
![]()
![]()
![]()
![]()
![]()