
Table of Contents
Installing the FastHub
Installing the FastHub
This chapter provides the following installation procedures:
- Unpacking
- Installation requirements
- Installing the unit
- Installing modules
- Building a hub stack (interconnecting units)
- Connecting to a terminal or modem
Additional procedures include:
- Removing modules
- Removing units
Warnings
Translated versions of the following safety warnings are provided in the "Translated Safety Warnings" appendix.
Warning Do not work on the system or connect or disconnect cables during periods of lightning activity.

Warning Do not touch the power supply when the power cord is connected. For systems with a power switch, line voltages are present within the power supply even when the power switch is off and the power cord is connected. For systems without a power switch, line voltages are present within the power supply when the power cord is connected.

Warning Read the installation instructions before you connect the system to its power source.

Warning This product relies on the building's installation for short-circuit (overcurrent) protection. Ensure that a fuse or circuit breaker no larger than 120 VAC, 15A U.S. (240 VAC, 10A international) is used on the phase conductors (all current-carrying conductors).

Warning To prevent the unit from overheating, do not operate it in an area that exceeds the maximum recommended ambient temperature of 104°F (40°C). To prevent airflow restriction, allow at least 3 inches (7.6 cm) of clearance around the ventilation openings.

Warning The device is designed to work with TN power systems.

Warning This equipment is intended to be grounded. Ensure that the host is connected to earth ground during normal use.

Warning Ultimate disposal of this product should be handled according to all national laws and regulations.

Warning Only trained and qualified personnel should be allowed to install or replace this equipment.

Warning Care must be given to connecting units to the supply circuit so that wiring is not overloaded.

Warning A voltage mismatch can cause equipment damage and may pose a fire hazard. If the voltage indicated on the label is different from the power outlet voltage, do not connect the chassis to that receptacle.

Warning To prevent bodily injury when mounting or servicing this unit in a rack, you must take special precautions to ensure that the system remains stable. The following guidelines are provided to ensure your safety:

- This unit should be mounted at the bottom of the rack if it is the only unit in the rack.
- When mounting this unit in a partially filled rack, load the rack from the bottom to the top with the heaviest component at the bottom of the rack.
- If the rack is provided with stabilizing devices, install the stabilizers before mounting or servicing the unit in the rack.
Warning Unplug the power cord before you work on a system that does not have an on/off switch.

Warning Before working on equipment that is connected to power lines, remove jewelry (including rings, necklaces, and watches). Metal objects will heat up when connected to power and ground and can cause serious burns or weld the metal object to the terminals.

FastHub Terminology
Table 2-1 defines the terminology used in this guide when discussing the FastHub.
Table 2-1 : FastHub Terminology
| Unit
|
Either of the two base units; a single physical repeater. Contrast with logical repeater.
|
| Hub
|
Single unit or interconnected units forming a hub stack.
|
| Hub stack
|
Interconnected units (up to four per hub stack).
|
Logical repeater
(or repeater)
|
Single unit or two to four units interconnected to create a single logical repeater. Interconnected units appear to the rest of the network and to the management console as one single logical repeater.
|
| Physical repeater
|
Same as unit---either of the two base units or another 100BaseT repeater.
|
| Collision domain
|
All of the devices connected to each other through one or more repeaters without any intervening bridge, switch, or router are said to be in the same collision domain. When two or more devices in a collision domain transmit at the same time, a collision occurs. Devices separated by a bridge, switch, or router are in different collision domains.
|
| Interconnect
|
Interconnect FastHubs (up to four) through the expansion connectors using the expansion cable to form a single logical repeater. See logical repeater description.
|
| Cascade
|
Cascade one FastHub to another through the 100BaseT ports using Category 5 UTP or multimode fiber-optic cable, resulting in two logical repeaters.
|
Unpacking the FastHub
Follow these steps to unpack the unit:
Step 1 Open the shipping container and carefully remove the contents.
Step 2 Return all packing materials to the shipping container and save it.
Step 3 Ensure that all items on the packing list were included in the shipment. Check each item for damage.
- Each FastHub is shipped with the following items:
- Rack-mount kit containing two brackets and four screws
- Four rubber feet for tabletop placement
- AC power cord
- Cable guides and screws
- This Catalyst FastHub 100+ Series Installation and Configuration Guide
- Cisco Connection Documentation, CiscoPro Solutions CD
- Warranty package
Note If any of these items are damaged or missing, notify Cisco Systems or your authorized Cisco reseller.
Installation Requirements
When determining where to place the FastHub, ensure that the following conditions are met:
- Cable distances from the FastHub to network equipment and workstations are within the limits listed in the "Making Network Connections" chapter.
- Operating environment is within the ranges listed in "Technical Specifications" in Appendix A.
- Clearance to front and rear panels is such that:
- Front panel indicators can be easily read.
- Access to ports is sufficient for unrestricted cabling.
- Rear-panel power connector is within reach of an AC power receptacle.
- Airflow around the unit and through the vents is unrestricted.
- Cabling is away from sources of electrical noise, such as radios, power lines, and fluorescent lighting fixtures.
Installing the FastHub
This section provides installation procedures for the FastHub. You can install the unit in a standard 19-inch rack or on a desk or table.
Rack-Mount Installation
The FastHub is supplied with two brackets and four screws for mounting in a standard 19-inch rack. The four rubber feet shipped with each unit are not used for rack-mounting.
To install the unit in a rack:
Step 1 Place the unit on a level surface and attach a rack-mount bracket on each side, as shown in Figure 2-1.
Figure 2-1 : Attaching a Rack-Mount Bracket

Step 2 Place the unit in the rack and secure with screws, as shown in Figure 2-2.
Figure 2-2 : Rack-Mounting the Unit

Step 3 Attach the left and right cable guides to the rack-mount brackets, as shown in Figure 2-3.
Figure 2-3 : Attaching Cable Guides

Step 4 If you are only installing one unit, go to Step 5.
- If you are installing multiple units that are to be interconnected through the rear panel expansion connectors:
- Install all the units in the rack.
- Follow the interconnection procedure in the "Building a Hub Stack" section in this chapter.
Step 5 Attach the power cord to the unit. If your configuration has a redundant power supply (RPS), see the RPS documentation. Note that only one power source can be supplying power to the unit. If you are using the RPS, the FastHub power cord must not be plugged in.
Step 6 See the "Making Network Connections" chapter for network connectivity procedures.
Tabletop Installation
To install the unit on a desk or table:
Step 1 Place the unit on a desk or table close to an AC power receptacle.
Step 2 Locate the adhesive strip with the rubber feet that shipped with the FastHub. Attach the rubber feet to the four round recessed areas on the bottom corners of the unit.
Note If you stack additional units on top of the bottom one, place rubber feet on the units being added to the hub stack.
Step 3 If you are only installing one unit, go to Step 4.
- If you are installing multiple units that are to be interconnected through the rear panel expansion connectors:
- Stack all the units.
- Follow the interconnection procedure in the "Building a Hub Stack" section in this chapter.
Step 4 Attach the power cord to the unit. If your configuration has an RPS, see the RPS documentation. Note that only one power source can be supplying power to the unit. If you are using the RPS, the FastHub power cord must not be plugged in.
Step 5 See the "Making Network Connections" chapter for network connectivity procedures.
Module Installation
This section provides installation procedures for the network management module (NMM) and 100BaseTX/16 port expansion module.
Network Management Module
Follow these steps to install the NMM.
 Caution Handle the NMM by the board edges to prevent ESD damage.
Note The NMM is hot-insertable; it can be added to the base unit without powering down or adversely affecting network performance.
Step 1 Remove the FastHub slot cover from the NMM slot by loosening the thumbscrews on each side of the slot cover.
Step 2 Holding the NMM by its front panel, guide it into the slot, aligning the sides of the NMM with the card guides in the slot, as shown in Figure 2-4.
Figure 2-4 : Installing the Network Management Module

Step 3 While keeping the NMM oriented horizontally, carefully slide it into the slot until the backplane connector is fully seated in the backplane.
Step 4 Tighten the thumbscrews on each side of the NMM.
Step 5 When the NMM is first seated in the backplane, the NMM front-panel LED flashes green, indicating that its power-on self-test (POST) is in progress.
- If this is the only NMM in the hub stack, after the POST the LED is solid green. This shows that the NMM is operational (enabled).
- If this is the second (standby) NMM in the hub stack, after the POST the LED is solid amber. This shows that the NMM is the secondary NMM and is operational (enabled).
Connecting to a Terminal or Modem
Note The terminal connected to the NMM console port must support VT-100 terminal emulation.
Note The well-known standard RS-232 was renamed EIA/TIA-232 after its acceptance by the Electronics Industries Association (EIA) and Telecommunications Industry Association (TIA).
The NMM contains an EIA/TIA-232 asynchronous console port (DB-9 male connector). You connect a terminal to the console port to access the FastHub management console, allowing you to manage a variety of hub and hub stack functions. Before connecting the terminal or modem, configure it to match the console port configuration defaults, as follows:
- 9600 baud
- Eight data bits
- One stop bit
- Parity: none
Use the null-modem cable supplied with the NMM to connect to a terminal. Use a standard modem cable to connect to a modem. See "Connectors and Cabling" in Appendix B for connector pinout and cabling details for null-modem and modem cables.
Connect the null-modem or modem cable as follows:
Step 1 Insert the cable connector into the NMM console port, as shown in Figure 2-5.
Figure 2-5 : Connecting the Network Management Module to a Terminal or Modem

Step 2 Insert the other end of the cable into the terminal or modem.
Step 3 From your terminal, boot the terminal emulation program.
Step 4 The FastHub Logon Security Menu is displayed. If network connectivity has been performed, see the "Out-of-Band Management" chapter for details on using the NMM management console. If network connectivity has not been performed, see the "Making Network Connections" chapter for network connectivity procedures.
Note If the Logon Security Menu does not display, see the "Troubleshooting" chapter for assistance.
Port Expansion Module
Follow these steps to install the 100BaseTX/16 port expansion module.
 Caution Handle the port expansion module by the board edges to prevent ESD damage.
Note The port expansion module is hot-insertable; it can be added to the base unit without powering down or adversely affecting network performance.
Step 1 Remove the FastHub slot cover from the port expansion module slot by loosening the thumbscrews on each side of the slot cover.
Step 2 Holding the port expansion module by its front panel, guide it into the slot, aligning the sides of the port expansion module with the card guides in the slot, as shown in Figure 2-6.
Figure 2-6 : Installing the Port Expansion Module

Step 3 While keeping the port expansion module oriented horizontally, carefully slide it into the slot until the backplane connector is fully seated in the backplane.
Step 4 Tighten the thumbscrews on each side of the port expansion module.
Note The port LEDs on the port expansion module remain off until a link is established.
Step 5 See the "Making Network Connections" chapter for network connectivity procedures.
Removing a Module
The NMM and the 100BaseTX/16 port expansion modules can be removed from the base unit without powering down the base unit. To remove a module, loosen the thumbscrews on each side of the module, and carefully slide it out of the base unit.
Building a Hub Stack
It is important to understand how the type of hub connection used in the installation plays a role in both managing the hub stack and determining acceptable cable distances between attached network devices.
Logical Repeaters
FastHub units are interconnected using the expansion cable and the expansion connectors on the rear of the unit; all units appear to the rest of the network and to the management console as a single logical repeater. You need one NMM per four interconnected units (hub stack).
Interconnecting hubs differs from cascading hubs by using the standard 100BaseT ports on the front of the unit. When one FastHub is cascaded to another FastHub, using Category 5 UTP or multimode fiber-optic cable and the 100BaseT ports, the two units appear to the rest of the network and to the management console as two logical repeaters. You need one NMM per unit.
Figure 2-7 shows four interconnected units creating a 128-port logical repeater; cascading two units results in a maximum of 64 ports between two logical repeaters.
Figure 2-7 : Building a Hub Stack

Collision Domains
Class II repeaters enable you to build networks with two or more repeaters or hub stacks in a single collision domain. With two Class II repeaters, you can have a short segment connecting the repeaters while maintaining 100-meter Category 5 UTP connections to the attached stations. Using more than two repeaters in a single collision domain requires considerably shorter connections to attached stations. Figure 2-8 shows the connection of two hub stacks to form a collision domain with up to 254 ports.
Figure 2-8 : Collision Domains

Hub Stack Interconnection
Note To cascade units through the 100BaseT ports, see the "Making Port Connections" section in the "Making Network Connections" chapter.
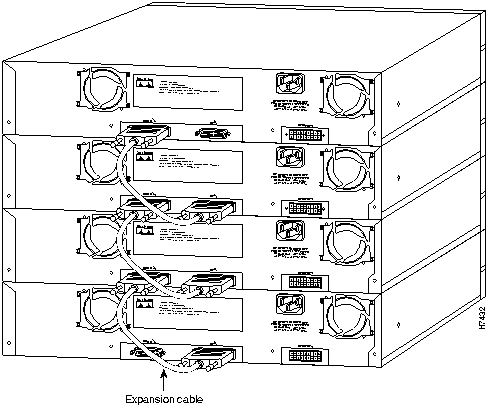
The physical position of the units in the hub stack and the expansion cable connections between units determine how they appear to the NMM management interface. The NMM management console uses a unit numbering convention, assigning hubs unit numbers from the bottom up---the hub at the bottom of the stack is unit 1, the hub above unit 1 is unit 2, and so on (see Figure 2-9). If you have four units in a stack and you remove unit 3 and connect the expansion cable from unit 2 to unit 4, unit 4 is renumbered as unit 3.
Use the following guidelines when connecting the expansion cables:
- Never connect an UP connector to an UP connector or a DOWN connector to a DOWN connector.
- Always connect the expansion cables following the direction of the arrows printed above each expansion connector on the rear panel (see Figure 2-9).
- Unit 1, the bottom unit, is always the unit with its DOWN connector left open.
- The UP connector of a lower unit is always connected to the DOWN connector of an upper unit.
- The UP connector of the topmost unit and the DOWN connector of the bottommost unit are always left open.
- Ensure that all screw locks on the expansion cable connectors are secure.
- Ensure that all unit interconnections are done before powering up (plugging in) the FastHubs. Interconnecting units while the units are powered up resets the units.
Only one power source can be supplying power to the unit. If you are using the RPS, the FastHub power cord must not be plugged in. If your configuration has a redundant power supply, see the RPS documentation.
See the "Making Network Connections" chapter for network connectivity procedures.
Figure 2-9 : Hub Stack Interconnection
Removing a FastHub
This section provides instructions for removing a FastHub from a hub stack.
Note Units can be safely inserted or removed from the hub stack without powering down any units in the stack. The stack reconfigures itself in less than 1 second (300 msec). During this brief period, all packets received by the hub stack are dropped. However, the end-station protocols retransmit the lost packets; no connections are lost and there is no degradation in network performance. If an NMM is present, all configured system parameters are retained, however, all network related statistics are cleared.
 Caution If the unit you are removing has an NMM installed and there is no backup NMM in the hub stack, you lose manageability for the entire hub stack.
 Caution In addition to losing port connectivity for the unit being removed, if the unit is mounted between two operating units, you split the Ethernet segment into two separate segments when the expansion cables are disconnected.
Follow these steps to remove the FastHub:
Step 1 On the FastHub being removed, disconnect the expansion cable from the DOWN and UP connectors.
Step 2 Remove the unit from the rack or tabletop.
Step 3 To prevent the FastHub units from introducing noise into the network through the disconnected expansion cables, it is important that you either install a replacement FastHub or reconnect the cables to existing stack units. See the "Hub Stack Interconnection" section in this chapter to interconnect the units.
Copyright 1988-1996 © Cisco Systems Inc.