
Table of Contents
Preparing for Installation
Preparing for Installation
This chapter includes specific information about required tools and parts, safety guidelines, and specific preparatory information required to assure a successful installation.
Do not unpack the Cisco 7513 until you are ready to install it. Keep the chassis in the shipping container to prevent accidental damage until you have determined where you want it installed. Use the document Cisco 7513 Unpacking Instructions (Document Number 78-2167-xx, where xx represents the latest version), which is available on Cisco Connection Documentation CD-ROM or as a printed copy. The Cisco Information Packet is included in the shipping container, together with any companion publications you specified on your order. Inspect all items for shipping damage. If anything is damaged, immediately contact a customer service representative.
Following are the tools and parts generally required to install your Cisco 7513:
- Number 1 Phillips and 3/16-inch (0.476 cm) flat-blade screwdrivers
- Rack-mount kit (hardware and documentation; procedure requires two people)
- One interface cable for each physical interface required
- A 20-amp circuit breaker and 20-amp outlet are required
- A channel service unit/digital service unit (CSU/DSU) for each data terminal equipment (DTE) serial interface
- Ethernet and Fast Ethernet transceivers (if required for the EIP and FEIP interfaces)
- Modem for remote configuration (if required)
- Additional tools, parts, and procedures listed and discussed in companion documentation, and which are not discussed in this publication
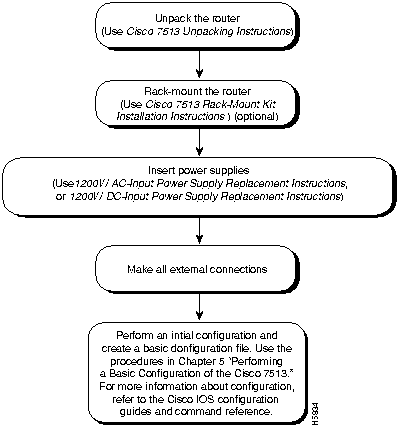
The flowchart in Figure 2-1 illustrates the recommended order of procedures to install the Cisco 7513 router, and additional Cisco publications to which you should refer.
Figure 2-1 Installation Flowchart
Because any device that uses electricity must be treated with respect, follow these guidelines to ensure general safety:
- Keep the chassis area clear and dust-free during and after installation.
- Keep tools away from walk areas where you and others could trip over them.
- Locate the emergency power-off switch for the room in which you are working. Then, if an electrical accident occurs, you can act quickly to shut off power.
- Wear safety glasses when exposed to conditions that might be hazardous to your eyes.
- Do not perform any action that creates a potential hazard to people or makes the equipment unsafe.
- When ESD grounding is required, ground the chassis using the power cable or a chassis ground wire.

Warning Before opening the chassis, disconnect the telephone-network cables to avoid contact with telephone-network voltages. (For translated versions of this warning, refer to the appendix "Translated Safety Warnings.")
- Do not work alone when potentially hazardous conditions exist.
- Never assume that power is disconnected from a circuit. Always check.

Warning Do not work on the system or connect or disconnect cables during periods of lightning activity. (For translated versions of this warning, refer to the appendix "Translated Safety Warnings.")
- Look carefully for possible hazards in your work area, such as moist floors, ungrounded power extension cables, and missing safety grounds.

Warning This unit might have more than one power cord. To reduce the risk of electric shock, disconnect the two power supply cords before servicing the unit. (For translated versions of this warning, refer to the appendix "Translated Safety Warnings.")
- If an electrical accident occurs, proceed as follows:
- Use caution; do not become a victim yourself. Disconnect power to the system.
- If possible, send another person to get medical aid. Otherwise, assess the condition of the victim and then call for help.

Warning Before working on a chassis or working near power supplies, unplug the power cord on AC units or disconnect the power at the circuit breaker on DC units. (For translated versions of this warning, refer to the appendix "Translated Safety Warnings.")
 Caution To assure that you provide a safe and effective ground when installing this unit, the ground must always be made first and disconnected last. This can be accomplished by using the power cable provided with your unit.
Note Wiring codes prevent 20A plugs from being used with most equipment rack power strips. The installation must comply with all applicable codes. The ground bond fastening hardware should be of compatible material and preclude loosening, deterioration, and electro-chemical corrosion of hardware and joined material. Installation is approved for use with copper conductors only. Attachment of the chassis ground receptacles to the central office or other interior ground system should be made with a Number 6 AWG copper ground conductor as a minimum. The Cisco 7513 chassis employs two threaded, M4 x .7 chassis ground receptacles. These receptacles are intended to be bonded directly to the central office or other interior ground system, and are located on each side of the rear of the chassis as shown in Figure 1-1. The chassis ground receptacles require M4 bolts and locking hardware, which are not included.
Electrostatic discharge (ESD) can damage equipment and impair electrical circuitry. It occurs when electronic components are improperly handled and can result in intermittent or complete failures. Always follow ESD-prevention procedures when removing and replacing components. Ensure that the chassis is electrically connected to earth ground. Wear an ESD-preventive wrist strap, ensuring that it makes good skin contact. To safely channel unwanted ESD voltages to ground, connect the clip to an unpainted surface of the chassis frame. If no wrist strap is available, ground yourself to the metal chassis.

Caution For safety, periodically check the resistance value of the ESD-preventive wrist strap, which should be between 1 and 10 megohms.
Depending on your configuration, you might need to remove processor modules to reduce the weight of the chassis for rack-mount installation. To remove or insert interface processors (AIP, CIP, EIP, FEIP, FIP, FSIP, HIP, MIP, and TRIP), which support online insertion and removal (OIR), you do not need to turn off power to the system; however, you must turn off the system power before you insert or remove an RSP2.
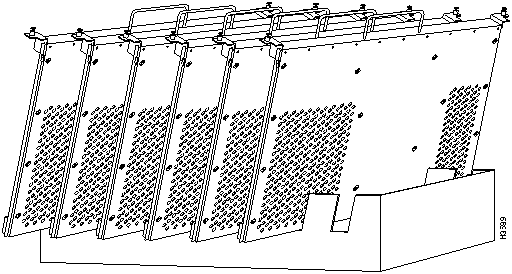
Note Place removed processor modules in the collapsible, black-cardboard, board racks that were provided with your packing material, as shown in Figure 2-2.
Figure 2-2 Temporary Storage for Removed Processor Modules
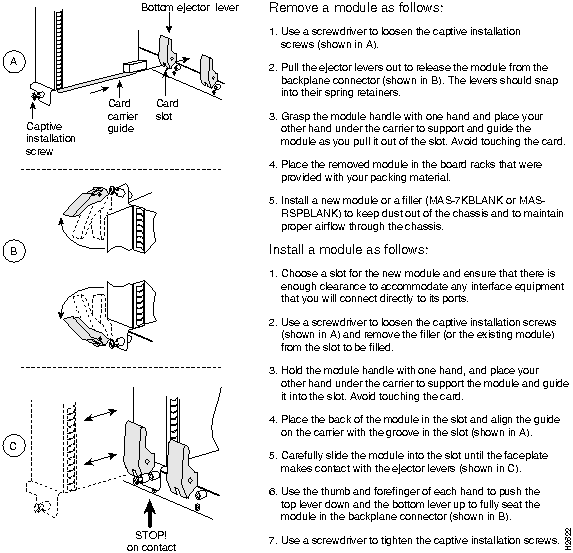
You need a number 1 Phillips or 3/16-inch, flat-blade screwdriver to remove any fillers (blank processor module carriers) and to tighten the captive installation screws that secure the processor module in its slot. Whenever you handle modules, you should use an ESD-preventive wrist strap or other grounding device to prevent ESD damage.
You can install interface processors in any of the eleven interface processor slots, numbered 0 through 5 (CyBus 0) and 8 through 12 (CyBus 1), from left to right when viewing the chassis from the rear. Slots 6 and 7 are the RSP slots and are reserved for the RSP2, which is a required system component. (Refer to the illustration of the card cage in Figure 1-2, in the chapter "Product Overview.")

Caution To prevent the overheating of internal components, always install interface processor fillers (MAS-7KBLANK) and RSP fillers (MAS-RSPBLANK) in the appropriate empty chassis slots to maintain the proper flow of cooling air across the processor modules. To prevent ESD damage, handle processor modules by the handles and carrier edges only.
Figure 2-3 shows the procedures for removing and replacing processor modules.
Figure 2-3 Removing and Replacing Processor Modules
Copyright 1988-1996 © Cisco Systems Inc.