|
|
Upgrading the Boot ROM on the RSP2 and Initializing the HSA Feature
Product Number RSP2-ROMMON=
This configuration note discusses the procedures required to replace the boot read-only memory (ROM) device on the Route Switch Processor (RSP2) in Cisco 7507 and Cisco 7513 routers and to initialize the high system availability (HSA) feature.
The HSA feature allows two RSP2s to be used simultaneously in a Cisco 7507 or Cisco 7513 router. One RSP2 operates as system master and the other RSP2 operates as the system slave, which takes over if the master RSP2 fails.
The boot ROM device for the RSP2 is an erasable programmable read-only memory (EPROM) device located in socket U30 on the RSP2, and is a dual in-line package (DIP).
Order of Procedures for the Boot ROM Upgrade and HSA Initialization
Following is the recommended order for the procedures you need to perform to replace the boot ROM device and then initialize the HSA feature:
The procedures for replacing the boot ROM and initializing HSA require the following tools and parts. (Also refer to the section "Software and Hardware Prerequisites," on page 4, for specific RSP2 DRAM requirements.)
Preventing Electrostatic Discharge Damage
Electrostatic discharge (ESD) can damage equipment and impair electrical circuitry. It occurs when electronic components are improperly handled and can result in intermittent or complete failures. Always follow ESD-prevention procedures when removing and replacing components. Ensure that the chassis is electrically connected to earth ground. Wear an ESD-preventive wrist strap, ensuring that it makes good skin contact. To safely channel unwanted ESD voltages to ground, connect the clip to an unpainted surface of the chassis frame. If no wrist strap is available, ground yourself to the metal chassis.
Software and Hardware Prerequisites
For the high system availability (HSA) feature to operate properly, the following prerequisites must be observed:
With HSA operation, the following items are important to note:
Determining Your Current Cisco IOS Release and System Bootstrap Version
The HSA feature requires Cisco IOS Release 11.1(4), or later, and System Bootstrap Version 11.1(2) or later. Your system might already be running System Bootstrap Version 11.1(2). Use the show version command to display the system bootstrap version currently running on the RSP2(s) in your Cisco 7507 or Cisco 7513.
Following is sample output of the show version command. (Take special note of the display lines preceded by >>. These lines indicate the Cisco IOS release and system bootstrap version currently running on your system.)
Installing the Correct Cisco IOS Release
If you determine that your Cisco IOS release is not Cisco IOS Release 11.1(4) or later, you need install the correct Cisco IOS release on the Flash memory card installed in PCMCIA slot 0. The following sections describe the procedures for copying a new Cisco IOS image to the Flash memory cards in the PCMCIA slots on your RSP2.
Copying a Cisco IOS Image from a TFTP Server to a Flash Memory Device
Following is the procedure for copying a Cisco IOS image to Flash memory. While there are several methods for copying Cisco IOS images from a TFTP server to a Flash memory device, the following method is recommended. Press Return after each command.
Configuring the System to Boot from the Correct Cisco IOS Image
Following is the procedure for configuring the system to boot from the correct Cisco IOS image stored in the Flash memory device. For HSA compatibility, this is Cisco IOS Release 11.1(4) or later. If the file from which you want to boot is the first file on the Flash memory device in slot 0, no modification is required to boot the new file; use the command boot system flash. However, if the file is not the first file listed in the Flash memory device, or is on another Flash memory device, you need to modify the configuration file to point to the Flash memory device and to the specific Cisco IOS image filename within it. Configure the system as follows:
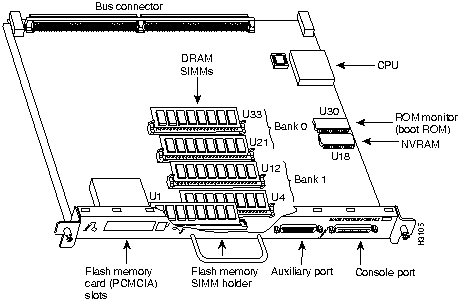
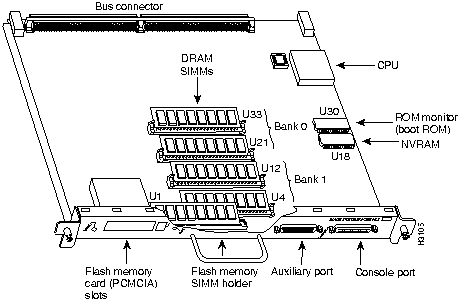
The boot ROM device is located in socket U30 on your RSP2. (See Figure 2.) Though the RSP slots are numbered differently in the Cisco 7507 and Cisco 7513, the procedures to remove an RSP2, replace the boot ROM device, and reinstall the RSP2 are identical for each chassis. Differences between the Cisco 7507 and the Cisco 7513 are clearly noted. Upgrade both RSP2s if required.
Figure 2 : Route Switch Processor (RSP2), Horizontal Orientation Shown
Following is the procedure for removing the RSP2:
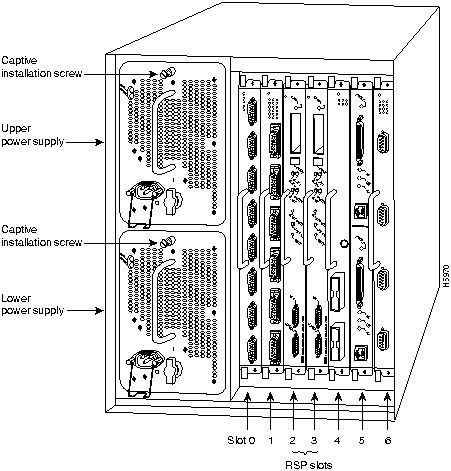
Figure 3 : Cisco 7507 with Two RSP2s Installed
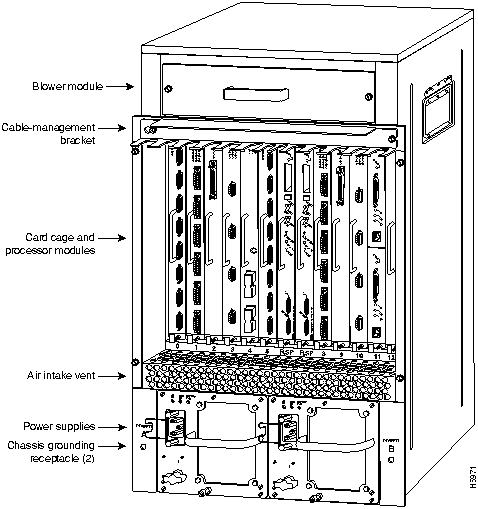
Figure 4 : Cisco 7513 with Two RSP2s Installed
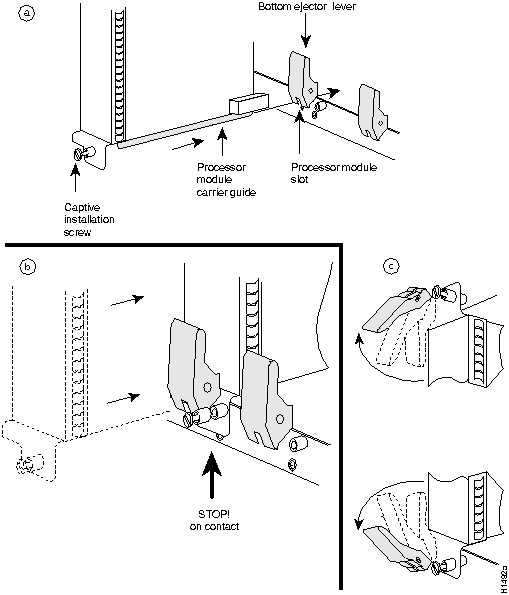
Figure 5 : Ejector Levers and Captive Installation Screw
This completes the RSP2 removal procedure. Proceed to the section "Changing the Boot ROM."
Following is the procedure for upgrading the boot ROM device on the RSP2.
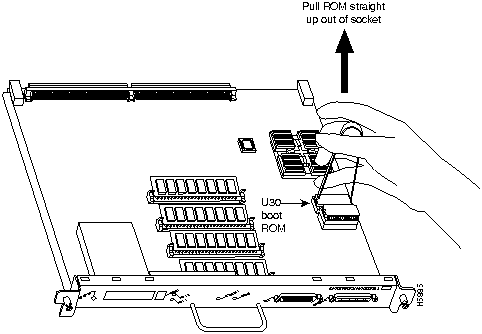
Figure 6 : Boot ROM Location on RSP2
Figure 7 : Boot ROM Label---Boot ROM Version 11.1(2) for Initial HSA Compatibility
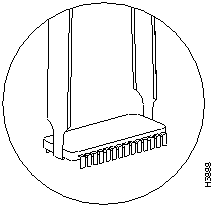
Figure 8 : Enlargement of the IC Removal Tool and Boot ROM
Figure 9 : Using the IC Removal Tool to Remove the Boot ROM
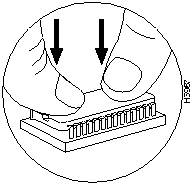
Figure 10 : Inserting the Boot ROM into the U30 Socket
If any pins are bent, remove the boot ROM, use the needlenose pliers to straighten the pins, and reinsert the boot ROM using steps 7 through 9. Note that a broken pin means that the boot ROM is unusable, and you must order a new one.
If all pins are inserted correctly and the boot ROM notch is aligned with the socket notch, the boot ROM is properly installed. Proceed to the section "Replacing the RSP2."
The RSP2 is keyed for installation only in an RSP2 slot. (See Figure 3 for the Cisco 7507 or Figure 4 for the Cisco 7513.) By default, the system master is the RSP2 that occupies the first RSP slot in the chassis---slot 2 in the Cisco 7507, and slot 6 in the Cisco 7513. Install both RSP2s in the chassis as required.
Follow these steps to install an RSP2:
Restarting the System and Initializing the HSA Feature
When you turn the system power back on, verify that the system boots and resumes normal operation. If you are restarting the system after upgrading the DRAM, expect that it will take the system longer to complete the memory initialization portion of the boot sequence with more DRAM.
Follow these steps to verify that the RSP2 is installed and functioning properly:
Amend the configuration file to boot the HSA-compatible Cisco IOS image on the slave RSP2 by copying the HSA-compatible Cisco IOS image to the Flash memory device on the slave RSP2. (The Flash memory device can be bootflash:, slot0:, or slot1:, but slot0: is used in the following examples.) Proceed as follows:
Verifying that the HSA Feature is Properly Initialized
Following is the procedure for verifying HSA initialization. Verify that the HSA feature is properly initialized using the show version and show boot commands. An example from a Cisco 7513 follows. (Take special note of the lines preceded by >>.)
Issue the show boot command. An example from a Cisco 7513 follows. (Take special note of the line preceded by >>.)
The HSA feature is now initialized. Refer to the section "Reference Information" for information on specific HSA configuration documentation.
If you need additional troubleshooting information for your Cisco 7507 or Cisco 7513, refer to the Cisco 7507 Hardware Installation and Maintenance or Cisco 7513 Hardware Installation and Maintenance publications.
If you need to configure the HSA feature for your RSP2, refer to the following publications:
All publications are available on the Cisco Connection Documentation, Enterprise Series CD-ROM, Cisco's online library of product information, or as printed copies.
The following sections include information on saving a configuration file to a server, retrieving the configuration file from a TFTP server, copying configuration files between your RSP2's NVRAM and a Flash memory card, and contacting Cisco Systems for additional information or assistance.
Saving and Retrieving the Configuration File
This section describes the procedures for saving (copying) and retrieving the system configuration using a Trivial File Transfer Protocol (TFTP) server.
Configuration information resides in two places when the router is operating: the default startup (permanent) configuration in NVRAM, and the running (temporary) configuration in DRAM. The startup configuration always remains available; NVRAM retains the information even when the power is shut down.
The running configuration is lost if the system power is shut down. The startup configuration (in NVRAM) contains all nondefault configuration information that you added with the configure command, the setup command facility, or by editing the configuration file.
The copy running-config startup-config command saves the running configuration to the startup configuration file in NVRAM, so that it will also be saved when power is shut down. Whenever you make changes to the system configuration file, issue the copy running-config startup-config command to ensure that the new configuration information is saved.
Save the configuration file to a remote server before removing the RSP2. You can retrieve it later and write it back into NVRAM. If you do not copy the configuration file, you will have to use the configure command or the setup command facility to reenter the configuration information after you reinstall the RSP2. This procedure requires privileged-level access to the EXEC command interpreter, which usually requires a password. Refer to the description that follows and contact your system administrator to obtain access, if necessary.
Using the EXEC Command Interpreter
Before you use the configure command, you must enter the privileged level of the EXEC command interpreter using the enable command. The system prompts you for a password if one has been set.
The system prompt for the privileged level ends with a pound sign (#) instead of an angle bracket (>). At the console terminal, enter the privileged level as follows:
The pound sign (#) at the system prompt indicates that you are at the privileged level of the EXEC command interpreter; you can now execute the EXEC-level commands that are described in the following sections.
Using the ping Command to Verify Server Connectivity
Before you attempt to copy or retrieve a file from a remote host, ensure that the connection is good between the router and the remote server by using the packet internet groper (ping) program. The ping program sends a series of echo request packets to the remote device and waits for a reply. If the connection is good, the remote device echoes them back to the local device.
The console terminal displays the results of each message sent: an exclamation point (!) indicates that the local device received an echo, and a period (.) indicates that the server timed out while awaiting the reply. If the connection between the two devices is good, the system displays a series of exclamation points (! ! !) or [ok]. If the connection fails, the system displays a series of periods (. . .) or [timed out] or [failed].
To verify the connection between the router and a remote host, issue the ping command followed by the name or Internet Protocol (IP) address of the remote server; then press Return. Although the ping command supports configurable options, the defaults, including interface processor as the protocol, are enabled when you enter a host name or address on the same line as the ping command. For a description of the configurable options, refer to the appropriate software documentation. The following example shows a successful ping operation:
The following example shows the results of a failed ping operation:
If the connection fails, check the physical connection to the remote file server and verify that you are using the correct address or name, then ping the server again. If you are unable to establish a good connection, contact your network administrator or refer to the end of this document for instructions on contacting technical assistance.
Copying the Configuration File
Before you copy the running configuration to the TFTP file server, ensure the following:
To store information on a remote host, enter the copy startup-config tftp privileged EXEC command. The command prompts you for the destination host's address and a filename, then displays the instructions for confirmation. When you confirm the instructions, the router sends a copy of the currently running configuration to the remote host. The system default is to store the configuration in a file called by the name of the router with -confg appended. You can either accept the default filename by pressing Return at the prompt, or enter a different name before pressing Return.
Follow these steps to copy the currently running configuration to a remote host:
After you copy the configuration file, proceed to the section "Upgrading the Boot ROM Device" on page 9. Then proceed to the following section "Retrieving the Configuration File," after you have replaced the boot ROM and reinstalled the RSP2. If you are unable to copy the configuration file to a remote host successfully, contact your network administrator or refer to the end of this document for instructions on contacting technical assistance.
Retrieving the Configuration File
After you reinstall the RSP2, you can retrieve the saved configuration and copy it back to NVRAM. To retrieve the configuration, enter configuration mode and specify that you will configure the router from the network. The system prompts you for a host name and address, the name of the configuration file stored on the host, and confirmation to reboot using the remote file.
Follow these steps to retrieve the currently running configuration from a remote host:
This completes the procedure for retrieving the saved configuration file.
Copying Files Between RSP2 NVRAM and a Flash Memory Card
Copying a configuration file to a Flash memory card in PCMCIA slot 0 or slot 1, might be required if you do not have access to a TFTP server on which you can temporarily store your configuration file. You can then copy the configuration file back to NVRAM after the boot ROM replacement procedure is complete. Use the following sections to first copy the configuration file to a Flash memory card, and then to copy the configuration from the Flash memory card back to NVRAM.
Copying a Configuration File from RSP2 NVRAM to a Flash Memory Card on the RSP2
You can use the command copy startup-config [ slot0: | slot1: ]:filename for the copy procedure where startup-config is the file's source (NVRAM) and [slot0: | slot1: ]:filename is the file's destination, in either of the Flash memory cards; however, the environmental variable CONFIG_FILE must be pointing (set) to NVRAM, which is the system default.
Use the show boot command to display the current setting for the environmental variable CONFIG_FILE as follows:
Follow these steps to copy a configuration file from RSP2 NVRAM to a Flash memory card:
After you copy your configuration file to a Flash memory card and have verified that it was copied correctly, proceed to the section "Upgrading the Boot ROM Device" on page 9. When you have finished replacing the boot ROM and reinstalling the RSP2, refer to the following section "Copying a Configuration File from a Flash Memory Card to RSP2 NVRAM."
Copying a Configuration from RSP2 DRAM to a Flash Memory Card on the RSP2
You can use the command copy running-config [ slot0: | slot1: ]:filename for the copy procedure where running-config is the file's source (the temporary configuration in DRAM) and [slot0: | slot1: ]:filename is the file's destination, in either of the Flash memory cards. An example of the copy startup-config slot0:filename command follows:
To verify the file was copied correctly, use the dir command as follows:
After you copy your configuration file, proceed to the section "Upgrading the Boot ROM Device" on page 9. When you have finished replacing the boot ROM and reinstalling the RSP2, refer to the following section "Copying a Configuration File from a Flash Memory Card to RSP2 NVRAM."
Copying a Configuration File from a Flash Memory Card to RSP2 NVRAM
Following is the procedure for copying your configuration file from the Flash memory card in PCMCIA slot 0 or slot 1, back to NVRAM.
Use the command copy [ slot0: | slot1: ]:filename startup-config for this copy procedure, where [slot0 | slot1 ]:filename is the source of the file (Flash memory card) and startup-config is the destination (NVRAM).
An example of the copy slot0:filename startup-config command follows:
To ensure that the startup configuration file, now stored in NVRAM, is the default running configuration file used by the system, issue the copy startup-config running-config command as follows:
Additional Flash Memory Commands
Following are additional commands related to the Flash memory in the single in-line memory module (SIMM) on the RSP2 (called bootflash) and in PCMCIA-based Flash memory cards. (The following example assumes you are currently in PCMCIA slot 0.) You can determine which PCMCIA slot you are accessing using the pwd command as follows:
You can move between Flash memory media using the cd [ bootflash: | slot0: | slot1: ] command as follows:
You can list the directory of any Flash memory media using the dir [ bootflash: | slot0: | slot1: ] command as follows:
You can delete a file from any Flash memory media using the delete command as follows:
The squeeze command permanently removes files, which are marked as deleted, and pushes all other undeleted files together to eliminate spaces between them.
Following is the syntax of the squeeze command:
To prevent loss of data due to sudden power loss, the "squeezed" data is temporarily saved to another location of Flash memory, which is specially used by the system. In the preceding command display output, the character "e" means this special location has been erased (which must be performed before any write operation). The character "b" means that the data that is about to be written to this special location has been temporarily copied. The character "E" signifies that the sector which was temporarily occupied by the data has been erased. The character "S" signifies that the data was written to its permanent location in Flash memory.
The squeeze command operation keeps a log of which of these functions has been performed so upon sudden power failure, it can come back to the right place and continue with the process. The character "Z" means this log was erased after the successful squeeze command operation.
A locked block of Flash memory occurs when power is lost or a Flash memory card is unplugged during a write or erase operation. When a block of Flash memory is locked, it cannot be written to or erased, and the operation will consistently fail at a particular block location. The only way to recover from locked blocks is by reformatting the Flash memory card with the format command.
Cisco Connection Online (CCO), formerly Cisco Information Online (CIO), is Cisco Systems' primary, real-time support channel. Maintenance customers and partners can self-register on CCO to obtain additional content and services.
Available 24 hours a day, 7 days a week, CCO provides a wealth of standard and value-added services to Cisco's customers and business partners. CCO services include product information, software updates, release notes, technical tips, the Bug Navigator, configuration notes, brochures, descriptions of service offerings, and download access to public and authorized files.
CCO serves a wide variety of users through two interfaces that are updated and enhanced simultaneously---a character-based version and a multimedia version that resides on the World Wide Web (WWW). The character-based CCO supports Zmodem, Kermit, Xmodem, FTP, and Internet e-mail, and is excellent for quick access to information over lower bandwidths. The WWW version of CCO provides richly formatted documents with photographs, figures, graphics, and video, as well as hyperlinks to related information.
You can access CCO in the following ways:
For a copy of CCO's Frequently Asked Questions (FAQ), contact ccohelp@cisco.com. For additional information, contact ccoteam@cisco.com.
Copyright 1988-1996 © Cisco Systems Inc.
![]()
We recommend that you make a note of your current environment settings, then reset them after restarting the system. Use the show boot command to display these settings.
If you want to boot a different Cisco IOS image after the boot ROM upgrade (as in the case of the HSA upgrade), disable any automatic system booting function if you have one enabled.
If you want to configure the HSA feature, refer to the configuration note Route Switch Processor (RSP2) Installation and Configuration (Document Number 78-2026-06 or later), or to the Cisco IOS release notes and Configuration Fundamentals Configuration Guide and Configuration Fundamentals Command Reference publications for your HSA-compatible Cisco IOS version. All publications are available on the Cisco Connection Documentation, Enterprise Series CD-ROM, Cisco's online library of product information, or as printed copies.

![]()
![]()
We recommend that you make a note of your current environment settings, then reset them after restarting the system. Use the show boot command to display these settings.
If you want to boot a different Cisco IOS image after the boot ROM upgrade (as in the case of the HSA upgrade), disable any automatic system booting function if you have one enabled.
![]()
![]()
Router> show version

Cisco Internetwork Operating System Software
>> IOS (tm) GS Software (RSP-JV-M), Version 11.1(4) [biff 51096]
Copyright (c) 1986-1996 by cisco Systems, Inc.
Compiled Mon 22-Jan-96 21:15 by biff
Image text-base: 0x600108A0, data-base: 0x607B8000
(additional displayed text omitted)

>> ROM: System Bootstrap, Version 11.1(2) [biff 2], RELEASE SOFTWARE (fc1)
ROM: GS Bootstrap Software (RSP-BOOT-M), Version 10.3(7), RELEASE SOFTWARE

Router uptime is 85 hours, 39 minutes
System restarted by reload
System image file is "slot0:rsp-jv-mz.111-4", booted via slot0

cisco RSP2 (R4600) processor with 81920K bytes of memory.
R4600 processor, Implementation 32, Revision 2.0
Router#
cd slot0:
Router#
pwd
slot0
Router#
dir slot0:
-#- -length- -----date/time------ name
1 5200084 Jul 11 1996 19:24:12 rsp-jv-mz.111-4
2 1186 Jul 12 1996 16:56:50 myfile2
3 3591664 Jul 12 1996 18:43:42 rsp-k-mz.103-12
5 512 Jul 12 1996 19:05:50 myfile1
11784216 bytes available (8794088 bytes used)
Router#
copy tftp flash slot0:
Enter source file name:
rsp-jv-mz.111-4.2
Enter destination file name [rsp-jv-mz.111-4.2]:
11784088 bytes available on device slot0, proceed? [confirm]
Address or name of remote host [255.255.255.255]?
1.1.1.1
Accessing file "rsp-jv-mz.111-4.2" on 1.1.1.1 ...FOUND
Loading rsp-jv-mz.111-4.2 from 1.1.1.1 (via Ethernet3/0): !!!!!!!!!!!!!!!!!!!!!!!!!!!!!!!!!!!!!!!!!!!!!!!!!!!!!!!!!!!!!!!!!!!!!!!!!!!!!!!!
!!!!!!!!!!!!!!!!!!!!!!!!!!!!!!!!!!!!!!!!!!!!!!!!!!!!!!!!!!!!!!!!!!!!!!!!!!!!!!!!!!!!!!!!!!!!!!!!!!!!!!!!!!!!!!!!!!!!!!!!!!!!!!!!!!!!!!!!!!!!!!!!!!!!!!!!!!!!!!!!!!!!!!!!!!!!!!!!!!!!!!!!!!!!!!!!!!!!!!!!!!!!!!!!!!!!!!!!!!!!!!!!!!!!!!!!!!!!!!!!!!!!!!!!!!!!!!!!!!!!!!!!!!!!!!!!!!!!!!!!!!!!!!!!!!!!!!!!!!!!!!!!!!!!!!!!!!!!!!!!!!!!!!!!!!!!!!!!!!!!!!!!!!!!!!!!!!!!!!!!!!!!!!!!!!!!!!!!!!!!!!!!!!!!!!!!!!!!!!!!!!!!!!!!!!!!!!!!!!!!!!!!!!!!!!!!!!!!!!!!!!!!!!!!!!!!!!!!!!!!!!!!!!!!!!!!!!!!!!!!!!!!!!!!!!!!!!!!!!!!!!!!!!!!!!!!!!!!!!!!!!!!!!!!!!!!!!!!!!!!!!!!!!!!!!!!!!!!!!!!!!!!!!!!!!!!!!!!!!!!!!!!!!!!!!!!!!!!!!!!!!!!!!!!!!!!!!!!!!!!!!!!!!!!!!!!!!!!!!!!!!!!!!!!!!!!!!!!!!!!!!!!!!!!!!!!!!!!!!!!!!!!!!!!!!!!!!!!!!!!!!!!!!!!!!
[OK - 6193520/12386304 bytes]
CCCCCCCCCCCCCCCCCCCCCCCCCCCCCCCCCCCCCCCCCCCCCCCCCCCCCCCCCCCCCCCCCCCCCCCCCCCCCCCCCCCCCCCCCCCCCCCCCCCCCCCCCCCCCCCCCCCCCCCCCCCCCCCCCCCCCCCCCCCCCCCCCCCCCCCCCCCCCCCCCCCCCCCCCCCCCCCCCCCCCCCCCCCCC
Router#
Router#
dir slot0:
-#- -length- -----date/time------ name
1 5200084 Jul 11 1996 19:24:12 rsp-jv-mz.111-4
2 1186 Jul 12 1996 16:56:50 myfile2
3 3591664 Jul 12 1996 18:43:42 rsp-k-mz.103-12
5 512 Jul 12 1996 19:05:50 myfile1
6 6193520 Jul 14 1996 11:36:20 rsp-jv-mz.111-4.2
5590568 bytes available (14987736 bytes used)
Router#
Router#
conf t
Enter configuration commands, one per line. End with CNTL/Z.
Router(config)#
boot system flash slot0:rsp-jv-mz.111-4.2
Ctrl-Z
Router#
%SYS-5-CONFIG_I: Configured from console by console
Router#
copy running-config startup-config
Building configuration...
[OK]
Router#
Router#
sh boot
BOOT variable = slot0:rsp-jv-mz.111-4.2,1;
CONFIG_FILE variable =
Current CONFIG_FILE variable =
BOOTLDR variable does not exist
Configuration register is 0x2
Router#
![]()
We recommend that you make a note of your current environment settings, then reset them after restarting the system. Use the show boot command to display these settings.
If you want to boot a different Cisco IOS image after the boot ROM upgrade (as in the case of the HSA upgrade), disable any automatic system booting function if you have one enabled.

![]()
![]()
![]()
![]()
(additional displayed text omitted from this example)
Warning: monitor nvram area is corrupt ... using default values
>> SLOT 6 RSP2 is system master
>> SLOT 7 RSP2 is system slave
RSP2 processor with 81920 Kbytes of main memory
rommon 1 >
(additional displayed text omitted from this example)
Warning: monitor nvram area is corrupt ... using default values
>> SLOT 2 RSP2 is system master
>> SLOT 3 RSP2 is system slave
RSP2 processor with 81920 Kbytes of main memory
rommon 1 >
rommon 1 >
sync
rommon 1 >
dir slot0:
File size Checksum File name
5200084 bytes (0x4f58d4) 0x827a9ae5 rsp-jv-mz.111-4
1176 bytes (0x498) 0xc9ea46ce myfile1 (deleted)
1215 bytes (0x4bf) 0x4b30dc00 myfile1
6176844 bytes (0x5e404c) 0x66180376 rsp-jv-mz.111-472
rommon 2 >
rommon 2 >
boot slot0:rsp-jv-mz.111-4
Cisco Internetwork Operating System Software
IOS (tm) GS Software (RSP-JV-M), Version 11.1(4) RELEASE SOFTWARE
Copyright (c) 1986-1996 by cisco Systems, Inc.
Compiled Mon 17-Jun-96 21:15 by biff
Image text-base: 0x600108A0, data-base: 0x60864000
[additional displayed text omitted from this example]
Router#
show version
Cisco Internetwork Operating System Software
IOS (tm) GS Software (RSP-JV-M), Version 11.1(4), RELEASE SOFTWARE (fc1)
Copyright (c) 1986-1996 by cisco Systems, Inc.
Compiled Mon 17-Jun-96 16:14 by biff
Image text-base: 0x600108A0, data-base: 0x60864000
ROM: System Bootstrap, Version 11.1(2) [biff 2], RELEASE SOFTWARE (fc1)
Router uptime is 6 minutes
System restarted by reload
System image file is "slot0:rsp-jv-mz.111-4", booted via
cisco RSP2 (R4600) processor with 81920K bytes of memory.
R4600 processor, Implementation 32, Revision 2.0
Last reset from power-on
G.703/E1 software, Version 1.0.
SuperLAT software copyright 1990 by Meridian Technology Corp).
Bridging software.
X.25 software, Version 2.0, NET2, BFE and GOSIP compliant.
TN3270 Emulation software (copyright 1994 by TGV Inc).
Chassis Interface.
[additional displayed text omitted from this example]
123K bytes of non-volatile configuration memory.
20480K bytes of Flash PCMCIA card at slot 0 (Sector size 128K).
8192K bytes of Flash internal SIMM (Sector size 256K).
>> Slave in slot 7 is running Cisco Internetwork Operating System Software
IOS (tm) GS Software (RSP-DW-M), Version 11.1(4), RELEASE SOFTWARE (fc1)
Copyright (c) 1986-1996 by cisco Systems, Inc.
Compiled Mon 17-Jun-96 16:15 by biff
Loaded from system
Configuration register is 0x100
Router#
configure terminal
Enter configuration commands, one per line. End with CNTL/Z.
Router(config)#
config-register 0x102
Ctrl-Z
Router#
Configuration register is 0x100 (will be 0x102 at next reload)
Router#
dir slaveslot0:
-#- -length- -----date/time------ name
1 2132 May 16 1996 13:38:12 matt-confg
2 6176844 Jul 01 1996 14:05:49 rsp-jv-mz.111-472
3 3591664 Jul 11 1996 15:49:23 rsp-k-mz.103-12
4 887 Jul 11 1996 18:17:03 myfile
5 5200084 Jul 11 1996 19:45:47 rsp-j-mz.111-1
1411748 bytes available (14972252 bytes used)
Router#
RSP-6#
del slaveslot0:rsp-j-mz.111-1
RSP-6#
squeeze slaveslot0:
All deleted files will be removed, proceed? [confirm]
Squeeze operation may take a while, proceed? [confirm]
(a few minutes might pass before the following prompt reappears)
Router#
Router#
copy slot0:rsp-jv-mz.111-4 slaveslot0:
6611832 bytes available on device slaveslot0, proceed? [confirm]
CCCCCCCCCCCCCCCCCCCCCCCCCCCCCCCCCCCCCCCCCCCCCCCCCCCCCCCCCCCCCCCCCCCCCCCCCCCCCCCCCCCCCCCCCCCCCCCCCCCCCCCCCCCCCCCCCCCCCCCCCCCCCCCCCCCCCCCCCCCCCCCCCCCCCCCCCCCCCCccccccccccccccccccccccccccccccccccccccccccccccccccccccccccccccccccccccccccccccccccccccccccccccccccccccccccccccccccccccccccccccccccccccccccccccccccccccccccccccccccccccccccccccccccccccccccccccccccccccccccccccccccccccccccccccccccccccccccccccccccccccccccccccccccccccccccccccccccccccccccccccccccccccccccccccccccccccccccccccccccccccccccccccccccccccccccccccccccccccccccccccccccccccccccccccccccccccccccccccccccccccccccccccccccccccccccccccccccccccccccccccccccccccccccccccccccccccccccccccccccccccc
Router#
dir slaveslot0:
-#- -length- -----date/time------ name
1 2132 May 16 1996 13:38:12 matt-confg
2 6176844 Jul 01 1996 14:05:49 rsp-jv-mz.111-472
3 3591664 Jul 11 1996 15:49:23 rsp-k-mz.103-12
4 887 Jul 11 1996 18:17:03 myfile
5 5200084 Jul 14 1996 12:52:54 rsp-jv-mz.111-4
1411748 bytes available (14972252 bytes used)
Router#
Router# show version
Cisco Internetwork Operating System Software
>> IOS (tm) GS Software (RSP-JV-M), Version 11.1(4), RELEASE SOFTWARE (fc1)
Copyright (c) 1986-1996 by cisco Systems, Inc.
Compiled Mon 17-Jun-96 16:14 by biff
Image text-base: 0x600108A0, data-base: 0x60864000

>> ROM: System Bootstrap, Version 11.1(2) [biff 2], RELEASE SOFTWARE (fc1)

Router uptime is 12 minutes
System restarted by reload
System image file is "slot0:rsp-jv-mz.111-4", booted via

cisco RSP2 (R4600) processor with 81920K bytes of memory.
R4600 processor, Implementation 32, Revision 2.0
Last reset from power-on
G.703/E1 software, Version 1.0.
SuperLAT software copyright 1990 by Meridian Technology Corp).
Bridging software.
X.25 software, Version 2.0, NET2, BFE and GOSIP compliant.
TN3270 Emulation software (copyright 1994 by TGV Inc).
Chassis Interface.
1 EIP controller (6 Ethernet).
1 FSIP controller (4 Serial).
PSFAIL: Power supply1 TRIP controller (4 Token Ring).
6 Ethernet/IEEE 802.3 interfaces.
4 Token Ring/IEEE 802.5 interfaces.
4 Serial network interfaces.
123K bytes of non-volatile configuration memory.

20480K bytes of Flash PCMCIA card at slot 0 (Sector size 128K).
8192K bytes of Flash internal SIMM (Sector size 256K).

>> Slave in slot 7 is running Cisco Internetwork Operating System Software
>> IOS (tm) GS Software (RSP-DW-M), Version 11.1(4), RELEASE SOFTWARE (fc1)
Copyright (c) 1986-1996 by cisco Systems, Inc.
Compiled Mon 17-Jun-96 16:15 by biff
Loaded from system

Configuration register is 0x100 (will be 0x102 at next reload)
Router# sh boot
BOOT variable =
CONFIG_FILE variable =
Current CONFIG_FILE variable =
BOOTLDR variable does not exist
Configuration register is 0x100 (will be 0x102 at next reload)

Slave auto-sync config mode is on

>> Current slave is in slot 7.
slave BOOT variable =
slave CONFIG_FILE variable =
slave BOOTLDR variable =
slave Configuration register is 0x102

Router#
Router>
enable
Password:
Router#
Router# ping 1.1.1.1
Type escape sequence to abort.
Sending 5, 100-byte ICMP Echos to 1.1.1.1, timeout is 2 seconds:
!!!!!
Success rate is 100 percent (5/5), round-trip min/avg/max = 12/12/12 ms
Router#
Sending 5, 100-byte ICMP Echos to 1.1.1.1, timeout is 2 seconds:
.....
Success rate is 0 percent (0/5)
Router#
Router#
copy startup-config tftp
Remote host []?
Router#
copy startup-config tftp
Remote host []?
servername
Translating "servername"...domain server (1.1.1.1) [OK]
Name of configuration file to write [Router-confg]?
Write file Router-confg on host 1.1.1.1? [confirm]
Writing Router-confg .....
Write file Router-confg on host 1.1.1.1? [confirm]
Writing Router-confg: !!!! [ok]
Writing Router-confg .....
Router#
show startup-config
>> Using 1186 out of 126968 bytes
!
version 11.1
hostname Router
Router#
Router#
copy tftp startup-config
Address of remote host [255.255.255.255]?
1.1.1.1
Name of configuration file [Router-confg]?
Router-confg
Name of configuration file [Router-confg]?
Configure using Router-confg from 1.1.1.1? [confirm]
Loading Router-confg from 1.1.1.1: ! ! [OK - 1186/126927 bytes]
Warning: distilled config is not generated
[OK]
%SYS-5-CONFIG_NV: Non-volatile store configured from Router-confg

by console tftp from 1.1.1.1
Booting Router-confg ..... [timed out]
Router#
show startup-config
Using 1186 out of 126968 bytes
!
version 11.1
hostname Router
!
Router#
Router#
copy startup-config running-config
Router#
%SYS-5-CONFIG_I: Configured from memory by console
Router#
Router# show boot
(display text omitted)

CONFIG_FILE variable =
Current CONFIG_FILE variable =

(display text omitted)
Router# copy startup-config slot0:myfile2
20575008 bytes available on device slot0, proceed? [confirm]
Address or name of remote host [1.1.1.1]?
Loading new.image from 1.1.1.1 (via Ethernet1/0): !!!!!!!!!!!!!!!!!!!!!!!!!!!!!!
!!!!!!!!!!!!!!!!!!!!!!!!!!!!!!!!!!!!!!!!!!!!!!!!!!!!!!!!!!!!!!!!!!!!!!!!!!!!!!!!
!!!!!!!!!!!!!!!!!!!!!!!!!!!!!!!!!!!!!!!!!!!!!!!!!!!!!!!!!!!!!!!!!!!!!!!!!!!!!!!!
!!!!!!!!!!!!!!!!!!!!!!!!!!!!!!!!!!!!!!!!!!!!!!!!!!!!!!!!!!!!!!!!!!!!!!!!!!!!!!!!
!!!!!!!!!!!!!!!!!!!!!!!!!!!!!!!!!!!!!!!!!!!!!!!!!!!!!!!!!!!!!!!!!!!!!!!!!!!!!!!!
!!!!!!!!!!!!!!!!!!!!!!!!!!!!!!!!!!!!!!!!!!!!!!![OK - 7799951/15599616 bytes]
CCCCCCCCCCCCCCCCCCCCCCCCCCCCCCCCCCCCCCCCCCCCCCCCCCCCCCCCCCCCCCCCCCCCCCCCCCCCCCCC
CCCCCCCCCCCCCCCCCCCCCCCCCCCCCCCCCCCCCCCCCCCCCCCCCCCCCCCCCCCCCCCCCCCCCCCCCCCCCCCC
CCCCCCCCCCCCCCCCCCCCCCCCCCCCCCCCCCCCCCCCCCCCCCCCCCCCCCCCCCCCCCCCCCCCCCCCCC
Router#
You can also copy the running configuration (located in DRAM) to a Flash memory card, as shown in the following section "Copying a Configuration from RSP2 DRAM to a Flash Memory Card on the RSP2."
Router#
dir slot0:
-#- -length- -----date/time------ name
1 5200084 Jul 11 1996 19:24:12 rsp-jv-mz.111-4
3 1215 Jul 11 1996 20:30:52 myfile1
4 6176844 Jul 11 1996 23:04:10 rsp-jv-mz.111-472
5 1186 Jul 12 1996 16:56:50 myfile2
9197156 bytes available (11381148 bytes used)
Router#
Router# copy running-config slot0:myfile2
20575008 bytes available on device slot0, proceed? [confirm]
Address or name of remote host [1.1.1.1]?
Loading new.image from 1.1.1.1 (via Ethernet1/0): !!!!!!!!!!!!!!!!!!!!!!!!!!!!!!
!!!!!!!!!!!!!!!!!!!!!!!!!!!!!!!!!!!!!!!!!!!!!!!!!!!!!!!!!!!!!!!!!!!!!!!!!!!!!!!!
!!!!!!!!!!!!!!!!!!!!!!!!!!!!!!!!!!!!!!!!!!!!!!!!!!!!!!!!!!!!!!!!!!!!!!!!!!!!!!!!
!!!!!!!!!!!!!!!!!!!!!!!!!!!!!!!!!!!!!!!!!!!!!!!!!!!!!!!!!!!!!!!!!!!!!!!!!!!!!!!!
!!!!!!!!!!!!!!!!!!!!!!!!!!!!!!!!!!!!!!!!!!!!!!!!!!!!!!!!!!!!!!!!!!!!!!!!!!!!!!!!
!!!!!!!!!!!!!!!!!!!!!!!!!!!!!!!!!!!!!!!!!!!!!!![OK - 7799951/15599616 bytes]
CCCCCCCCCCCCCCCCCCCCCCCCCCCCCCCCCCCCCCCCCCCCCCCCCCCCCCCCCCCCCCCCCCCCCCCCCCCCCCCC
CCCCCCCCCCCCCCCCCCCCCCCCCCCCCCCCCCCCCCCCCCCCCCCCCCCCCCCCCCCCCCCCCCCCCCCCCCCCCCCC
CCCCCCCCCCCCCCCCCCCCCCCCCCCCCCCCCCCCCCCCCCCCCCCCCCCCCCCCCCCCCCCCCCCCCCCCCC
Router#
Router# dir slot0:
-#- -length- -----date/time------ name
1   5200084  Jul 11 1996 19:24:12 rsp-jv-mz.111-4
3   1215     Jul 11 1996 20:30:52 myfile1
4   6176844  Jul 11 1996 23:04:10 rsp-jv-mz.111-472
5   1186     Jul 12 1996 16:56:50 myfile2

9197156 bytes available (11381148 bytes used)
Router#
Router# copy slot0:myfile startup-config
[ok]
Router#
Router# copy startup-config running-config
Router#
%SYS-5-CONFIG_I: Configured from memory by console
Router#
Router# pwd
slot0
Router# cd slot1
slot1
Router# cd slot0
Router# pwd
slot1
Router# dir
-#- -length- -----date/time------ name
1   1        Jul 12 1996 09:54:53 fun1
Router# delete slot0:fun1
Router# dir
-#- -length- -----date/time------ name
Router# squeeze slot0:
All deleted files will be removed, proceed? [confirm]
Squeeze operation may take a while, proceed? [confirm]
ebESZ
![]()
tac@cisco.com.
To obtain general information about Cisco Systems, Cisco products, or upgrades, contact 800 553-6387, 408 526-7208, or
csrep@cisco.com.

![]()
![]()
![]()
![]()
![]()
![]()
![]()
![]()