
Table of Contents
Preparing for Installation
Preparing for Installation
This chapter includes specific information about required tools and parts, safety guidelines, and specific preparatory information required to assure a successful installation.
Do not unpack the Cisco 7505 until you are ready to install it. Keep the chassis in the shipping container to prevent accidental damage until you determine where you want to install it, then proceed with unpacking.
The Cisco Information Packet is included in the shipping container, together with any companion publications you specified on your order. Inspect all items for shipping damage. If anything appears to be damaged, immediately contact a customer service representative. When you finish unpacking the router, refer to the following sections.
Following are the tools and parts generally required to install your Cisco 7505:
- Number 1 Phillips and 3/16-inch (0.476 cm) flat-blade screwdrivers
- Rack-mount brackets (included)
- One interface cable for each physical interface required
- A channel service unit/digital service unit (CSU/DSU) for each data terminal equipment (DTE) serial interface
- Ethernet transceivers (for EIP or FEIP interfaces connected to 10BaseT networks)
- Modem for remote configuration (if required)
- Additional tools, parts, and procedures listed and discussed in companion documentation, and which are not discussed in this publication
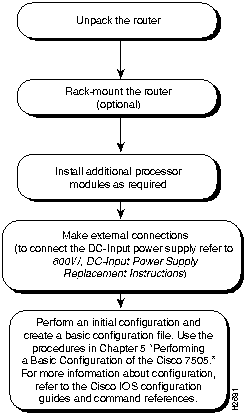
Figure 2-1 shows a flowchart that illustrates the recommended order of procedures to install the Cisco 7505 router and attach external cables to it. It also indicates the Cisco publications you should refer to for more detailed information.
Figure 2-1 Installation Flowchart
Because any device that uses electricity can cause injury, follow these guidelines to ensure general safety:
- Keep the chassis area clear and dust-free during and after installation.
- Keep tools away from walk areas where you and others could trip over them.
- Wear safety glasses when exposed to conditions that might be hazardous to your eyes.

Warning Invisible laser radiation may be emitted from the aperture ports of the single-mode FDDI card when no cable is connected. Avoid exposure and do not stare into open apertures. (For translated versions of this warning, refer to the appendix "Translated Safety Warnings.")
- Do not perform any action that creates a potential hazard to people or makes the equipment unsafe.
- Locate the emergency power-off switch for the room in which you are working. Then, if an electrical accident occurs, you can act quickly to shut off power.
- Before working on the system, unplug the power cable.
- If ESD grounding is required, ground the chassis.
- Disconnect all power before working with a chassis, or working near power supplies.

Warning See the installation instructions before you connect the system to its power source. (For translated versions of this warning, refer to the appendix "Translated Safety Warnings.")
 Warning Before working on a chassis or working near power supplies, unplug the power cord on AC units or disconnect the power at the circuit breaker on DC units. (For translated versions of this warning, refer to the appendix "Translated Safety Warnings.)
 Warning Do not touch the power supply when the power cord is connected. For systems with a power switch, line voltages are present within the power supply even when the power switch is off and the power cord is connected. For systems without a power switch, line voltages are present within the power supply when the power cord is connected. (For translated versions of this warning, refer to the appendix "Translated Safety Warnings.)
- Do not work alone if potentially hazardous conditions exist.
- Never assume that power is disconnected from a circuit. Always check.
- Look carefully for possible hazards in your work area, such as moist floors, ungrounded power extension cables, and missing safety grounds.
- If an electrical accident occurs, proceed as follows:
- Use caution; do not become a victim yourself. Disconnect power to the system.
- If possible, send another person to get medical aid. Otherwise, assess the condition of the victim and then call for help.
- Determine if the person needs rescue breathing or external cardiac compressions; then take appropriate action.
Electrostatic discharge (ESD) can damage equipment and impair electrical circuitry. It occurs when electronic components are improperly handled and can result in intermittent or complete failures. Always follow ESD-prevention procedures when removing and replacing components. Ensure that the chassis is electrically connected to earth ground. Wear an ESD-preventive wrist strap, ensuring that it makes good skin contact. To safely channel unwanted ESD voltages to ground, connect the clip to an unpainted surface of the chassis frame. If no wrist strap is available, ground yourself to the metal chassis.

Caution For safety, periodically check the resistance value of the ESD-preventive wrist strap, which should be between 1 and 10 megohms.
Depending on your configuration, you might need to insert additional or new processor modules in your Cisco 7505. To insert or remove interface processors (AIP, CIP, EIP, FEIP, FIP, FSIP, HIP, MIP, and TRIP), you do not need to turn off power to the system; all interface processor support online insertion and removal (OIR). However, you must turn off the system power before you insert or remove the RSP1.
You need a number 1 Phillips or 3/16-inch, flat-blade screwdriver to remove any fillers (blank processor carriers) and to tighten the captive installation screws that secure the processor module in its slot. Whenever you handle modules, you should use an ESD-preventive wrist strap or other grounding device to prevent ESD damage.
You can install interface processors (as shown in the following illustration) in any of the four interface processor slots, numbered 0 through 3 from bottom to top when viewing the chassis from the rear. (Refer to the illustration of the Cisco 7505 in Figure 1-1.) The top slot (slot 4) must contain the RSP1, which is a required system component. The processor carriers are keyed so you cannot incorrectly install them in the chassis slots.

Caution To prevent the overheating of internal components, always install fillers in empty slots to maintain the proper flow of cooling air across the cards. To prevent ESD damage, handle processor modules by the handles and carrier edges only.
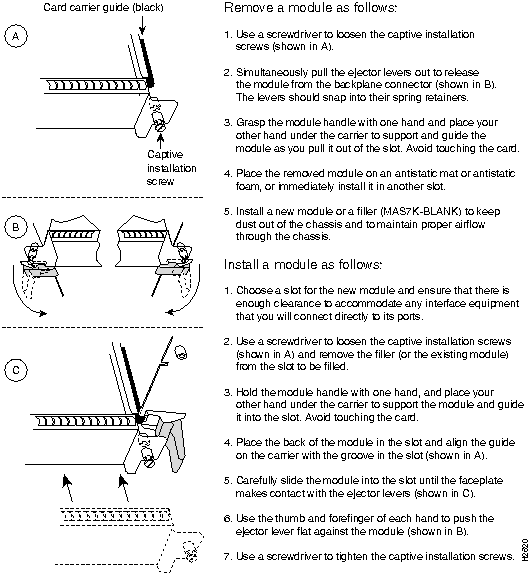
Figure 2-2 illustrates the procedures for removing and installing processor modules.
Figure 2-2 Removing and Replacing Processor Modules
Copyright 1988-1996
©
Cisco Systems Inc.