|
|

This chapter describes the procedures to rack-mount the Catalyst 5000 series switch at your site.
A rack-mount kit is included for mounting the switch in a standard 19-inch equipment rack with two unobstructed outer posts. This kit is not suitable for use with other racks, such as telco-type equipment racks, or those with obstructions (such as a power strip) that could impair access to the switch modules and power supplies.
Following is the procedure for attaching the rack-mount kit and installing the switch in a wiring closet rack. Two or more people are needed to perform this procedure.
Be sure you have at least three or four feet of clearance behind the rack for maintenance. The intake and exhaust ports for cooling air are located on the front and rear and both sides of the chassis, so multiple switches can be stacked with little or no clearance in a rack. The chassis is 10.36 inches (25.9 cm) high.
Before rack-mounting the Catalyst 5000 series switch, confirm that your rack-mount configuration conforms to the following criteria:
Warning Two people are required to lift the chassis. Grasp the chassis underneath the lower edge and lift with both hands. To prevent injury, keep your back straight and lift with your legs, not your back. To prevent damage to the chassis and components, never attempt to lift the chassis with the handles on the power supplies or on the interface processors, or by the plastic panels on the front of the chassis. These handles were not designed to support the weight of the chassis.To see translated versions of this warning, refer to the appendix "Translated Safety Warnings."
Refer to the section "Lifting the Chassis Safely" in the chapter "Installation Overview."
Following are the tools and equipment you will need to install the chassis:
If you are installing the chassis in a rack, you will also need the following:
The rack-mount kit is for a standard 19-inch rack with a minimum depth (between the front and rear mounting posts) of 19 1/4 inches and a maximum depth of 32 inches. The width between the two front equipment mounting strips (left front and right front) must be at least 17 3/4 inches. Two L brackets, which you attach to either the front or back of the chassis, and the mounting posts connect the chassis to the rack. Some equipment racks provide a power strip along the length of one of the rear posts. If your rack has this feature, consider the position of the strip when planning fastener points and, before you install the L brackets on the chassis, determine whether you will install the chassis from the front or the rear of the rack.
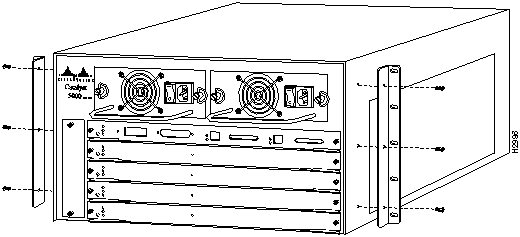
Take the following steps to attach the two L brackets to the switch chassis:
Table 3-1 : Rack-Mount Kit Checklist
Figure 3-1 : Attaching the L Bracket
Figure 3-2 : Attaching the Cable Guide
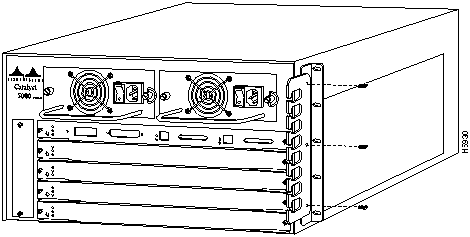
Installing the Chassis in the Rack
The L brackets attach the chassis to the front mounting posts. You can mount the L brackets on either the front or rear of the chassis, whichever end will be in the front of the rack.
Follow these steps to install the switch in an open rack that allows you to slide the chassis in from the front.
Warning Two people are required to lift the chassis. Grasp the chassis underneath the lower edge and lift with both hands. To prevent injury, keep your back straight and lift with your legs, not your back. To prevent damage to the chassis and components, never attempt to lift the chassis with the handles on the power supplies or on the interface processors, or by the plastic panels on the front of the chassis. These handles were not designed to support the weight of the chassis.To see translated versions of this warning, refer to the appendix "Translated Safety Warnings."
Figure 3-3 : Installing the Switch in the Rack
This concludes the rack-mount installation.
Copyright 1988-1996 © Cisco Systems Inc.
![]()
![]()
![]()
Quantity
Part Description
Received
2
L brackets (left and right)
1
Cable guide
6
M4 Phillips countersunk-head screws
8
12-24 x 3/4-inch Phillips binder-head screws
8
10-32 x 3/4-inch slotted binder-head screws
![]()

![]()
![]()
![]()
![]()
![]()
![]()
![]()
![]()
![]()