Caution Before opening the chassis, be sure that you have discharged all static electricity from your body and be sure the power is off. Before performing any procedures described in this appendix, review the sections "Safety Recommendations," "Preventing Electrostatic Discharge Damage," and "Preventing Electromagnetic Interference" in the chapter "Preparing to Install Cisco 700 Series Routers."
Setting Termination to Off for Cisco 750 Series Routers
This section describes how to configure termination for the Cisco 750 series routers. This procedure consists of the following three steps:
- Opening the Chassis
- Moving the Termination Jumpers
- Closing the Chassis
This process require a Number 1 Phillips screwdriver.
Opening the Chassis
Take the following steps to open the chassis:
Step 1 Turn OFF the power. Do not unplug the power cable so that ESD voltages can be channeled to ground.
Step 2 Remove all interface cables from the rear-panel connectors of the router.
Step 3 Turn the router upside down so that the top of the router is resting on a stable surface.
Step 4 Use the Phillips screwdriver to remove the four screws located on the bottom of the chassis. Put the screws in a safe place.
Step 5 Holding the chassis with both hands, turn the router over so that the bottom of the router is resting on a stable surface.
Step 6 Gently pull the top section away from the bottom section, and put the top in a safe place.
Moving the Termination Jumpers
Take the following steps to move the termination jumpers on the Cisco 750 series routers:
Step 1 Locate the termination jumpers on the motherboard. If you are using the Cisco 751, refer to Figure F-1 for jumper location. If you are using the Cisco 752 or the Cisco 753, refer to Figure F-2 for jumper location.
Figure F-1 : Termination Jumper Location, Cisco 751
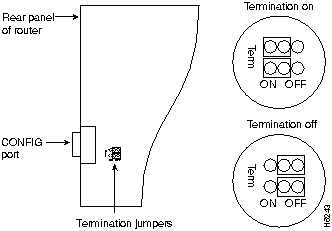
Figure F-2 : Termination Jumper Location, Cisco 752 and Cisco 753
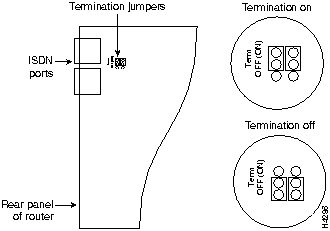
Step 2 Gently move both jumpers to the Termination off position as indicated in the appropriate illustration for your router model.
Closing the Chassis
Take the following steps to close the chassis:
Step 1 Correctly position the top and bottom chassis sections and press them together.
Step 2 When the two sections fit snugly together, turn the chassis over so that the bottom is facing up, and the top is resting on a stable surface.
Step 3 Use the Phillips screwdriver to replace the four chassis screws. Do not overtighten the screws.
Step 4 Reinstall the chassis on the wall, rack, or desktop.
Step 5 Replace all network cables.
Step 6 Power on the router.
Setting Termination to Off for Cisco 760 Series Routers
This section describes how to configure termination for the Cisco 760 series routers. This procedure consists of the following three steps:
- Opening the Chassis
- Removing the Termination Jumpers
- Closing the Chassis
This procedure requires a Number 1 Phillips screwdriver.
Opening the Chassis
Take the following steps to open the chassis:
Step 1 Turn OFF the power. Do not unplug the power cable so that ESD voltages can be channeled to ground.
Step 2 Remove all interface cables from the rear-panel connectors of the router.
Step 3 Turn the router so that the rear panel is toward you.
Step 4 Use the Phillips screwdriver to remove the two screws located on the rear panel of the chassis. Put the screws in a safe place.
Step 5 Gently pull the top section up and away from the bottom section. Put the chassis top in a safe place.
Removing the Termination Jumpers
Take the following steps to remove the termination jumpers on the Cisco 760 series routers:
Step 1 Locate the termination jumpers on the motherboard. Refer to Figure F-3 for jumper location.
Figure F-3 : Termination Jumper Location, Cisco 760 Series Routers
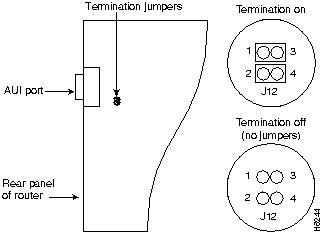
Step 2 Gently remove both jumpers, as indicated in Figure F-3, to set the router's termination to OFF.
Closing the Chassis
Take the following steps to close the chassis:
Step 1 Correctly position the top and bottom chassis sections and press them together.
Step 2 When the two sections fit snugly together, turn the chassis so that the rear panel is toward you.
Step 3 Replace the two chassis screws, tightening them to no more than 8 or 9 inch/pounds of torque.
Step 4 Reinstall the chassis on the wall, rack, or desktop.
Step 5 Replace all network cables.
Step 6 Power on the router.
Copyright 1988-1996 © Cisco Systems Inc.
