Banner
HomeTOCPrevNextGlossSearchHelp

PDF

Table of Contents

Troubleshooting

Troubleshooting

Troubleshooting

Use the information in this appendix to help isolate problems you might encounter with Cisco 1600 series routers, or to rule out the router as the source of the problem.

This appendix contains the following sections:

For information about the Cisco 1600 series ROM monitor, refer to the appendix "ROM Monitor."

If you cannot locate the source of the problem, contact your local reseller for information on how to proceed. Before you call, have the following information ready:


Recovering a Lost Enable Password

This section describes how to recover a lost enable password.


Note You can recover a lost enable password, but not an enable secret password. This password is encrypted, and must be replaced with a new enable secret password. See the section "Hot Tips" on Cisco Connection Online (CCO) for information on replacing enable secret passwords.

Follow this procedure to recover a lost enable password:

Step 1 Connect an ASCII terminal or a PC running a terminal emulation program to the console port located on the rear panel of the router. Refer to the section "Connecting the Console" in the chapter "Installing the Router."

Step 2 Configure the terminal to operate at 9600 baud, 8 data bits, no parity, and 2 stop bits.

Step 3 Reboot the router to enter the normal operating mode of the router.

Step 4 After a few seconds, you see the user EXEC prompt (Router>). Enter the show version command to display the existing configuration register value:


Router> show version

Step 5 Record the setting of the configuration register. It is usually 0x2102 or 0x102.

Step 6 If Break is disabled (the router's default setting), turn the router OFF, wait five seconds, and turn it ON again. Within 60 seconds of turning on the router, press the Break key. This action causes the terminal to display the ROM monitor program prompt (rommon 2>). Proceed to Step 8. If Break is enables, proceed to Step 7.


Note Some terminal keyboards have a key labeled "Break." If your keyboard does not have a Break key, refer to the documentation that came with the terminal for instructions on how to send a Break.


Note You can view the Break setting by entering the show version EXEC command. If Bit 8 is set to 0, Break is enabled. If Bit 8 is set to 1, Break is disabled. To enable Break, enter the config-register 0x01 EXEC command.

Step 7 If Break is enabled, send a Break. This action causes the terminal to display the bootstrap program prompt (rommon 2>). Proceed to Step 8.

Step 8 To reset the configuration register to boot from the boot ROMs and ignore NVRAM, enter confreg 0x142 at the ROM monitor prompt:


rommon 2> confreg 0x142

Step 9 Initialize the router by entering the initialize command:


rommon 2> i

The router cycles its power; the configuration register is set to 0x142; and the router boots the boot ROM system image, indicated by the system configuration dialog:

--- System Configuration Dialog ---

Step 10 Enter no in response to the prompts until the following message is displayed:


Press RETURN to get started!

Step 11 Press Return. The boot ROM prompt appears:


Router>

Step 12 Enter the enable command to enter enable mode. Configuration changes can be made only in enable mode:


Router> enable

The prompt changes to the privileged EXEC prompt:

Router#

Step 13 Enter the show startup-config command to display the enable password in the configuration file:


Router# show startup-config

Step 14 Enter the configure terminal command to enter configuration mode:


Router# configure terminal

Step 15 Enter the configure register command to return the original value found in Step 4, or set the configuration register to the default value (0x2102).

Step 16 Press Ctrl-Z to exit configuration mode.


Note To return to the configuration being used before recovering the lost enable password, do not save the configuration changes before rebooting the router.

Step 17 Reboot the router and enter the recovered password.


Problem Solving

The key to problem solving is to isolate the problem to a specific subsystem by comparing what the router is doing to what it should be doing.

When problem solving, consider the following subsystems of the router:

  • WAN interface cards---Refer to the LEDs on the cards and the LEDs on the router front panel to help identify a failure. For information on the front panel LEDs, refer to the section "Front Panel LEDs" later in this appendix.

  • Cables---Check all the external cables that connect the router to the network.

  • Power system---Consider the external power source, power cable, router power supply, and circuit breaker. Check for inadequate ventilation or air circulation.

  • ISDN configuration---Consider ISDN-specific hardware and software configuration (Cisco 1603, Cisco 1604, and ISDN BRI WAN interface cards only).


Troubleshooting WAN Interface Cards and Cables

Check for the following symptoms to help isolate the problem:

  • WAN interface card is not recognized by the router.

    • Check the card connection to the motherboard connector and make sure it is secure.

    • Check the LEDs on the card and on the front panel of the router. (See the section "WAN Interface Card LEDs" later in this appendix.)

    • If you are using a Cisco 1603 or Cisco 1604, check that the router does not have a ISDN S/T or an ISDN U card installed.

  • WAN interface card is recognized, but interface ports do not initialize.

    • Check the card connection to the motherboard connector and make sure it is secure.

    • Check the external cable connections to make sure they are secure.

  • Router does not boot properly or constantly or intermittently reboots.

    • Check the WAN interface card connection to the motherboard connector and make sure it is secure.

    • Check that the Flash memory card is correctly installed in the router. For more information on installing the card, refer to the section "Installing a Flash Memory Card" in the chapter "Installing the Router."

  • Router boots, but the console screen is frozen.

    • Check the external console connection and make sure it is secure.

    • Verify that the parameters for your terminal are set to the following:
      9600 baud
      8 data bits
      No parity generated or checked
      1 stop bit

  • Router powers on and boots only when a particular WAN interface card is disconnected from the motherboard.

    • Replace the card. Consult your reseller or local Cisco sales office for warranty information.

    • If you are using a Cisco 1603 or Cisco 1604, check that the router does not have a ISDN S/T or an ISDN U card installed.

  • Router powers on and boots only when a particular cable is disconnected.

    • There might be a problem with the WAN interface card or card cables. Consult your reseller or local Cisco sales office for warranty information.


Troubleshooting the Power System

Check the following items to help isolate the problem:

  • Router shuts down after being on a short time.

    • Check the environmental site requirements in the section "Site Requirements" in the chapter "Preparing to Install the Router."

    • Check for a power supply failure. If the LED on the front panel labeled SYSTEM PWR is not on, the power supply has failed.

  • Router partially boots, but LEDs remain off.

    • Check for a power supply failure.

  • Router is on, but the LED on the front panel labeled SYSTEM PWR is off

    • Check for a power supply failure.

  • The LED on the front panel labeled SYSTEM PWR is on, but the router does not pass console or EIA data.

    • Check for a power supply failure.


Troubleshooting ISDN

This section describes problems related to the ISDN line that might occur with the router.

There are two commands that are useful when troubleshooting ISDN. The clear interface command, when entered with the bri keyword, terminates any active ISDN calls and resets the ISDN BRI interface. Enter the command as follows:

Router# clear interface bri0

The clear controller command is used on routers with an ISDN BRI U interface. Entered with the bri keyword, this command performs the same function as the clear interface command, but also resets the ISDN line between the router and the central office switch. Enter the command as follows:

Router# clear controller bri0

Table A-1 lists troubleshooting methods for ISDN-specific problems that might occur.

Table A-1 : Troubleshooting ISDN

Symptom Checks Causes and Solutions
Router is on, OK LED (next to ISDN S/T port) is off (Cisco 1603 and ISDN S/T WAN interface card)
  • Is the SYSTEM OK LED on?
  • Are all ISDN cables properly connected?
  • Is the NT1 on?
  • Possible router hardware problem.
  • Possible ISDN line problem. Check with ISDN service provider.
  • Possible NT1 problem.
Router is on, NT1 LED is off (Cisco 1604 and ISDN U WAN interface card)
  • Is the SYSTEM OK LED on?
  • Are all ISDN cables properly connected?
  • Is the ISDN line connected to the router's ISDN U port?
  • Possible router hardware problem.
  • Possible ISDN line problem. Check with ISDN service provider.
  • Possible ISDN line problem. Check with ISDN service provider.
NT1 LED is on, OK LED (next to ISDN S/T port) is off (Cisco 1604)
  • If there is no device connected to the ISDN S/T port, the OK LED is supposed to be off.
  • Is the device connected to the ISDN S/T port turned on and correctly configured?
  • Possible router hardware problem.

  • Possible problem with device connected to the ISDN S/T port.
Cisco 1604 cannot create an ISDN connection to the remote router when an ISDN device is connected to the ISDN S/T port
  • Is the ISDN configured for multipoint service.
  • Is the external ISDN device using both B channels?
  • The service provider should configure the line for multipoint service.
  • The service provider should configure the line for multipoint service.
ISDN device attached to the Cisco 1604 ISDN S/T port does not operate correctly.
  • Does the device operate correctly if the interface for the Cisco 1604's ISDN U port (interface bri0) is shut down?
  • Is the Cisco 1604 using both B channels?
  • The service provider should configure the line for multipoint service.

  • The service provider should configure the line for multipoint service.
Cannot make an ISDN connection to remote device (Cisco 1603, Cisco 1604, ISDN WAN interface cards)
  • Use show status command to check the following:
    • Does the current ISDN switch type match actual switch type being used?
Use the isdn switch-type command to configure correct switch type.
  • Check the following:
    • Is Layer 1 status deactivated?


    • If Layer 1 status is active, does Layer 3 status say "2 Active Layer 3 calls"?


    • If Layer 1 status is active, does Layer 3 status say "No Active Layer 3 call(s)"?
    • If Layer 1 status is active, does Layer 3 status say "1 Active Layer 3 call"?

  • Use the show controller bri0 command to check for the messages CO RUNNING LOOPBACK TESTS or CO TESTING. If you receive these messages, contact the service provider.
  • Router might have called itself. Check destination phone number configured with the dialer map command and the dialer string command.
  • Check destination phone number. Check route to the destination.
  • Check router's protocol configurations.


Front Panel LEDs

The LEDs on the front panel of the router enable you to determine router performance and operation at a glance. This section contains information about reading the LEDs and using them to troubleshoot problems.

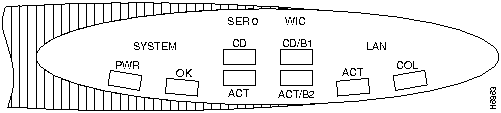
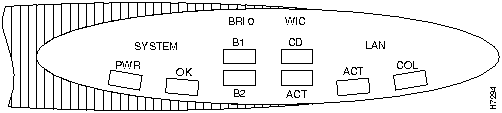
Figure A-1 and Figure A-2 illustrate the LEDs on the front panel of Cisco 1600 series routers.

Figure A-1 : Front Panel LEDs---Cisco 1601 and Cisco 1602

h6863.gif

Table A-2 describes the front panel LEDs for the Cisco 1601 and Cisco 1602 routers.

Table A-2 : Front Panel LEDs---Cisco 1601 and Cisco 1602

LED Color Description
SYSTEM PWR Green Indicates that the router is turned on, that DC power is being supplied to the router.
SYSTEM OK Green Indicates that the router has successfully booted. Blinks during the boot cycle.
LAN ACT Green Indicates that data is being sent to or received from the local Ethernet LAN.
LAN COL Yellow Flashing indicates packet collisions on the local Ethernet LAN.
SER 0 CD Green
  • Cisco 1601---Indicates an active connection on the serial port.
  • Cisco 1602---Indicates an active connection on the CSU/DSU port.
SER 0 ACT Green
  • Cisco 1601---Indicates that data is being sent to or received from the serial port.
  • Cisco 1602---Indicates that data is being sent to or received from the CSU/DSU port.
WIC CD/B1 Green
  • Serial WAN interface card installed1---Indicates an active connection on the serial port.
  • ISDN BRI WAN interface card installed---Indicates an ISDN connection on B-channel 1.
WIC ACT/B2 Green
  • Serial WAN interface card installed---Indicates that data is being sent to or received from the serial port.
  • ISDN BRI WAN interface card installed---Indicates an ISDN connection on B-channel 2.

Figure A-2 : Front Panel LEDs---Cisco 1603 and Cisco 1604

h7294.gif

Table A-3 describes the front panel LEDs for the Cisco 1603 and Cisco 1604 routers.

Table A-3 : Front Panel LEDs---Cisco 1603 and Cisco 1604

LED Color Description
SYSTEM PWR Green Indicates that the router is turned on, that DC power is being supplied to the router.
SYSTEM OK Green Indicates that the router has successfully booted. Blinks during the boot cycle.
LAN ACT Green Indicates that data is being sent to or received from the local Ethernet LAN.
LAN COL Yellow Flashing indicates packet collisions on the local Ethernet LAN.
BRI 0 B1
Green Indicates an ISDN connection on B-channel 1.
Note for Cisco 1604 only---If an ISDN device connected to the ISDN S/T port is using B-channel 1, the LED will go on,
BRI 0 B2 Green Indicates an ISDN connection on B-channel 2.
Note for Cisco 1604 only---If an ISDN device connected to the ISDN S/T port is using B-channel 2, the LED will go on,
WIC CD Green Indicates an active connection on the WAN interface card serial port.
WIC ACT Green Indicates that data is being sent over the WAN interface card serial port.


Rear Panel LEDs

Table A-4 describes the rear panel LEDs. For illustrations of these LEDs and the rear panel of the routers, refer to Figure 1-2 through Figure 1-5 in the chapter "Overview."

Table A-4 : Rear Panel LED Descriptions

LED Color Description
All Models:
LINK
Green Indicates 10BaseT link integrity. Does not go on when connected to an Ethernet network through the AUI port.
OK (for Flash memory PC Card) Green Indicates that the Flash memory card is correctly installed.
Cisco 1601:
RDY Green Indicates that a serial port cable connection has been made to a modem or DSU/CSU.
Cisco 1602:
LOOPBACK Yellow Indicates that the DSU/CSU is in CSU or DSU loopback mode.
ALARM Yellow Indicates an alarm condition on the DSU/CSU port.
CARRIER Green Indicates line synchronization or connection on the DSU/CSU port.
Cisco 1603:
OK (next to ISDN BRI S/T port) Green Indicates that a physical connection has been established with the ISDN central office switch.
Cisco 1604:
NT1 Green Indicates that a physical connection has been established from the router's internal NT1 to the ISDN central office switch.
OK (next to ISDN S/T port) Green Indicates that the device connected to the router's ISDN S/T port has established a physical connection with the ISDN central office switch.


WAN Interface Card LEDs

Table A-5 describes the LEDs that appear on the front panel of each card.

Table A-5 : WAN Interface Card LED Descriptions

Card LEDs Color Description
Synchronous serial CONN Green
  • DTE1 mode---Indicates that DSR2, DCD3, and CTS4 signals have been detected.
  • DCE mode---Indicates that DTR5 and RTS6 have been detected.
ISDN BRI S/T
  • B1
  • B2
  • OK
Green

Green

Green
  • Indicates an ISDN connection on B-channel 1.
  • Indicates an ISDN connection on B-channel 2.
  • Indicates that the ISDN port has synchronized with the central office switch.
ISDN BRI U
  • B1
  • B2
  • NT1
Green

Green

Green
  • Indicates an ISDN connection on B-channel 1.
  • Indicates an ISDN connection on B-channel 2.
  • Indicates that the integrated NT1 has synchronized with the central office switch.

1 DTE = data terminal equipment.
2 DSR = data set ready.
3 DCD = data carrier detect.
4 CTS = Clear To Send.
5 DTR = data terminal ready.
6 RTS = Request To Send.

For more information on WAN interface cards, refer to the chapter "Using WAN Interface Cards."

HomeTOCPrevNextGlossSearchHelp
-

Copyright 1988-1996 © Cisco Systems Inc.