
Table of Contents
Quick-Start Tutorial
Quick-Start Tutorial
This chapter walks you through discovering a hypothetical network, setting up a soft permanent virtual channel (SPVC), and using the monitoring and operation, administration, and management (OAM) features in AtmDirector to troubleshoot and enhance the network.
In this chapter, you will
- Start the AtmDirector application.
- Discover an ATM network.
- Rename the discovered ATM network.
- Set global options.
- Check the operation of the ATM network devices by setting the polling interval and interpreting status conditions.
- Invoke CiscoView to troubleshoot a device.
- Obtain a list of virtual channels (VCs) on a link.
- Check the utilization of a VC.
- Create an SPVC.
- Obtain and interpret a trace report and graphical display.
- Check the connectivity of a virtual channel by sending an OAM ping.
Hypothetical ATM Network
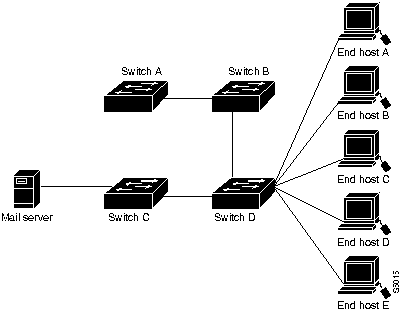
The hypothetical ATM network consists of the following devices:
- One mail server
- Four LS1010 ATM switches connected through a private network
- Five workstations
Table 4-1 shows the configuration information about the hypothetical network, and Figure 4-1 shows a diagram of the hypothetical network.
Table 4-1 : Hypothetical Network Configuration
| Mail Server
|
47:00:81:540a:0000:0041:0a0b:0b75:4000:0c80:1030:00
|
172.18.20.5
|
| Switch A
|
47:00:81:9100:0000:0074:0a08:010a:4000:0c80:8000:00
|
172.18.20.6
|
| Switch B
|
47:00:81:9100:0000:0072:010b:0a32:4000:0c80:8010:00
|
172.18.20.7
|
| Switch C
|
47:00:81:540a:0000:0051:0b0a:0b81:4000:0c80:8020:00
|
172.18.20.8
|
| Switch D
|
47:00:81:9100:0000:0051:0b0a:0b81:4000:0c80:8030:00
|
172.18.20.9
|
| End Host A
|
47:00:81:9100:0000:0051:0b0a:0b81:4000:0c80:9020:00
|
192.48.63.17
|
| End Host B
|
47:00:81:9100:0000:0051:0b0a:0b81:4000:0c80:0000:00
|
192.48.63.18
|
| End Host C
|
47:00:81:9100:0000:0051:0b0a:0b81:4000:0c80:0010:00
|
192.48.63.19
|
| End Host D
|
47:00:81:9100:0000:0051:0b0a:0b81:4000:0c80:0020:00
|
192.48.63.20
|
| End Host E
|
47:00:81:9100:0000:0051:0b0a:0b81:4000:0c80:2000:00
|
192.48.63.21
|
Figure 4-1 : Diagram of Hypothetical Network
Start the AtmDirector Application
To start the AtmDirector application, follow these steps:
Step 1 Log in to your system.
Step 2 Bring up your window manager.
Step 3 Open an xterm window.
Step 4 Change directory by entering the following command:
%
cd /opt/CSCOatmd/bin
Note If you installed AtmDirector in a directory other than CSCOatmd, enter that directory name. If the AtmDirector bin directory is in your search path, you can enter the command to start AtmDirector from any directory.
Step 5 Enter the following command to start AtmDirector:
%
atmdirector
- The system displays the AtmDirector main window.
Discover the ATM Network
AtmDirector uses the discovery process to poll the ATM network for information for its database. To discover the network, you need to seed the discovery process and set the SNMP community string and the discovery polling interval.
Seed the discovery process by supplying AtmDirector with the IP addresses of the ATM switches in each network fabric. In this example, use the IP address of switch A.
The discovery polling interval defines the amount of idle time between discovery processes. This interval should be frequent enough to maintain the accuracy of the database, but not so often that the network is overloaded with unnecessary traffic. If there are frequent adds, moves, and changes to your network, you might want to set a frequent discovery polling interval, for example, every 15 minutes. However, if the network configuration doesn't change often, a polling interval of 60 minutes is sufficient.
Note You should schedule the discovery process to occur at non-peak traffic times.
In this network, changes are infrequent, so set the discovery polling interval to 60 minutes.
To seed the discovery process and set the discovery polling interval, follow these steps:
Step 1 Select Options>Global Options from the AtmDirector window, shown in Figure 4-2. The Global Options window appears with the discovery index tab window selected, as shown in Figure 4-3.
Step 2 In the Seed IP List table, enter a value in the Seed IP Address column identifying the ATM switch that is to be the seed, the starting point, for the discovery process.
- In this case, enter 172.18.20.6, which is the IP address of switch A. See Table 4-1.
Step 3 If the default public and private SNMP community strings have been changed, enter the customized community string of the ATM switch in the Community String List field.
Figure 4-2 : AtmDirector Window
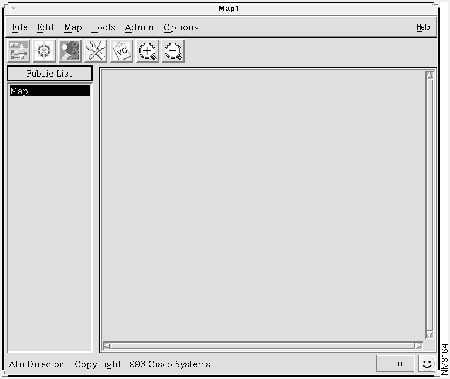
Figure 4-3 : Discovery Index Tab Window
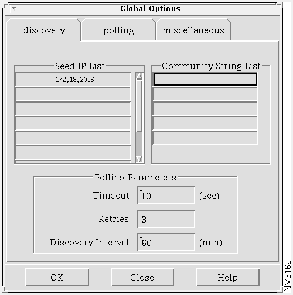
Step 4 In the Polling Parameters box, configure the fields as follows:
- Timeout = 10 seconds. If the discovery process does not receive a response from a device in 10 seconds, it stops polling the device and proceeds to the next device.
- Retries = 3. The discovery process attempts to reach the seed three times before stopping the discovery process.
- Discovery Interval = 60 minutes. The discovery process initiates the discovery process every 60 minutes.
Step 5 Click OK to save the entered values and close the window.
Rename the Discovered Network
After you seed the discovery process and set the discovery polling interval, the discovery process begins. After the discovery process is completed, a generic name for the discovered fabric appears in the Fabric List column, as shown in Figure 4-2. AtmDirector sequentially names newly discovered fabrics with the name "Mapn," where n is a number from 1 to 999.
To rename the fabric to a more meaningful name, follow these steps:
Step 1 Select Edit>Rename Fabric. The Rename Fabrics window appears, as shown in Figure 4-4, listing the names of existing fabrics.
Step 2 Select the name of the desired fabric from the list. The name of the selected fabric appears in the Old Name field.
Step 3 Enter a new logical name for the fabric in the New Name field. For this tutorial, enter "Network-A" as the new name.
Step 4 Click OK to save the entered values and close the window.
Figure 4-4 : Rename Fabric Window
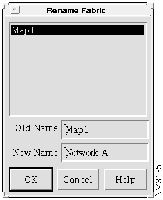
Figure 4-5 : AtmDirector Window Showing Renamed Fabric

Set Global Options
You can configure a default fabric to display when AtmDirector is started, and you can set the factor by which the map is enlarged or reduced with zooming in and out, respectively.
To set the parameters, follow these steps:
Step 1 Select Options>Global Options from the AtmDirector window, shown in Figure 4-5. The Global Options window appears.
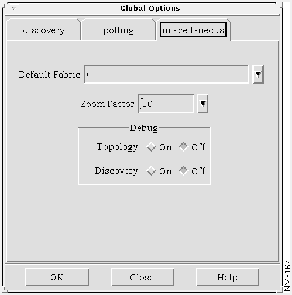
Step 2 Select the miscellaneous index tab. The miscellaneous index tab window appears, as shown in Figure 4-6.
Step 3 In the Default Fabric field, enter "Network-A" as the name of the fabric that AtmDirector is to display at startup.
Step 4 In the Zoom Factor field, enter a number for the factor by which the map is enlarged or reduced with the Zoom In and Zoom Out options.
Step 5 Click OK to save the entered values and close the window.
Note The debug options are used when troubleshooting. Refer to Appendix A, "Troubleshooting," for details.
Figure 4-6 : Miscellaneous Index Tab Window
Check the Operation of the ATM Network
Now that you have discovered the ATM network, you should set the SNMP polling interval so that AtmDirector notifies you of devices that are up, down, or previously down.
Set the Status Polling Interval
Using the same guidelines that you used to set the discovery polling interval in the "Discover the ATM Network" section, set the status polling interval to 15 seconds, as follows:
Step 1 Select Options>Global Options from the AtmDirector window, shown in Figure 4-7. The Global Options window appears.
Step 2 Select the polling index tab. The polling index tab window appears, as shown in Figure 4-7.
Step 3 In the SNMP box, configure the fields as follows:
- Timeout = 10 seconds. If the polling process does not receive a response from a device in 10 seconds, it declares the device unreachable.
- Number of Retries = 3. The discovery process attempts to reach the device three times, before declaring the device unreachable.
Step 4 In the Status Polling Interval field, enter 15 seconds. The polling process will poll the device every 15 seconds.
Step 5 Click OK to save the entered values and close the window.
Figure 4-7 : Polling Index Tab Window

View and Interpret the Status of Devices
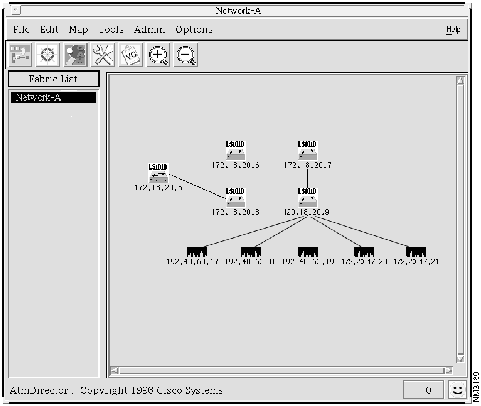
AtmDirector displays the names of discovered networks in the left column in the AtmDirector window. (See Table 1-1.)
To view the status of devices in the hypothetical network, double-click the network fabric name. The topology map of the network appears, as shown in Figure 4-8. AtmDirector indicates the status of devices by changing the color of the icon, as shown in Table 1-1. Switch A (IP address 172.18.20.6) is red in this case.
Figure 4-8 : AtmDirector Display Showing Network-A
Invoke CiscoView
To troubleshoot the inoperable switch, invoke CiscoView from AtmDirector. Select Map>Object>CiscoView, or select the device, click the right mouse button, and choose CiscoView from the popup menu.
CiscoView is a GUI-based device management software application that provides dynamic status, statistics, and comprehensive configuration information for Cisco Systems switched internetworking products (switches, routers, concentrators, and adapters). CiscoView graphically displays a physical view of Cisco devices. Additionally, this network management tool provides monitoring functions and offers basic troubleshooting. For details about using CiscoView to troubleshoot and configure devices, refer to the CiscoView User Guide or the online help provided with CiscoView.
After the switch is up from the previously down state, clear the status condition by selecting the device on the topology map and choosing Admin>Clear State. The color of the device icon changes to green.
Obtain a List of Virtual Channels on a Link
You can use AtmDirector reports and graphical displays to troubleshoot the ATM network or simply monitor the traffic and usage of VCs.
As the network manager of the hypothetical network, you learn that users are having difficulty accessing the mail server. After checking the topology map and verifying that all devices are operational, you want to view usage and other information about the link to determine what to do next.
You can select a VC in several ways, based on the type of information you have and the type of information you need. You can view all connections or connections specified by SVC addresses.
In this case, you want to concentrate on the connection between Switch C and the mail server. To display this connection, follow these steps:
Step 1 From the topology map on the AtmDirector window, select the link connected to the mail server.
Step 2 Select Tools>VC List>By SVC Addresses.
Step 3 The VC Filter window appears showing the ATM addresses of all devices with SVCs connected to the selected link. Figure 4-9 shows an example of the VC Filter window with the pertinent SVCs.
Figure 4-9 : VC Filter Window Showing SVCs
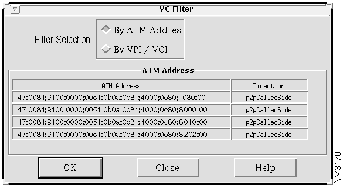
Step 4 Select the ATM addresses of the mail server and Switch C.
Step 5 Click OK. The VC List window appears, showing the VPI/VCI connections between the selected devices, as shown in Figure 4-10.
The VC List window shows the following information about the links:
- VPI/VCI numbers
- The type of configuration: switched virtual channel (SVC), permanent virtual channel (PVC), or SPVC
- The type of cast, either point-to-point or point-to-multipoint
- The traffic class, as follows:
- VbrNrt---Variable bit rate nonreal time
- VbrRt---Variable bit rate real time
- Cbr---Constant bit rate
- Abr---Available bit rate
- Ubr---Unspecified bit rate
You can request the percentage of bandwidth used to transmit and receive data. The following section, "Check the Utilization of a VC," describes how to request this information.
Figure 4-10 : VC List Window
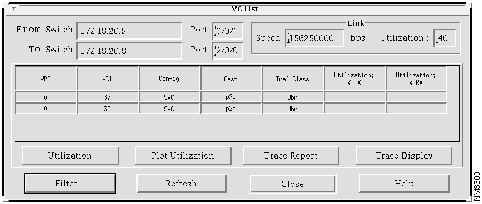
Check the Utilization of a VC
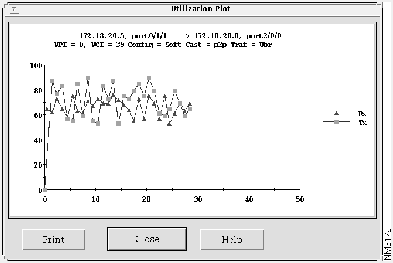
From the VC List window, you can view utilization information for VPI/VCIs in a tabular or graphical format. Select Utilization to view the information in the Utilization% Tx column and Utilization% Rx column, as shown in Figure 4-11, or select Plot Utilization to view the information in a graphical display, as shown in Figure 4-12.
The percentage of utilization values is represented in two columns, one for Transmit (Tx) and one for Receive (Rx). The utilization values for the transmit and receive directions are based on the From device reference of this link. On the utilization graph, the From device (source) is the device on the left; the To device (destination) is the switch on the right.
The data shown for the selected VPI/VCI indicates that usage on the link is high.
Figure 4-11 : Utilization Table
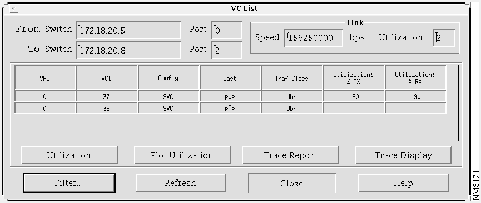
Figure 4-12 : Utilization Graph
Create an SPVC
Because the utilization reported for the link is high, the link appears to be a bottleneck to data flow. You can create an SPVC (a combination of permanent and switched virtual channels) that provides the following benefits of both types of channels:
- Dedicated bandwidth between the end hosts and their corresponding switches.
- Switched virtual channels between intermediary switches for improved reliability. If one switch goes down, the virtual channel can be redirected to a different switch.
To set up an SPVC, you need to create PVCs between the end hosts and their respective switches through each switch's command-line interface or by using CiscoView. You can create these PVCs either before or after setting up the SPVC in AtmDirector. The VPI/VCI values entered at the switches and in AtmDirector must match. Refer to the command reference or configuration guide for the switch for information about creating a PVC.
To create an SPVC, follow these steps:
Step 1 From the topology map on the AtmDirector window, select the link connected to the mail server. Press the shift key and select the link connected to the end hosts.
Step 2 Select Tools>Soft PVC/PVP Setup. The SPVC/SPVP Setup window appears, as shown in Figure 4-13.
Step 3 In the Connection box, choose SPVC.
Figure 4-13 : SPVC/SPVP Setup Window
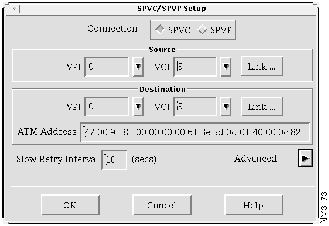
Step 4 In the VPI field and VCI field in the Source box, either choose a previously created VPI/VCI or enter a VPI/VCI value, and press the Return key. You can display previously created VPI/VCIs by clicking the down arrow next to the VPI field and VCI field.
- You can create the PVCs at the end hosts either before or after setting up the SPVC or SPVP. If the PVCs for the desired end hosts have been created already, use those VPI/VCI values. If the PVCs have not been created, enter VPI/VCI values for the PVCs, and use these values when setting up the PVCs at the end hosts.
Step 5 In the Slow Retry Interval field, enter 10 seconds and press the Return key. If the LS1010 switch detects that the SPVC is set up but not active, it attempts to set up the SPVC again, according to the interval set in the Slow Retry Interval field. In this case, the LS1010 switch waits 10 seconds before attempting to set up the SPVC again.
- You can check the status of this SPVC using CiscoView.
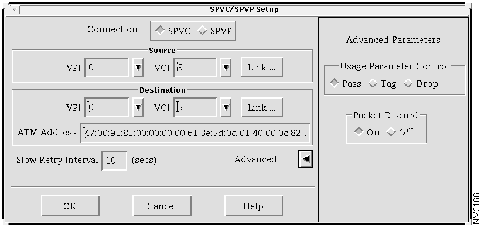
Step 6 As an option, you can configure the advanced parameters. Click Advanced Parameters. The Advanced Parameters window appears to the right of the SPVC/SPVP Setup Window, as shown in Figure 4-14.
Step 7 In the Usage Parameter Control field, select Pass, Tag, or Drop.
Step 8 In the Packet Discard field, select On or Off. If this field is enabled, the switch discards ATM adaptation layer 5 (AAL5) frames when a threshold has been exceeded. If this field is disabled, these packets are not discarded.
Note Refer to the LightStream 1010 ATM Switch Configuration Guide for further information about traffic shaping on the LS1010.
Step 9 Click OK.
Figure 4-14 : SPVC/SPVP Setup Window With Advanced Parameters
Obtain and Interpret a Trace Report and Graphical Display
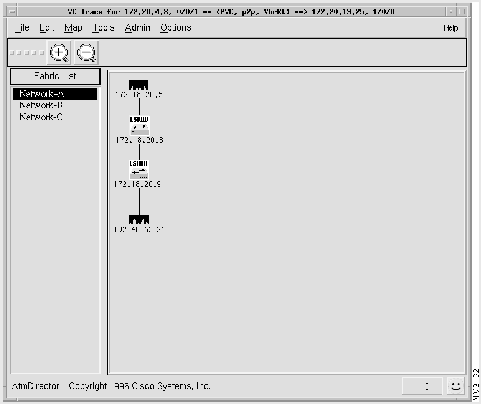
You have added the SPVC; however, users are still reporting difficulty in sending and receiving mail. To obtain a trace report or graphical display to see which devices are involved in switching the virtual channel across the network, follow these steps:
Step 1 From the topology map on the AtmDirector window, select the link connected to the mail server.
Step 2 Select Tools>VC List>By SVC Address.
Step 3 The VC Filter appears showing the ATM addresses of all devices with SVCs connected to the selected link. (See Figure 4-9).
Step 4 Select the VPI/VCIs for the SPVC that you created.
Step 5 Select Trace Report to view the information in a table, as shown in Figure 4-15, or Trace Display to view the information in a graphical display, as shown in Figure 4-16.
These tools show the switches and ports that are involved. You can now invoke CiscoView and check the operation of the switches in question. To invoke CiscoView from AtmDirector, select Map>Object>CiscoView or select the device, click the right mouse button, and choose CiscoView from the popup menu.
Figure 4-15 : Trace Report
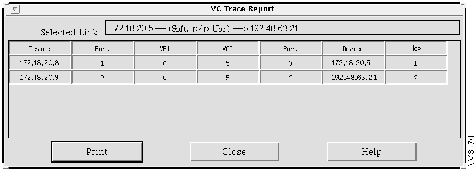
Figure 4-16 : Trace Display
Send OAM Pings to Check the Connectivity of a VC
Using CiscoView, you notice a port on one of the switches was down. After resetting the port using CiscoView, you can verify the connection by sending an OAM ping to the mail server. To do so, follow these steps:
Step 1 Select the ATM switch from which you want to send the OAM ping. In this case, select switch D, IP address 120.18.20.9. See Figure 4-8.
Step 2 Press the shift key and select the link you want to use to send the OAM ping. Select Tools>OAM Ping or click the OAM Ping icon on the toolbar. The OAM Ping window appears, as shown in Figure 4-17.
- In the Source IP Address field, IP address 172.18.20.9 for Switch D appears. The numbers of the card, subcard, and port appear in the Port field. The VPI and VCI values for the selected link appear in the VPI field and VCI field, respectively.
Step 3 Select the VPI/VCI value of the VC from which you want to send the OAM ping.
Step 4 In the Timeout field, enter 10 for the number of seconds that the ATM switch waits before determining that the OAM ping has failed.
Step 5 In the Delay field, enter 5 for the number of seconds that the LS1010 switch must wait before sending the next OAM ping either after a response or after declaring a timeout for a previous OAM ping.
Step 6 For the Ping Type, select either Segment or End-End. In this case, select End-End so that the OAM ping loops back at the destination and not at each intermediary switch.
Step 7 In the Destination Type field, indicate the type of destination address you are supplying. Select either IP for IP address or NSAP prefix for network service access point prefix. In this case, select IP.
Step 8 In the Destination Address field, enter either the IP or the NSAP prefix, as you specified in the Destination Type field. In this case, enter 172.18.20.5 for the mail server.
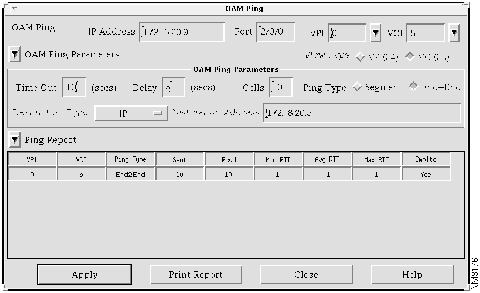
Step 9 Click Apply.
- AtmDirector displays the results of the OAM ping in the Ping Report table, shown in Figure 4-18. The ping report is refreshed at each polling interval.
- The OAM ping report shows the following information:
- VPI---The virtual path identifier value
- VCI---The virtual channel identifier value6
- Ping Type---Type of OAM ping, either Segment or End-End
- Sent---Number of cells sent
- Rcvd---Number of cells received
- Min RTT---Minimum round-trip time in seconds
- Avg RTT---Average round-trip time in seconds
- Max RTT---Maximum round-trip time in seconds
- Cmpltd---The status of the OAM ping, either yes for completed, or no for not completed
- The OAM ping is successful. Therefore, the link is operational. Users now have connectivity to the mail server.
Figure 4-17 : OAM Ping Window
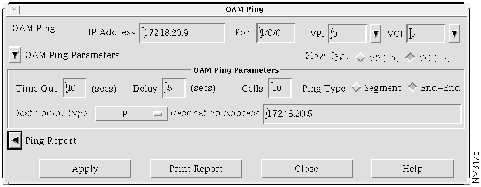
Figure 4-18 : OAM Ping Report Window Showing the Ping Report
Copyright 1988-1996 © Cisco Systems Inc.