|
|

This chapter shows how to set jumpers and switches in LightStream 2020 hardware, and explains how many of each major hardware component---NPs, switch cards, line cards, and power supplies---can coexist in a LightStream 2020 multiservice ATM switch (LS2020 switch).
Setting Jumpers and Switches on Access Cards
This section explains how to set jumpers and switches on I/O access cards. It includes these procedures:
Setting LSAC Interface Jumpers
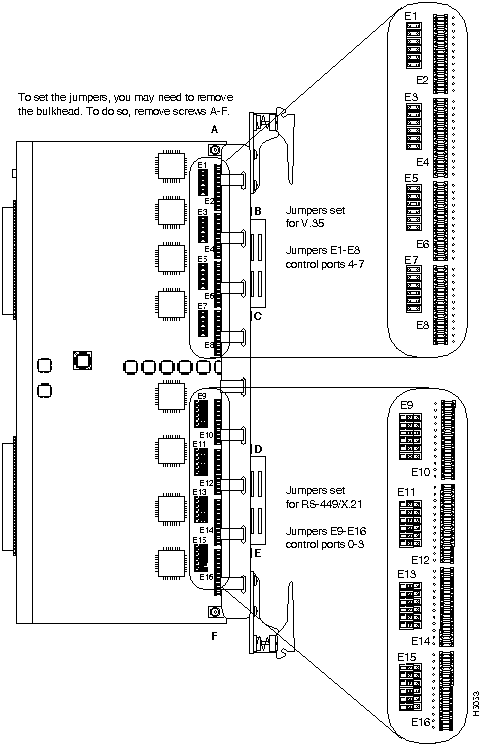
This section describes the user-settable jumpers on the low-speed access card (LSAC) and shows how to set them. The jumpers allow you to select one of two interface types:
These jumpers are set for you in the factory based on the configuration specified in your system order, so you should not have to change the jumpers unless you change your configuration.
Figure 4-1 shows the location of the 16 sets of interface jumpers on the card, and illustrates how to set them. For V.35, put jumpers on the left and center pins. For RS-449 and X.21, put jumpers on the right and center pins. (The settings are indicated on the card, as shown.) Note that in Figure 4-1 the card is configured to provide RS-449/X.21 interfaces for ports 4 through 7, and V.35 interfaces for ports 0 through 3.
Each LSAC serves up to eight I/O ports. If you want all eight ports to use the same interface, set all the jumpers the same way. If you prefer, you can set the LSAC to give you four ports of one type and four of another (four V.35 and four X.21, for example). You will need one fantail of each type.
The interface jumpers are labelled E1 through E8 and E11 through E18. (E9 and E10 are not interface jumpers and are not located near the interface jumpers on the card.) The interface jumpers can be divided functionally into two groups:
(The two connectors on the front edge of the card are labelled with the numbers of the ports they serve. Each connector can be attached to a fantail that provides four I/O ports.)
Figure 4-1 : Interface Jumpers on Low-speed Access Card This section describes the user-settable jumpers on the serial access card (SAC) and shows how to set them. The jumpers allow you to select one of two interface types:
These jumpers are set for you in the factory based on the configuration specified in your system order, so you should not have to change the jumpers unless you change your configuration.
Each SAC serves up to eight I/O ports. For all eight ports to use the same interface, use the same settings for all the jumpers. If you set the SAC to give you four ports of one type and four of another (for example, four V.35 and four RS-449), you will need one fantail of each type. If you will use the card for X.21, consider devoting the whole card to that interface so as to use the full capacity of the X.21 fantail.
The interface jumpers can be divided functionally into two groups:
(The two connectors on the front edge of the card are labelled with the numbers of the ports they serve. Each connector can be attached to a fantail that provides four I/O ports.)
The board contains two sizes of jumpers: small jumpers (covering 12 pins) and large jumpers (covering 36 pins). To reach the large jumpers, you may need to remove the bulkhead. To do this, remove the screws immediately above and below each I/O connector and remove the two screws attached to the bulkhead on the underside of the card.
Position the jumpers as follows:
Figure 4-2 shows a card configured to provide RS-449/X.21 interfaces for ports 0 to 3 and V.35 interfaces for ports 4 to 7.
Figure 4-2 : Interface Jumpers on Serial Access Card Setting CEMAC Interface Jumpers
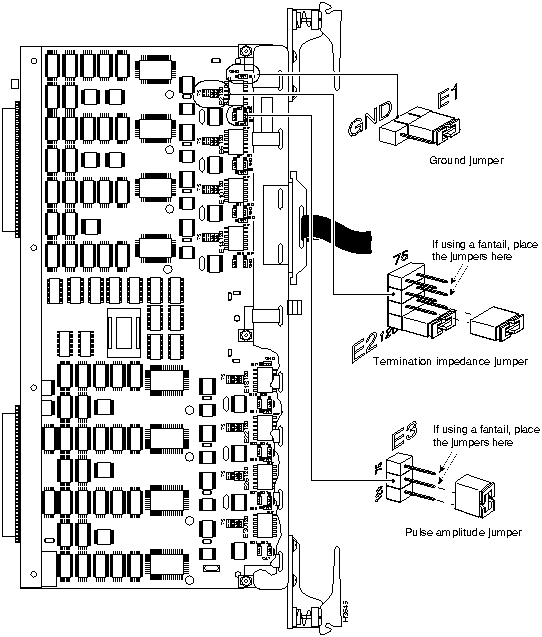
This section describes the user-settable jumpers on the E1 circuit emulation access card (E1 CEMAC) and shows how to set them.
The jumpers allow you to select termination impedance and grounding on the receive line and pulse amplitude and grounding on the transmit line. There are two possible settings: use one if you plan to attach the CEMAC to a fantail, and use the other if you plan to use the CEMAC without a fantail. The jumper settings are described below.
Settings for Use with a Fantail
If you use a fantail, the CEMAC card must be set to use 75-ohm settings for termination impedance and pulse amplitude. This can be set by putting the termination impedance jumpers on the leftmost pins (the pins farthest away from the bulkhead) and putting the pulse amplitude jumper on the upper pins. See Figure 4-3.
Settings for Use without a Fantail
If you do not plan to use a fantail, use the default settings, which are as follows: the termination impedance and pulse amplitude jumpers are set to 120 ohms, and the transmit and receive lines are not grounded.
Figure 4-3 shows the eight sets of interface jumpers on the card and illustrates how to set them. (The settings are indicated on the card, as shown.) Note that the card shown is configured to the factory default settings.
The interface jumpers are labelled E1 through E32. The jumpers associated with each port are shown in Table 4-1.
Figure 4-3 : Interface Jumpers on E1 CEMAC Turning Off the Transmit Laser on the OC3AC
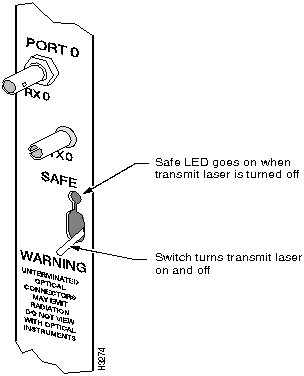
Single-mode ports on the OC-3c access card have transmit lasers whose emissions can be dangerous to the eye. When a single-mode port is not being used, we recommend that you turn off its transmit laser. Turning off the laser turns on the port's green Safe LED. (When the LED is on, you know that it is safe to look at the connector for that port.)
The toggle switch has two positions:
To turn off the laser, move the toggle switch, shown in Figure 4-4. The green Safe LED comes on to tell you the laser is off.
Figure 4-4 : Detail of Single Mode OC-3c Card Showing Safe LED and Transmit Laser's Toggle Switch Setting Jumpers and Switches on Fantails
This section explains how to set jumpers and switches on LS2020 fantails. It includes these procedures:
Setting Ground Jumpers on the E1 Fantail
The E1 fantail has two jumper positions for each port, as shown in Figure 4-5:
The transmit ground jumper setting is appropriate for most applications. If you wish to change the setting to receive ground, you can do so on a per-port basis (that is, the ports can have different settings). To change a port's ground setting from transmit to receive, do this:
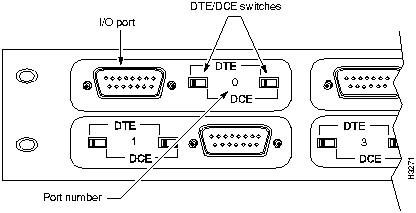
Figure 4-5 : Ground Jumpers on E1 Fantail Configuring X.21 Ports as DTE or DCE
The X.21 fantail has eight ports, and each can be set to function either as DTE or as DCE. Next to each connector is a pair of slider switches with settings labelled DTE and DCE (see Figure 4-6). The two switches in each pair are linked, so it is impossible to set them to different modes. Note that in Figure 4-5 the switches are set to DTE.
To change a port's DTE/DCE setting, do the following:
Figure 4-6 : Detail of X.21 Fantail Showing Ports and DTE/DCE Switch Pairs Guidelines in this section help you determine how many of each major component (NPs, switch cards, line cards, and power supplies) can be installed in a single LS2020 chassis. You will find this information useful if you are considering adding line cards or redundancy to your system, or if you want to rearrange the cards in a chassis.
NPs, Switch Cards, Line Cards, Disks, and Power Trays
The number of NPs, switch cards, and bulk power trays installed in an LS2020 chassis depends on whether redundancy is desired.
The two power trays in a redundant system load-share, and if either one fails, the other can power the entire switch. NPs and switch cards do not load-share; only one card of each type is active at any given time. The second NP and switch card serve as hot spares. If an active NP or switch card fails, its backup takes over automatically.
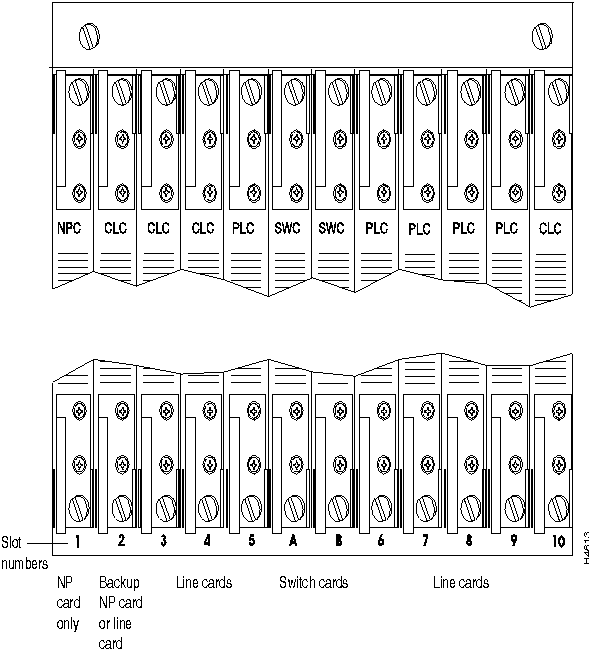
The list below outlines the types of cards that can be installed in each slot in the front of an LS2020 chassis. Figure 4-7 shows the slot numbers.
Filler panels are provided to cover empty slots.
Figure 4-7 : Detail of Front of LS2020 Showing Slot Numbers Access Cards and Console/Modem Assemblies
Up to 10 I/O access cards and two console/modem assemblies can be installed in the back of an LS2020 chassis. The type and placement of cards in the back of the chassis is determined by the cards installed in the front. Behind each NP and line card, an access card of the correct type must be installed. (Table 1-5 in the chapter "Hardware Description" matches access cards to function cards.) If there is a mismatch between the function card and access card in the same slot, the cards will not power up. A console/modem assembly must be installed behind each switch card.
Every LS2020 switch has two blowers. (Blowers are located at the top of the chassis; one is accessible from the front, one from the rear.) If one fails, a single blower can, under normal conditions, cool the entire chassis. However, a failed blower should be replaced as soon as possible.
Copyright 1988-1996 © Cisco Systems Inc.
![]()

Jumper
E Number
Function
Port 0
Port 1
Port 2
Port 3
Port 4
Port 5
Port 6
Port 7
Receive Gnd
E29
E25
E21
E17
E13
E9
E5
E1
Impedance
E30
E26
E22
E18
E14
E10
E6
E2
Amplitude
E31
E27
E23
E19
E15
E11
E7
E3
Transmit Gnd
E32
E28
E24
E20
E16
E12
E8
E4
![]()
![]()

card in a nonredundant configuration.
![]()
![]()
![]()
![]()
![]()
![]()
![]()
![]()
![]()