|
|

Cisco LightStream 100 Release Note for Software Release 2.5
This release note describes the new features and modifications for Cisco LightStream 100 Software Release 2.5.
Software Release 2.5 supports the following additional features:
To shorten the time-consuming and error-prone task of end-to-end manual configuration of PVCs, Software Release 2.5 now supports soft PVC/PVP. With soft PVC/PVP support, you can create a PVC across a multiswitch network by designating only the two end points of the connection. The software dynamically establishes a connection between the two end points, eliminating manual configuration of the switches between the two points. Without soft PVC/PVP support, every link in the path between the two ATM hosts must be manually configured as a PVC. By reducing manual configuration, soft PVC/PVP can save you considerable time configuring a network.
To illustrate how soft PVC/PVP dynamically establishes a connection between the two end points, Figure 1 shows a simple three-switch network that contains the following:
Figure 1 : Three-Switch Network
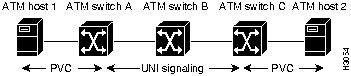
With soft PVC/PVP support, you need only configure the PVCs on the ATM hosts and assign a 20-byte ATM address to each border switch. Then enter the setup command on one of the border switches. Upon receiving the command, the signaling component in the LS-100 uses standard User-Network Interface (UNI) 3.x signaling and Interim Inter-Switch Signaling Protocol (IISP) to originate and route a call through the ATM network and dynamically establish a connection between ATM hosts.
A soft PVC/PVP connection can only be established between PVC-capable hosts (ATM host 1 and 2 in Figure 1). Additionally, the border switches (ATM switch A and C in Figure 1) must support soft PVC/PVP. However, soft PVC/PVP support is not necessary on intermediate switches (switch B in Figure 1), although the intermediate switches must support UNI 3.x signaling and IISP. Furthermore, a minimum of two ATM switches are required for a soft PVC/PVP connection: a source-border switch and target-border switch. You cannot establish a soft PVC/PVP connection between two ATM hosts connected to a single ATM switch.
A source-border switch initiates a soft PVC/PVP connection between two ATM hosts, and must be directly connected to a PVC-capable ATM host. In Figure 1, either switch A or C could be a source-border switch.
The target-border switch terminates the SVC portion of the soft PVC/PVP connection. Normally an SVC connection terminates at an ATM host, but for soft PVC/PVPs the SVC connection terminates at the target-border switch. The target-border switch must also be directly connected to a PVC-capable ATM host. In Figure 1, either switch A or C could be a target-border switch.
The type of switch, source-border or target-border, depends on which ATM switch you enter in the setup command to establish a soft PVC/PVP connection. For example, if you enter the setup command on ATM switch A in Figure 1, ATM switch A becomes the source-border switch, and ATM switch C becomes the target-border switch.
End-to-end signaling between ATM hosts via LightStream100 switches is still available. Even though the previous examples show a PVC-capable only host, you can use soft PVC/PVP to setup a virtual path (VP) between PVC connections and use standard UNI end-to-end signaling to set up virtual paths between PVCs. However, soft PVC/PVP support is only between ATM hosts with PVC connections. For example, you cannot use soft PVC/PVP to establish paths if one ATM host is PVC-capable only and the other ATM host is SVC-capable only.
Setting Up a Soft PVC/PVP Connection
To set up a soft PVC/PVP connection, follow these steps:
Soft PVC/PVP Configuration Commands
The pvc add, pvc delete, and show softPVP, and soft establish commands are new with Software Release 2.5. This section describes the new commands. The set local command has been modified. The set local command in this section supersedes the same command in the Cisco LightStream 100 User Guide. This section describes the configuration commands used to configure soft PVC/PVP on the LightStream100. This section also describes the ATM network service access point (NSAP) address format.
This section describes the ATM NSAP address format used in some of the commands in this section. Refer back to this section for an explanation of the NSAP address format. Figure 2 shows the format of the NSAP address.
Figure 2 : NSAP Address Format
The 20-byte ATM NSAP address consists of the following:
The first 14 bytes of an ATM address (13 byes for address prefix and 1 byte for port number) uniquely identify a particular port on a switch in an ATM network. For example, if switch C in Figure 1 is the target-border switch, the ATM address for switch C would be 13 bytes of address prefix and the fourteenth byte would be the port number connecting ATM switch C to ATM host 2.
The pvc add command adds a PVC endpoint. When using this command, confirm that a broadcast connection is already set by the pvc establish command. Enter the same source parameters (line number, VPI, VCI) as those specified by the pvc establish command. Note that the traffic type (bit rate type) on the endpoint becomes the same as that specified by the pvc establish command.
Format:
Format explanation:
Example:
Error messages:
Error messages (Multicast):
If an endpoint is added incorrectly, first remove the endpoint using the pvc remove command; then reenter the pvc add command.
The pvc delete command deletes a PVC setting.
Format:
Format explanation:
Example:
The set local command sets the IP address, mask, and host name of the LightStream 100 switch.
Format:
Format explanation:
The 20-byte ATM NSAP address consists of the following:
The first 14 bytes of an ATM address (13 byes for address prefix and 1 byte for port number) uniquely identify a particular port on a switch in an ATM network.
Example:
Error messages:
Enter the show local command on the console to display the ATM address.
The show softPVP command displays soft PVC/PVP information. Enter this command on either the source-border or the target-border switch, but not on an intermediate switch. Intermediate switches cannot differentiate a normal SVC from soft PVC/PVPs.
Format:
Format explanation:
Example:
If the calling party address is not fully specified, the system will left justify the address and fill in the remaining bytes with zeros.
Also, the fourteenth byte of the called party address is the port number (in this case, port number 4), which is the port to which the target ATM host is directly connected.
Use the show svc command to display all the SVCs associated with a particular port. The show svc command does not differentiate between regular end-to-end signaling and soft PVC/PVP connections.
The soft establish command sets up a soft PVP/PVC connection.
Format:
Format explanation:
Output example:
Error message:
Number of parameter is illegal.
Example:
To enable the use of standards-based signaling over public carriers, the LightStream100 now supports switched virtual circuit (SVC) tunneling. SVC tunneling allows you to set up temporary SVCs over previously established permanent virtual paths (PVPs).
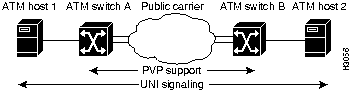
Figure 3 shows a simple network composed of two ATM hosts and two ATM switches.
One benefit of SVC tunneling is that you need only configure a PVP between the ATM switches connected to the public carrier. Signaling messages between the two ATM switches are then "tunneled" (exchanged) through the PVP over the ATM Forum-recommended virtual circuit five. The PVP appears as a point-to-point link to the two ATM switches. Routing of signaling messages between the two ATM switches over the public carrier is based on ATM Forum standard IISP. Without SVC tunneling, the complete path between the two ATM hosts must be configured as a PVC.
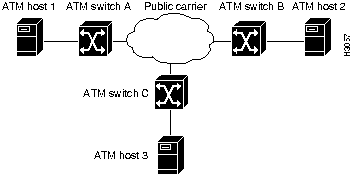
Another benefit of SVC tunneling is that only a single ATM switch port must be connected to the public carrier network. Through a single port, an ATM switch can communicate with multiple ATM switches (that support SVC tunneling) connected to the same public carrier, as shown in Figure 4.
Figure 4 : Multiple ATM Switches Connected to a Public Carrier
For example, in Figure 4 ATM switch A can communicate with ATM switch B and C simultaneously through a single port connected to the public carrier. For this communication to occur, the public carrier provides two PVPs: one PVP (VP1) between ATM switch A and B and another PVP (VP2) between ATM switch A and C.
In general, one PVP is required between two ATM switches connected to the public carrier. Messages are tunneled between the two ATM switches over the assigned PVP. Signaling messages are exchanged over VP 5, where VP is the PVP between the two ATM switches and 5 is the reserved VCI channel (on the VP) allocated by the ATM Forum for signaling.
The LightStream100 supports a maximum of 64 virtual paths.
Except where indicated otherwise, the syntax for the commands used to configure SVC tunneling are described in the next section, "SVC Tunneling Configuration Commands." To set up SVC tunneling, follow these steps only on the LightStream100s connected to the public carrier (for example, ATM switch A, B, and C in Figure 4):
SVC Tunneling Configuration Commands
In Software Release 2.5, the set signaling command is new. The set sscop, set atmsig, and route add commands have been modified. The modified commands in this section supersede the same commands in the Cisco LightStream100 User Guide. This section describes the configuration commands used to configure SVC tunnels on the LightStream100.
The set signaling command configures a virtual path on a particular port or line. Configure multiple VPs per port by entering the set signaling command multiple times.
Format:
Format explanation:
The delete signaling command deletes the configured tunnel.
Example:
Error message:
The set sscop command sets the SSCOP parameters for ATM signaling per line.
Format:
Format explanation:
Example:
Error messages:
Note that P1 and P10 should match the port number and virtual path configured by the set signaling command.
Parameters P2 through P9 are standard SSCOP parameters with built-in default values. The default parameters are well suited for most networks. Do not change the parameters unless you have excellent knowledge of the SSCOP protocol and the network configuration.
Display the defaults by entering the show sscop command to display parameters P2 through P9. Then refer to the parameters when configuring tunnels.
The delete sscop command deletes the configured tunnel.
Format explanation:
The set atmsig command sets Q.2931 (formerly Q.93B) parameters for ATM signaling on the specified line.
Format:
Format explanation:
P13: VP (0--4095)
Command example:
Error messages:
Note that parameters P1 and P13 should match the port number and virtual path configured by the set signaling command. Parameters P1 and P13 should also match parameters P1 and P10 specified by the set sscop command.
Parameters P2 through P12 are standard Q.2931 parameters with built-in default parameters. The default parameters are well suited for most networks. Do not change these parameters unless you have excellent working knowledge of the Q.2931 protocol and the network configuration.
Display the default values by entering the show atmsig command, which displays parameters P2 through P12. Then refer to them when configuring SVC tunnels.
The LightStream 100 switch currently supports only UNI 3.0 signaling.
The delete atmsig command deletes the configured tunnel.
The route add command is used by IISP to route signaling messages across multiple switches and even among multiple ports on a single switch.
Format:
Format explanation:
Example:
Error messages:
The route add command has been extended to now include a virtual path tied to a particular port because there could be multiple virtual paths associated with a single port.
Cisco LightStream User Guide Errata for Release 2.5
This section provides corrections and additional information for Release 2.5 of the Cisco LightStream 100 User Guide publication.
On page 1-18, add the following section after the section "Communicating with the NMS Manager."
The LightStream 100 only supports AAL5 SNAP encapsulation for the packets that go to the switch.
Cisco Information Online (CIO) is Cisco Systems' primary, real-time support channel. Maintenance customers and partners can self-register on CIO to obtain additional content and services.
Available 24 hours a day, 7 days a week, CIO provides a wealth of standard and value-added services to Cisco's customers and business partners. CIO services include product information, software updates, release notes, technical tips, the Bug Navigator, configuration notes, brochures, descriptions of service offerings, and download access to public and authorized files.
CIO serves a wide variety of users through two interfaces that are updated and enhanced simultaneously---a character-based version and a multimedia version that resides on the World Wide Web (WWW). The character-based CIO (called "CIO Classic") supports Zmodem, Kermit, Xmodem, FTP, Internet e-mail, and fax download options, and is excellent for quick access to information over lower bandwidths. The WWW version of CIO provides richly formatted documents with photographs, figures, graphics, and video, as well as hyperlinks to related information.
You can access CIO in the following ways:
For a copy of CIO's Frequently Asked Questions (FAQ), contact If you are a network administrator and need personal technical assistance with a Cisco product that is under warranty or covered by a maintenance contract, contact Cisco's Technical Assistance Center (TAC) at 800 553-2447, 408 526-7209, or
Copyright 1988-1996 © Cisco Systems Inc.

LS100# pvc add p1 p2 p3 p4 p5 p6
LS100# pvc add 1 3 3 12 5 5
Connection endpoint has been added.
Modified Connection:
Low:     1,     3,     3,     1, 1
High:    1,     5,     5
High:    12,    5,     5
LS100# pvc delete p1 p2 p3 p4 p5 p6 p7 p8
LS100# pvc delete 1 1 1 2 7 1 3 8
Bi direction Best Effort Connection has been deleted.
Low:         1,      2,      7,      1,      1
High:        1,      3,      8,      1,      1Error message:
LS100# set local p1 p2 p3 p4
LS100# set local m5core 13.12.11.10 222.123.22.23 cc010203040506070809101112
Local configuration data has been set.
LS100# show softPVP p1
LS100# show softPVP 0
Line Number : 0
Endpoint TrfType FwdMbps BkwdMbps LN VPI VCI VPI VCI Retry Calling UBR-BE  -  -  0  0 50  0 50  2 Calling
UBR-BE  -  -  0  2 70  3 80  2
CallingPartyAddress AA AA
CalledPartyAddress CC01020304050607080910111204 CC01020304050607080910111204
LS100# soft establish p1 p2 p3 p4 p5 p6 p7 p8 p9 p10 p11 p12 p13 p14 p15 [CR]
Soft PVPC/PVCC has been issued.
kirin# soft est ?
<SrcAtmAddrs>  Calling Party ATM Address    (0-9,a-f,A-F max=40)
<LclTermPort>  Local Port where soft PVP/PVC is terminated(0-15)
<Local VPI>    VPI on Local Port   (0-4095)
<Local VCI>    VCI on Local Port   (0, 32-4095, 0 : PVPC)
<DstAtmAddrs>  Called Party ATM Address      (0-9,a-f,A-F max=40)
<Remote VPI>   VPI on Remote Port  (0-4095)
<Remote VCI>   VCI on Remote Port  (0, 32-4095, 0 : PVPC)
<Retry>        Number of retry     (0-15) or infinite
<Traffic>      Traffic type VBR-GS(0),CBR-GS(1) or UBR-BE(2)
<FWPCR>        Forward  Peak Cell Rate, 0-155(Mbps), Valid for VBR/CBR
<BWPCR>        Backward Peak Cell Rate, 0-155(Mbps), Valid for VBR/CBR
<Local UPVP>   Local UPVP(0-512)
<Local COOP>   Local COOP 0:Pass non-conforming cells
                          1:Drop non-conforming cells
<Remote UPVP>  Remote UPVP(0-512)
<Remote COOP>  Remote COOP 0:Pass non-conforming cells
                           1:Drop non-conforming cells
LS100# set signaling p1 p2
LS100# set signaling 1 12
LS100# set sscop p1 p2 p3 p3 p4 p5 p6 p7 p8 p9 p10
LS100# set sscop 0 4 1 1 10 100 25 4 yes 70
LS100# set atmsig p1 p2 p3 p4 p5 p6 p7 p8 p9 p10 p11 p12 p13
LS100# set atmsig 0 master 4 30 90 10 4 120 15 4 4 14 8
LS100# route add p1 p2 p3 p4 p5 p6
LS100# route add xxx123456789 e.164 2 3 10 200
SVC route has been added.
http://www.cisco.com
.
cio.cisco.com
(198.92.32.130).
ciohelp@cisco.com.
For additional information, contact
cioteam@cisco.com.
tac@cisco.com.
To obtain general information about Cisco Systems, Cisco products, or upgrades, contact 800 553-6387, 408 526-7208, or
csrep@cisco.com.

![]()
![]()
![]()
![]()
![]()
![]()
![]()
![]()