|
|

Installing the Cisco LightStream100 Processor Card and Software Version 2.5 Upgrade
These instructions explain how to upgrade the Cisco LightStream100 processor card and install Software Version 2.5. For Software Release 2.5 and later releases, it is necessary to upgrade the processor card to accommodate the software. The old processor card does not have enough Flash memory to accommodate Software Release 2.5 or later releases.
Have the following equipment available:
Installing the New Processor Card
To install the new processor (PROC) card, follow these steps:
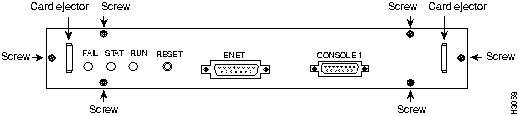
Figure 1 : Old PROC Card Panel
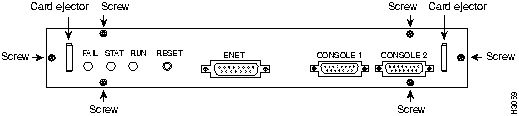
Figure 2 : New PROC Card Panel
This section explains how to install Software Release 2.5 on a DOS-based or UNIX-based TFTP server and download the software to the new processor card.
Software Release 2.5 is available on the diskettes that shipped with the processor card upgrade or from Cisco Information Online (CIO).
To install the software from the diskettes on a DOS-based TFTP server, follow these steps:
Using a UNIX-Based TFTP Server
This section provides guidelines for installing Software Release 2.5 from the diskettes that shipped with the processor card upgrade using a UNIX-based TFTP server. In the examples that follow, the command syntax might vary for your particular UNIX operating system. Refer to the instructions that accompanied your operating system software for command syntax.
To install the software from the diskettes on a UNIX-based TFTP server, follow these steps:
If you are a registered CIO user, you can obtain a copy of Software Release 2.5 by logging in to CIO and using TFTP to download the software to your server by entering the accesss code 25LS100. Refer to the section "Cisco Information Online" at the end of this publication for instructions about accessing CIO.
After the software is installed on your TFTP server, you then download the software to Flash memory in the LightStream100.
To download the software to Flash memory, follow these steps at the LightStream100 console terminal:
To verify that Software Release 2.5 is installed and running, in enabled mode, enter the show version command on the LightStream100 console terminal. Messages similar to the following appear:
Make sure that Software Version 2.5 appears in the command output.
Cisco Information Online (CIO) is Cisco Systems' primary, real-time support channel. Maintenance customers and partners can self-register on CIO to obtain additional content and services.
Available 24 hours a day, 7 days a week, CIO provides a wealth of standard and value-added services to Cisco's customers and business partners. CIO services include product information, software updates, release notes, technical tips, the Bug Navigator, configuration notes, brochures, descriptions of service offerings, and download access to public and authorized files.
CIO serves a wide variety of users through two interfaces that are updated and enhanced simultaneously---a character-based version and a multimedia version that resides on the World Wide Web (WWW). The character-based CIO (called "CIO Classic") supports Zmodem, Kermit, Xmodem, FTP, Internet e-mail, and fax download options, and is excellent for quick access to information over lower bandwidths. The WWW version of CIO provides richly formatted documents with photographs, figures, graphics, and video, as well as hyperlinks to related information.
You can access CIO in the following ways:
For a copy of CIO's Frequently Asked Questions (FAQ), contact If you are a network administrator and need personal technical assistance with a Cisco product that is under warranty or covered by a maintenance contract, contact Cisco's Technical Assistance Center (TAC) at 800 553-2447, 408 526-7209, or
Copyright 1988-1996 © Cisco Systems Inc.
The system is coming up now.
If you want to enter boot program, push [ESC] key immediately. If the [ESC] key is detected within 3 seconds, boot program is loaded. Otherwise, online program will be loaded from the flash memory.
BOOT#
prompt appears on the terminal console screen.
BOOT# set server SERVER_IP_ADDRESS PATH
BOOT# set server 170.65.255.122 /tftpboot/A100/AB0251
BOOT# set ether SWITCH_IP_ADDRESS
BOOT# set router DEFAULT_ROUTER_IP_ADDRESS
set boot command will erase the current configuration on the switch.
BOOT# set boot initialize
BOOT# exit
Network boot is in progress.
</tftpboot/A100/025-1/AB0251>..
</tftpboot/A100/025-1/Itron>...
</tftpboot/A100/025-1/usdb>...
</tftpboot/A100/025-1/resserv>..
</tftpboot/A100/025-1/Mstart>..
</tftpboot/A100/025-1/Mrsc>...........
</tftpboot/A100/025-1/Mdse>................................
</tftpboot/A100/025-1/Mgwd>...........................................
</tftpboot/A100/025-1/Miom>...........................
</tftpboot/A100/025-1/Mpath>............................................
</tftpboot/A100/025-1/Mns>..............
</tftpboot/A100/025-1/Msnmpd>........................
</tftpboot/A100/025-1/Mdebug>..
</tftpboot/A100/025-1/Mscmpw>..
</tftpboot/A100/025-1/Mconfig>..
</tftpboot/A100/025-1/Mscmod>.................
</tftpboot/A100/025-1/Mscmod2>....
</tftpboot/A100/025-1/Msyscis>..
</tftpboot/A100/025-1/Mcrc>..
CRC check is in progress ...........OK.
Flash memory save is in progress .....................................................................................................................................................................................OK.
The system is coming up now.
If you want to enter boot program, push [ESC] key immediately.
If the [ESC] key is detected within 3 seconds, boot program is loaded.
Otherwise, online program will be loaded from the flash memory.
Cisco Systems, Inc. ATM LightStream 100 (Formerly known as Hyperswitch A100)
LS100 Software Version 2.5(2)
Boot ROM Version K02 22 Mar 95
ATMSIG Version 2.5(0.4) 28 July 95: 0436
!!!
Hardware Configuration:
CPU Board : OK;
Bus Convertor : OK;
Switch Core : OK;
Gateway PAD : OK;
Slot 0: OC-3C(MMF) OK;
Slot 1: Not Installed;
Slot 2: OC-3C(MMF) OK;
Slot 3: Not Installed;
Slot 4: OC-3C(MMF) OK;
Slot 5: Not Installed;
Slot 6: OC-3C(MMF) OK;
Slot 7: Not Installed;
Slot 8: OC-3C(MMF) OK;
Slot 9: Not Installed;
Slot10: OC-3C(MMF) OK;
Slot11: Not Installed;
Slot12: Not Installed;
Slot13: Not Installed;
Slot14: Not Installed;
Slot15: Not Installed;
System initialization Complete
passwd=c>
passwd=c>
prompt appears, the LightStream100 is ready to configure.
Cisco Systems, Inc. ATM LightStream 100 (Formerly known as Hyperswitch A100)
LS100 Software Version 2.5(2)
Boot ROM Version K02 22 Mar 95
ATMSIG Version 2.5(0.4) 28 July 95: 0436
http://www.cisco.com
.
cio.cisco.com
.
ciohelp@cisco.com.
For additional information, contact
cioteam@cisco.com.
tac@cisco.com.
To obtain general information about Cisco Systems, Cisco products, or upgrades, contact 800 553-6387, 408 526-7208, or
csrep@cisco.com.

![]()
![]()
![]()
![]()
![]()
![]()
![]()
![]()