|
|
Cisco HyperSwitch A100 Software Configuration
This publication suggests a software configuration path for you to follow for the initial bring-up of the Cisco HyperSwitch A100 ATM switch in a minimum time.
![]()
These software configuration procedures are not a substitute for the Cisco HyperSwitch A100 User Guide, rather they are a guide for the expert user.
The initial software configuration procedures consist of the following:
Help with command syntax is available by entering a question mark at the system prompt.
For example:
> show pvc ?
line           All pvc set on specified line/VP
detail         PVC set on specified line/VP/VC
Refer to the Cisco HyperSwitch A100 User Guide for more information about commands.
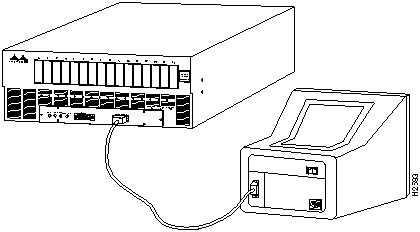
This procedure describes connecting an EIA/TIA-232 cable from a console terminal to the HyperSwitch A100. To connect the cable, do the following:
Figure 1 Connecting a Console Terminal to a HyperSwitch A100
To set the HyperSwitch A100 and console terminal communications parameters, perform the following procedure:
Follow these steps when powering ON the HyperSwitch A100.
Cisco Systems, Inc. ATM HyperSwitch
Software Version 1.2(0)
Boot ROM Version K07 10 Sep 94
ATMSIG Version 1.2(0.4)
Hardware Configuration:
CPU Board      : OK;
Bus Convertor  : OK;
Switch Core    : OK;
Gateway PAD    : OK;
Slot 0: OC-3C(MMF)     OK;
Slot 1: Not Installed;
Slot 2: Not Installed;
Slot 3: Not Installed;
Slot 4: Not Installed;
Slot 5: Not Installed;
Slot 6: 100M-TAXI      OK;
Slot 7: Not Installed;
Slot 8: Not Installed;
Slot 9: Not Installed;
Slot10: Not Installed;
Slot11: Not Installed;
Slot12: Not Installed;
Slot13: Not Installed;
Slot14: Not Installed;
Slot15: OC-3C(MMF)     OK;
System Initialization finished.

>
> show version
Software Version 1.2(0)
Boot ROM Version K07 10 Sep 94
ATMSIG Version 1.2(0.4)
>
> show status
CPU           :(Normal)
SwitchCore    :(Normal)
Bus Interface :(Normal)
FAN           :(Normal)
GWPAD         :(Normal)
Line0         :(Normal)
Line1         :(NA)
Line2         :(NA)
Line3         :(NA)
Line4         :(NA)
Line5         :(NA)
Line6         :(Normal)
Line7         :(NA)
Line8         :(NA)
Line9         :(NA)
Line10        :(NA)
Line11        :(NA)
Line12        :(NA)
Line13        :(NA)
Line14        :(NA)
Line15        :(Normal)
Follow this procedure to enter the privileged mode.
passwd=c> enable
passwd=c> Input password: ********
passwd=c#
The following procedures step you through an example of an initial configuration of the HyperSwitch A100.
Perform the following to set the local host name, IP address, and IP mask for the Ethernet port.
passwd=c# set local a100 99.99.10.10 255.255.255.0
a100#
The following sections contain examples of creating and deleting switched virtual circuits (SVCs). All of these examples are based on creating connections between two ATM hosts or routers, one connected to port 0 on the HyperSwitch A100 and the other ATM host or router connected to port 7 on the HyperSwitch A100.
Perform the following steps to add SVC routes.
a100# route add AA12345678 nsap 0
SVC route has been added.

a100# route add BB12345678 nsap 1
SVC route has been added.
a100# show route
Destination                                  Type   1st_Choice 2nd_Choice
AA12345678 XXXXXXXXXX XXXXXXXXXX XXXXXXXXXX NSAP        0          -
BB12345678 XXXXXXXXXX XXXXXXXXXX XXXXXXXXXX NSAP        7          -
a100# show svc 0
Line Number  :  1
Uni/Bi  Guaranteed/Best Effort  Mbps        LN    VPI    VCI  LN    VPI    VCI
     1        Best Effort         0.0        0      0    128   7      0    129
SVC route entries may be deleted one at a time or all at once with the following commands.
Enter route ? to determine the command syntax.
a100# route delete ?
<Destination>  Destination Address
               Type:NSAP  Max:40char (0-9,A-F,X)
               Type:E.164 Max:16char (0-9,X)
<Type>         Type NSAP or E.164
a100#
To delete one route entry, enter the route delete command, as in the following example:
a100# route delete aa12345678 nsap
SVC route has been deleted.
To delete the entire routing table, enter the route flush command, as in the following example:
a100# route flush
SVC routing table has been flushed.
a100#
The following is an example of how to create a PVC between an ATM host or router connected to port 0 on the HyperSwitch A100 and the ATM host or router connected to port 7 on the HyperSwitch A100. This example will establish a bidirectional best effort PVC between VPI/VCI 0/10 on port 0 to VPI/VCI 0/10 on port 7.
For example:
a100# pvc establish 1 1 0 0 0 10 512 1  7 0 10 512 1
***Bi direction Best Effort Connection has been established.
Low           : 0,   0,   10,  512,1
High          : 7,   0,   10,  512,1
The following examples show the available parameters of the pvc ? and pvc establish ? commands.
For example:
a100# pvc ?
establish      Establish PVC
delete         Delete PVC,line/VPI/VCI are required.
add            Add endpoint to existing uni-direction PVC
remove         Remove endpoint from existing uni-direction PVC
a100#
For example:
a100# pvc establish ?
<Direction>    Direction of connection Uni(0),Bi(1) or Multicast(2)
<Traffic>      Traffic type Guaranteed(0) or Best Effort(1)
<Throughput>   Throughput 0-155(Mbps)
<LowLine>      Low  line number 0-15
<LowVP>        Low  VPI  0-4095
<LowVC>        Low  VCI  0-4095
<LowUPVP>      Low  UPVP 0-512
<LowCOOP>      Low  COOP 1:Discard violated cells 0:Pass violated cells
<HighLine>     High line number 0-15
<HighVP>       High VPI  0-4095
<HighVC>       High VCI  0-4095
<HighUPVP>     High UPVP 0-512
<HighCOOP>     High COOP 1:Discard violated cells 0:Pass violated cells
To display PVC information, enter the show pvc line or show pvc detail command as in the following example:
a100# show pvc detail 0 0 10
Direction of Connection:Bi
Traffic Type:Best Effort
Throughput  :0Mbps
Low             Line Number, VPI, VCI , UPVP,COOP:
                     0     ,   0,   10,  512,  1
High            Line Number, VPI, VCI , UPVP,COOP:
                     7     ,   0,   10,  512,  1

a100#
Enter the show pvc line ? and show pvc detail ? to determine further command options, as in the following examples:
a100#sh pvc line ?
<Line>         Line number 0-15
<VPI>          VPI 0-4095
a100#
a100#sh pvc detail ?
<Line>         Line number 0-15
<VPI>          VPI 0-4095
<VCI>          VCI 0-4095
a100#.
To save configuration changes, enter the save command, as follows:
a100# save
Now Data saving ! Please do NOT push reset button till
the "save" is complete........
System data has been saved.

a100#
Connect one HyperSwitch A100 to another HyperSwitch A100 by designating one HyperSwitch A100 as the slave (the user side of the UNI). The following example sets port 7 to slave mode for connecting to another HyperSwitch A100.
a100# show atmsig
Line Number  M/S    T303  T308  T309  T310  T313  T316  T317  T322  T398  T399
   0         Master    4    30    90    10     4   120    60     4     4    14
   7         Master    4    30    90    10     4   120    60     4     4    14
a100# set svcline 7 suspend
SVC status of the Line Interface 7 : Suspended

a100# set atmsig 7 slave 4 30 90 10 4 120 60 4 4 14

a100# set svcline 7 resume
SVC status of the Line Interface 0 : Resumed
a100# show atmsig
Line Number  M/S    T303  T308  T309  T310  T313  T316  T317  T322  T398  T399
   0         Master    4    30    90    10     4   120    60     4     4    14
   7         Slave     4    30    90    10     4   120    60     4     4    14
a100#
Enter the save command to save the configuration change.
Refer to the Cisco HyperSwitch A100 User Guide for additional command information.

|
|
Copyright 1988-1995 © Cisco Systems Inc.