|
|

This chapter provides maintenance procedures for the Cisco 7010 router and its components. Your Cisco 7010 is configured to your order and ready for installation and startup when it leaves the factory. In the future, as your communication requirements change, you may want to upgrade your system, add components, or change the initial configuration. This chapter describes the procedures for installing, replacing, and reconfiguring interface processors, and for adding and replacing internal system components. Software and microcode component upgrades require specific part numbers and other frequently updated information; therefore, only basic hardware replacement guidelines are included in this publication. Detailed, up-to-date instructions (called configuration notes) are shipped with the replacement parts or upgrade kits.
The replaceable system components fall into two categories: those that support online insertion and removal (OIR) and those that require you to shutdown the system power before replacement. Because interface processors support OIR, you can remove and replace them while the system is operating. However, you must shutdown the system power before removing the RP, the SP (or SSP), RSP7000, RSP7000CI, or any of the internal components (the fan tray, power supply, and arbiter). Access to the internal components also requires that you remove the chassis cover panel and power harness cover in the noninterface processor end of the router, which exposes the power supply backplane connection. If the power is not shutdown, the high current present in the wiring, and on the backplane if the backplane cover is removed, becomes a hazard. Therefore, always make sure that the system power switch is turned off before removing any internal components or interior chassis panels.
This chapter contains information on the following:
![]()
Installing and Configuring Processor Modules
This section provides installation and removal procedure for all processor modules, which include the RP, SP, SSP, RSP7000, RSP7000CI, and CxBus interface processors. This section also includes instructions for replacing spares on the interface processors, for configuring jumpers, and for using basic configuration commands that you may need when setting up new interfaces.
On the RP, you can change the settings of the hardware configuration register and Flash memory write-protection jumpers to define boot instructions, set broadcast addresses and console baud rates, and set (or remove) write protection for the contents of Flash memory.
On the FSIP, you can replace a port adapter if one fails, and with software commands you can change the rate or direction timing signals, change the default NRZ to NRZI format, or change the default 16-bit error correction cyclic redundancy check (CRC) to 32-bit on individual interfaces.
EPROM replacement procedures are included in this section in case replacement is necessary for some unforeseen reason. An EPROM component on the SP (or SSP) and each interface processor contains a default microcode image. The router supports downloadable microcode, so it is unlikely that you will ever need to replace the microcode EPROM.
Each RP, SP (or SSP), RSP7000, RSP7000CI, and interface processor contains a bus-type connector that mates with the system backplane. Each card connector comprises a set of tiered pins, in three lengths. The pins send specific signals to the system as they make contact with the backplane. The system assesses the signals it receives and the order in which it receives them to determine what event is occurring and what task it needs to perform, such as reinitializing new interfaces or shutting down removed ones. For example, when inserting an interface processor, the longest pins make contact with the backplane first, and the shortest pins make contact last. The system recognizes the signals and the sequence in which it receives them. The system expects to receive signals from the individual pins in this logical sequence, and the ejector levers help to ensure that the pins mate in this sequence.
Online Insertion and Removal Information
All CxBus interface processors (AIP, CIP, EIP, FIP, FSIP, HIP, MIP, and TRIP) support online insertion and removal (OIR), which allows you to install, remove, replace, and rearrange the interface processors without turning off the system power. When the system detects that an interface processor has been installed or removed, it automatically runs diagnostics and discovery routines, acknowledges the presence or absence of the interface processor, and resumes system operation without any operator intervention. You do not need to notify the software or shutdown the system power.
When you remove or insert an interface processor, the backplane pins send signals to notify the system, which then performs as follows:
OIR functionality enables you to add, remove, or replace interface processors with the system online, which provides a method that is seamless to end users on the network, maintains all routing information, and ensures session preservation.
When you insert a new interface processor, the system runs a diagnostic test on the new interfaces and compares them to the existing configuration.
If this initial diagnostic test fails, the system remains off line for another 15 seconds while it performs a second set of diagnostic tests to determine whether or not the interface processor is faulty and if normal system operation is possible.
If the second diagnostic test passes, which indicates that the system is operating normally and the new interface processor is faulty, the system resumes normal operation but leaves the new interfaces disabled. If the second diagnostic test fails, the system crashes, which usually indicates that the new interface processor has created a problem on the bus and should be removed.
The system brings online only interfaces that match the current configuration and were previously configured as up; all other interfaces require that you configure them with the configure command. On interface processors with multiple interfaces, only the interfaces that have already been configured are brought online.
For example, if you replace a single-PCA CIP with a dual-PCA CIP, only the previously configured interface is brought online automatically; the new interface remains in the administratively shutdown state until you configure it and bring it online.
You will need a number 1 Phillips or 3/16-inch flat-blade screwdriver to remove any blank interface processor carriers (fillers) and to tighten the captive installation screws that secure the interface processor in its slot. (Most interface processor carriers use slotted screws, but some were manufactured with Phillips screws.) Whenever you handle interface processors, use a wrist strap or other grounding device to prevent ESD damage. (See the section "Preventing Electrostatic Discharge Damage" in the chapter "Preparing for Installation.")
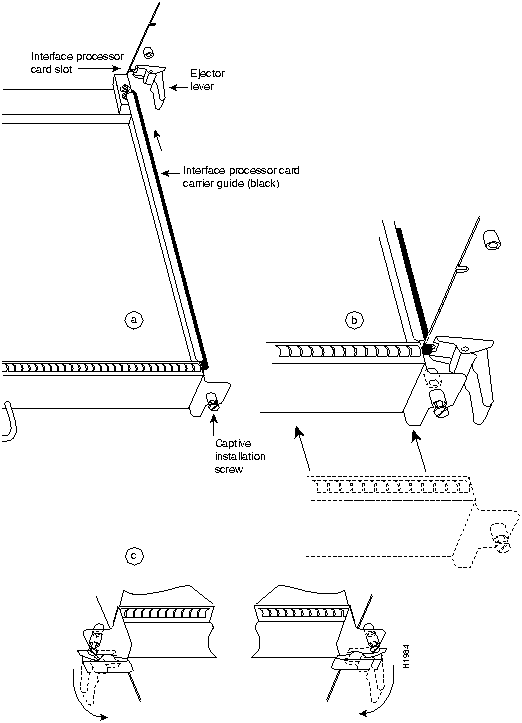
The function of the ejector levers is to align and seat the card connectors in the backplane. Failure to use the ejector levers and insert the interface processor properly can disrupt the order in which the pins make contact with the backplane. Follow the installation and removal instructions carefully, and review the following examples of incorrect insertion practices and results:
It is also important to use the ejector levers when removing an interface processor to ensure that the board connector pins disconnect from the backplane in the logical sequence expected by the system. Any RP, SP (or SSP), or interface processor that is only partially connected to the backplane can hang the bus. Detailed steps for correctly performing OIR are included in the following procedures for installing and removing interface processors.
Following are detailed steps for removing and replacing interface processors and successfully performing OIR. Figure 5-1 shows the functional details of the ejector levers, which you must use properly when inserting or removing interface processors.
Figure 5-1 : Ejector Levers and Captive Installation Screws
Removing and Replacing the RP, SP or SSP, RSP7000, or RSP7000CI
The RP, SP (or SSP), RSP7000, and RSP7000CI do not support OIR, because they are all required system components. Removing these boards without first shutting down the system will cause an abrupt system shutdown and can damage or destroy memory files.
To remove or replace one of these processor modules, first shut down all system power, then follow the procedures in the following sections, "Removing CxBus Interface Processors" and "Installing CxBus Interface Processors."
Removing CxBus Interface Processors
To remove a CxBus interface processor, follow these steps:
Installing CxBus Interface Processors
You can install interface processors in any of the three interface processor slots, numbered 0 through 2 from the bottom slot upward when viewing the chassis from the interface processor end. (See Figure 1-3.) The top slot contains the RP, and the slot directly below the RP contains the SP (or SSP). Blank interface processor fillers are installed in slots without interface processors to maintain consistent air flow through the interface processor compartment.
Following are installation steps for the CxBus interface processors, which support OIR and can be removed and installed while the system is operating. The RP, SP (or SSP), RSP7000, or RSP7000CI are required system components. You must turn off the system power before removing or installing them. After you have turned the system power off, the installation steps for the RP, SP (or SSP), RSP7000, and RSP7000CI are the same as those for the interface processors.
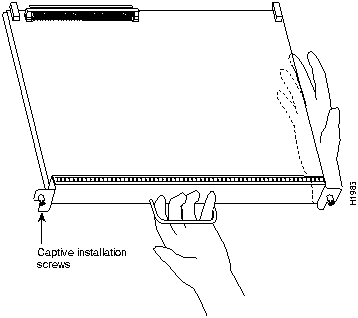
Figure 5-2 : Handling an Interface Processor during Installation
When you remove and replace CxBus interface processors, the system provides status messages across the console screen. The messages are only informational. In the following sample display, the events logged by the system show that an EIP was removed from slot 0, the system reinitialized the remaining interface processors, and marked the EIP that was removed from slot 0 as down. When the EIP was reinserted, the system marked the interfaces as up again.
Microcode Component Replacement
The SP (or SSP) and each interface processor contain default microcode, which is an image of board-specific software instructions on a single ROM device on each board. Microcode operates with the system software and controls features and functions that are unique to an interface processor type. New features and enhancements to the system or interfaces are often implemented in microcode upgrades. Although each processor type contains the latest available microcode version (in ROM) when it leaves the factory, updated microcode images are periodically distributed with system software images to enable new features, improve performance, or fix bugs in earlier versions. The latest available microcode version for each interface processor type is bundled with each new system software maintenance upgrade; the bundled images are distributed as a single image on floppy disk.
Although most upgrades support the downloadable microcode feature and are distributed on floppy disk, some images may require ROM replacement. If necessary, use the following instructions to replace an interface processor EPROM in case Flash memory is damaged or otherwise not available, or to change the default microcode on a board for any other reason. The replacement procedures are the same for each board with the exception of the FSIP, which uses a PLCC-type package for the microcode.
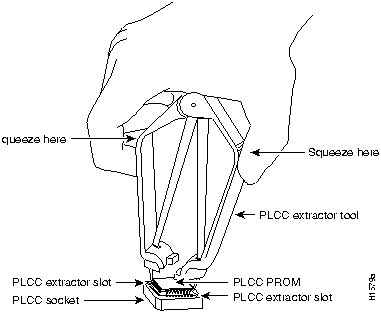
You must use a PLCC extractor to remove the FSIP microcode component. (See Figure 5-3.) You cannot use a small flat-blade screwdriver to pry it out of the socket as with the older type of integrated circuits (ICs). A PLCC IC does not have legs or pins that plug into the socket; instead, the contacts are on the sides of the IC and along the inner sides of the socket. When the IC is seated in the socket, the top of the IC is flush with the top of the socket. Forcing a small screwdriver or other tool between the IC and the sides of the socket to pry out the IC will damage the component or the socket or both, and you will have to replace them.
Figure 5-3 : Removing a Microcode Component from a PLCC-Type Package
You need the following tools to replace the microcode component:
Following are the steps for replacing the microcode ROM device on the SP (or SSP) and any interface processor. Refer to the illustrations of the individual interface processors in the section "Interface Processors" in the chapter "Product Overview" for socket locations.
Verifying the Microcode Version
The system automatically reloads the microcode when you insert an interface processor online or restart the system. The system default is to load the ROM microcode for all processor types. However, because microcode upgrades are usually distributed as files to be stored and loaded from Flash memory, the system may be configured to bypass the ROM image for a particular processor type and load an image from a Flash memory file instead. (This can be true for any or all processor types.) To determine whether the interface processor you just upgraded is loading the new ROM microcode or an image from Flash memory, issue the show controller cxbus command. The first line of the status display for the SP (or SSP) and for each interface processor displays the currently loaded and running microcode version for that particular processor type. The following example shows that the EIP in slot 0 is running EIP Microcode Version 1.0:
If the microcode version in the display is different from the ROM version you just installed, use the microcode card-type rom configuration command to change the configuration so the system loads the ROM microcode for that processor type. Verify that the new microcode version is loading from ROM and, if necessary, correct the configuration with the following steps:
The replacement procedure is complete. If the Enabled indicator does not go on after a second installation attempt, or if any of the interfaces fail to return to their previous state, refer to the troubleshooting procedures in the chapter "Troubleshooting the Installation."
This section describes the following maintenance aspects of the RP and RSP7000, with differences noted:
Most system software upgrades are distributed on floppy disk or Flash memory cards. However, occasionally it might be necessary to replace the system software ROMs to ensure proper operation with a newer software release. Also, if your RP supports 16-MB SIMMs, you can upgrade the DRAM yourself with SIMMs that you obtain from an approved vendor.
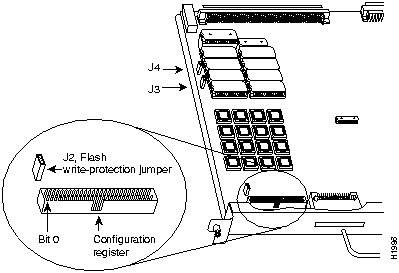
The RP contains the hardware configuration register and the Flash memory write-protect jumper, both of which are shown in Figure 5-4. Jumpers installed on the hardware configuration register define boot instructions and set broadcast addresses and console baud rates. Jumper J2, when removed, protects the contents of Flash memory by preventing any information to be written to Flash memory. Jumpers J3 and J4 (see Figure 5-4) are set according to the size of the eight software EPROMs on the RP. These jumpers correspond to the EPROMs only and not to the software image size; you do not need to reset the jumpers when loading a larger software image into Flash memory. (See Figure 5-8 for jumper settings.)
Figure 5-4 : RP Jumper Locations
Hardware Configuration Register Settings
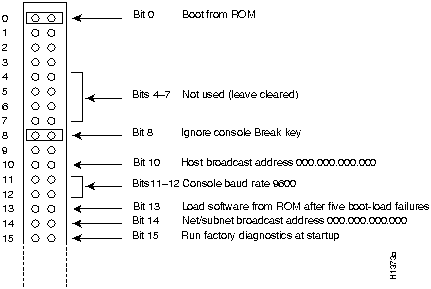
The hardware configuration register (see Figure 5-4) comprises the upper 32 pins of a 50-pin jumper block located above the Flash memory card port on the RP. You can define system boot instructions, set broadcast addresses and console baud rates, or instruct the router to perform factory diagnostics at startup by installing jumpers on specific pins. Jumper bit (or position) 0 is the top pair of pins. To set a bit to 1, insert a jumper. To clear a bit to 0, remove the jumper.
To change configuration register settings, you must turn off the system power and remove the RP. Figure 5-5 shows the configuration register with the factory default setting, with jumpers installed on bits 0 and 8. Bit 0 instructs the system to boot from ROM; bit 8 instructs the system to ignore the Break key on the console terminal keyboard.
Figure 5-5 : Configuration Register Factory Default Settings
The lowest four bits of the configuration register (bits 3 through 0) form the boot field. The boot field specifies a number in binary. When the boot field is set to either 0 or 1 (0-0-0-0 or 0-0-0-1) the system ignores any boot instructions in the configuration file. When the boot field is set to 0, you must boot the operating system manually by giving a b (or boot) command to the system bootstrap program or rom monitor. You can enter the boot command only, or include additional boot instructions with the command such as the name of a file stored in Flash memory or a file that you specify for netbooting. If you use the boot command only, without specifying a file or any other boot instructions, the system boots from the ROM image. Otherwise, you can instruct the system to boot from a specific image such as a Flash file (boot system flash filename), or to netboot by sending broadcast TFTP requests (boot system filename) or a direct TFTP request to a specific server (boot system filename address). When the boot field is set to 1 (the factory default), the system boots from ROM. Boot field settings of 0 and 1 both override any boot instructions in the system configuration file.
If you set the boot field to any bit pattern other than 0 or 1, the system uses the resulting number to form a file name for netbooting. To form the file name, the system starts with cisco and links the octal equivalent of the boot field value (jumper setting) and the processor type in the format cisco<jumpervalue>-<processorname>. (Table 5-1 lists the default boot file names or actions for the RP.) The system uses the default filename for netbooting. However, if the configuration file contains any boot instructions, the system uses those boot instructions instead of the filename it computed from the jumper settings.
Table 5-1 : Default Boot Filenames---Boot Field Jumpers
Bit 8 in the configuration register controls the console Break key. Setting bit 8 to 1 (the factory default) causes the processor to ignore the console Break key. Clearing bit 8 to 0 causes the processor to interpret Break as a command to force the system into the bootstrap monitor, thereby suspending normal operation.
Bit 9 in the configuration register is not used.
Bit 10 in the configuration register controls the host portion of the Internet broadcast address. Setting bit 10 causes the processor to use all zeros; clearing bit 10 (the factory default) causes the processor to use all ones. Bit 10 interacts with bit 14, which controls the network and subnet portions of the broadcast address. Table 5-2 shows the combined effect of bits 10 and 14.
Table 5-2 : Configuration Register Settings for Broadcast Address Destination
Bits 11 and 12 in the configuration register determine the console port baud rate. Table 5-3 shows the bit settings for the four available baud rates. (The factory default is 9600.)
Table 5-3 : System Console Terminal Baud Rate Settings
Bit 13 in the configuration register determines the system's response to a boot-load failure. Setting bit 13 causes the system to load operating software from ROM after five unsuccessful attempts to load a boot file from the network. Clearing bit 13 causes the system to continue attempting to load a boot file from the network indefinitely. By factory default, bit 13 is cleared to 0.
Bit 14 in the configuration register controls the network and subnet portions of the Internet broadcast address. Setting bit 14 causes the system to include the network and subnet portions of its address in the broadcast address. Clearing bit 14 causes the system to set the entire broadcast address to all ones or all zeros, depending on the setting of bit 10. By factory default, bit 14 is cleared to 0. See Table 5-2 for the combined effect of bits 10 and 14.
Bit 15 in the configuration register controls factory diagnostic mode in the system. Setting bit 15 causes the system to produce detailed CPU self-check messages, to automatically prompt for interface addresses (not look for addresses on the network), to not read configuration files or nonvolatile memory, and to automatically set to diagnostic tracing modes using the debug commands. Clearing bit 15 (the factory default) causes the system to operate normally.
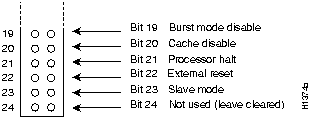
Bits 16 through 18 are not used and should remain cleared.
Bit 19 disables the fast page burst mode from the DRAM to the MC68EC040 processor.
Bits 20 through 23 (the four pairs of pins on the far left of the 50-pin header) are not used in normal operation; however, they can be used to invoke the cache disable, processor halt, external reset, and slave mode functions. (See Figure 5-6.)
Figure 5-6 : Optional Configuration Register Settings
Flash Memory Write Protection
The Flash memory write-protection option protects the contents of Flash memory against accidental erasure or reprogramming. The factory default, with a jumper installed on J2, is to allow programming (writing) to Flash memory. To protect the contents, remove the jumper from J2. You can later replace the jumper to enable Flash memory programming. The location of J2 is shown in Figure 5-4.
Software Configuration Register
This section describes the software (virtual) configuration register that is used with the RP in a system running Cisco Internetwork Operating System (Cisco IOS) Release 10.0 or later. Its functions are identical to the hardware configuration register except the settings are changed through the command line interface.
Following is the information included in this section:
Software Configuration Register Settings
Settings for the 16-bit software configuration register are written into the NVRAM. Following are some reasons for changing the software configuration register settings:
Table 5-4 lists the meaning of each of the software configuration memory bits, and Table 5-5 defines the boot field.
Table 5-4 : Software Configuration Register Bit Meanings
Table 5-5 : Explanation of Boot Field (Configuration Register Bits 00 to 03)
Changing Settings
Some common reasons to modify the value of the software configuration register are as follows:
To change the configuration register while running the system software, follow these steps:
Bit Meanings
The lowest four bits of the software configuration register (bits 3, 2, 1, and 0) form the boot field. (See Table 5-5.) The boot field specifies a number in binary form. If you set the boot field value to 0, you must boot the operating system manually by entering the b command at the bootstrap prompt as follows:
Definitions of the various b command options follow:
For more information about the b [tftp] flash filename command, refer to the set of router products configuration publications.
If you set the boot field value to 0x2 through 0xF, and there is a valid system boot command stored in the configuration file, then the router boots the system software as directed by that value. If you set the boot field to any other bit pattern, the router uses the resulting number to form a default boot filename for netbooting. (See Table 5-6.)
In the following example, the software configuration register is set to boot the router from Flash memory and to ignore Break at the next reboot of the router:
The server creates a default boot filename as part of the automatic configuration processes. To form the boot filename, the server starts with the name cisco and adds the octal equivalent of the boot field number, a hyphen, and the processor-type name. Table 5-6 lists the default boot filenames or actions for the processor.
Table 5-6 : Default Boot Filenames---Boot Field Jumpers
Bit 8 controls the console Break key. Setting bit 8 (the factory default) causes the processor to ignore the console Break key. Clearing bit 8 causes the processor to interpret the Break key as a command to force the system into the bootstrap monitor, thereby halting normal operation. A break can be sent in the first 60 seconds while the system reboots, regardless of the configuration settings.
Bit 9 controls the secondary bootstrap program function. Setting bit 9 causes the system to use the secondary bootstrap; clearing bit 9 causes the system to ignore the secondary bootstrap. The secondary bootstrap program is used for system debugging and diagnostics.
Bit 10 controls the host portion of the IP broadcast address. Setting bit 10 causes the processor to use all zeros; clearing bit 10 (the factory default) causes the processor to use all ones. Bit 10 interacts with bit 14, which controls the network and subnet portions of the broadcast address. Table 5-7 shows the combined effect of bits 10 and 14.
Table 5-7 : Configuration Register Settings for Broadcast Address Destination
Bits 11 and 12 in the configuration register determine the baud rate of the console terminal.
Table 5-8 : System Console Terminal Baud Rate Settings
Bit 13 determines the server response to a boot-load failure. Setting bit 13 causes the server to load operating software from ROM after five unsuccessful attempts to load a boot file from the network. Clearing bit 13 causes the server to continue attempting to load a boot file from the network indefinitely. By factory default, bit 13 is cleared to 0.
Enabling Booting from Flash Memory
To enable booting from Flash, set configuration register bits 3, 2, 1, and 0 to a value between 2 and 15 in conjunction with the boot system flash [filename] configuration command.
To enter configuration mode while in the system software image and specify a Flash filename from which to boot, enter the configure terminal command at the enable prompt, as follows:
To disable Break and enable the boot system flash command, enter the config-register command with the value shown in the following example:
Copying to Flash Memory
Copying a new image to Flash memory might be required whenever a new image or maintenance release becomes available. To copy a new image into Flash (write to Flash), you must first reboot from ROM and then copy the new image into Flash. You cannot copy a new image into Flash while the system is running from Flash. Use the copy tftp flash command for the copy procedure.
Following is the sample output for reloading the router and then copying a file (called 7K10020Z) to Flash memory from a TFTP server (called server1):
The configuration register setting 0x0101 tells the system to boot from ROM, but does not reset the Break disable.
The configuration register setting 0x102 tells the system to boot from ROM, disable Break, and check for a default netboot filename.
The system is now ready to be configured to boot from the new image you copied to Flash. For more information on the copy tftp flash command, and other related commands, refer to the set of router products configuration publications.
Recovering a Lost Password
An overview of recovering a lost password follows:
To recover a lost password, follow these procedures.
Saving and Retrieving the Configuration File
This section describes the procedures for saving and retrieving the system configuration using a Trivial File Transfer Protocol (TFTP) server.
The procedures for saving and retrieving the configuration file might be required for the following scenarios:
Configuration information resides in two places when the router is operating: the default (permanent) configuration in NVRAM, and the running (temporary) memory in RAM. The default configuration always remains available; NVRAM retains the information even when the power is shut down. The current information is lost if the system power is shut down. The current configuration contains all nondefault configuration information that you added with the configure command, the setup command facility, or by editing the configuration file.
The copy running-config startup-config command adds the current configuration to the default configuration in NVRAM, so that it will also be saved when power is shut down. Whenever you make changes to the system configuration, issue the copy running-config startup-config command to ensure that the new configuration is saved.
You also replace the entire configuration in NVRAM. If you copy the configuration file to a remote server before removing the RP (or RSP7000), you can retrieve it later and write it back into NVRAM. If you do not copy the configuration file, you will have to use the configure command or the setup command facility to reenter the configuration information after you install the RP (or RSP7000). This procedure requires privileged-level access to the EXEC command interpreter, which usually requires a password. Refer to the description that follows and contact your system administrator to obtain access, if necessary.
Using the EXEC Command Interpreter Before you use the configure command, you must enter the privileged level of the EXEC command interpreter using the enable command. The system prompts you for a password if one has been set.
The system prompt for the privileged level ends with a pound sign (#) instead of an angle bracket (>). At the console terminal, enter the privileged level as follows:
The pound sign (#) at the system prompt indicates that you are at the privileged level of the EXEC command interpreter; you can now execute the EXEC-level commands that are described in the following sections.
Using the ping Command to Verify Server Connectivity Before you attempt to copy or retrieve a file from a remote host, ensure that the connection is good between the router and the remote server, by using the packet internet groper (ping) program. The ping program sends a series of echo request packets to the remote device and waits for a reply. If the connection is good, the remote device echoes them back to the local device.
The console terminal displays the results of each message sent: an exclamation point (!) indicates that the local device received an echo, and a period (.) indicates that the server timed out while awaiting the reply. If the connection between the two devices is good, the system displays a series of exclamation points (! ! !) or [ok]. If the connection fails, the system displays a series of periods (. . .) or [timed out] or [failed].
To verify the connection between the router and a remote host, issue the ping command followed by the name or Internet Protocol (IP) address of the remote server; then press Return. Although the ping command supports configurable options, the defaults, including interface processor as the protocol, are enabled when you enter a host name or address on the same line as the ping command. For a description of the configurable options, refer to the appropriate software documentation.
The following example shows a successful ping operation:
The following example shows the results of a failed ping operation:
If the connection fails, check the physical connection to the remote file server and verify that you are using the correct address or name, then ping the server again. If you are unable to establish a good connection, contact your network administrator or refer to the end of this document for instructions on contacting technical assistance.
Copying the Configuration File
Before you copy the running configuration to the TFTP file server, ensure the following:
To store information on a remote host, enter the copy startup-config tftp privileged EXEC command. The command prompts you for the destination host's address and a filename, then display the instructions for confirmation. When you confirm the instructions, the router sends a copy of the currently running configuration to the remote host. The system default is to store the configuration in a file called by the name of the router with -confg appended. You can either accept the default filename by pressing Return at the prompt, or enter a different name before pressing Return.
Follow these steps to copy the currently running configuration to a remote host:
If you are unable to copy the configuration to a remote host successfully, contact your network administrator or refer to the end of this document for instructions on contacting technical assistance.
Retrieving the Configuration File
After you reinstall the RP (or RSP7000), you can retrieve the saved configuration and copy it back to NVRAM. To retrieve the configuration, enter configuration mode and specify that you will configure the router from the network. The system prompts you for a host name and address, the name of the configuration file stored on the host, and confirmation to reboot using the remote file.
You can access the router through a console terminal attached directly to the RP (or RSP7000) console port, or you can configure an interface port and Telnet to the router from a remote terminal.
Follow these steps to retrieve the currently running configuration from a remote host:
This completes the procedure for retrieving the configuration file.
Copying Files Between NVRAM and a Flash Memory Card
Copying a configuration file to a Flash memory card in the PCMCIA slot might be required if you do not have access to a TFTP server on which you can temporarily store your configuration file. You can then copy the configuration file back to NVRAM as required. Use the following sections to first copy the configuration file to a Flash memory card, and then to copy the configuration from the Flash memory card back to NVRAM.
Copying a Configuration File from NVRAM to a Flash Memory Card
Following is the procedure for copying your configuration file in NVRAM, to a Flash memory card. You can use the command copy startup-config [ slot0 | slot1 ]:filename for the copy procedure where startup-config is the file's source (NVRAM) and [slot0 | slot1 ]:filename is the file's destination, in either of the Flash memory cards. However, the environmental variable CONFIG_FILE must be pointing (set) to NVRAM, which is the system default.
Use the show boot command to display the current setting for the environmental variable CONFIG_FILE as follows:
An example of the copy startup-config slot0:filename command follows:
Copying a Configuration File from a Flash Memory Card to NVRAM Following is the procedure for copying your configuration file from the Flash memory card in the PCMCIA slot, back to NVRAM. Use the command copy [ slot0 | slot1 ]:filename startup-config for this copy procedure, where [slot0 | slot1 ]:filename is the source of the file (Flash memory card) and startup-config is the destination (NVRAM).
An example of the copy slot0:filename startup-config command follows:
Replacing System Software EPROMs
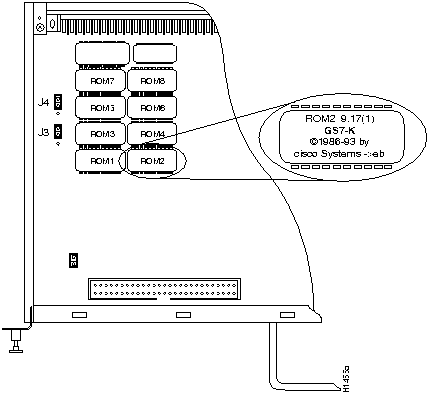
This section describes the procedure for upgrading the system software by replacing the eight erasable programmable read-only memory (EPROM) components on the RP and, if necessary, changing the positions of the jumpers on J3 and J4. (The components actually are EPROMs; however they are commonly known as the software or boot ROMs.) Although most system software maintenance releases for the Cisco 7000 series are distributed on floppy disk instead of on replacement EPROMs, some releases may require ROM replacement. System software images also can be netbooted.
The system software resides on a set of eight EPROMs on the RP. The EPROMs are labeled with a ROM number that corresponds to the RP EPROM socket in which it should be installed. The sockets have labels too, although obscure, on the silk-screen portion of the RP board. Each EPROM has a notch cut on one end to indicate proper orientation. It should be placed so that its notch faces the same direction as the notch in the EPROM socket. Do not rely on the orientation of the EPROM labels to indicate the correct position of the EPROMs on the board. Figure 5-7 shows the location and socket numbers of the EPROMs on the RP.
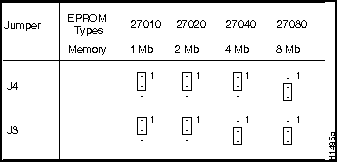
The jumpers on J3 and J4, which are shown in Figure 5-7, correspond to the size (capacity) of the EPROMs installed on the RP. If you replace the system software ROMs with new EPROMs of a different size (for example, if you replace 2-MB EPROMs with 4-MB EPROMs), you will also need to change the jumper settings on J3 or J4.
Figure 5-7 shows the orientation of J3 and J4 on the RP when set for 2 MB, the factory default. Figure 5-8 shows the jumper settings for each EPROM size with the jumpers oriented as in Figure 5-7. For example, if you are installing a new image that resides on 4-MB EPROMs, you will need to move the jumper on J3 from the upper two posts to the lower two posts. This is not required if you upgrade by downloading a new software image into Flash memory; it is only necessary when you physically replace the EPROMs.
Follow these steps to upgrade the EPROMs in the RP:
Figure 5-7 : System Software EPROM Sockets and Jumpers J3 and J4
Figure 5-8 : Jumper Settings for Software EPROM Sizes
Replacing RP SIMMs (Upgrading DRAM)
The system DRAM resides on four single inline memory modules (SIMMs) on the RP. The default DRAM configuration is 16 MB (four 4 MB x 9 SIMMs). This section provides the steps for increasing the amount of DRAM from 16 MB to 64 MB by replacing the four 4 MB SIMMs with four 16 MB SIMMs that you obtain from an approved vendor. Some (earlier) RPs do not support 16 MB SIMMs; before upgrading, use the prerequisites in the following section to ensure that your RP will support the larger SIMMs. You must use SIMMs that you obtain from an approved vendor; otherwise, Cisco Systems cannot ensure proper operation.
Compatibility Requirements
Before replacing SIMMs to increase the amount of DRAM available in your system, ensure that your RP supports 16 MB SIMMs and that you obtain the replacement SIMMs from an approved vendor.
Only RPs that meet the following prerequisites support the larger (16 MB) SIMMs:
Bootstrap Version 4.6 is used exclusively with Software Release 9.17, and Bootstrap Version 4.7 is used exclusively with Software Release 9.21. The revision numbers (indicated within parentheses) for each version are revised independently of other bootstrap versions. Therefore, 4.6(7) can be a later version than 4.7(2).
Software Release 9.17(8), RP board revision B0, and System Bootstrap Version 4.6(7.3) began shipping as the default for Cisco 7000 series systems in March 1994.
RPs that shipped from the factory with Release 9.17(7) or earlier in ROM do not support 16 MB SIMMs. To verify that your RP supports the larger SIMMs, issue the following commands:
Parts and Tools
In addition to the tools you need to remove and replace the RP, you will also need the following tools and parts to replace SIMMs. If you need additional equipment, contact a service representative for ordering information.
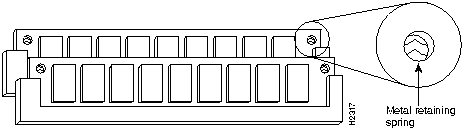
Removing SIMMs
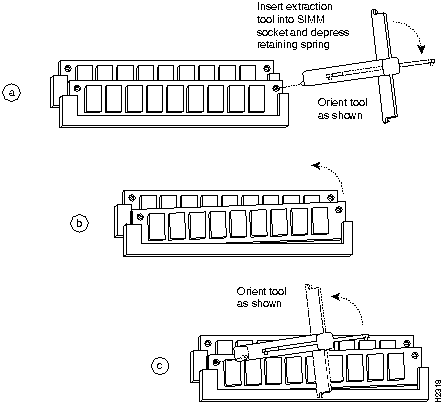
Because the SIMMs on the RP are not intended to be replaced often, if at all, the SIMM sockets do not use the thumb tabs that are often used in PCs and other computer equipment. Each RP SIMM socket has two metal retaining springs, one at each end. (See Figure 5-9.)When a SIMM is fully seated in the socket, the retaining springs snap upward into the holes at the ends of the SIMM to lock it in the socket. You need the AMP extraction tool to remove the SIMMs from this type of socket. The extraction tool has an embossed tip specifically designed to depress the retaining spring while wedging the SIMM out of the socket.
Follow these steps to remove the existing 4 MB SIMMs:
Figure 5-10 : Using the SIMM Extraction Tool
This completes the SIMM removal procedure. Proceed to the next section to install the new SIMMs.
Installing New SIMMs
SIMMs are sensitive components that are susceptible to ESD damage. Handle SIMMs by the edges only; avoid touching the memory modules, pins, or traces (the metal fingers along the connector edge of the SIMM). (See Figure 5-11.)
Follow these steps to install the new SIMMs:
![]()
![]()
![]()
![]()
![]()
![]()
![]()
7010#

%OIR-6-REMCARD: Card removed from slot 0, interfaces disabled
%LINK-5-CHANGED: Interface TokenRing2/0, changed state to initializing
%LINK-5-CHANGED: Interface Ethernet0/1, changed state to administratively down
%LINK-5-CHANGED: Interface Ethernet0/5, changed state to administratively down
%LINK-5-CHANGED: Interface TokenRing2/0, changed state to up

7010#

%OIR-6-INSCARD: Card inserted in slot 0, interfaces administratively shut down
%LINK-5-CHANGED: Interface TokenRing2/0, changed state to initializing
%LINK-5-CHANGED: Interface Ethernet0/1, changed state to up
%LINK-5-CHANGED: Interface Ethernet0/5, changed state to up
%LINK-5-CHANGED: Interface TokenRing2/0, changed state to up
![]()
7010#
show cont cxbus
EIP 0, hardware version 5.1, microcode version 1.0
Interface 0 - Ethernet0/0, station addr 0000.0c02.d0ec (bia 0000.0c02.d0cc)
7010>
enable
Password:
7010#
configure terminal
microcode eip rom
microcode reload
^Z
write terminal
[OK]
Action/Filename
Bit 3
Bit 2
Bit 1
Bit 0
bootstrap mode
0
0
0
0
ROM software
0
0
0
1
cisco2-rp1
0
0
1
0
cisco3-rp1
0
0
1
1
cisco4-rp1
0
1
0
0
cisco5-rp1
0
1
0
1
cisco6-rp1
0
1
1
0
cisco7-rp1
0
1
1
1
cisco10-rp1
1
0
0
0
cisco11-rp1
1
0
0
1
cisco12-rp1
1
0
1
0
cisco13-rp1
1
0
1
1
cisco14-rp1
1
1
0
0
cisco15-rp1
1
1
0
1
cisco16-rp1
1
1
1
0
cisco17-rp1
1
1
1
1
Bit 14
Bit 10
Address (<net><host>)
out
out
<ones><ones>
out
in
<zeros><zeros>
in
in
<net><zeros>
in
out
<net><ones>
Baud
Bit 12
Bit 11
9600
0
0
4800
0
1
1200
1
0
2400
1
1
![]()
Bit No.1
Hexadecimal
Meaning
00 to 03
0x0000 to 0x000F
Boot field (see Table 5-5)
06
0x0040
Causes system software to ignore NVRAM contents
07
0x0080
OEM bit enabled2
08
0x0100
Break disabled
09
0x0200
Use secondary bootstrap
10
0x0400
Internet Protocol (IP) broadcast with all zeros
11 to 12
0x0800 to 0x1000
Console line speed (default is 9,600 baud)
13
0x2000
Boot default ROM software if network boot fails
14
0x4000
IP broadcasts do not have network numbers
15
0x8000
Enable diagnostic messages and ignore NVRAM contents
1 The factory default value for the configuration register is 0x0101. This value is a combination of the following: bit 8 = 0x0100 and bits 00 through 03 = 0x0001 (see Table5-5).
2 OEM = original equipment manufacturer.
Boot Field
Meaning
00
Stays at the system bootstrap prompt
01
Boots system image in system ROM
02 to 0F
Specifies a default netboot filename
Enables boot system commands that override the default netboot filename
Router>
enable
Password:
router#
Router#
conf term
Enter configuration commands, one per line. End with CTRL/Z
config-register 0x
value
Configuration register is 0x141 (will be 0x101 at next reload)
Boot ROMs do not support software configuration register.
Value not written to NVRAM.
> b [tftp] flash filename
Router# conf term
Enter configuration commands, one per line. End with CTRL/Z.
config-register 0x102
boot system flash [filename]
^z
Router#
Action/Filename
Bit 3
Bit 2
Bit 1
Bit 0
bootstrap mode
0
0
0
0
ROM software
0
0
0
1
cisco2-rp1
0
0
1
0
cisco3-rp1
0
0
1
1
cisco4-rp1
0
1
0
0
cisco5-rp1
0
1
0
1
cisco6-rp1
0
1
1
0
cisco7-rp1
0
1
1
1
cisco10-rp1
1
0
0
0
cisco11-rp1
1
0
0
1
cisco12-rp1
1
0
1
0
cisco13-rp1
1
0
1
1
cisco14-rp1
1
1
0
0
cisco15-rp1
1
1
0
1
cisco16-rp1
1
1
1
0
cisco17-rp1
1
1
1
1
Bit 14
Bit 10
Address (<net> <host>)
Off
Off
<ones> <ones>
Off
On
<zeros> <zeros>
On
On
<net> <zeros>
On
Off
<net> <ones>
Table 5-8 shows the bit settings for the four available baud rates. (The factory-set default baud rate is 9,600.)
Baud
Bit 12
Bit 11
9,600
0
0
4,800
0
1
1,200
1
0
2,400
1
1
Router# configure terminal
Enter configuration commands, one per line. End with CTRL/Z.
boot system flash [filename]
config-reg 0x102
^Z
router#
Router# configure terminal
Enter configuration commands, one per line. End with CTRL/Z.
config-reg 0x101
^Z
Router# reload
...
router# copy tftp flash
IP address or name of remote host [255.255.255.255]? server1
Name of tftp filename to copy into flash []? 7K10020Z
copy 7K10020Z from 131.131.101.101 into flash memory? [confirm] <Return>
xxxxxxxx bytes available for writing without erasure.
erase flash before writing? [confirm] <Return>
Clearing and initializing flash memory (please wait)####...
Loading from 101.2.13.110: !!!!!!!!!!!!!!!!!!!!!!!!!!!!!!!!!!!!
!!!!!!!!!!!!!... [OK - 324572/524212 bytes]
Verifying checksum...
VVVVVVVVVVVVVVVVVVVVVVVVVVVVVVVVVVVVVVVVVVVVVVVVVVVVVVVVVVVVVVVVVVVVVVVVVVVVVVV..
Flash verification successful. Length = 1204637, checksum = 0x95D9

router# config term
Enter configuration commands, one per line. End with CTRL/Z.
config-reg 0x102
^Z
Router# reload
...
>
o/r
>
i
--- System Configuration Dialog ---
Press RETURN to get started!
Router>
Router#
Router#
conf term
Enter configuration commands, one per line. End with CTRL/Z.
Router>
enable
Password:
Router#
Router# ping 1.1.1.1
Type escape sequence to abort.
Sending 5, 100-byte ICMP Echos to 1.1.1.1, timeout is 2 seconds:
!!!!!
Success rate is 100 percent (5/5), round-trip min/avg/max = 12/12/12 ms
Router#
Sending 5, 100-byte ICMP Echos to 1.1.1.1, timeout is 2 seconds:
.....
Success rate is 0 percent (0/5)
Router#
Router#
copy startup-config tftp
Remote host []?
Router#
copy startup-config tftp
Remote host []?
servername
Translating "servername"...domain server (1.1.1.1) [OK]
Name of configuration file to write [Router-confg]?
Write file Router-confg on host 1.1.1.1? [confirm]
Writing Router-confg .....
Write file Router-confg on host 1.1.1.1? [confirm]
Writing Router-confg: !!!! [ok]
Writing Router-confg .....
Router#
copy tftp startup-config
Host or network configuration file [host]?
IP address of remote host [255.255.255.255]?
1.1.1.1
Name of configuration file [router-confg]?
Configure using router-confg from 1.1.1.1? [confirm]
Booting router-confg from 1.1.1.1: ! ! [OK - 874/16000 bytes]
Booting Router-confg ..... [timed out]
Router# show boot
(display text omitted)

CONFIG_FILE variable =
Current CONFIG_FILE variable =

(display text omitted)
Router# copy startup-config:myfile1 slot0:myfile1
20575008 bytes available on device slot0, proceed? [confirm]
Address or name of remote host [1.1.1.1]?
Loading new.image from 1.1.1.1 (via Ethernet1/0): !!!!!!!!!!!!!!!!!!!!!!!!!!!!!!
!!!!!!!!!!!!!!!!!!!!!!!!!!!!!!!!!!!!!!!!!!!!!!!!!!!!!!!!!!!!!!!!!!!!!!!!!!!!!!!!
!!!!!!!!!!!!!!!!!!!!!!!!!!!!!!!!!!!!!!!!!!!!!!!!!!!!!!!!!!!!!!!!!!!!!!!!!!!!!!!!
!!!!!!!!!!!!!!!!!!!!!!!!!!!!!!!!!!!!!!!!!!!!!!!!!!!!!!!!!!!!!!!!!!!!!!!!!!!!!!!!
!!!!!!!!!!!!!!!!!!!!!!!!!!!!!!!!!!!!!!!!!!!!!!!!!!!!!!!!!!!!!!!!!!!!!!!!!!!!!!!!
!!!!!!!!!!!!!!!!!!!!!!!!!!!!!!!!!!!!!!!!!!!!!!![OK - 7799951/15599616 bytes]
CCCCCCCCCCCCCCCCCCCCCCCCCCCCCCCCCCCCCCCCCCCCCCCCCCCCCCCCCCCCCCCCCCCCCCCCCCCCCCCC
CCCCCCCCCCCCCCCCCCCCCCCCCCCCCCCCCCCCCCCCCCCCCCCCCCCCCCCCCCCCCCCCCCCCCCCCCCCCCCCC
CCCCCCCCCCCCCCCCCCCCCCCCCCCCCCCCCCCCCCCCCCCCCCCCCCCCCCCCCCCCCCCCCCCCCCCCCC
Router#
Router# copy slot0:myfile1 startup-config
20575008 bytes available on device slot0, proceed? [confirm]
Address or name of remote host [1.1.1.1]?
Loading new.image from 1.1.1.1 (via Ethernet1/0): !!!!!!!!!!!!!!!!!!!!!!!!!!!!!!
!!!!!!!!!!!!!!!!!!!!!!!!!!!!!!!!!!!!!!!!!!!!!!!!!!!!!!!!!!!!!!!!!!!!!!!!!!!!!!!!
!!!!!!!!!!!!!!!!!!!!!!!!!!!!!!!!!!!!!!!!!!!!!!!!!!!!!!!!!!!!!!!!!!!!!!!!!!!!!!!!
!!!!!!!!!!!!!!!!!!!!!!!!!!!!!!!!!!!!!!!!!!!!!!!!!!!!!!!!!!!!!!!!!!!!!!!!!!!!!!!!
!!!!!!!!!!!!!!!!!!!!!!!!!!!!!!!!!!!!!!!!!!!!!!!!!!!!!!!!!!!!!!!!!!!!!!!!!!!!!!!!
!!!!!!!!!!!!!!!!!!!!!!!!!!!!!!!!!!!!!!!!!!!!!!![OK - 7799951/15599616 bytes]
CCCCCCCCCCCCCCCCCCCCCCCCCCCCCCCCCCCCCCCCCCCCCCCCCCCCCCCCCCCCCCCCCCCCCCCCCCCCCCCC
CCCCCCCCCCCCCCCCCCCCCCCCCCCCCCCCCCCCCCCCCCCCCCCCCCCCCCCCCCCCCCCCCCCCCCCCCCCCCCCC
CCCCCCCCCCCCCCCCCCCCCCCCCCCCCCCCCCCCCCCCCCCCCCCCCCCCCCCCCCCCCCCCCCCCCCCCCC
Router#
![]()
7010# show version
GS Software (GS7), Version 9.17(8.1)
Copyright (c) 1986-1994 by cisco Systems, Inc.
Compiled Fri 04-Feb-94

System Bootstrap, Version 4.6(7.3)
7010# show diag 4

Slot 4:
        EEPROM format version 1
        Route Processor, HW rev 1.1, board revision B0
        Serial number: 00809933  Part number: 73-0877-04
tac@cisco.com
.
requesting the list of approved vendors to
cs-rep@cisco.com
.
![]()

![]()
![]()