|
|
WAN Card Slot Network Module Configuration Note
Product Numbers:
NM-1E2W, NM-2E2W, NM-1E1R2W
CPANM-1E2W, CPANM-2E2W, CPANM-1E1R2W
This document provides information about the following network modules for the Cisco 3600 series of modular access routers:
Unless specifically identified, references to 2-slot network modules in this configuration note and other publications include all three network modules.
Each 2-slot network module provides one or two LAN interfaces, plus two slots for optional WAN interface cards. For information on WAN interface cards, see the card's configuration note.
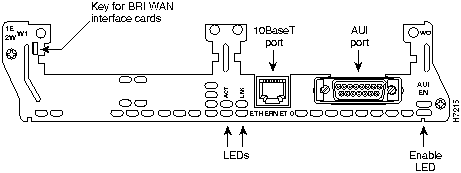
Figure 1 : 1-Ethernet 2-WAN Card Slot Network Module
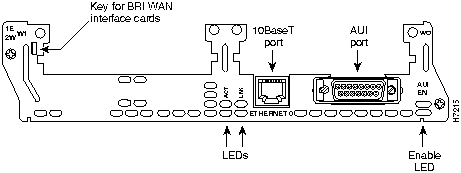
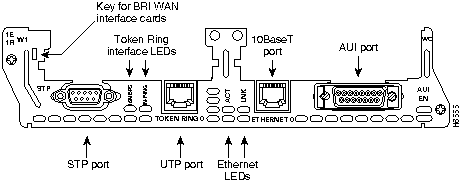
Figure 2 : 2-Ethernet 2-WAN Card Slot Network Module
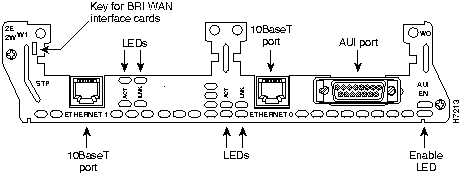
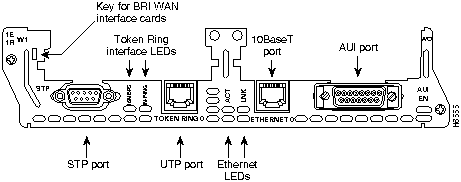
Figure 3 : 1-Ethernet 1-Token Ring 2-WAN Card Slot Network Module
Use this document in conjunction with your router installation and configuration guide and the Regulatory Compliance and Safety Information document for your router. If you have questions or need help, refer to the section "Obtaining Service and Support" later in this document for further information.
This document contains the following sections:
![]()
The minimum version of Cisco Internetwork Operating System (Cisco IOS) software needed for 2-slot network modules is 11.1(6)AAS.
Follow these guidelines to ensure general safety:
Follow these guidelines when working on equipment powered by electricity:
Preventing Electrostatic Discharge Damage
Electrostatic discharge (ESD) can damage equipment and impair electrical circuitry. It occurs when electronic printed circuit cards are improperly handled and can result in complete or intermittent failures. Always follow ESD prevention procedures when removing and replacing cards. Ensure that the router chassis is electrically connected to earth ground. Wear an ESD-preventive wrist strap, ensuring that it makes good skin contact. Connect the clip to an unpainted surface of the chassis frame to safely channel unwanted ESD voltages to ground. To properly guard against ESD damage and shocks, the wrist strap and cord must operate effectively. If no wrist strap is available, ground yourself by touching the metal part of the chassis.
You need the following tools and equipment to install a network module in a Cisco 3600 series chassis slot:
Installing a 2-Slot Network Module in a Chassis Slot
The following instructions apply only to installing network modules in a chassis slot. To install a WAN interface card in a network module, see the configuration note for the WAN interface card.
You can install network modules in the chassis either before or after mounting the router, whichever is more convenient.
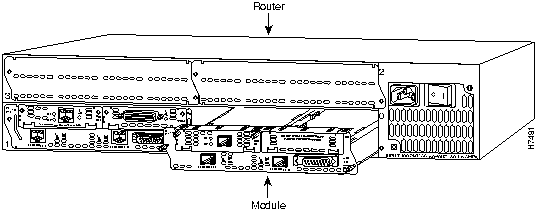
Follow this procedure to install a network module:
Figure 4 : Installing a Module in a Router
If the router is configured with fewer than four network modules, make sure that blank panels fill the open chassis slots to provide proper airflow. (See Figure 5.)
Figure 5 : Blank Network Module Panel
Blank WAN Interface Card Panels
If the 2-slot network module is configured with fewer than two WAN interface cards, make sure that blank panels fill the open base module slots to provide proper airflow. (See Figure 6.)
Figure 6 : Blank WAN Interface Card Panel
The number and type of connectors on a 2-slot network module depend on the type of module.
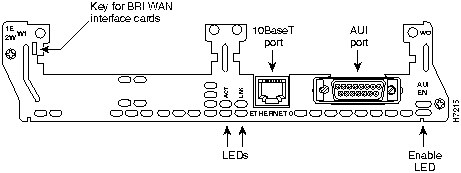
The 1E 2-slot network module has one Ethernet attachment unit interface (AUI) DB-15 connector and one 10BaseT RJ-45 connector. (See Figure 7.) Only one of these two connectors can be active at a time. The active port is identified in software by port type (Ethernet), the module's slot number, and port number 0.
The module detects the type of network connection automatically, and you do not need to select the media type in software. If cables are plugged into both ports, the 10BaseT connection is selected.
Figure 7 : 1E 2-Slot Network Module
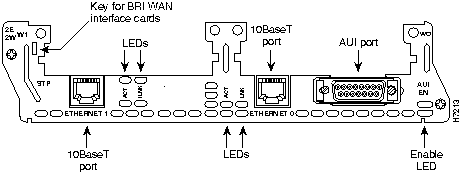
The 2E 2-slot network module has ports for two Ethernet connections. (See Figure 8.)
Ethernet port 0 uses either the AUI (DB-15) connector on the right or the 10BaseT (RJ-45) connector in the center, but only one at a time. Ethernet port 1 uses the 10BaseT connector on the left. This port does not provide an AUI connector. Ports are identified in software by port type (Ethernet), the module's slot number, and the port number.
The module detects the type of network connection automatically, and you do not need to select the media type in software. If cables are plugged into both ports, the 10BaseT connection is selected.
Figure 8 : 2E 2-Slot Network Module
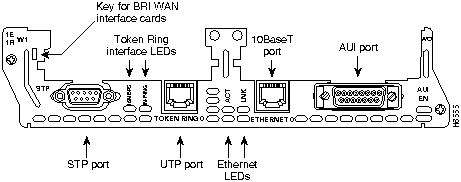
The 1E1R 2-slot network module has ports for one Ethernet connection and one Token Ring connection. (See Figure 9.)
The Ethernet port (Ethernet 0) uses either the AUI (DB-15) connector or the 10BaseT (RJ-45) connector, but only one at a time. The Token Ring port (Token Ring 0) uses either the shielded twisted-pair (STP) connector or the unshielded twisted-pair (UTP) connector, but only one at a time. Ports are identified in software by port type (Ethernet or Token Ring), the module's slot number, and the port number.
The module detects the type of network connection automatically, and you do not need to select the media type in software. If cables are plugged into both Ethernet ports, the 10BaseT connection is selected.
Figure 9 : 1E1R 2-Slot Network Module
On 1-Ethernet network modules and on Ethernet port 0 (the right-hand port) of 2-Ethernet network modules, connect either the Ethernet AUI or the 10BaseT connector, but not both at the same time.
Ethernet port 1 (the left-hand port) of 2-Ethernet network modules provides only a 10BaseT connector.
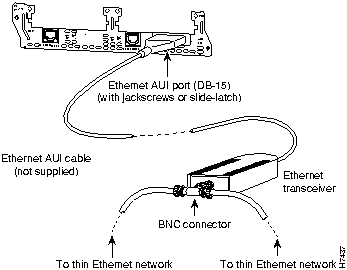
Use an Ethernet AUI cable to connect the AUI port on an Ethernet network module to an Ethernet transceiver. The female end of the AUI cable mates with the slide-latch connector of the transceiver cable. (See Figure 10.)
Figure 10 : Connecting an Ethernet AUI Port to a Transceiver
If the transceiver cable has thumbscrew connectors, you can connect it directly to the AUI port by replacing the AUI port slide latch with a jackscrew (provided in a separate bag).
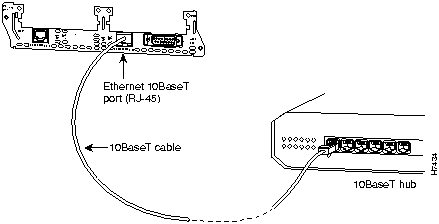
Use an Ethernet 10BaseT cable to connect the 10BaseT port on an Ethernet network module to a hub or other network device. Figure 11 shows the 10BaseT port on an Ethernet network module connected to a hub.
Figure 11 : Connecting an Ethernet 10BaseT Port to a Hub Selecting the Ethernet Media Type
Ethernet network modules detect the type of connection, AUI or 10BaseT, automatically. You do not need to select the media type in software. If cables are plugged into both ports, the 10BaseT connection is selected.
This section illustrates the Ethernet AUI (DB-15) cable assembly and 10BaseT (RJ-45) connector, and lists pinouts and signal descriptions for each.
Figure 12 shows the Ethernet AUI cable assembly, and Table 1 lists the pinout.
Figure 12 : AUI Cable Assembly
Figure 13 shows the 10BaseT (RJ-45) connector, and Table 2 lists the pinout. Pins not listed are not connected.
Table 2 : 10BaseT C onnector Pinout
The 1E1R 2-slot network module has one DB-9 connector for an STP Token Ring connection and one RJ-45 connector for a UTP connection. (See Figure 9.) Only one connector can be active at a time.
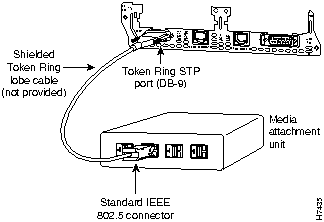
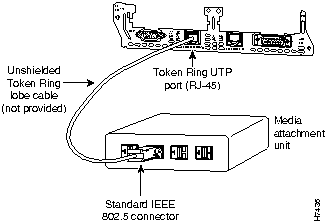
To connect the module to a Token Ring network, attach one end of a shielded Token Ring lobe cable to the DB-9 connector on the network module (see Figure 14), or attach one end of an unshielded Token Ring lobe cable to the UTP connector on the network module (see Figure 15). Attach the other end of the cable to the Token Ring media attachment unit (MAU). The network module automatically detects which connector is in use.
Figure 14 : Connecting a Token Ring STP Port (DB-9) to an MAU
Figure 15 : Connecting a Token Ring UTP Port (RJ-45) to an MAU
Table 3 lists the pinout for the Token Ring port. Pins not listed are not connected.
Table 3 : Token Ring Port Pinout (DB-9)
Figure 16, Figure 17, and Figure 18 show the LEDs on each 2-slot network module.
All network modules have an enable LED. The enable LED indicates that the module has passed its self-tests and is available to the router.
The 1E and 2E 2-slot network modules have two Ethernet LEDs. The ACT (activity) LED indicates that the router is sending or receiving Ethernet transmissions. The LNK (link) LED indicates that the Ethernet port is receiving the link integrity signal from the hub (10BaseT only).
Figure 16 : 1-Ethernet 2-WAN Card Slot Network Module
Figure 17 : 2-Ethernet 2-WAN Card Slot Network Module
Figure 18 : 1-Ethernet 1-Token Ring 2-WAN Card Slot Network Module
The 1E1R 2-slot network module has two Token Ring LEDs, labeled 16MBPS and IN-RING. The 16MBPS LED indicates a ring speed of 16 Mbps. If it is off, the ring speed is 4 Mbps.
The IN-RING LED indicates that the Token Ring interface is inserted into the ring. If it is off, the interface is not inserted into the ring.
Configuring the LAN Interfaces
Whenever you install a new interface, or if you want to change the configuration of an existing interface, you must configure the interface. If you replace a module that was already configured, the router recognizes it and brings up the interface in the existing configuration.
Before you configure an interface, have the following information available:
You can configure the new interface and other router parameters by using any of the following methods:
These procedures are explained in the following sections. If you have questions or need help, refer to the section "Obtaining Service and Support" later in this document for further information.
You can configure the Ethernet or Token Ring interfaces on your 2-slot network module manually, by entering Cisco IOS commands on the command line. This method, called configuration mode, provides the greatest power and flexibility.
Before you begin, disconnect all WAN cables from the router to keep it from trying to run the AutoInstall process. The router tries to run AutoInstall whenever you power it ON if there is a WAN connection on both ends and the router does not have a valid configuration file stored in nonvolative random-access memory (NVRAM) (for instance, when you add a new interface). It can take several minutes for the router to determine that AutoInstall is not connected to a remote Transmission Control Protocol/Internet Protocol (TCP/IP) host.
To enter configuration mode, follow this procedure:
The AutoInstall process is designed to configure the router automatically after it connects to your WAN. For AutoInstall to work properly, a TCP/IP host on your network must be configured to provide the configuration files. The TCP/IP host can reside anywhere on the network if the following two conditions are met:
This functionality is coordinated by your system administrator at the TCP/IP host site. You should not try to use AutoInstall unless the required files have been installed on the TCP/IP host.
Follow this procedure to prepare your router for the AutoInstall process:
You can configure the router manually using the System Configuration Dialog facility. Unlike configuration mode, the System Configuration Dialog prompts you for each response.
Before you begin, disconnect all WAN cables from the router to keep it from trying to run the AutoInstall process. The router tries to run AutoInstall whenever you power it ON if there is a WAN connection on both ends and the router does not have a configuration file stored in NVRAM. It can take several minutes for the router to determine that AutoInstall is not connected to a remote TCP/IP host.
This section shows a sample configuration using the System Configuration Dialog. You should enter values appropriate for your router and network.
Many prompts in the System Configuration Dialog include default answers, shown in square brackets following the question. Enter your response, or press Return to accept the default answer.
You can request help at any time by entering a question mark (?) at a System Configuration Dialog prompt.
Follow this procedure to configure the router using the System Configuration Dialog:
For service and support for a product purchased from a reseller, contact the reseller. Resellers offer a wide variety of Cisco service and support programs, which are described in the section "Service and Support" in the information packet that shipped with your chassis.
For service and support for a product purchased directly from Cisco, use CCO.
CCO is Cisco Systems' primary, real-time support channel. SMARTnet customers and partners can self-register on CCO to obtain additional content and services.
Available 24 hours a day, 7 days a week, CCO provides a wealth of standard and value-added services to Cisco's customers and business partners. CCO services include product information, software updates, release notes, technical tips, the Bug Navigator, configuration notes, brochures, descriptions of service offerings, and download access to public and authorized files.
CCO serves a wide variety of users through two interfaces that are updated and enhanced simultaneously---a character-based version and a multimedia version that resides on the World Wide Web (WWW). The character-based CCO supports Zmodem, Kermit, Xmodem, FTP, and Internet e-mail, and is excellent for quick access to information over lower bandwidths. The WWW version of CCO provides richly formatted documents with photographs, figures, graphics, and video, as well as hyperlinks to related information.
You can access CCO in the following ways:
For a copy of CCO's Frequently Asked Questions (FAQ), contact ccohelp@cisco.com. For additional information, contact ccoteam@cisco.com.
Please use CCO to obtain general information about Cisco Systems, Cisco products, or upgrades. If CCO is not accessible, contact 800 553-6387, 408 526-7208, or csrep@cisco.com.
Copyright 1988-1996 © Cisco Systems Inc.
![]()
![]()
![]()
![]()
![]()
![]()
![]()
![]()
![]()
![]()
![]()
![]()
![]()
![]()




Pin
Ethernet Circuit
Signal Name
3
DO-A
Data Out Circuit A
10
DO-B
Data Out Circuit B
11
DO-S
Data Out Circuit Shield
5
DI-A
Data In Circuit A
12
DI-B
Data In Circuit B
4
DI-S
Data In Circuit Shield
7
CO-A
Control Out Circuit A (not connected)
15
CO-B
Control Out Circuit B (not connected)
8
CO-S
Control Out Circuit Shield (not connected)
2
CI-A
Control In Circuit A
9
CI-B
Control In Circuit B
1
CI-S
Control In Circuit Shield
6
VC
Voltage Common
13
VP
Voltage Plus
14
VS
Voltage Shield (L25 and M25)
Shell
PG
Protective Ground

Pin
Description
1
TX+
2
TX--
3
RX+
6
RX--
Pin
Signal
1
Receive
3
+5V1
5
Transmit
6
Receive
9
Transmit
1 600 mA maximum.
![]()
![]()
Would you like to enter the initial dialog? [yes]:
If the current configuration is valid, you enter the normal operating mode automatically.
Router>
enable
Password:
Router#
Router#
config terminal
Router(config)#
Router(config)#
ip routing
Router(config)#
appletalk routing
Router(config)#
ipx routing
Router(config)#
interface ethernet 0/0
Router(config-if)#
Router(config-if)#
ip address 172.16.74.3 255.255.255.0
Router(config-if)#
appletalk static cable-range 3-3
Router(config-if)#
appletalk zone ZZEth
Router(config-if)#
ipx network B005
Router#
show running-config
Router#
show startup-config
Router#
copy running-config startup-config
Building configuration. . .
[OK]
Router#
Router#
copy running-config startup-config
Building configuration. . .
[OK]
Router#
This step saves the configuration settings that the AutoInstall process created. If you do not do this, your new configuration will be lost the next time you boot the router.
Would you like to enter the initial dialog? [yes]:
You can enter the System Configuration Dialog at any time from the enable prompt (Router#) by entering the setup command.
First, would you like to see the current interface summary? [yes]:
Interface IP-Address OK? Method Status Protocol
First, would you like to see the current interface summary? [yes]:
Interface IP-Address OK? Method Status Protocol
Ethernet0/0 unassigned NO unset up down
Ethernet0/1 unassigned NO unset up down
Ethernet1/0 unassigned NO unset up down
TokenRing1/0 unassigned NO unset reset down
Configuring interface Ethernet0/0:
Is this interface in use? [yes]:
Configuring interface TokenRing1/0:
Is this interface in use? [yes]:
Tokenring ring speed (4 or 16) ? [16]:
Configure IP on this interface? [yes]:
IP address for this interface:
172.16.74.3
Number of bits in subnet field [8]:
8
    Class B network is 172.16.0.0, 8 subnet bits; mask is

    255.255.255.0
Configure AppleTalk on this interface? [no]:
yes
Extended AppleTalk network? [no]:
yes
AppleTalk starting cable range [0]:
3
AppleTalk ending cable range [1]:
3
AppleTalk zone name [myzone]: ZZEth
AppleTalk additional zone name:
AppleTalk additional zone name:
Configure IPX on this interface? [no]:
yes
IPX network number [1]:
B005
Use this configuration? [yes/no]:
yes
Building configuration...
Use the enabled mode 'configure' command to modify this configuration.
Press RETURN to get started!

![]()
![]()
![]()
![]()
![]()
![]()
![]()
![]()