|
|

Cisco 3600 Series Rack-Mount and Wall-Mount Configuration Note
Product Numbers:
ACS-3620RM-19=, ACS-3620RM-24=, ACS-3640RM-19=, ACS-3640RM-24=
CPAACS-3620RM-19=, CPAACS-3620RM-24=, CPAACS-3640RM-19=, CPAACS-3640RM-24=
This document describes how to rack-mount or wall-mount a Cisco 3620 or Cisco 3640 router.
Use this document in conjunction with your router installation and configuration guide and the Regulatory Compliance and Safety Information document for your router.
If you have questions or need help, refer to the section "Obtaining Service and Support" later in this document.
This document contains the following sections:
![]()
Follow these guidelines to ensure general safety:
Follow these guidelines when working on equipment powered by electricity:
Preventing Electrostatic Discharge Damage
Electrostatic discharge (ESD) can damage equipment and impair electrical circuitry. It occurs when electronic printed circuit cards are improperly handled and can result in complete or intermittent failures. Always follow ESD prevention procedures when removing and replacing cards. Ensure that the router chassis is electrically connected to earth ground. Wear an ESD-preventive wrist strap, ensuring that it makes good skin contact. Connect the clip to an unpainted surface of the chassis frame to safely channel unwanted ESD voltages to ground. To properly guard against ESD damage and shocks, the wrist strap and cord must operate effectively. If no wrist strap is available, ground yourself by touching the metal part of the chassis.
This section explains how to mount a Cisco 3620 or Cisco 3640 router in a 19-inch, 23-inch, or 24-inch equipment rack or telco rack. If you have questions or need help with the rack-mounting procedure, refer to the section "Obtaining Service and Support" later in this document.
If you are planning to rack-mount your router, do so before making network and power connections. If you need to install network modules or WAN interface cards, you can do so either before or after mounting the router, whenever you have better access to the rear of the router.
You need the following tools and equipment to mount a Cisco 3600 series router in a rack:
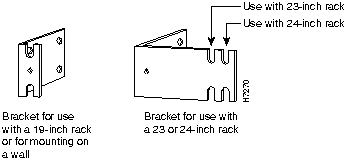
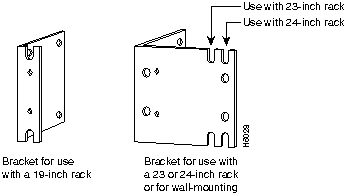
Each router is shipped with one set of brackets. Brackets for 19-inch racks are shipped unless you specify 23-inch or 24-inch brackets at the time of your order. Figure 1 shows brackets for the Cisco 3620 router, and Figure 2 shows brackets for the Cisco 3640 router.
Figure 1 : Cisco 3620 Rack-Mount Brackets
Figure 2 : Cisco 3640 Rack-Mount Brackets
Rack-Mounting the Cisco 3620 Router
This section explains how to rack-mount the Cisco 3620 router.
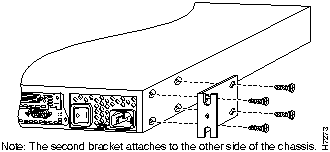
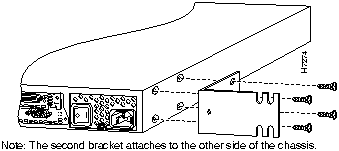
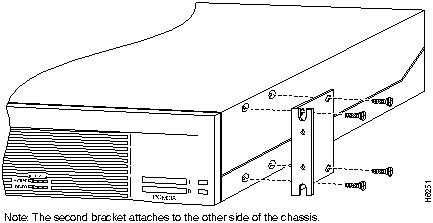
Attaching Brackets to the Cisco 3620 Router
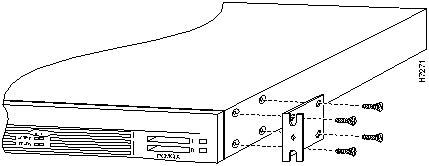
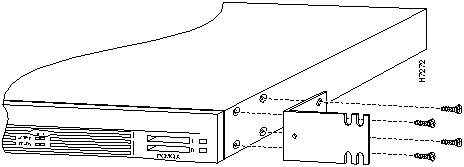
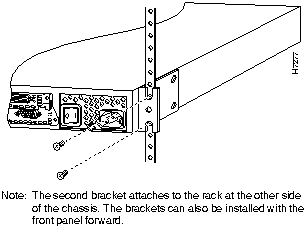
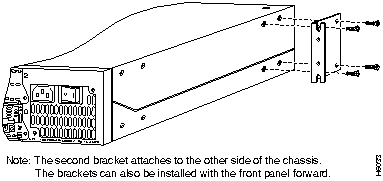
To install the router in a rack with the front panel forward, attach the brackets on each side of the chassis as shown in Figure 3 or Figure 4.
Figure 3 : Cisco 3620 19-Inch Bracket Attachment---Front Panel Forward
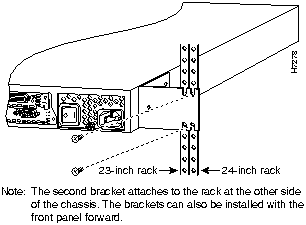
Figure 4 : Cisco 3620 23-Inch or 24-Inch Bracket Attachment---Front Panel Forward
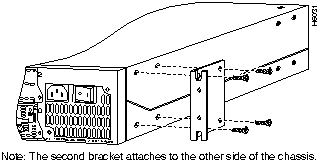
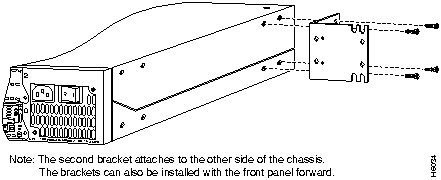
To install the router in a rack with the rear panel forward, attach the brackets on each side of the chassis as shown in Figure 5 or Figure 6.
Figure 5 : Cisco 3620 19-Inch Bracket Attachment---Rear Panel Forward
Figure 6 : Cisco 3620 23-Inch or 24-Inch Bracket Attachment---Rear Panel Forward
To install the router in a center-mount telco rack, attach the brackets on each side of the chassis as shown in Figure 7 or Figure 8.
Figure 7 : Cisco 3620 Telco 19-Inch Bracket Attachment---Rear Panel Forward
Figure 8 : Cisco 3620 Telco 23-Inch or 24-Inch Bracket Attachment---Rear Panel Forward
Mounting the Cisco 3620 Router in a Rack
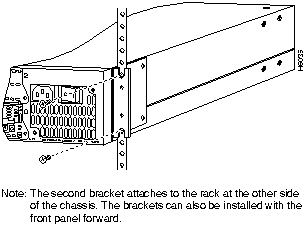
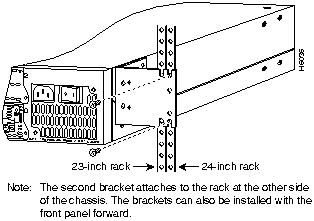
After you fasten the brackets to the chassis, you can mount it in a rack. Using your own screws, attach the chassis to the rack as shown in Figure 9 or Figure 10.
Figure 9 : Mounting the Cisco 3620 in a 19-Inch Rack---Rear Panel Forward
Figure 10 : Mounting the Cisco 3620 in a 23-Inch or 24-Inch Rack---Rear Panel Forward
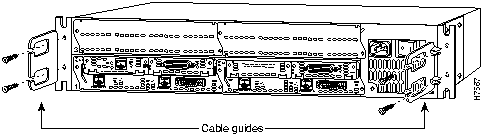
Attaching Cable Guides to the Cisco 3620 Router
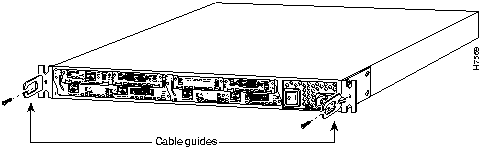
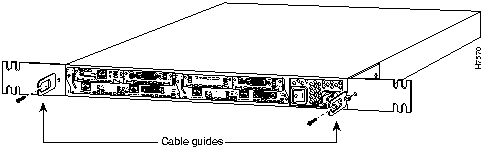
Attach the cable guides to the rack-mounting brackets on each side of the chassis as shown in Figure 11 or Figure 12.
Figure 11 : Attaching Cisco 3620 Cable Guides to 19-Inch Rack-Mounting Brackets
Figure 12 : Attaching Cisco 3620 Cable Guides to 23-Inch or 24-Inch Rack-Mounting Brackets
Rack-Mounting the Cisco 3640 Router
This section explains how to rack-mount the Cisco 3640 router.
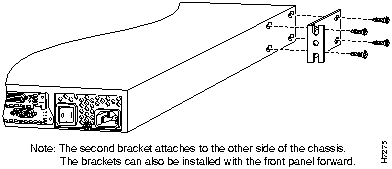
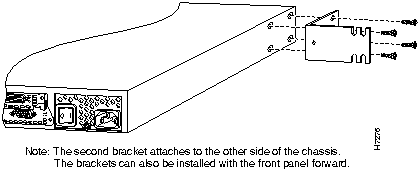
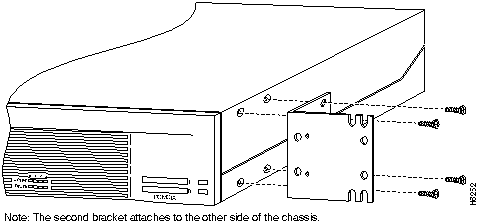
Attaching Brackets to the Cisco 3640 Router
To install the router in a rack with the front panel forward, attach the brackets on each side of the chassis as shown in Figure 13 or Figure 14.
Figure 13 : Cisco 3640 19-Inch Bracket Attachment---Front Panel Forward
Figure 14 : Cisco 3640 23-Inch or 24-Inch Bracket Attachment---Front Panel Forward
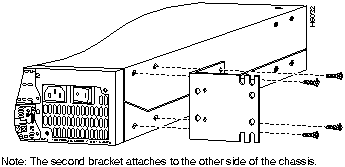
To install the router in a rack with the rear panel forward, attach the brackets on each side of the chassis as shown in Figure 15 or Figure 16.
Figure 15 : Cisco 3640 19-Inch Bracket Attachment---Rear Panel Forward
Figure 16 : Cisco 3640 23-Inch or 24-Inch Bracket Attachment---Rear Panel Forward
To install the router in a center-mount telco rack, attach the brackets on each side of the chassis as shown in Figure 17 or Figure 18.
Figure 17 : Cisco 3640 Telco 19-Inch Bracket Attachment---Rear Panel Forward
Figure 18 : Cisco 3640 Telco 24-Inch Bracket Attachment---Rear Panel Forward
Mounting the Cisco 3640 Router in a Rack
After you fasten the brackets to the chassis, you can mount it in a rack. Using your own screws, attach the chassis to the rack as shown in Figure 19 or Figure 20.
Figure 19 : Mounting the Cisco 3640 in a 19-Inch Rack---Rear Panel Forward
Figure 20 : Mounting the Cisco 3640 in a 23-Inch or 24-Inch Rack---Rear Panel Forward
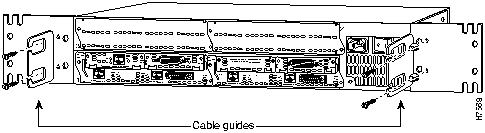
Attaching Cable Guides to the Cisco 3640 Router
Attach the cable guides to the rack-mounting brackets on each side of the chassis as shown in Figure 21 or Figure 22.
Figure 21 : Attaching Cisco 3640 Cable Guides to 19-Inch Rack-Mounting Brackets
Figure 22 : Attaching Cisco 3640 Cable Guides to 23-Inch or 24-Inch Rack-Mounting Brackets
This section explains how to mount a Cisco 3620 or Cisco 3640 router on a wall. If you have questions or need help with the wall-mounting procedure, refer to the section "Obtaining Service and Support" later in this document.
If you are planning to wall-mount your router, do so before making network and power connections. If you need to install network modules or WAN interface cards, you can do so either before or after mounting the router, whenever you have better access to the rear of the router.
You need the following tools and equipment to install a Cisco 3600 series router on a wall:
Cisco Systems does not supply the board or screws.
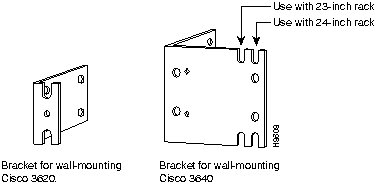
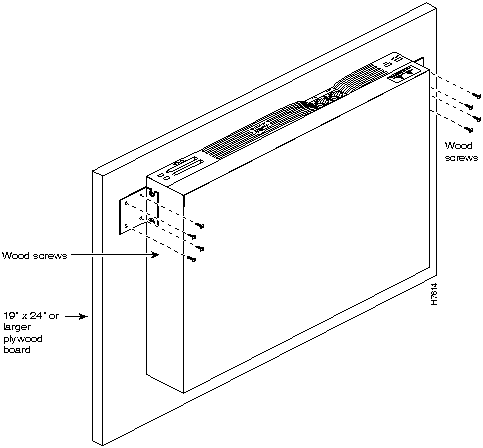
Each router is shipped with one set of brackets. Brackets for 19-inch racks are shipped unless you specify 23-inch or 24-inch brackets at the time of your order. The Cisco 3620 router uses 19-inch rack brackets to mount on a wall, and the Cisco 3640 router uses 23-inch or 24-inch rack brackets to mount on a wall. Figure 23 shows the wall-mount brackets.
Figure 23 : Wall-Mount Brackets
Wall-Mounting the Cisco 3620 Router
This section explains how to wall-mount the Cisco 3620 router.
Attaching Wall-Mounting Brackets to the Cisco 3620 Router
To install the router on a wall, first attach the brackets on each side of the chassis as shown in Figure 24, using the special plastic washers and slotted hex-head screws. Place the washers so that the narrow shoulder faces the router chassis.
Figure 24 : Cisco 3620 Wall-Mount Bracket Attachment
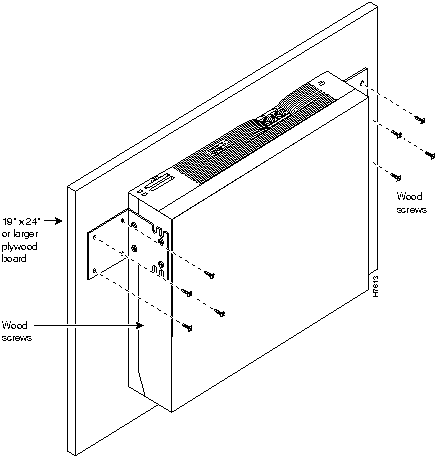
Mounting the Cisco 3620 Router on the Wall
After fastening the brackets to the chassis, follow this procedure to mount it on the wall (refer to Figure 25):
Figure 25 : Mounting the Cisco 3620 Router on a Wall
Wall-Mounting the Cisco 3640 Router
This section explains how to wall-mount the Cisco 3640 router.
Attaching Wall-Mounting Brackets to the Cisco 3640 Router
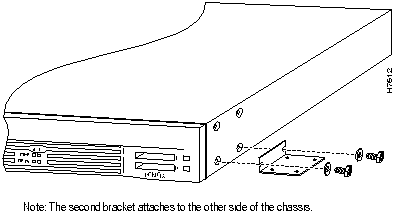
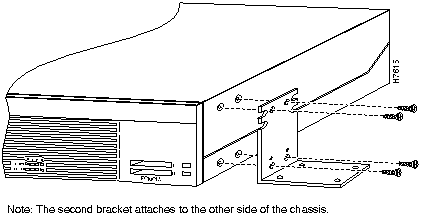
To install the router on a wall, first attach the brackets on each side of the chassis as shown in Figure 26.
Figure 26 : Cisco 3640 Wall-Mount Bracket Attachment
Mounting the Cisco 3640 Router on the Wall
After fastening the brackets to the chassis, follow this procedure to mount it on the wall (see Figure 27):
Figure 27 : Mounting the Cisco 3640 Router on a Wall
For service and support for a product purchased from a reseller, contact the reseller. Resellers offer a wide variety of Cisco service and support programs, which are described in the section "Service and Support" in the information packet that shipped with your chassis.
For service and support for a product purchased directly from Cisco, use CCO.
CCO is Cisco Systems' primary, real-time support channel. SMARTnet customers and partners can self-register on CCO to obtain additional content and services.
Available 24 hours a day, 7 days a week, CCO provides a wealth of standard and value-added services to Cisco's customers and business partners. CCO services include product information, software updates, release notes, technical tips, the Bug Navigator, configuration notes, brochures, descriptions of service offerings, and download access to public and authorized files.
CCO serves a wide variety of users through two interfaces that are updated and enhanced simultaneously---a character-based version and a multimedia version that resides on the World Wide Web (WWW). The character-based CCO supports Zmodem, Kermit, Xmodem, FTP, and Internet e-mail, and is excellent for quick access to information over lower bandwidths. The WWW version of CCO provides richly formatted documents with photographs, figures, graphics, and video, as well as hyperlinks to related information.
You can access CCO in the following ways:
For a copy of CCO's Frequently Asked Questions (FAQ), contact ccohelp@cisco.com. For additional information, contact ccoteam@cisco.com.
Please use CCO to obtain general information about Cisco Systems, Cisco products, or upgrades. If CCO is not accessible, contact 800 553-6387, 408 526-7208, or csrep@cisco.com.
Copyright 1988-1996 © Cisco Systems Inc.
![]()
![]()
![]()
![]()
Plan to mount the router so that the front and rear of the chassis are perpendicular to the floor, with the front upward and at eye level, so you can read the LEDs.
![]()
Plan to mount the router so that the front and rear of the chassis are perpendicular to the floor, with the front upward and at eye level, so you can read the LEDs.
![]()
![]()
![]()
![]()
![]()
![]()
![]()
![]()