|
|
Upgrading the DRAM SIMM
in the Cisco 2500 Series Routers
Product Numbers MEM-1X4D=, MEM-1X8D=, MEM-1X16D=, MEM-6M=, and MEM-18M=
This document explains how to upgrade the primary memory dynamic random-access memory (DRAM) single in-line memory module (SIMM) on your Cisco 2500 Series product. You can upgrade to 4 MB, 8 MB, or 16 MB of primary DRAM.
This document contains the following sections:
Preventing Electrostatic Discharge Damage
Electrostatic discharge (ESD) is a discharge of stored static electricity that can damage equipment and impair electrical circuitry. It occurs when electronic components are improperly handled and can result in complete or intermittent failures.
Following are guidelines for preventing ESD damage:
![]()
This section explains how to open the chassis by removing the chassis cover.
The following tools are required to open the chassis:
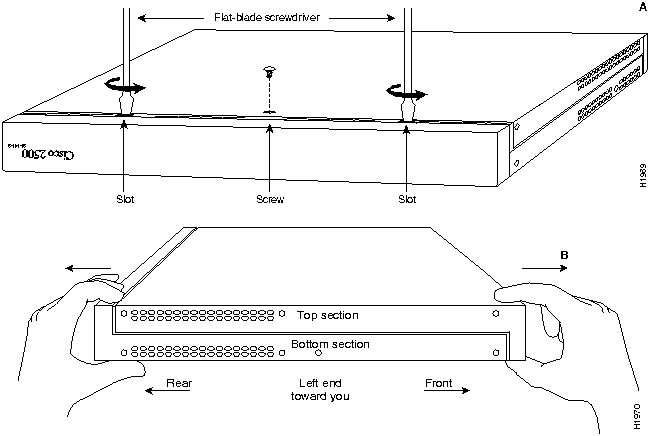
Refer to Parts A and B in Figure 1 and follow these steps to remove the chassis cover:
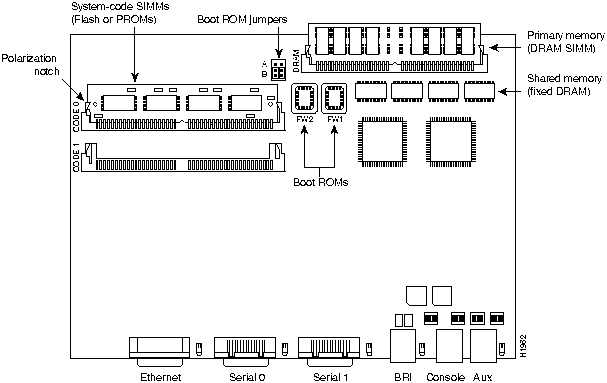
Figure 1 : Chassis Cover Removal---Parts A (Top) and B (Bottom) Figure 2 : System Board Layout---Model 2503 Shown (Chassis, Fan, and Power Supply Not Shown) Installing Primary-Memory DRAM SIMMs
The router contains primary and shared (or packet) memory. Primary memory size, in kilobytes (KB), is displayed in the system banner on the console screen. Primary and shared memory are 1 MB each of the dynamic random-access memory (DRAM) on the system board.
After booting your system, the system banner displays the amount of primary memory installed. The following example shows a system with 1 MB (1024 KB) of primary memory. (The system does not display shared memory.)
If you use very large routing tables or many protocols, you might need to expand primary memory. This expansion might also be necessary when the router is set up as a connection device between large external networks and your internal network.
You can upgrade to 4 MB, 8 MB, or 16 MB of DRAM. Table 1 lists the upgrade amounts and corresponding memory configurations.
Table 1 : Memory Configurations
You can order DRAM SIMMs from Cisco Systems or an approved vendor.
Table 2 lists the upgrade amounts and corresponding Cisco Systems product numbers.
Table 2 : Cisco Systems DRAM SIMMs
Table 3 lists approved 70 nanosecond (ns) DRAM SIMM vendors.
Table 3 : Approved DRAM SIMM Vendors
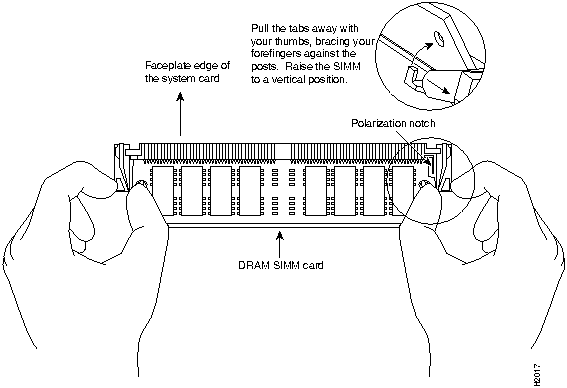
Following is the procedure for installing DRAM SIMMs:
Figure 3 : Removing and Replacing the DRAM SIMM This section explains how to close the chassis.
The following tools are required to replace the cover:
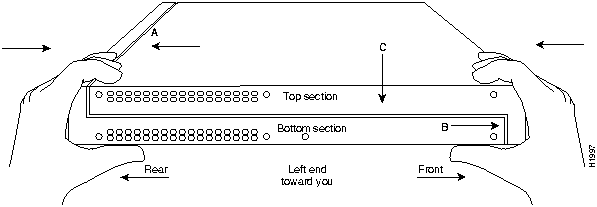
To replace the cover, follow these steps:
Figure 4 : Replacing the Chassis Cover Cisco Information Online (CIO) is Cisco Systems' primary, real-time support channel. You can use your product serial number to activate CIO for a single user during your warranty period. Maintenance customers and partners can self-register on CIO to obtain additional content and services.
Available 24 hours a day, 7 days a week, CIO provides a wealth of standard and value-added services to Cisco's customers and business partners. CIO services include product information, software updates, release notes, technical tips, the Bug Navigator, configuration notes, brochures, descriptions of service offerings, and download access to public and authorized files.
CIO serves a wide variety of users through two interfaces that are updated and enhanced simultaneously---a character-based version and a multimedia version that resides on the World Wide Web (WWW). The character-based CIO (called "CIO Classic") supports Zmodem, Kermit, Xmodem, FTP, Internet e-mail, and fax download options, and is excellent for quick access to information over lower bandwidths. The WWW version of CIO provides richly formatted documents with photographs, figures, graphics, and video, as well as hyperlinks to related information.
You can access CIO in the following ways:
For a copy of CIO's Frequently Asked Questions (FAQ), contact
Copyright 1988-1996 © Cisco Systems Inc.
![]()


![]()
System Bootstrap, Version (2.1), SOFTWARE
Copyright (c) 1986-1993 by cisco Systems
2500 processor with 1024 Kbytes of main memory
>
Upgrade DRAM
Memory Configuration
4 MB
1 MB x 36 DRAM SIMM
8 MB
2 MB x 36 DRAM SIMM
16 MB
4 MB x 36 DRAM SIMM
Upgrade DRAM
Cisco Systems Product Number
4 MB (1 MB x 36, 70 ns DRAM SIMM)
MEM1X4D=, MEM-6M=
8 MB (2 MB x 36, 70 ns DRAM SIMM)
MEM-1X8D=
16 MB (4 MB x 36, 70 ns DRAM SIMM)
MEM-1X16D=, MEM-18M=
Upgrade DRAM
Vendor
Vendor Part Number
4 MB (1 MB x 36, 70 ns DRAM SIMM)
Hyundai
HYM536100AM-70
Micron
MT9D136M-7
Mitsubishi
MH1M36ASDJ-7
Mitsubishi
MH1M36BNDJ-7
NEC
MC421000A36BE-70
OKI
MSC23136B-70BS12
Samsung
KMM5361003C-70
8 MB (2 MB x 36, 70 ns DRAM SIMM)
Smart Modules
SM536C2000-7
16 MB (4 MB x 36, 70 ns DRAM SIMM)
Hitachi
HB56D436SBR-7AGS
Hyundai
HYM536410M-70
Mitsubishi
MH4M36ANXJ-7
NEC
MC-424000A36BE-70
Samsung
KMM5364100A-70
![]()

![]()

http://www.cisco.com
.
cio.cisco.com
(198.92.32.130).
ciohelp@cisco.com.
For additional information, contact
cioteam@cisco.com.
tac@cisco.com.
To obtain general information about Cisco Systems, Cisco products, or upgrades, contact 800 553-6387, 408 526-7208, or
csrep@cisco.com.

![]()
![]()
![]()
![]()
![]()
![]()
![]()
![]()