|
|

This chapter describes some of the tools provided for detecting and identifying network and/or equipment problems that are available to the network operator.
There are considerably more advanced tools built into the system software that are available only to StrataCom personnel, such as ISC. These advanced tools require in-depth knowledge or the hardware and software and are used generally to locate the less common types of system problems.
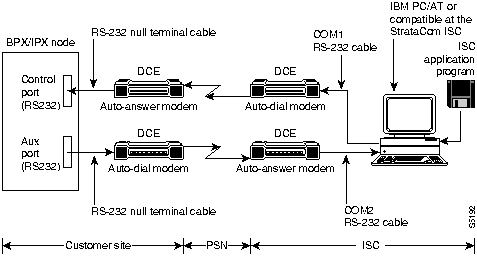
In a network with BPX, IGX, and IPX nodes, it is recommended that at least one node be configured to transmit alarms automatically to the StrataCom International Support Center (ISC). Figure 6-1 illustrates the hardware configuration required for implementation.
When an alarm occurs on the network, the autodial modem automatically dials the specified telephone number. An auto-answer modem at StrataCom ISC answers the call and directs it to a dedicated personal computer. The alarm is logged under the network ID (an ASCII character string) specified by the network administrator and approved by ISC personnel.
If the auto-answer modem at ISC is busy when an alarm arrives, then the autodial modem will keep dialing until the call is completed. A suggested modem is the Codex V.34 RSA 28.8 Kbaud modem. Connections to the node are detailed in the appropriate BPX Reference Manual or IPX Reference Manual.
Figure 6-1 : Automatic Alarm Reporting to ISC The BPX, IGX, and IPX system software provides a variety of tools for monitoring the network and detecting and locating network and system problems. Almost all network troubleshooting can be performed from the console of the StrataView Plus Network Management Station (NMS). These tools are described in general in the following paragraphs.
The StrataView NMS displays a map of the network topology indicating where the nodes are located and the packet trunks that provide the connections between the nodes (refer to Figure 6-2). This topology map displays, in color, any network faults detected by the system.
All nodes in the network are accessible from the StrataView Plus NMS and any network or system fault detected will be reported to the NMS. In addition the network operator can access any routing node in the network by using a Virtual Terminal (vt) command to create a virtual connection from the NMS console directly to the desired node. Non-routing nodes are accessed via "telnet" command on a LAN interface, and are managed via in-band SNMP. This allows the operator to enter commands and view system status as if he were locally connected to the node.
Figure 6-2 : Example of a StrataView Plus Topology Map Whenever an alarm condition is detected in the network, the NMS console will sound an alarm tone, a Major Alarm or Minor Alarm notice will flash, and one or more of the icons on the topology map will change color to alert the network operator of the fault. Additionally, each node can be equipped to output a set of relay contact closures to operate customer alarm systems to notify network operators of an alarm condition in the network. See IPX Reference Manual or the BPX Reference Manual for information.
Another method of identifying the location of a network alarm is to issue a Display Networks (dspnw) command (Figure 6-3) A Major or Minor alarm indication after one or more of the node names will be displayed if there is an alarm anywhere in the network. This screen will identify the node(s) that detected the alarm condition.
Figure 6-3 : Display Network Screen
Once the location (node) where the alarm has been detected is identified, the network operator can use the Virtual Terminal feature to observe the status at that location. The Display Alarms (dspalms) command and associated screen will be used here. Figure 6-4 illustrates a Minor Alarm at a node named D1.beta.
Figure 6-4 : Display Alarms Screen
Displaying Trunk and Circuit Line Status
If the Display Nodes (dspnds) or Display Network (dspnw)) command screen indicates a service-affecting problem with either a network trunk or customer circuit line, there are two similar screens that will display their status. Figure 6-5 illustrates an example of the Display Trunk (dsptrks) command screen with a Major Alarm on trunk 5.2. It also indicates whether the alarm is a Red (Local) or Yellow (Remote) alarm.
Figure 6-5 : Display Trunk Status Screen
Figure 6-6 illustrates an example of the Display Lines (dsplns) command screen with a Major Alarm on line 12.2. It also indicates whether the line alarm is a Red (Local) or Yellow (Remote) alarm.
Figure 6-6 : Display Line Status Screen
Network trunk and line inputs to each node are constantly monitored for error conditions such as loss of signal, bipolar errors, frame errors, etc. These trunk and line errors may not be severe enough to cause a Red or Yellow Alarm but can be observed using the Display Trunk Errors (dsptrkerrs) and Display Line Errors (dsplnerrs) command screens. Figure 6-7 illustrates a typical summary trunk errors screen. Errored tens of seconds statistics are also kept and are displayed by a second trunk or circuit line screen.
Figure 6-7 : Display Trunk Errors Screen
The system software automatically determines the card configuration of the node and displays the card type in each shelf slot. Each card is shipped with a model and revision number burned into Read-Only Memory to assist in tracking each individual card for inventory purposes.
Each card in a node is periodically tested in a background mode so as not to disrupt normal traffic. A short, automatic self-test is performed to identify card failures and, if the node is equipped with a redundant card set, transfer operation to the alternate card before any downtime is detected. The Display Cards (dspcds) screen, Figure 6-8, shows what cards are equipped and their status: active, failed, or standby (for redundant card sets).
Figure 6-8 : Display Cards Screen
If any card is removed for any reason, including replacement, the node configuration database will remember what type of card was initially installed in each slot to minimize the possibility of installing the wrong card type in a slot.
Additionally, all node power supply voltage outputs are monitored and an alarm is generated if any output fails or if any voltage falls out of tolerance. The status of each power supply in the node is displayed on the Display Power Supply Status (dsppwr) command screen (Figure 6-9).
Each node is cooled by various fan assemblies. In the IPX and IGX cabinets and in the BPX enclosure, there is a temperature sensor that monitors the ambient temperature inside the enclosure. If there should be a failure of one or more of the fans, causing the temperature to rise, an alarm will be generated so the fan or assembly can be replaced before the temperature exceeds the maximum allowed. The cabinet temperature can be observed in the IPX, IGX, and BPX on the dsppwr command screen. In addition, the BPX provides a Display Assembly Modules (dspasm) screen.
Figure 6-9 : Display Power Supply Status Screen
The endpoints and status of each connection that terminates on a node can be displayed using the Display Connections (dspcons) command and associated screen. This lists the connections by number and remote node. It also displays the status, OK or failed, and the Class of Service assigned. If desired, a filter can be applied so that this screen displays only certain types of connections, for example (Options: -v,-d,-a,-atfr,-g,+d,-abit,-fabit,-fail, nodename, -down,start_channel). See Figure 6-10 for an example of a typical Display Connections (dspcons) command screen.
Figure 6-10 : Display Connections Screen
A record of all events is kept in each node as well as in the StrataView Plus NMS. This Event Log is useful in maintaining the network as it lists in chronological order, all network events, and displays the alarm/event category, major, minor, information, etc.
You can use the HP OpenView Event Browers to display a network-wide list of events and alarms or filter the list as desired. Aternatively, the dsplog command can be used at any selected node to observe an event log for that particular node as indicated in Figure 6-11. The node's log database can generally hold events for approximately 30 days after which the most recent log entry replaces the oldest entry.
Figure 6-11 : Event Log Screen for a Node
Display of Network Trunk Loading
IPX/IGX/BPX system software automatically assigns connections to the network trunks as they are added. If there is a choice between several trunks to the same destination, the software will attempt to balance the loading on the trunks. If an attempt to add a connection fails, it often is the result of inadequate bandwidth available for the connection.
Trunk loading on each trunk can be displayed by using the Display Trunk Loading (dspload) command, which displays the loading in both directions of transmission for each of the packet types. This screen is useful for determining the capacity of each trunk to accommodate additional frame relay traffic. Figure 6-12 illustrates a typical trunk loading screen.
Figure 6-12 : Display Trunk Loading
There are a number of manually-initiated tests that can be performed from the NMS console to assist in system troubleshooting. These tests may be included in a job so they can be scheduled to run remotely at a specified time if desired.
There are several user-initiated tests that can be used to diagnose system problems. These tests are self-contained in that they do not require the use of external test equipment. They also do not require the operator to place a loopback at the far end to test both directions of transmission. These tests are listed in Table 6-1.
There are also several display commands that can be used to obtain information that may be helpful in troubleshooting system problems. These are also listed in Table 6-1.
Table 6-1 : System Troubleshooting Commands Available
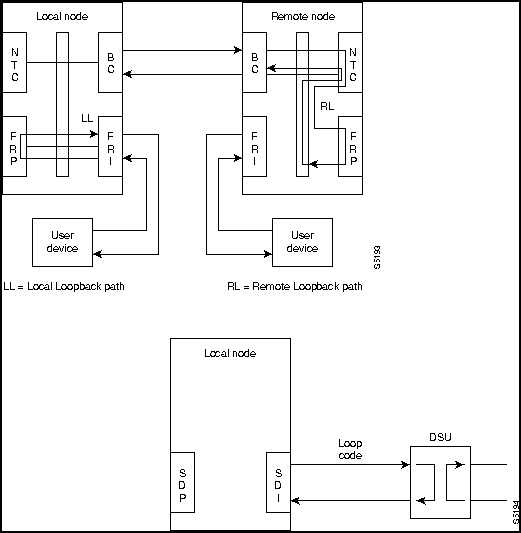
There are also various loopback paths that can be set up to help diagnose transmission problems. They rely on using external test equipment to provide the source of a test signal. The available loopback commands are listed in Table 6-2. Figure 6-13 illustrates the various loopback paths using, in this example, a frame relay card set (FRP/FRI) in an IPX node.
A local loopback path (LL) is set up in the local node at the PAD card (FRP) associated with the port or connection to be tested. A test signal applied to the input passes through the associated Interface Card (FRI), is sent to the Frame Relay PAD card (FRP) over the system bus where it is looped back towards the input. This tests the cabling and the local node processing of the signal.
Table 6-2 : System Loopback Tests
A remote loopback path (RL) is set up in the remote node also at the PAD card (FRP). But, in this case, the signal travels over the network and through the remote node processing equipment but does not include the remote node Interface Card (FRI) or associated cabling. These components would be tested using another local loopback at the remote node.
The external loopback command finds limited use in data applications where an external data interface unit (DSU or CSU) is attached to the local node data interface card, illustrated by the SDI card in Figure 6-13. The local node transmits the appropriate loopback codes out the circuit line towards the external device and then sets up the appropriate loopback path.
Figure 6-13 : Network Loopback Paths System software includes a Test Connection (tstcon) command for testing network connections. This test is initiated by the network operator from the NMS console and can be performed at any time but it momentarily interrupts traffic on the connection during the test. Testing a connection should be performed only when an alarm has been reported from the connection or during off-hours.
Test Connection tests both directions of transmission from end-to-end and displays a pass or fail indication for each connection tested. The test may be specified for a single connection or for a group of connections. The operator may specify a single connection, all connections, all connections of a particular type (voice, data, or frame relay), or a starting and ending connection number.
In addition to testing the connection, the Test Connection routine will attempt to isolate and repair any failure it detects. The controller card at the node where the Test Connection (tstcon) command is issued instructs the service card to build packets containing special test frames. These packets are sent across the network to the terminating node, which depacketizes them, repacketizes the frame, and sends them back to the originating node where the returned frame is analyzed.
If the returned test pattern is incorrect, the system goes into an automatic fault isolation mode. Controllers in the various nodes along the connection route communicate with each other over an overhead message channel separate from the normal circuits.
The test pattern continues to be transmitted and analyzed at each node along the path as it is transmitted and as it is received until the failed network element is identified. Redundant cards may be switched into operation and routing tables in associated network trunk cards may be reprogrammed in an attempt to correct the problem. If all else fails, the suspected path and/or network component is then reported to the network manager (NMS).
External devices connected to network nodes, such as bridges, routers, or sub-rate multiplexers may be accessed through the NMS Window command. This feature provides a direct command line interface to external devices from the NMS console. Depending on the capability of the external device, it is often possible to report status and alarms and to control or configure the device through an RS232 port connection.
Figure 6-14 illustrates a Window display of a router connected to the local node. In this example, the window is used to initiate a ping of the router connection.
Figure 6-14 : NMS Window to a Local Router
StrataView Plus collects network statistical data on the operation of the network and stores them in its database. They are available for display on the StrataView Plus console in either tabular form or as bar charts. Statistics can be a useful source of information for troubleshooting problems that do not necessarily cause a major or minor alarm indication or for locating intermittent failures that may occur at random.
There are four classes of statistics:
Table 6-3 lists the statistics categories and the general nature of the statistics collected in each category. Note this is not a complete list of statistics but merely indicates some of the various conditions monitored. Refer to the StrataView Plus Operators Guide for a complete listing.
Most statistics are collected on-demand and must be enabled by the system operator. The operator can set the collection interval, the sampling times, and the number of collection buckets to tailor the statistics for either long-term network performance evaluation or short term for network troubleshooting.
Table 6-3 : Typical Statistics Collected
Copyright 1988-1996 © Cisco Systems Inc.
![]()

bpxb           VT    YourID:1       BPX 15    8.1.1     Dec. 9 1995  14:34 PST


NodeName    Alarm  Trunk              Trunk              Trunk
bpxa               1.1-1.1/bpxe       6.2-3.2/bpxc       5.1-6.1/bpxb
                   6.1-11.2/bpxd      1.2-5.1/bpxb       1.3-1.3/bpxc
                   5.2-12.2/bpxg
bpxb               6.1-5.1/bpxa       5.1-1.2/bpxa       6.2-3.1/bpxc
                   4.1-4.1/bpxc       4.2-4.2/bpxc       4.3-4.3/bpxc
                   5.3-1.2/bpxe
bpxc               3.2-6.2/bpxa       3.1-6.2/bpxb       2.1-14.1/bpxd
                   2.2-16/ipxb        2.3-14.3/bpxd      1.3-1.3/bpxa
                   4.1-4.1/bpxb       4.2-4.2/bpxb       4.3-4.3/bpxb
bpxd               14.1-2.1/bpxc      14.2-3/ipxa        14.3-2.3/bpxc
                   11.2-6.1/bpxa
bpxe               1.1-1.1/bpxa       1.2-5.3/bpxb       1.3-2.1/bpxf
bpxf        Minor  2.1-1.3/bpxe

This Command: dspnw


Continue?


Next Command:
bpxf           VT    YourID:1       BPX 15    8.1.1     Dec. 9 1995  14:36 PST

Alarm summary   (Configured alarm slots: None)
Connections Failed:       None
Groups Failed:            None
TRK Alarms:               None
Line Alarms:              None
Cards Failed:             None
Slots Alarmed:            None
Missing Cards:            None
Remote Node Alarms:       None
Remote Domain Alarms:     None

Interface Shelf Alarms:   1 Minor
ASM Alarms:               None


Last Command: dspalms
bpxb           VT    YourID:1       BPX 15    8.1.1     Dec. 9 1995  14:44 PST

TRK  Type      Current Line Alarm Status               Other End
 4.1 E3        Clear - OK                              bpxc/4.1
 4.2 E3        Clear - OK                              bpxc/4.2
 4.3 E3        Clear - OK                              bpxc/4.3
 5.1 T3        Clear - OK                              bpxa/1.2
 5.2 T3        Major - Loss of Sig (RED)               axis31(AXIS)
 5.3 T3        Clear - OK                              bpxe/1.2
 6.1 OC3       Clear - OK                              bpxa/5.1
 6.2 OC3       Clear - OK                              bpxc/3.1


Last Command: dsptrks
bpxb           VT    YourID:1       BPX 15    8.1.1     Dec. 9 1995  14:51 PST

Line Type      Current Line Alarm Status
10.1 E3        Clear - OK
10.2 E3        Clear - OK
12.1 T3        Clear - OK
12.2 T3        Major -
13.1 T3        Clear - OK
13.2 T3        Clear - OK
14.1 OC3       Clear - OK
14.2 OC3       Clear - OK


Last Command: dsplns
bpxc           VT    StrataCom       BPX 15    8.1.1     Dec. 9 1995  14:59 PST

Total Errors

      Code    Rx Cell Out of  Loss of Frame   HCS     Tx Cell Cell    Cell
TRK   Errors  Dropped Frames  Signal  BitErrs Errors  Dropped Errors  Oofs
 1.1        0       0       0       0       -       0       0       -       -
 1.3        0       0       0       0       -       0       0       -       -
 2.1        0       0       0       0       -       0       0       -       -
 2.2        0       0       0       0       -       0       0       -       -
 2.3        0       0       0       0       -       0       0       -       -
 3.1        -       0       0       0       -       0       0       -       -
 3.2        -       0       0       0       -       7       0       -       -
 4.1        0       0       0       0       -       0       0       -       -
 4.2        0       0       0       0       -       0       0       -       -
 4.3        0       0       0       0       -       0       0       -       -


Last Command: dsptrkerrs


Next Command:
bpxb           VT    YourID:1       BPX 15    8.1.1     Dec. 9 1995  15:06 PST


   FrontCard    BackCard                    FrontCard    BackCard
   Type   Rev   Type  Rev   Status          Type   Rev   Type  Rev   Status
1  Empty                                 9  Empty
2  Empty                                 10 ASI-E3 JA11  E3-2  BE    Active
3  Empty                                 11 Empty
4  BNI-E3 CD03  E3-3  BE    Active       12 ASI-T3 JA11  T3-2  BE    Active
5  BNI-T3 CB04  T3-3  AA    Active       13 ASI-T3 JX11  T3-2  BE    Active
6  BNI-OC3BHA   MMF-2 AH    Active       14 ASI-OC3BWA   MMF-2 DJ    Active
7  BCC    AVC   LMBCC P01   Standby      15 ASM    ACA   LMASM P01   Active
8  BCC    A0405 LMBCC AC    Active


Last Command: dspcds


Next Command:
bpxb           VT    YourID:1       BPX 15    8.1.1     Dec. 9 1995  15:09 PST

         Power Status                                      Cabinet Temperature

ASM Status: Active                                            31        87

Power voltage A/B:      0 / 48 V                           C  60  |  |  140  F
                                                           e      |  |       a
PSU  Ins Type Rev SerNum Failure                           n  50  |--|  122  h
 A    N  N/A  N/A   N/A    N/A                             t      |  |       r
 B    Y  240V  0C 26229   None                             i  40  |  |  104  e
                                                           g      |  |       n
            Fan Status                                     r  30  |  |  86   h
                                                           a      |  |       e
     FAN   1    2    3                                     d  20  |  |  68   i
         3300 3240 3240 RPM                                e      `--'       t


Last Command: dsppwr


Next Command:
bpxb           VT    YourID:1       BPX 15    8.1.1     Dec. 9 1995  15:17 PST

 Local           Remote      Remote                 Only        Route
 Channel         NodeName    Channel         State  atfr        Avoid COS O
 5.2.6.100       bpxb        13.2.10.1000    Failed cbr
 5.2.6.101       bpxb        13.2.10.1001    Failed abr
 10.1.1.1        bpxa        13.1.1.1        Ok     abr                0  L
 10.1.1.5        bpxb        10.1.1.5        Ok     vbr
 10.1.7.*        bpxd        4.1.7.*         Ok     abr                0  L
 10.1.9.*        bpxa        13.1.9.*        Ok     vbr                0  L
 10.1.10.10      bpxa        13.1.10.10      Ok     cbr                0  L
 10.1.11.*       bpxa        13.1.11.*       Ok     abr                0  L
 10.1.17.200     bpxa        13.1.17.201     Ok     abr                0  L
 10.1.23.102     bpxd        4.1.23.102      Ok     abr-Grp            0  R
 10.1.23.103     bpxd        4.1.23.103      Ok     abr-Grp            0  R
 10.1.23.104     bpxd        4.1.23.104      Ok     abr-Grp            0  R
 10.1.23.105     bpxd        4.1.23.105      Ok     abr-Grp            0  R

This Command: dspcons -atfr


Continue?
bpxa           VT    YourID:1       BPX 15    8.1.1     Dec. 9 1995  15:33 PST

Most recent log entries (most recent at top)
Class  Description                                             Date     Time
Info   User YourID logged in (Virtual Terminal)                12/09/95 15:33:29
Info   User richard logged out (Virtual Terminal)              12/09/95 15:05:55
Info   User richard logged in (Virtual Terminal)               12/09/95 15:05:32
Info   User rachel logged out (Virtual Terminal)               12/09/95 14:57:42
Info   User rachel logged in (Virtual Terminal)                12/09/95 14:57:17
Clear  Communication Break with bpxb Cleared                   12/08/95 16:31:22
Minor  Communication Break with bpxb                           12/08/95 16:31:12
Info   User StrataCom charlie in (Local)                       12/08/95 16:25:14
Info   User StrataCom nancy out (Local)                        12/08/95 16:09:06
Info   User StrataCom evans out (Virtual Terminal)             12/08/95 15:46:15
Info   User StrataCom nancy in (Virtual Terminal)              12/08/95 15:46:04
Info   Clock switch to Line 5.1 of bpxb via TRK 5.1            12/08/95 15:34:59
Clear  TRK 5.1 OK                                              12/08/95 15:34:28

This Command: dsplog


Continue?
bpx1a           VT    YourID:1       BPX 15    8.1.1     Dec. 9 1995  15:38 PST

Trunk loads for node 'bpx1'

     Units     Used          Available     Reserved
TRK  Xmt  Rcv   Xmt    Rcv    Xmt    Rcv    Xmt   Rcv
1.1  Cell Cell  88320  88304   6688   6704   992   992
1.2  Cell Cell  63808  63808  31200  31200   992   992
1.3  Cell Cell      0      0  95008  95008   992   992
5.1  Cell Cell 273008 273008  79200  79200   992   992
5.2  Cell Cell      0      0 352208 352208   992   992
6.1  Cell Cell      0      0 352208 352208   992   992
6.2  Cell Cell 326592 326592  25616  25616   992   992


Last Command: dspload


Next Command:
Command
Description
Test Connection (tstcon)---frame relay
Performs a bi-directional test of the specified frame relay connection or range of connections by inserting an IPX-generated test pattern and comparing the returned pattern with the pattern transmitted. A pass or fail indication appears next to the tested connection in the Display Connections screen.
Test Connection (tstcon)---data
Same as above except for synchronous data connections.
Test Connection (tstcon)---voice
Same as above except for voice connections.
Test Delay (tstdelay)---frame relay
Measures the round-trip delay over the selected frame relay connection.
Test Port (tstport)---frame relay
Tests the operation of the selected frame relay port on the node.
Test Port (tstport)- data
Same as above except for synchronous data ports.
Display Connection States (dspconst)
Displays in real-time the status of all voice connections terminating at a specified node.
Display Breakout Box (dspbob)---frame relay
Displays in real-time the status of data and control leads on selected frame relay connection.
Display Breakout Box (dspbob)---data
Same as above for synchronous data connections.
Display Breakout Box (dspbob)---trunk
Same as above for network subrate trunks.
Display Buses (dspbuses)
Displays the status of the IPX system buses.
Display Slot Errors (dspsloterrs)
Displays any data errors associated with the slots in a BPX node.
Display Slot Alarms (dspslotalms)
Displays any alarms associated with the slots in a BPX node.
Display Trunk Errors (dsptrkerrs)
Displays any data errors associated with the network trunks connected to a node.
Command
Description
Add Local Loopback (addloclp) ---frame relay port
Adds a loopback path at the frame relay port from the transmit side back to the receive side at the local node.
Add Local Loopback (addloclp)---frame relay connection
Does the same as above only for an individual frame relay connection.
Add Local Loopback (addloclp)---data
Adds a loopback path at the synchronous data port from the transmit side back to the receive side at the local node.
Add Local Loopback (addloclp) ---voice
Adds a loopback path for an individual voice channel on a circuit line at the local node.
Add Remote Loopback (addrmtlp)---frame relay port
Adds a loopback path at the frame relay port from the transmit side back to the receive side at the remote node.
Add Remote Loopback (addrmtlp)---frame relay connection
Does the same as above only for an individual frame relay connection.
Add Remote Loopback (addrmtlp)---data
Adds a loopback path at the synchronous data port from the transmit side back to the receive side at the remote node.
Add Remote Loopback (addrmtlp) ---voice
Adds a loopback path for an individual voice channel on a circuit line at the remote node.
Add External Loopback (addextlp)---data
Activates a near end or far end loopback on an external device, such as a DSU, connected to a synchronous data port.
Protocol [ip]:

Target IP address:  192.9.202.1

Repeat count [5]:
Datagram size [100]:

Timeout in seconds [2]:


Extended commands [n]:

Type escape sequence to abort. ^^

Sending 5, 100-byte ICMP Echos to 192.9.202.1, timeout is 2 seconds:

. . . . .

Success rate is 100 percent
Statistics Category
Types of Statistics
Trunk statistics
Various trunk errors, bipolar violations, frame bit errors, loss of signal, etc.
Packet errors and out of frame.
FastPackets and ATM cells of various types transmitted/dropped.
Transmitted ATM cell counts.
Received ATM cell counts.
Cells with CLP and EFCN set.
ATM header error counts
DS3 PLCP error counts.
Bdata queue dropped cells.
Line statistics
Various circuit line errors, bipolar violations, frame bit errors, loss of signal, etc.
Connection statistics
Packets transmitted and received.
Transmitted and received data bytes.
Frame relay frames transmitted/discarded.
Frames transmitted with FECN or BECN or DE set.
Packets with CLP bit set dropped.
Seconds in service.
Frame Relay Port
Frames transmitted and received.
Bytes transmitted and received.
Frames received with CRC or other errors
Frames discarded at the connection ingress
Frames discarded at the connection egress
Frames discarded at the port egress
LMI messages sent or dropped for various errors.
DE frames dropped.
![]()
![]()
![]()
![]()
![]()
![]()
![]()
![]()