|
|

This chapter describes Cisco ConnectPro simple and advanced windows. Cisco ConnectPro provides configuration schemes for both nontechnical and advanced users. With Cisco ConnectPro you can choose between simple (a subset of all possible dialog boxes) and advanced windows. You can use the Cisco ConnectPro simple windows to configure bridging to allow your router to make a call. Use Cisco ConnectPro advanced windows to add advanced functionality such as Internet Protocol (IP) and Internetwork Packet Exchange (IPX) routing.
Throughout this guide you will find references that match the Cisco ConnectPro window fields to their respective software commands, which are listed in the Cisco 750 Series and Cisco 760 Series Command Reference. Use the command reference manual to obtain detailed information on any Cisco ConnectPro parameter.
After you log in to Cisco ConnectPro, you will create a simple user profile. A user profile is a set of software configurations customized for and associated with a specific remote site. Profiles are saved and stored in your router's nonvolatile memory.
You can use profiles to create a different set of configurations, such as filters, called numbers, demand thresholds, line timeouts, passwords, and receive numbers for individual remote sites. Profiles enable your router to make on-demand calls to various numbers, based on demand filters that are customized for each called remote site.
With Cisco ConnectPro you can enter parameters at both the system and profile levels.
System parameters are parameters that are configured for the entire router, and they are independent of profiles. System parameters can be changed only at the system level. They cannot be modified on a per-profile basis.
Profile parameters are parameters that can be configured on a per-profile basis. They apply to the particular connection associated with an individual remote site. Create a profile and then redefine the individual parameters within that profile.
Simple Cisco ConnectPro Profile
The Simple Cisco ConnectPro profile is the name of the profile created when you first logged in to Cisco ConnectPro. The Simple Cisco ConnectPro profile consists of all the profile parameters at the default level. All profiles are based on values inherited from the system level. Therefore, if most of your profiles will share many of the same profile parameter values, set those values at the system level. This creates a customized template for your profiles. All new profiles will inherit all values from this template.
After you have customized the system profile, you can create individual profiles by redefining system parameters at the profile level. This affects only that specific profile. The system level profile remains the same.
You are not required to redefine all parameters for every profile. Parameters not redefined at the profile level are inherited from the system-level template.
Cisco ConnectPro provides two types of interfaces: a simple interface for quick configuration of bridging, and a full interface to configure advanced functions such as IP and IPX routing.
To quickly configure bridging functions by using Cisco ConnectPro, do the following:
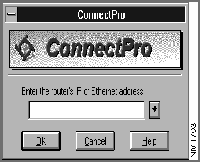
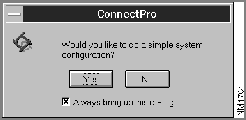
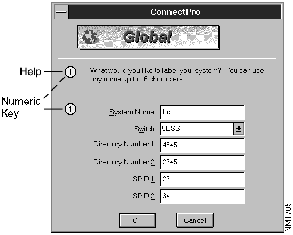
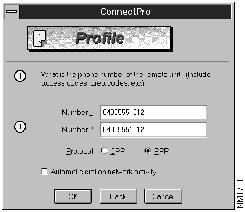
Figure 3-1 : Login Dialog Box Figure 3-2 : Simple System Configuration Dialog Box Figure 3-3 : Global Configuration Dialog Box Figure 3-4 : Profile Configuration Dialog Box Table 3-1 : Automatic Dialing
The Simplified Configuration menu is displayed. (See Figure 3-5.)
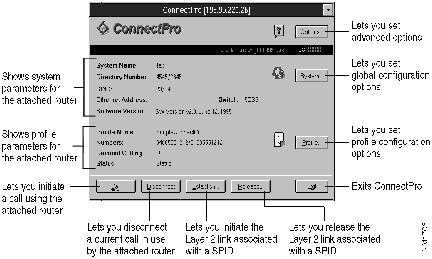
Figure 3-5 : Simplified Configuration Menu The simplified menu provides buttons that you can use to further configure your router. (See Figure 3-6.)
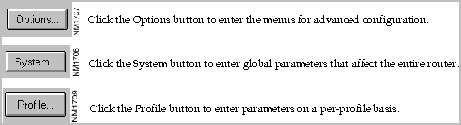
Figure 3-6 : Options, System, and Profile Buttons Dialog Box To configure your router, use the System button and follow the procedures in the Global Configuration dialog box.
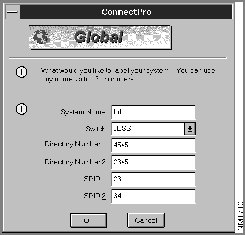
Using the System button, you can quickly configure your router for operation. In the Global Configuration dialog box enter the router's name, switch type, and SPIDs (if required). Use the Tab key to move to the next field. As you move to the next field, the circled number changes chronologically, providing help dialog boxes for system setup.
Figure 3-7 : Global Configuration Dialog Box Configuring Your Simple Cisco ConnectPro Profile
Using the Profile button, you can configure a Simple Cisco ConnectPro profile.
To set up the Simple Cisco ConnectPro profile, choose Profile from the simplified menu. The Profile Configuration dialog box is displayed. (See Figure 3-8.)
Figure 3-8 : Profile Configuration Dialog Box Enter the appropriate information into the Profile Configuration dialog box. For information about each field, see Step 8 in "Creating Configurations," which appears earlier in this chapter. Table 3-1, in the same section, summarizes the conditions set by the Automatic Dial check box.
The Cisco ConnectPro Options button provides an advanced menu so that you can view dialog boxes on all possible static and dynamic values used by a router.
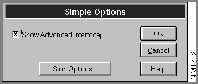
To view the Simple options, do the following:
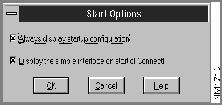
Figure 3-9 : Simple Options Dialog Box Figure 3-10 : Start Options Dialog Box The Cisco ConnectPro advanced menu provides access to all of the Cisco ConnectPro
Table 3-2 : Cisco ConnectPro Advanced Menu
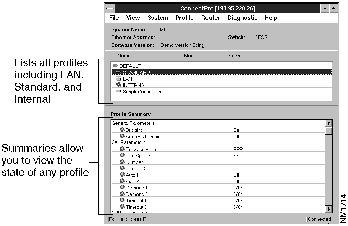
The Cisco ConnectPro advanced menu provides profile summaries for any profile, including the default LAN, internal, and standard profiles. The Cisco ConnectPro Advanced Menu dialog box is shown in Figure 3-11.
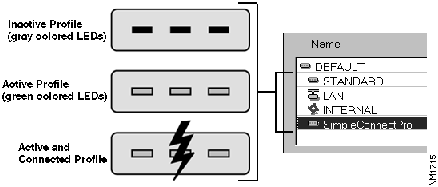
Figure 3-11 : Advanced Menu Dialog Box Profile icons on the advanced menu convey the state of the profile. (See Figure 3-12.)
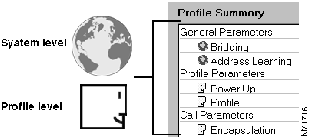
Figure 3-12 : Profile Icons on the Advanced Menu The Profile Summary section enables you to view both system-level and profile-level parameters for any setting. (See Figure 3-13.) Click the level graphic of any parameter to toggle between its system-level and profile-level values.
Figure 3-13 : Profile Summary Dialog Box You can use Cisco ConnectPro to customize any router to fit the requirements of your current task. As your needs change, you can modify any of the Cisco ConnectPro dialog boxes to accommodate your new requirements.
Using commands from the advanced menu, you can further configure your router. Table 3-3 summarizes some actions you can take using the Cisco ConnectPro advanced menu.
Table 3-3 : Advanced Configurations
Copyright 1988-1996 © Cisco Systems Inc.
your router
Set to On
Set to Off
Result
Set Auto Port 1|2 to On
Set Auto Port 1|2 to Off
Based on demand parameters you set using the link command, calls are initiated on each link when specified packet statistics are met.
Demand threshold
Port 1
Port 2 = 48 kbps
Demand threshold
Port 1 = 48 kbps
Port 2 = 0
Specifies the data rate at which the router will make a call. This data rate must exist for the length of time specified in the parameter. The range is 0--128 kbps.
Demand duration
Port 1 = 1 sec.
Port 2 = 1 sec.
Demand duration
Port 1 = 1 sec.
Port 2
Specifies the length of time that the traffic is to be above the threshold before a call is made. The range is 1--255 seconds.
Demand source
Port 1 = LAN
Port 2 = Both
Demand source
Port 1= Both
Port 2
Specifies the source of the traffic when measuring the threshold.
Timeout threshold
Port 1
Port 2 = 48
Timeout threshold
Port 1 = 48
Port 2
Rate (kbps) of traffic below which the call is to be connected.
Timeout duration = Off
Timeout duration
Port 1 = Off
Port 2
Length of time (in seconds) that the traffic is to be below the threshold when the call is disconnected.
Timeout source
Port 1 = LAN
Port 2 = Both
Timeout source
Port 1 = Both
Port 2
See "Demand source."
Set Profile PowerUp value to Active
Set Profile PowerUp value to Inactive
Determines whether profile is made active when router is powered up.
Set Profile PowerUp value to Disconnect Keep
Set Profile PowerUp value to Disconnect Keep
Determines whether profile remains active and connection virtual after physical disconnection.

configuration information.
configuration functions. Table 3-2 summarizes the Cisco ConnectPro advanced menu.
To Do the Following
Choose This Menu
Access items that perform basic operations such as starting Cisco ConnectPro or opening a configuration file. You can also use the File menu to download software configurations to a file you specify.
File
Access items to view current configurations, including IP and IPX routing configurations.
View
Access items to establish system-level parameters.
System
Access items to establish profile-level parameters.
Profile
Access items to initiate or disconnect a call, establish or release a SPID, or reset or reboot your router.
Router
Access items to test the LAN and WAN connections.
Diagnostic
used to provide the appropriate configuration and security measures for
unknown callers.
To Do the Following
Choose
From
Open a Cisco ConnectPro configuration file
Open File
File menu
Log in to attached router
Login
File menu
Log out of attached router
Logout
File menu
Save current file
Save To File
File menu
Save current file to specified location while retaining current file
Save To File As
File menu
Send configuration file to attached router
Send to Access Unit
File menu
Download new versions of Access Unit software
Download Software
File menu
Initiate the Cisco ConnectPro advanced menu
Options
File menu
Exit from Cisco ConnectPro
Exit
File menu
Toggle the Cisco ConnectPro status bar
Status Bar
View menu
Display the Cisco ConnectPro simple menus
Simple
View menu
Display known Ethernet addresses
Addresses
View menu
Display all current connections
Connections
View menu
Display a log of the Cisco ConnectPro call activities
Logs
View menu
Display packet count statistics
Packet Summary
View menu
Display negotiation parameter
Negotiation
View menu
Display the current status of ISDN links
Status
View menu
Display static and dynamic IP routes for all active profiles
IP Routes
View menu
Display IPX connection information
IPX Connections
View menu
Display IPX Routing Information Protocol (RIP)/Service Advertising Protocol (SAP) statistics
IPX Demand
View menu
Display the current routing table
IPX Routes
View menu
Display static SAP entries
IPX Services
View menu
Display IPX, RIP, and SAP statistic summaries
IPX Statistics
View menu
Enter system parameters that globally affect the router
Global
System menu
Enter general parameters that globally affect the router
General
System menu
Turn Unicast bridge filtering on or off and set the LAN and WAN filtering modes
Bridge Filter
System menu
Define or modify various bridging filters
Bridge Filter Lists
System menu
Set global parameters that affect the router when using Combinet Packet Protocol (CPP)
CPP
System menu
Set global security parameters that affect the router when using CPP
CPP Security
System menu
Set global parameters that affect the router when using the Point-To-Point Protocol (PPP)
PPP
System menu
Set security parameters that globally affect the router when using PPP protocol
PPP Security
System menu
Provide parameters that control automatic dialing and disconnection of the router's links
Link
System menu
Set SNMP parameters that globally affect the router when using SNMP
SNMP
System menu
Enter parameters that affect the router on a per-profile basis
General
Profile menu
Define or modify various filters on a per-profile basis
Filter Lists
Profile menu
Define CPP compression and protocol
CPP
Profile menu
Define security parameters for the profile when using CPP
CPP Security
Profile menu
Define security parameters for the profile when using PPP
PPP Security
Profile menu
Define parameters that control automatic dialing and disconnection of the router's links on a per-profile basis
Link
Profile menu
Define IP routing on a per-profile basis
IP
Profile menu
Set up or modify static IP routes and IP filters on a per-profile basis
IP Lists
Profile menu
Specify support for IPX routing on a per-profile basis
IPX
Profile menu
Define or modify static IPX routes and IPX filters on a per-profile basis
IPX Lists
Profile menu
Set the active status on the selected inactive profile
Active
Profile menu
Initiate a call on the specified link using a specified phone number
Call
Router menu
Terminate any currently connected call
Disconnect
Router menu
Initialize the Layer 2 link of a SPID
Establish
Router menu
Release the Layer 2 link of a SPID
Release
Router menu
Set all variable parameters to their default values
Reset System
Router menu
Perform a software reset of the router
Reboot System
Router menu
Perform a test of the LAN connection
Packet Test
Diagnostic menu
Perform a test of the ISDN links
Packet Test
Diagnostic menu
Ping (contact) the specified IP address
Ping
Diagnostic menu
![]()
![]()
![]()
![]()
![]()
![]()
![]()
![]()