|
|

This chapter provides procedures for installing a LightStream 2020 multiservice ATM switch (LS2020 switch) in a networking environment. Installing an LS2020 switch involves several tasks in two major categories:
Unpacking and Inspecting the LS2020 Switch Hardware
When unpacking the LightStream 2020 switch, you should inspect the shipping container contents to ensure the shipment is complete as well as check for damage that may have occurred during shipment.
Installing an LS2020 Switch in Rack
This section explains how to mount an LS2020 chassis in an equipment rack.
Cooling Air and Hardware Placement
An LS2020 chassis takes in cooling air at the bottom of the front panel and exhausts it at the top rear and right side of the chassis. (The air vents on the right side of the chassis can safely be covered by the rack side panels, but they should not otherwise be blocked.) To minimize the potential for thermal problems, position the LS2020 chassis so that
Ensure that you have the following items on hand before you begin installing the LS2020 switch:
To mount the LS2020 switch in an equipment rack, perform the following steps:
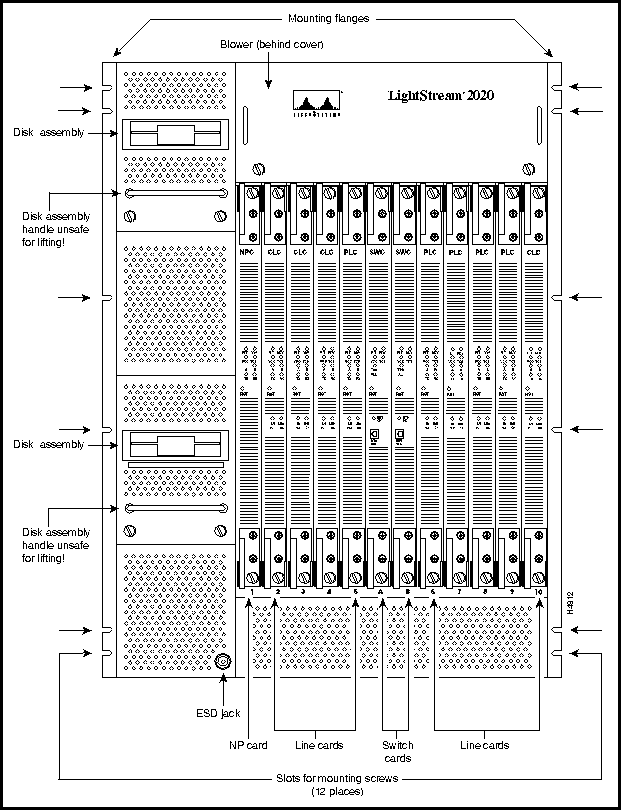
Figure 2-1 : Front View of LightStream 2020 Chassis
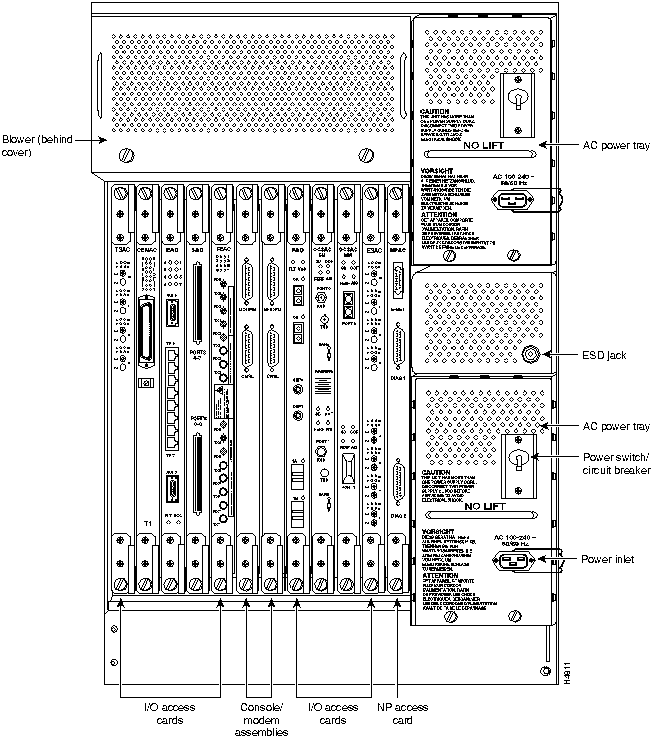
Figure 2-2 : Rear View of AC-powered LightStream 2020 Chassis
The procedure in this section explains how to wire a DC-powered LS2020 switch to a DC power source. This task should be performed only by qualified service personnel or a licensed electrician.
This section applies only to systems with the DC power option. If you have a standard AC-powered system, skip to the section "Installing Fantails."
For general information on DC-powered LS2020 systems, see the LightStream 2020 Hardware Reference and Troubleshooting Guide. For power specifications, see the LightStream 2020 Site Planning and Cabling Guide.
Note the following in preparation for wiring a DC-powered LS2020 switch:
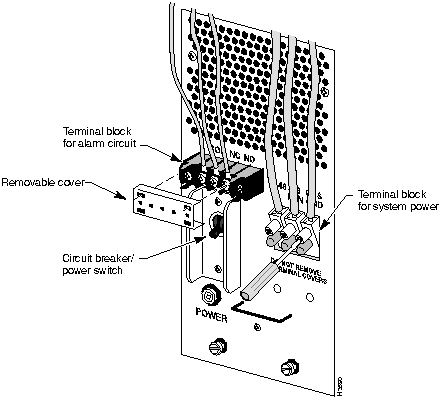
Figure 2-3 : Connections to DC-powered Chassis
To wire a DC-powered LS2020 switch to a DC power source, perform the following steps:
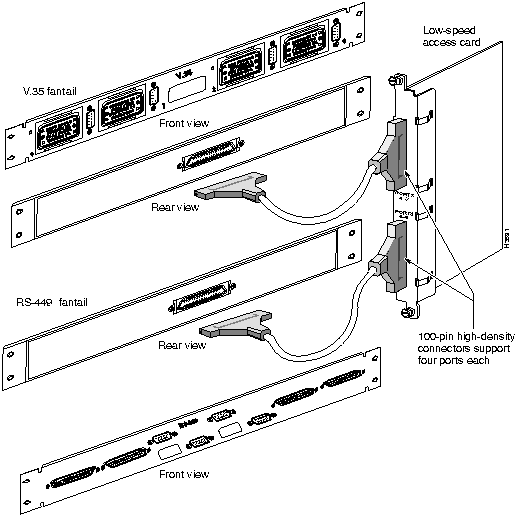
This section explains how to mount and connect fantails in your LS2020 switch (see Figure 2-4). Fantails provide connectors for data cables on low-speed (V.35, X.21 and EIA/TIA-449) lines and T3 lines that are attached to cell line card/T3 access cards in an LS2020 switch.
If your system has no low-speed or cell line card/T3 modules, skip to the section "Attaching Data Cables."
Obtain the following equipment and tools in preparation for installing fantails:
Figure 2-4 : Fantail Cable Connections
Fantail Installation Procedure
To install fantails in your LS2020 switch, perform the following steps:
To connect cables to your LS2020 switch, perform the following steps:
Before applying system power, check the front and back of the system to ensure that all boards, disks, blowers, bulkheads, filler panels, and covers are in place and secured firmly to the chassis frame. When in place, these items form an enclosure that serves three important functions:
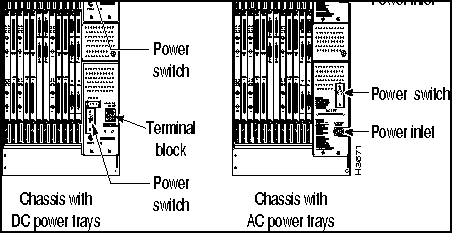
You can power your LS2020 switch with either an AC or a DC power tray. In addition, you can equip your LS2020 switch with an optional (redundant) power tray of like type (see Figure 2-5).
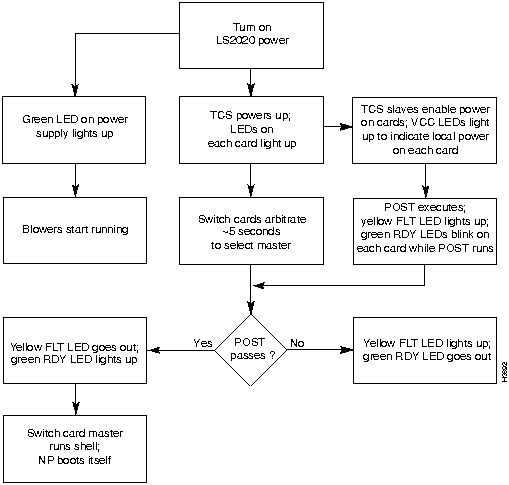
To power up an LS2020 switch, perform the following steps:
Figure 2-5 : LightStream 2020 AC and DC Power Trays
Figure 2-6 : LightStream 2020 Power-up Sequence You should install a modem for each switch card in the LS2020 chassis. In the event that an operational problem causes a node to be isolated from the rest of the network, the modem may be the only means available for communicating with that node.
The modem connects to the modem port on the modem/console assembly bulkhead at the back of the LS2020 chassis, using the modem cable described in the LightStream 2020 Site Planning and Cabling Guide.
A modem attached to an LS2020 node must be a V.42 Hayes-compatible unit capable of operating at 2400 baud. The following modems are compatible with the LS2020 switch:
For information on the default modem port settings and how to change them, see the LightStream 2020 Network Operations Guide.
Basic LS2020 Configuration Tasks
This section explains how to enter basic configuration information for your LS2020 chassis in order to make it operable in your networking environment and manageable from your NMS. You must perform these procedures for the NP card(s) in your LS2020 chassis.
Required Configuration Information
You need to have the following information available before beginning the basic configuration procedures:
You must create a password for each of the four default login accounts on the LS2020 switch: root, oper, npadmin, and fldsup. See the LightStream 2020 Network Operations Guide for more information about default login accounts.
A password must be at least six characters in length. It can be as long as you wish, but only the first eight characters are used. Any combination of characters is acceptable, including spaces.
You must assign a unique host name to each LS2020 node. Typically, a name can be chosen to reflect the node's geographic location (for example, Tokyo2) or its function within an organization (for example, mfg3).
The name may consist of any combination of letters and numbers up to 32 characters, but it must not begin with a number. Thus, Pensacola23 is a valid host name, but 23Pensacola is not; similarly, Pensacola.23 is not a valid name, since it contains a character other than a letter or number.
For each LS2020 node, you must provide from one to four IP addresses and associated network masks, as described below:
Network management can also be accomplished by means of an Ethernet LAN connected to an ordinary Ethernet data port (that is, an Ethernet access card port) on the LS2020 node. The NMS, however, must be attached directly to that Ethernet LAN. In this case, do not configure the NP's Ethernet address or default router address. Furthermore, in the current release, to provide access control over Ethernet ports that can be used by an NMS, a port configuration parameter has been added which allows you to specify whether IP traffic destined for an NP is forwarded or blocked. This configuration parameter, lsLanPortNPTrafficFilter, determines whether or not inbound frames received on an Ethernet port are delivered to any NP in the network. The default value of this parameter for all access card Ethernet LAN ports is to block IP traffic to an NP. Therefore, you must explicitly set this parameter, on a port-by-port basis, to forward traffic to an NP. The Ethernet ports on the NP access cards remain unaffected in the current release, that is, these ports always pass IP traffic to the NP.
For detailed information about configuring Ethernet port attributes, see the LightStream 2020 Configuration Guide. For detailed information about IP addresses, subnet masks, and network classes, see the LightStream 2020 Site Planning and Cabling Guide.
For each trunk port that you configure, the following information is required:
For more information about trunk port configuration, refer to the LightStream 2020 Configuration Guide.
Attaching a Terminal to a Console Port
This section explains how to attach a VT100 terminal (or equivalent) to the console port of a
Prior to Release 2.1 of the LS2020 platform software, the TCS hub code for a Release 2 switch card (SC2) supported baud rate selection for both the console and modem ports through what was called the "BREAK" detection mechanism (also referred to as the "auto-baud" or "pseudo-auto-baud" mechanism). Use of this mechanism, which involved multiple activations of the Break key for baud rate selection, is no longer supported. Under this previous scheme, the midplane EEPROM locations used to maintain the console and modem port baud rates were "reserved" and, hence, not initialized with appropriate default values.
Now, when new TCS hub code is installed in a Release 2 switch card that has not had these "reserved" locations initialized, the new code evaluates the contents of these EEPROM locations and initializes them, if required, with appropriate default values. See the section below entitled "Setting Console/Modem Baud Rates through TCS Hub Commands" for these default values and the order of precedence for other possible baud rates for the console and modem ports.
Setting Console/Modem Baud Rates through TCS Hub Commands
To detect and set baud rates for the console and modem ports for Release 2 switch cards, you use the TCS hub show and set commands, respectively. These commands interpret and manipulate the contents of specific fields in the midplane EEPROM used for storing initialized baud rates for the console and modem ports.
The general form of the TCS hub show command for baud rate detection is outlined below:
where:
The general form of the TCS hub set command for baud rate selection is outlined below:
where:
For the Modem Port:
The following is the order of precedence of the baud rate for the modem port on a Release 2 switch card:
For the Console Port:
The following is the order of precedence of the baud rate for the console port on a Release 2 switch card:
Changing Modem Port Baud Rate if Modem Connection Cannot Be Established
If the modem port on a Release 2 switch card (SC2) is initialized with a baud rate other than that with which the modem can operate, you can change the modem port baud rate through either of two methods, whichever is appropriate for your LS2020 configuration:
Method 1
If you have access to the local console, perform the following procedure to match the modem port baud rate:
Method 2
If you do not have access to the local console, but you can dial into the LS2020 chassis by means of a switch card, perform the following procedure to match the baud rate of the desired modem port:
Attaching a Terminal and Matching the Baud Rate
Figure 5-2 in Chapter 5, "Additional Components" illustrates the console/ modem assembly for a switch card. This assembly is inserted in the access (rear) side of the LS2020 chassis opposite a corresponding switch card. This assembly provides the means for attaching a terminal or a modem to your LS2020 switch.
To attach the terminal cable to the console port and to match the terminal and the console port baud rates, perform the following procedure:
Connecting the Terminal to the NP
To connect a terminal to the NP in your LS2020 switch, perform the procedure below. For simplicity, this procedure assumes that you are using the NP in slot 1.
The screen displays for the boot sequence then continue as shown in Step 1 in the section "Entering Configuration Data" later in this chapter. However, before proceeding with the entry of required configuration data, note the following special consideration about running configuration scripts.
Special Consideration: Running Scripts Separately
When you enter configuration data, two scripts are invoked automatically that prompt you for basic configuration information (see bullets below). If you make a mistake entering information in response to script prompts, you can run the scripts again separately. To do so, enter the name of the script you want to run at the bash# (root) prompt or the single-user ($) prompt.
When you run these scripts from the command line, they behave very much as they do in the scripted configuration procedure. However, one difference to note is that the setsnmpconfig command checks for the presence of configuration files. (Normally, these files are not present during a typical installation of a new LS2020 switch.) If the system finds such files, it asks if you want to continue, as shown below:
If configuration files are present and you choose not to overwrite them, the setsnmpconfig script cannot continue. Instead, the script exits and returns you to the command line.
If configuration files are not present, or if they are present and you choose to overwrite them, a script prompts you to enter network configuration information, as outlined in the following section, "Entering Configuration Data."
In this procedure, a script prompts you to enter basis LS2020 configuration information. In performing this procedure, it is assumed that you have already initiated the boot sequence, as previously described in the section "Connecting the Terminal to the NP."
Upon completion of the basic configuration procedures for the NP(s) in your LS2020 chassis, continue as described in the following section, "How to Proceed."
This section describes actions you should take after installing a new LS2020 switch.
To ensure that the newly installed LS2020 switch is working properly, run the hardware diagnostics described in the LightStream 2020 Hardware Reference & Troubleshooting Guide.
Keep a maintenance log for each LS2020 switch in your network. At a minimum, you should record the following information:
You are also advised to record any unusual LS2020 behavior. The maintenance log can be highly useful in identifying and correcting chronic or intermittent LS2020 operational problems.
Installing StreamView Network Management Software
You must install the CLI, the StreamView configurator, monitor , and topology map modules , and the private MIB database on the NMS that you will be using to manage your LS2020 network. The chapter "Installing Network Management Software Applications" presents the necessart procedures for installing the network management software.
Setting Up Network Environment
The chapter "Setup Procedures" presents procedures and options that enable you to tailor your network environment to your particular operating requirements. For example, you can enable the security mechanism that prevents unauthorized network access. Also, you can change operational parameters, such as the default SNMP community name(s) and the default trap delivery address(es).
You should read the chapter "Setup Procedures" and perform any applicable procedures therein before activating your LS2020 switch in the network.
The StreamView LS2020 configurator is used to create a global configuration database for your LS2020 network and to load appropriate configuration information into each LS2020 switch in the network.
For detailed information about these high-level procedures, see the LightStream 2020 Configuration Guide.
Backing Up Distribution Diskettes
By default, LS2020 chassis (platform) software is installed at the factory on the hard disk prior to shipment of the unit to a customer site. However, if you come into possession of distribution diskettes for a new LS2020 software release and you are concerned about how carefully they may be handled and stored, you should back them up before proceeding with any new software installation.
In the following procedures, it is assumed that you have access to a PC running DOS 5.0 (or later) and which supports at least one 1.44 MB floppy disk drive. It is also assumed that you have a supply of at least 15 blank, DOS-formatted 1.44 MB diskettes.
If Your PC Has Two 1.44-MB Floppy Disk Drives
To back up each LS2020 software distribution diskette, perform the following steps:
If Your PC Has One 1.44-MB Floppy Disk Drive
To copy each LS2020 software distribution diskette, perform the following steps:
Copyright 1988-1996 © Cisco Systems Inc.
![]()
![]()
![]()
![]()
(0 -- 450 feet or 450 -- 900 feet), and the cell payload scrambling mode (enabled or disabled).
Release 2 switch card and how to match the baud rate between them.
TCS hub<<A or B>>
show <sa | sb> <console | modem> baudrate
TCS hub<<A or B>>
Is the TCS hub prompt for the switch card (either switch card A or B, as appropriate)
show
Is the command that operates in conjunction with command arguments to display the baud rate for the specified switch and the specified port
<sa | sb>
Denotes that the
show
command is to apply to switch card A or B, whichever is specified
<console | modem>
Denotes that the
show
command is to apply to the console port or the modem port, whichever is specified
baudrate
Displays the baud rate for the specified port
TCS hub<<A or B>>
set <sa | sb> <console | modem> baudrate <rate>
TCS hub<<A or B>>
Is the TCS hub prompt for the switch card (either switch card A or B, as appropriate)
set
Is the command that operates in conjunction with command arguments to set the baud rate for the specified switch and the specified port
<sa | sb>
Denotes that the
set
command is to apply to switch card A or B, whichever is specified
<console | modem>
Denotes that the
set
command is to apply to the console port or the modem port, whichever is specified
baudrate
Indicates that the
set
command is to set the baud rate for the specified port
<rate>
Defines the actual baud rate for the specified port
init
command.
set
command from the console:
set {
sa |
sb}
modem baudrate {
2400 |
9600}
{sa | sb}
represents either Release 2 switch card A or B, as appropriate, and
{2400 | 9600}
represents the available choices in matching the modem port baud rate.
init
command at the TCS hub prompt:
init {
sa |
sb}
modem
This command initializes the modem port on the specified switch card with the selected baud rate.
set
command at the TCS hub prompt:
set {
sa |
sb}
modem baudrate {
2400 |
9600}
sb
in the
set
command; if you have dialed into the chassis through switch card B, specify
sa
in the
set
command. Finally, specify the desired baud rate for the modem port.
init
command at the TCS hub prompt:
init {
sa |
sb}
modem
TCS hub<<A or B>>
prompt appears, or if some other prompt appears (see the note below), after you press Return, the prompt signifies agreement between the terminal baud rate and the console port baud rate and indicates that the terminal is properly attached.
TCS hub<<A or B>>
prompt, depending on the card to which a connection exists. For example, if you had previously established a connection to an NP card via the TCS connect command, the system would respond with the bash (
#
) prompt, rather than the
TCS hub<<A or B>>
prompt. The appearance of any valid system prompt on the terminal screen after
Return key activation signifies baud rate agreement.
`
. (back quote plus dot, that is, left single quote plus period) at the terminal keyboard and press Return. This action breaks the connection which may exist between the switch card and any nonoperational or missing card.
Return key activation, a baud rate mismatch still exists and you must continue with Step 4.
on the terminal keyboard.
set <switch slot> console baudrate <rate>
command to set the baud rate of the console port to agree with that of the terminal you are attempting to attach.
set <"other" switch slot> console baudrate <rate>
command to set the console port baud rate for the "other" switch card to agree with the baud rate of the terminal you are attempting to attach.
TCS hub<<A>>
reset 1
TCS hub<<A>>
connect 1
System will boot in 5 seconds: hit <RETURN> to interrupt.

System will boot in 4 seconds: hit <RETURN> to interrupt.

System will boot in 3 seconds: hit <RETURN> to interrupt.

System will boot in 2 seconds: hit <RETURN> to interrupt.

System will boot in 1 seconds: hit <RETURN> to interrupt.
Configuration information already exists. If you continue, the configuration
information on this network node will be destroyed by overwriting the
following files:

   /usr/app/base/config/configure.netdb

   /usr/app/base/config/mma.db.dir

   /usr/app/base/config/mma.db.pag

Continue? (y/n) [n]
![]()
**** LynxOS is down ****

***booting: drive:0, partition:0, kernel:"lynx.os", flags:0x4308

Resetting SCSI bus

Kernel linked for 0xea010000

LOAD AT 0x10000

        471040+40960+136260[61824+50608]

TOTAL SIZE: 745080 at 0x1001c

START AT 0x10020

NP memory size: 32 MB

ILACC: EEPROM enet addr:8:0:8:0:14:25, Silicon Rev:0x5, IB:0xea146620

virtual console: IB: 0xea139d20

NCR 53C710: Chip Revision: 0x2, IB: 0xec13d000


LynxOS/68040-MVME167 Version 2.2.1

Copyright 1992 Lynx Real-Time Systems Inc.

All rights reserved.


LynxOS release 2.2.1, level 1: NP-LynxOS #57: compiled Mar 05 1996 12:38:19


LynxOS Startup: ma


fsck /dev/sd0a

(all sizes and block numbers in decimal)

(file system creation time is Tue Mar 5 20:07:12 1996)

checking used files

recovering orphaned files

making free block list

making free inode list

43967 free blocks 3343 free inodes


fsck /dev/sd0b

(all sizes and block numbers in decimal)

(file system creation time is Tue Mar 5 20:07:33 1996)

checking used files

recovering orphaned files

making free block list

making free inode list

54194 free blocks 3633 free inodes


fsck /dev/sd0c

(all sizes and block numbers in decimal)

(file system creation time is Tue Mar 5 20:07:53 1996)

checking used files

recovering orphaned files

making free block list

making free inode list

49658 free blocks 3698 free inodes


fsck /dev/sd0d

(all sizes and block numbers in decimal)

(file system creation time is Tue Mar 5 20:08:11 1996)

checking used files

recovering orphaned files

making free block list

making free inode list

69884 free blocks 4434 free inodes


mounting all filesystems

Starting VM System ... Virtual Memory Engaged!
The timezone information for this system has not been configured!

Set the daylight savings and time zone information? (y/n) [y]
y


Set the daylight savings method to one of the following values:

     0 (no daylight savings)

     1 (USA)

     2 (Australia)

     3 (East Europe)

     4 (Central Europe)

     5 (Western Europe)

  Daylight savings method:
1
Set the timezone by specifying the number of minutes west of Greenwich

  Examples:

     300 (US Eastern Time)

     360 (US Central Time)

     420 (US Mountain Time)

     480 (US Pacific Time)

  Minutes west of Greenwich, England:
300


At the prompt, enter a new date or press <RETURN> to continue.


  The date is set to Tue Mar 5 16:04:57 EDT 1996

  Enter date (yymmddhhmm[.ss]:
9305041607


At the prompt, enter a new date or press <RETURN> to continue.

  The date is set to Tue Mar 5 16:07:00 EDT 1996

  Enter date (yymmddhhmm[.ss]:
Return
Enter date
prompt confirms the initial date entry.)
The following accounts do not have passwords:

   root fldsup npadmin oper


Install a password on the root account? (y/n) [y]
y

Enter new password:

Retype new password:


Install a password on the fldsup account? (y/n) [y]
y

Enter new password:

Retype new password:


Install a password on the npadmin account? (y/n) [y]
y

Enter new password:

Retype new password:


Install a password on the oper account? (y/n) [y]
y

Enter new password:

Retype new password:
Host Name
and the IP addresses shown in bold typeface in the script below are for illustrative purposes only; you must supply an actual name and real IP addresses in these fields.
The minimum network management information has not been configured!
Create a minimal network management configuration? (y/n) [y]
y


Specify the host name for this network node.
Host name:
LightStream1


You must allocate a subnetwork address for the internal network that connects all network processors in your network. Configure the Chassis Primary (Active) IP address for use within that subnet.
Chassis Primary (Active) IP Address [a.b.c.d]:
192.1.1.11


Configure the IP subnet mask for the internal network that connects all network processors in your network.
Chassis Subnet Mask [a.b.c.d]:
255.255.255.0
Does the chassis contain redundant network processors (Y/N)? [N]
N
Y
to this query, proceed to Step 5. Otherwise, continue with the configuration script as follows:
Your system may be attached to an external Ethernet LAN by means of the on-board Ethernet LAN interface on the network processor.
If the network processor is attached to an Ethernet LAN, you will be asked to provide the IP address and IP subnet mask of the network processor's on-board Ethernet LAN interface.
Is the network processor attached to an Ethernet LAN (Y/N)? [N} Y
Configure the IP address for the network processor's Ethernet LAN interface.
Network Processor Ethernet IP Address [a.b.c.d]: 197.112.23.11
Configure the IP subnet mask for the network processor's Ethernet LAN interface.
Network Processor Ethernet IP Mask [a.b.c.d]: 255.255.255.0
Is there an IP router on the attached Ethernet LAN (Y/Y)? [N] Y
Configure the Default IP router on the network processor's Ethernet LAN interface.
Network Processor Ethernet Default IP Router [a.b.c.d]:
197.112.23.1
CHASSIS INFORMATION
Host Name:
LightStream1
Chassis Primary (Active) IP Address:
192.1.1.11
Chassis Secondary IP Address: <none>
Chassis Subnet Mask:
255.255.255.0
Network Processor Ethernet IP Address:
197.112.23.11
Network Processor Ethernet IP Mask:
255.255.255.0
Network Processor Default IP Router:
197.110.175.2
Chassis configuration contains 1 network processor.
Network processor's on-board Ethernet LAN interface is attached to an external Ethernet LAN.
Is the chassis and network processor information correct? (Y/N)? [Y]
Y
Y
to this query, the script continues with the trunk port configuration query below.
N
" at the chassis and network processor information query and repeat this step in its entirety. You will be prompted by the configuration script to re-enter all the applicable network management information for your LS2020 switch.
Configure trunk port information (Y/N)? [N]
N
Creating minimum configuration database...done.
N
to the above trunk port configuration query, the system reports that it is creating a minimum configuration database and that you have completed the basic configuration procedure.
Y
" to the trunk port configuration query, proceed with Step 6.
Does the chassis contain redundant network processors (Y/N)? [N]
Y
Configure the Chassis Secondary IP address (for use by a network processor while acting as backup). This address should be an address on the subnetwork connecting all network processors in your network.
Chassis Secondary IP Address [a.b.c.d]:
192.1.1.12
Your system may be attached to an external Ethernet LAN by means of the on-board Ethernet LAN interface on the network processors.
In a redundant configuration with two network processors, if the network processors are each attached to an external Ethernet LAN by means of the on-board Ethernet LAN interfaces, the two network processors should each be attached to the same Ethernet LAN.
If the network processors are attached to an Ethernet LAN, you will be asked to provide the IP address and IP subnet mask of the network processors' on-board Ethernet LAN interface.
Are the two network processors attached to an Ethernet LAN (Y/N)? [N]
Y
In a redundant configuration with two network processors, the primary (active) network processor provides the logical connection to the attached Ethernet LAN. Thus you will be asked to specify only one IP address and mask.
Configure the IP address for the network processors' Ethernet LAN interface.
Network Processor Ethernet IP Address [a.b.c.d]:
197.112.23.12
Configure the IP subnet mask for the network processors' Ethernet LAN interface.
Network Processor Ethernet IP Mask [a.b.c.d]:
255.255.255.0
Is there an IP router on the attached Ethernet LAN (Y/N)? [N]
Y
Configure the Default IP router for the network processors' Ethernet LAN interface.
Network Processor Ethernet Default IP Router [a.b.c.d]:
197.112.23.1
CHASSIS INFORMATION
Host Name:
LightStream1
Chassis Primary (Active) IP Address: 192.1.1.11
Chassis Secondary IP Address: 192.1.1.12
Chassis Subnet Mask: 255.255.255.0
Network Processor Ethernet IP Address: 197.112.23.12
Network Processor Ethernet IP Mask: 255.255.255.0
Network Processor Default IP Router: 197.112.23.1
Chassis configuration contains 2 redundant network processors.
Network processors' on-board Ethernet LAN interfaces are attached to an external Ethernet LAN.
Is the chassis and network processor information correct? (Y/N) [Y]
Y
Y
to this query, the script continues with the trunk port configuration query below.
N
" at the chassis and network processor information query and repeat this step in its entirety. You will be prompted by the configuration script to re-enter all the applicable network management information for your LS2020 switch.
Configure trunk port information (Y/N) [N]
N
Creating minimum configuration database...done.
N
to the above trunk port configuration query, the system reports that it is creating a minimum configuration database and that you have completed the basic configuration procedure.
Y
to the trunk port configuration query, proceed with Step 6 below.
The trunk port configuration parameters you specify depend on the type of trunk port that you intend to use for SNMP configuration traffic. For detailed information about the various trunk port configuration parameters supported by the LS2020 switch, refer to the chapter in the LightStream 2020 Configuration Guide
that describes "port attributes."
Configure trunk port information (Y/N) [N]
y


Trunk Card Type:

   1) Low Speed

   2) T3

   3) E3

   4) OC3

Specify the trunk card type (1-4):
1


Specify the trunk card slot number (1-10):
3


Specify the port number (0-7):
0


DCE/DTE Type:

   1) DCE

   2) DTE

Specify the DCE/DTE type (1-2):
1


DCE Bit Rate:

     1) 128 Kb   5) 448 Kb    9) 1344 Kb    13) 3584 Kb

     2) 192 Kb   6) 512 Kb   10) 1536 Kb  14) 4000 Kb

     3) 256 Kb  7) 768 Kb   11) 1792 Kb   15) 5376 Kb
  4) 384 Kb  8) 896 Kb   12) 2688 Kb


Specify the DCE Bit Rate (1-15):
1


TRUNK INFORMATION

 Type: Low Speed Trunk    Slot: 3   Port: 0

 DCE/DTE Type:            DCE

 DCE Bit Rate:            128 (kbps)


Is the port information correct? (Y/N) [Y]
Y
N
to the port confirmation prompt, you will be prompted to re-enter all the trunk port information, beginning with the "
Trunk Card Type
."
Y
, you will be queried if you want to configure an additional trunk, as shown below:
Configure additional trunk port information (Y/N)? [N]
Y
Y
to this query, repeat this procedure to configure additional trunk ports.
N
to this query, the system responds with the following message:
Creating minimum configuration database...done.
A trunk configuration CLI script has been written to /tmp/trunkconfig.cli
NDD_3
trap for that card appears on the console, as shown in the example below.
(OPER) NDD_3 at 03/05/96 10:56:04 EDT (03/05/96 14:54:04 GMT)
Line Card ls2020:5 (MS-TR) up.
oper
or
npadmin
account, as shown in the example below:
user name:
npadmin
password:
<password> Return
oper
or
npadmin
account, the CLI starts automatically, first presenting the CLI banner on the console and then the CLI prompt, as shown in the example below:
cli: (ls_main) compiled Mar 05 1996 @ 03:45:21

Copyright 1996. Cisco Systems, Inc. All Rights Reserved.

cli>
cli>
protected
Enter Password:
<password> Return
*cli>
source
command, as shown below:
*cli>
source "/tmp/trunkconfig.cli"
C:\>
diskcopy a: b: /v
C:\>
diskcopy a: a: /v
![]()
![]()
![]()
![]()
![]()
![]()
![]()
![]()