
Table of Contents
Configuration Procedures
Configuration Procedures
This chapter tells you how to perform configuration tasks for a LightStream 2020 multiservice ATM switch (LS2020 switch). It tells you how to create configuration objects (chassis, cards, and ports), how to provision for permanent virtual circuits (PVCs), and how to configure virtual LAN internetworking attributes. It also describes general database management functions, such as saving and backing up the global database and updating a local database.
This chapter does not define configuration attributes, nor does it recommend attribute settings: that material is provided in the following chapter, "Configuration Attributes."
Preparing to Configure a Network
To create a new configuration, you need information on each LS2020 switch. If the switch is already installed in the network, you can use the configurator's Verify function to obtain default settings for many attributes. The section entitled "Verifying a Database" later in this chapter has information on the verification procedures.
If the switch is not installed, you need to consider the following points:
- Hardware configuration:
- Determine how many network processors (NPs) are in the chassis.
- Determine which NPs, if any, require NP IP addresses as well as NP IP masks. (For information on IP addresses, refer to the section "IP Address Attributes" in the following chapter.)
- Obtain the primary Ethernet IP address, secondary IP address (if one is needed), subnet mask, and default router address (if one exists).
- Determine the number of line cards of each type (LSC, MSC, PLC, and CLC).
- Determine whether the line cards are to be configured as edge or trunk interfaces.
- Determine the location (chassis slot) of each line card.
- Determine how many ports of each type are to be configured on each line card.
- Determine the names you will assign to the nodes, cards, and ports in your LS2020 network. (The configurator creates default names for cards and ports, but you can change them if you want to.)
- Obtain the chassis ID number for each node. Use the CLI command show chassis to display it.
- Determine how many trunk ports will connect this LS2020 switch to others in the network. What will be the bit rate on each trunk?
- Determine how many edge ports will connect this LS2020 switch to devices outside the LS2020 network. For serial ports, what will be the bit-rate for each one?
- Familiarize yourself with the configuration of edge devices that will connect to the LS2020 network. For example, you should know
- What types of interface are present (frame relay, FDDI, ATM UNI, etc.)?
- What is the destination and what are the bandwidth requirements for each PVC?
- Which local management interface (LMI) is used?
- Which device provides the clocking? What is the speed?
- List attributes and values for each chassis, card, and port.
- If your LS2020 network is configured with bridging interfaces, you should have information on the following points:
- Are the default values for the spanning tree bridge attributes acceptable for your application?
- Do you want to specify any custom filters for those ports?
- Do you need to specify any static bridge filters for devices on the attached LANs?
- Do you want to create any workgroups for those ports? multicast groups? traffic profiles?
- For each virtual circuit, you will be required to specify the node, card, and port at each end and the required bandwidth. As you configure the virtual circuits, you might find it helpful to create a form like the one shown in Figure 3-1.
Figure 3-1 : Sample Chart of Virtual Circuits
| LS1
|
2
|
0
|
16
|
LS2
|
9
|
0
|
500
|
| LS1
|
2
|
0
|
17
|
LS2
|
9
|
1
|
510
|
| LS1
|
2
|
0
|
18
|
LS2
|
9
|
1
|
520
|
| LS1
|
3
|
2
|
40
|
LS2
|
2
|
1
|
600
|
| LS1
|
4
|
2
|
50
|
LS2
|
3
|
1
|
650
|
Now you are ready to use the configurator to create and load a configuration database.
Starting the Configurator
The StreamView configurator includes three separate configuration programs:
- Node Configure (also known as CFG), which you use to configure chassis, cards, ports, internetworking entities (such as bridges and filters), and SNMP trap attributes
- PVC Configure (also known as PVC), which you use to configure permanent virtual circuit (PVC) attributes
- VLI Configure (also known as VLI), which you use to configure virtual LAN internetworking (VLI) attributes
All of the configuration programs read from and write to the same database. A locking mechanism allows only one configurator to write to the global database at a time. (See the section entitled "Overriding a Configurator Lock" later in this chapter for information on the locking mechanism.)
You can start and run the configurator under HP OpenView or without it. The following sections describe both procedures.
Starting Under HP OpenView
You start each of the three configuration programs in much the same way. In the following procedure, Node Configure is used as an example, with any differences being noted. The assumption here is that HP OpenView is installed and functioning properly.
To start the configurators, use the following procedure:
Step 1 In the OpenView Root dialog box, shown in Figure 3-2, double-click on the IP Internet icon. An IP Internet map is displayed (Figure 3-3).
Figure 3-2 : HP OpenView Root Dialog Box
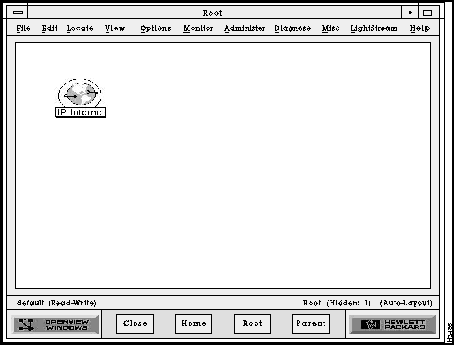
Figure 3-3 : IP Internet Map

Step 2 Pull down the LS2020 menu on the menu bar, and click on Node Configure, PVC Configure, or VLI Configure.
Step 3 Select the database access mode on the pop-up dialog box that is displayed. If you select read/write, the database is locked to other users and you can make changes to the database file. If you select read only, the file is not locked but you can only examine the settings in the file. If the configurator reports that someone else is using the database, see the section entitled "Overriding a Configurator Lock" later in this chapter before proceeding.
Note The configurator automatically opens the default database file (defined by the LSC_DATABASE variable that is set during installation). You can open a different file, such as a backup file, using the procedure in the section entitled "Opening a Database File" later in this chapter.
Starting Without HP OpenView
To start the configurators without HP OpenView, use this procedure:
Step 1 At the system prompt, type cfg, pvc, or vli.
Step 2 Select the database access mode on the resulting pop-up dialog box. If you select Read/Write, the database is locked to other users, and you can make changes to the database file. If you select Read Only, the file is not locked, and you can only examine the settings in the file. If the configurator reports that someone else is using the database, see the section entitled "Overriding a Configurator Lock" later in this chapter before proceeding.
Note The configurator automatically opens the default database file that is set during installation. You can open a different file using the procedure in the section entitled "Opening a Database File" later in this chapter.
General Configuration Procedures
Table 3-1 summarizes steps for performing some frequently used configuration procedures.
Note The configurator uses standard Motif conventions for the graphical interface. See your Motif documentation for more detailed information.
Table 3-1 : Frequently Used Configuration Procedures
| Store changes made in dialog box
|
Click on the OK button at the bottom of the dialog box.
|
| Discard changes made in dialog box
|
Click on the Cancel button at the bottom of the dialog box.
|
| Return to the previous dialog box
|
Click on the OK button (any changes are stored).
Click on the Cancel button (any changes are ignored).
|
| Save changes to global database
|
Pull down the File menu on the Node Configurator dialog box and select Save. If you specify a chassis update, changes are written to the global database immediately and sent to the local database at the time specified by the UpdateTime attributes.
|
| Enter information in a field box
|
Click inside the box and type the information.
|
| Edit information in a field box
|
Use the left and right arrows on the right keypad to move around the field box. Double-click on an entry to select it, or press the left mouse button and, keeping it down, drag it over the characters you want to select. Use the Backspace key to delete selected items one character at a time.
|
| Select a radio button attribute
|
Click on one of two (or more) radio buttons to select among mutually exclusive settings (for example, enable/disable).
|
| Select a check button attribute
|
Click on a check button to select that attribute value. (You can click on more than one check button: check buttons are used for values that are not mutually exclusive.)
|
| Select from an Option button list
|
- Click on the arrow beside the option button to display all available selections.
- Scroll through the list by clicking repeatedly on either the up or down arrow, or by clicking on the scroll bar and sliding it in the desired direction.
- Click on the desired setting; the list disappears and the selected value is displayed in the option button.
|
| Select from a list box
|
- To select one entry, click once on that entry.
- To select multiple contiguous entries, click on the first entry, press the mouse button and, keeping it down, drag over the entries you want to select. (In some cases, the configurator does not support multiple selections in a list. These are noted where appropriate.)
- To select multiple noncontiguous entries, click on the first entry, press the Control key, and click on the other desired entries. (In some cases, the configurator does not support multiple selections in a list. These cases are identified in the text.)
|
| Deselecting from a list box
|
Click on a pre-selected entry, or hold the Control key down and click the mouse button.
|
| Add to a list box
|
- Enter new information in field boxes or by selecting a radio or check button.
- Click on the Add button and the entry is added to the list.
|
| Delete an entry from a list box
|
- Click on the entry to be deleted.
- Click on the Delete button and the entry is removed from the list.
|
| Edit an entry in a list box
|
- Click on the entry to be edited.
- Enter changes and click on the Edit button. The list is updated with the new attributes.
|
Once you start the configurators, you can make entries or changes in the global configuration database. The information is not written to the global database until you perform the save operation. The save operation is discussed in the section entitled "Saving or Aborting Changes" later in this chapter. Information from the global database is not sent to a switch until you specify an update time.
Creating a Chassis
This section tells you how to create and configure an LS2020 chassis object, starting at the Node Configurator dialog box. Use the Node Configure tool (cfg) to create a chassis object.
Note In order for the configurator to be able to access an LS2020 node through IP, your network administrator must establish and maintain the /etc/hosts file on the Sun workstation running the configurators. This file correlates the LS2020 node name with an IP address and is needed for communication between the NMS and the switches.
You can create a configuration file for a node before or after it is installed. In either case, the name given to the chassis during installation should be the same name used during configuration and the same name that is entered in the /etc/hosts file. (A chassis can be configured with the IP address being used as a name if the /etc/hosts file or name server is not available.)
Note This section does not give recommended settings nor does it describe the various attributes that you can configure using this procedure. See the following chapter, "Configuration Attributes," or the online help for that type of information.
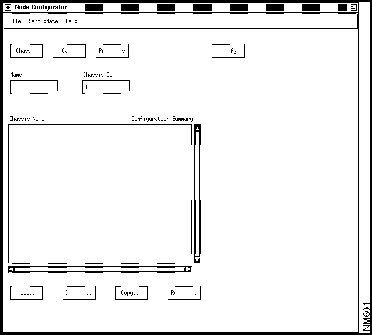
In the Node Configurator dialog box (Figure 3-4), the Chassis Name list box gives the names of all LS2020 chassis that are currently entered in the global database file. This does not mean that the chassis have been installed; it simply means that someone has used the configurator to create database entries for them.
Figure 3-4 : Node Configurator Dialog Box
Here are the steps for creating a node configuration file. The attributes used in this task are described in the following chapter in the section "Chassis Attributes."
Step 1 If you are adding a new chassis, click in the Name field box above the list and type in a name. The name should be unique and should have no more than 39 characters. (Do not use a name that begins with a number or that includes quotation marks or other special characters.)
Step 2 If the chassis has not been installed yet, click in the Chassis ID field box and type in a unique ID number. You can use a temporary number. (Once the chassis is installed, you can use the Verify function to get the actual ID number.)
Step 3 Click on the Add push button, and the new chassis name is added to the list.
Step 4 Click on the entry in the Chassis Name list to select the chassis you are going to configure.
Step 5 If you are configuring a chassis that has already been installed, you can use the Verify function to retrieve the configuration attributes that were entered during installation (or set to default values by the software). This saves you from having to re-enter that information. The Verify function is discussed later in this chapter under the heading "Verifying CFG Attributes."
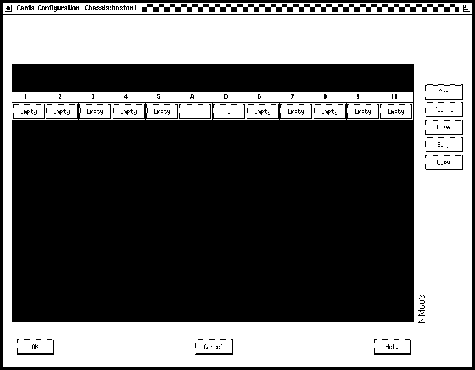
Step 6 Click on the Chassis button to reach the Chassis Configuration dialog box (Figure 3-5).
Figure 3-5 : Initial Chassis Configuration Dialog Box

Step 7 The dialog box provides field boxes for the primary and secondary IP addresses, IP subnet mask, NP (Ethernet) IP address, NP IP subnet mask, and default router address attributes. You must set a primary IP address and subnet mask. Set any other address or mask attributes as required. (If you want more information on the attributes, click on the Help button.)
Step 8 The dialog box also contains two optional attributes, system contact and system location. Make entries as desired.
Step 9 You can set SNMP agent attributes in this dialog box: you can set the trap filter level or enable or disable the trap log.
Step 10 To store the changes you have made in this dialog box, click on the OK button. This returns you to the Node Configurator dialog box.
You have now created and configured a chassis object; you can go on to configure card objects, or you can delete, copy, or rename a chassis.
Deleting a Chassis
To delete a chassis, use the following procedure:
Step 1 Click on the appropriate entry in the Chassis Name list.
Step 2 Click on the Delete button.
Step 3 A pop-up dialog box is displayed asking if you want to delete the chassis. Click on the OK button to delete the chassis. The record is deleted and the entry is removed from the Chassis Name list. (Click on the Cancel button if you do not want to delete the chassis.)
Note You cannot delete a chassis that has been configured with PVCs. You must delete the PVCs and update the chassis before you can delete the chassis.
Copying a Chassis
To copy a chassis, use the following procedure:
Step 1 Click on the appropriate entry in the Chassis Name list.
Step 2 Click on the Copy button. A pop-up dialog box is displayed.
Step 3 Enter a new chassis name and chassis ID in the field boxes provided. Make entries for the NP IP address and for the primary and secondary IP addresses.
Step 4 Click on the OK button to copy the chassis. All chassis, card, port, and bridging attributes are copied to the new chassis, and the entry is added to the Chassis Name list. (Click on the Cancel button if you do not want to copy the chassis.)
Note The PVC and VLI attributes for the chassis are not copied.
Step 5 Rename the cards and ports, if desired. The configurator does not do this for you.
Renaming a Chassis
To rename a chassis, use the following procedure:
Step 1 Click on the appropriate entry in the Chassis Name list.
Step 2 Click on the Rename button. A pop-up dialog box is displayed.
Step 3 Enter a new chassis name in the field box provided.
Step 4 Click on the OK button to rename the chassis. The new chassis name is added to the Chassis Name list, and the previous name is removed. (Click on the Cancel button if you do not want to rename the chassis.)
Note When you rename a chassis, the PVC and VLI attributes associated with the chassis are retained. You do not have to re-enter them.
Creating Cards
This section describes the procedure for creating and configuring database objects for the following kinds of LS2020 card:
- Network processor (NP)
- Low-speed line card (LSC)
- Medium-speed line card (MSC)
- Packet line card (PLC)
- Cell line card (CLC)
The NP has no ports and must be inserted in slot 1. (If you have a backup NP, insert it in slot 2.) The NP receives little attention in this manual because it lacks edge and trunk connections and so differs from the other cards discussed here. Switch cards have no configurable attributes and thus are not listed here at all.
Before executing this procedure, you must have created a chassis object. In this procedure, you are assumed to be starting out in the Node Configurator dialog box (Figure 3-4), where the last procedure, Creating a Chassis, ends.
Before you configure any cards, you need to know what cards are installed, their slot numbers, and their special (nondefault) configuration attributes. You use this information as you create the configuration file. If the switch has already been installed, you can use the Verify button on the Node Configurator dialog box to retrieve card configuration information from the switch. The information was entered during installation or set to default values by the software.
To configure cards, use this procedure. The attributes used in this task are described in the next chapter in the section "Card Attributes."
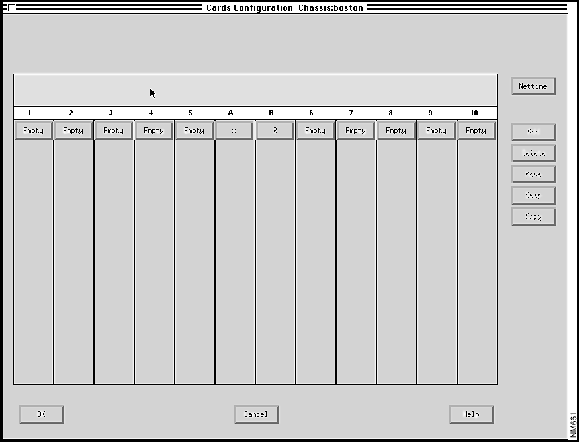
Step 1 In the Node Configurator dialog box, click on the chassis you wish to configure cards for and then click on the Cards push button. The Cards Configuration dialog box (Figure 3-6) appears. The box shows the slot numbers in the LS2020 chassis.
Figure 3-6 : Cards Configuration Dialog Box
Note The NP card normally occupies slot 1; slot 2 holds either a backup NP card or a line card. Slots 3 through 10 are for line cards only. Slots A and B are for switch cards.
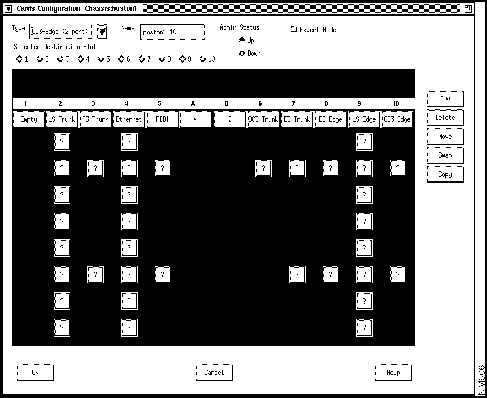
Step 2 Click on the push button below the number of the slot that you want to configure. This button is labeled Empty, or, if it has been previously configured, it is labeled with an abbreviation for the card type. After you click on a push button, card configuration attributes are displayed across the top of the dialog box (see Figure 3-7).
Figure 3-7 : Cards Configuration Dialog Box with Card Attributes Displayed

Step 3 To select a card type, pull down the Type button and click on the desired card type. The list closes, and the selected type is displayed on the Type option button.
Step 4 You can enter a name for the card by clicking in the Name field and then typing a name. (Naming a card is optional. Choose a name with no more than 19 characters, and do not use a name that begins with a number or includes quotation marks.) If you do not enter a name, the configurator provides a default name, which uses the switch name as a base. For example, if the chassis name is Boston1, the default name for the card in slot 4 is Boston1.4.
Step 5 To change the administrative status of a card, click on the appropriate radio button. The default card status is up. It is usually best to leave the status set to up in the configuration.
Note If you are an expert user, continue to Step 6. Otherwise, go to Step 7.
Step 6 To change the maximum number of virtual circuits allowed on the card, click on the Expert radio button. A default value is provided for this attribute, and in most cases you should not change it.
Step 7 Click on the Add push button. The push button below the slot number is filled in with an abbreviation for the card type that you configured. Push buttons (labeled with question marks) appear in the corresponding slot, the number of push buttons displayed indicating the number of ports available for that type of card.
You have now created and configured a card object. You can delete, move, swap, or copy a card, or you can create ports on the cards that you have configured.
Deleting a Card
To delete a card and its associated ports, use this procedure:
Step 1 In the Cards Configuration dialog box, click on the push button below the number of the card you want to delete.
Step 2 Click on the Delete button. The card name disappears from the button and is replaced with the word Empty, and any port icons are removed.
Note If any PVCs are configured for the card, they must be deleted and the switches must be updated before you can delete the card.
Moving a Card to Another Slot
To move a card and its associated ports from one slot to another, use this procedure:
Step 1 In the Cards Configuration dialog box, click on the push button below the number of the card you want to move.
Step 2 Click on the Move button. The dialog box displays the Selected Destination Slot field (see Figure 3-8).
Note If any PVCs are configured for the card, they must be deleted and the switches must be updated before you can move the card.
Figure 3-8 : Moving a Card from One Slot to Another

Step 3 Click on the radio button labeled with the destination slot number, and the dialog box is updated to show the card in its new slot. The old slot is labeled Empty.
Step 4 Rename the card and its ports, if desired. The configurator does not do this for you.
Swapping Cards Between Slots
To swap two cards and their associated ports between slots:
Step 1 In the Cards Configuration dialog box, click on the push button below the number of one of the cards you want to exchange.
Step 2 Click on the Swap button. The dialog box displays the Selected Destination Slot field.
Note If any PVCs are configured for either card, they must be deleted, and the switches must be updated before you can swap the cards.
Step 3 Click on the radio button labeled with the destination slot number, and the dialog box is updated to show the cards in their new slots.
Step 4 Rename the card and its ports, if desired. The configurator does not do this for you.
Copying a Card to Another Slot
To copy a card and its associated ports to a slot:
Step 1 In the Cards Configuration dialog box, click on the push button below the number of the card you want to copy.
Step 2 Click on the Copy button. The dialog box displays the Selected Destination Slot field.
Note PVCs configured for the card are not copied.
Step 3 Click on the radio button labeled with the destination slot number. The dialog box is updated to show the same type of card and ports in the new slot.
Note All port attributes are also copied to the new slot.
Step 4 It is advisable to rename the card and its ports. (This eliminates the confusion that could easily result from the use of duplicate names.) The configurator does not do this for you.
Creating Ports
This section explains how to create and configure LS2020 ports with the StreamView configurator. A port's type is determined by its configuration settings and its interface module (line card and access card combination). To configure a port, you first select a card type in the Cards Configuration dialog box. This gives you access to individual port attributes.
The configurator card type names do not correspond directly to interface module names. Table 3-2 matches port types and interface modules with configurator edge card types. Table 3-3 matches port types and interface modules with configurator trunk card types.
Table 3-2 : Configuring Edge Ports
| If you want to configure this type of port
|
And you have this type of interface module
|
You select this type of card
in the configurator
|
| Frame relay/frame forwarding
|
PLC with SAC
|
SAC-Edge (8 port)
|
|
|
LSC with LSAC
|
LS-Edge (8 port)
|
| ATM UNI over T3
|
CLC with 4 port T3AC
|
T3-Edge (4 port)
|
|
|
CLC with 8 port T3AC
|
T3-Edge (8 port)
|
|
|
MSC with T3 MSAC
|
T3-Edge (2 port)
|
| ATM UNI over E3
|
CLC with 4 port E3AC
|
E3-Edge (4 port)
|
|
|
CLC with 8 port E3AC
|
E3-Edge (8 port)
|
|
|
MSC with E3 MSAC
|
E3-Edge (2 port)
|
| ATM UNI over OC-3c
|
CLC with OC3AC SM
|
OC3-Edge (1 or 2 ports)
|
|
|
CLC with OC3AC MM
|
OC3-Edge (1 or 2 ports)
|
| FDDI LAN
|
PLC with FAC
|
FDDI (2 port)
|
| Ethernet LAN
|
PLC with EAC
|
Ethernet (8 port)
|
| Fiber Ethernet LAN
|
PLC with FEAC
|
Ethernet (8 port)
|
| Circuit emulation
|
PLC with CEMAC
|
CEMAC (8 port)
|
Table 3-3 : Configuring Trunk Ports
| If you want to configure this type of port
|
And you have this type of interface module
|
You select this type of card
in the configurator
|
| T1 trunk
|
PLC with SAC
|
SAC-Trunk (8port)
|
|
|
LSC with LSAC
|
LS-Trunk (8port)
|
| T3 trunk
|
CLC with 4 port T3AC
|
T3-Trunk (4 port)
|
|
|
CLC with 8 port T3AC1
|
T3-Trunk (4 port)
|
|
|
MSC with T3 MSAC
|
T3-Trunk (2 port)
|
| E3 trunk
|
CLC with 4 port E3AC
|
E3-Trunk (4 port)
|
|
|
CLC with 8 port E3AC1
|
E3-Trunk (4 port)
|
|
|
MSC with E3 MSAC
|
E3-Trunk (2 port)
|
| OC-3c trunk
|
CLC with 1 port OC3AC SM
|
OC3-Trunk (1 port)
|
|
|
CLC with 2 port OC3AC SM2
|
OC3-Trunk (1 port)
|
|
|
CLC with 1 port OC3AC MM
|
OC3-Trunk (1 port)
|
|
|
CLC with 2 port OC3AC MM2
|
OC3-Trunk (1 port)
|
1. Up to four ports can be used when the module is configured as a trunk.
2. Although the card has two physical ports, only one port can be used when the module is configured as a trunk.
|
Before creating a port, you must create at least one chassis object and one card object. The card must be the type that is appropriate for the port you want to create (see Table 3-2 and Table 3-3). (For example, if you want to create a frame relay port, you can select LS-Edge or SAC-Edge as the card type.)
If you are configuring the switch before it has been installed, you need to create the configuration file, where you enter the port types for each card as well as the card's nondefault configuration attributes. If the switch has already been installed, you can use the Verify function to retrieve previously set card and port configuration information. This information might have been entered during switch installation, or it could be based on default software values.
Be aware of two conventions used by the configurator, regardless of the type of port you are configuring:
- Each port number is assigned by the configurator based on the position of the Port push button in the Cards Configuration dialog box. Ports are assigned numbers, starting at 0, from top to bottom of the dialog box.
- The configurator creates a default name for each port, which is a concatenation of the chassis name, slot number, and port number. For example, in the chassis named Boston, the name of the first port in the third slot would be Boston.3.0. You can give the port another name if you wish.
The following procedure is for the creation of trunk and edge ports. The general procedure is the same, regardless of the interface type; only the attributes vary.
The port configuration procedure begins in the Cards Configuration dialog box. Figure 3-9 shows the Cards Configuration dialog box, configured with many of the card types described in this section.
Note Configure port 0 on all cards, even if it is not going to be used. Card type is derived from the setting for the lowest configured port. Configuring an unused port does not affect system operation.
Figure 3-9 : Sample Cards Configuration Dialog Box with Several Slots Occupied
To create a trunk or edge port, use this procedure. The attributes used in this task are described in the next chapter in the section "Port Attributes."
Step 1 In the Cards Configuration dialog box, click on a port button that is labeled with a question mark. A port configuration dialog box is displayed. This dialog box shows the attributes appropriate for the type of port that you are configuring. It also provides default settings for all attributes.
Note The dialog boxes for the various port types are shown at the end of this procedure.
Step 2 You can use the default name or enter a name for the port. (Naming ports is optional. Choose a name with no more than 19 characters, and do not use a name that begins with a number or includes quotation marks.)
Step 3 Examine the other default values and reset any that require adjustment. Click on the OK button at the bottom of the dialog box; you are returned to the Card Configuration dialog box. If you need information on attributes, click on the Help button on the dialog box or refer to the following chapter, "Configuration Attributes."
You have now finished configuring the physical-level components for your switch: chassis, cards, and ports. You can go on to configure network-level attributes (such as bridging and filtering) and internetwork-level attributes (such as PVC and VLI).
Changing Port Types
To change any port type except the LSC edge port, you must delete the card that the port is on, create the desired card type, and then configure the ports. For instance, to change an E3 edge port to an E3 trunk port, you must
- Delete PVCs associated with the port and update the switches
- Delete the E3 edge card
- Create the E3 trunk card
- Configure the E3 trunk ports
When you are changing between a frame relay port and a frame forwarding port on an LSC edge card, you must
- Delete PVCs associated with the port and update the switches.
- Click on the appropriate radio button at the top of the Frame Relay Port Configuration or Frame Forwarding Port Configuration dialog box. Figure 3-14 shows the frame forwarding port configuration dialog box, and Figure 3-15 shows the frame relay port configuration dialog box.
- Configure the ports.
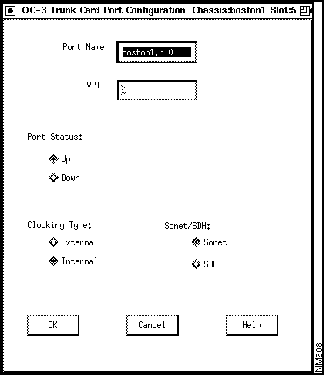
Trunk Port Dialog Boxes
The screens in Figure 3-10 through Figure 3-13 show the trunk port dialog boxes.
Figure 3-10 : LS Trunk and SAC Trunk
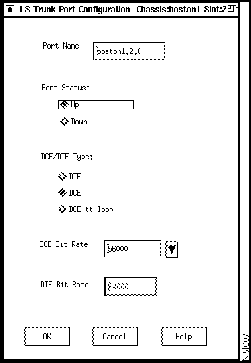
Figure 3-11 : T3 Trunk, Four Port
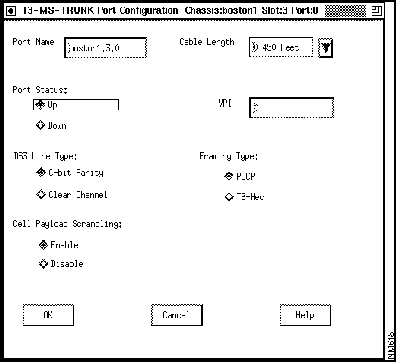
Figure 3-12 : E3 Trunk, Four Port
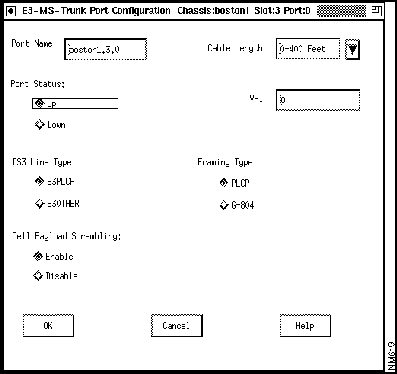
Figure 3-13 : OC-3 Trunk
Edge Port Dialog Boxes
The screens in Figure 3-14 through Figure 3-22 show representative edge port dialog boxes. The full listing of all edge port types is available in the Type list box in the Cards Configuration dialog box. The following chapter, "Configuration Attributes," gives details about all fields for all cards.
LS Edge/SAC Edge Port---Frame Relay
At the top left of the dialog box, there are two radio buttons for selecting frame relay and frame forwarding. Frame relay is the default setting. If you want to configure a frame forwarding port, click on that radio button; the dialog box is changed to show frame forwarding attributes. Figure 3-14 shows the frame forwarding dialog box, and Figure 3-15 shows the frame relay dialog box.
Figure 3-14 : LS Edge and SAC Edge, Frame Forwarding
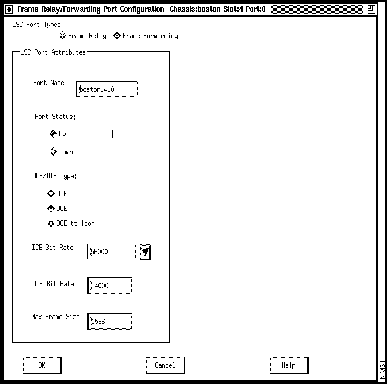
Figure 3-15 : LS Edge and SAC Edge, Frame Relay
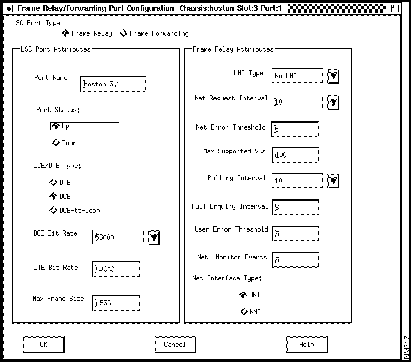
Figure 3-16 : T3 Edge, Four Port
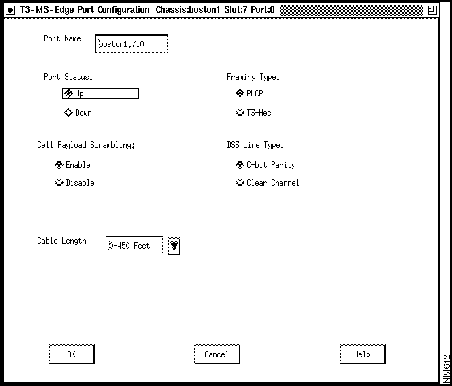
Figure 3-17 : E3 Edge, Four Port

Figure 3-18 : FDDI Port
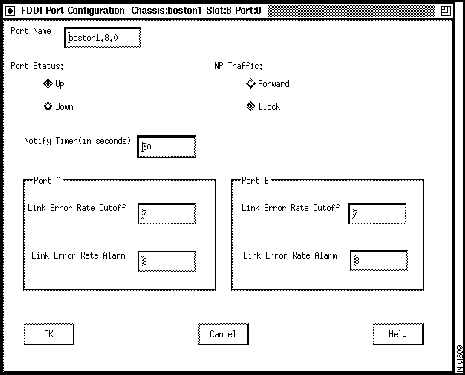
Figure 3-19 : Ethernet Port
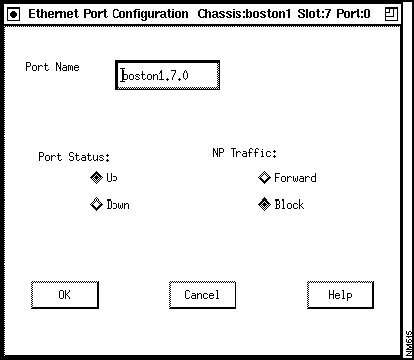
Figure 3-20 : Fiber Ethernet Port
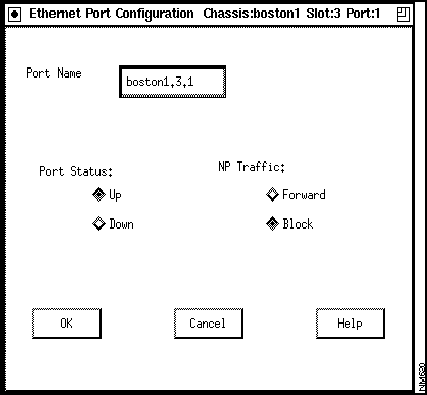
Figure 3-21 : OC-3 Edge, One Port
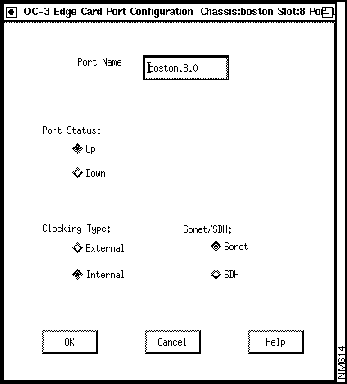
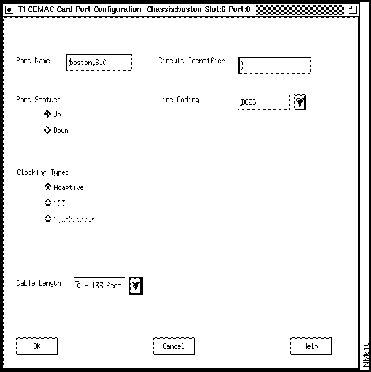
Figure 3-22 : T1 CEMAC
Configuring Network Timing on a Chassis
This procedure explains how to configure a prioritized list of timing sources for the node. This list, called the Preference Table, holds up to ten entries. The entries are listed in order from most desirable timing source to least. The Nettime attributes are described in the next chapter in the section "Nettime Attributes."
Note The network timing feature is not available in LS2020 nodes that have Release 1 switch cards.
Step 1 In the Node Configurator dialog box, click on the chassis you wish to configure cards for and then click on the Cards push button. The Cards Configuration dialog box (Figure 3-23) appears. The box shows the slot numbers in the LS2020 chassis.
Figure 3-23 : Cards Configuration Dialog Box
Step 2 In the upper right corner of the Cards Configuration dialog box, click on the Nettime push button. The Nettime dialog box (Figure 3-24) appears. (If the Nettime button is grayed out, the system has detected one or more Release 1 switch cards in the target node and the network timing feature is therefore unavailable.)
Figure 3-24 : Nettime Dialog Box
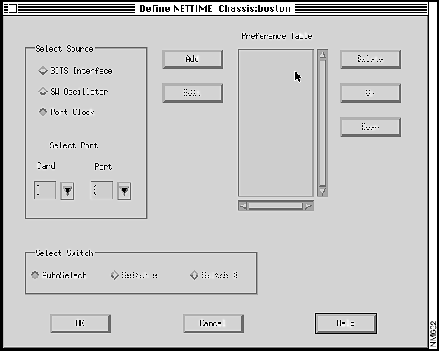
Step 3 To add an entry to the Preference Table, click on one of the timing sources in the Select Source portion of the dialog box. If you select BITS Interface or SW Oscillator, click on the Add button to add that source to the Preference Table. If you select Port Clock, you must specify the card and port from which the timing will be derived. Then click on the Add button to add that source to the Preference Table.
- To delete an entry from the Preference Table, select it and click on the Delete button.
- To move an entry up or down in the Preference Table, select it and click on the Up button or the Down button.
- To replace an entry with a different entry in the same position in the Preference Table, select the entry. In the Select Source portion of the dialog box, click on the radio button for the replacement entry. Then click on the Edit button. The old entry is replaced with the new one in the Preference Table.
Step 4 In the Select Switch portion of the dialog box, you can select the switch card that will provide clocking to the node: Switch A, Switch B, or Autoselect.
Configuring Bridging Attributes
If you have configured any FDDI or Ethernet ports (including Fiber Ethernet ports) in your network, you can configure
- Bridge-level and port-level spanning tree bridge attributes
- Custom filters for ports
- Traffic profiles
- Multicast groups
- Static bridge filters
The following sections describe the procedures you use to configure each of these entities.
Spanning Tree Bridge
Use the following procedure to configure spanning tree bridge attributes. The spanning tree bridge attributes are described in the following chapter, in the section "Spanning Tree Attributes."
Step 1 Click on the Protocols button on the Node Configurator dialog box (Figure 3-4). A dialog box like the one shown in Figure 3-25 is displayed.
Figure 3-25 : Protocols Configuration Dialog Box
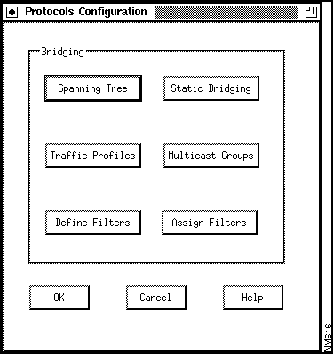
Step 2 Click on the Spanning Tree button. A dialog box like the one shown in Figure 3-26 is displayed.
Figure 3-26 : Bridging Configuration Dialog Box
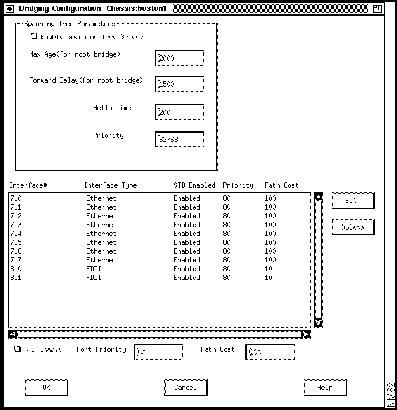
Step 3 The Spanning Tree Parameters portion of the dialog box defines chassis-level bridging attributes. To change an attribute, click in the field box and type in a new value.
Step 4 The Interface list in the lower half of the dialog box displays all configured bridge ports on the chassis with their default settings. If you want to change a value, click on a port to select it, and then type in the Port Priority or Path Cost field box to set the value for the port. You can also enable or disable spanning tree bridging on a per-port basis by clicking on the STB Enable check button.
Step 5 Click on the Edit button to store the changes. The parameters in the list box are updated to reflect the newly entered values.
Step 6 Repeat Step 4 and Step 5 for any other ports that have values you want to change.
Step 7 Store the changes you have made to this dialog box by clicking on the OK button. (You can also click on the Cancel button to discard the changes.)
Custom Filters
You can use the custom filters capability to set up multiple per-port filters on a chassis. The filters applied to a port determine the action taken on incoming frames at that port.
You create custom filters on a per-port basis. Creating a custom filter consists of defining the filter and then assigning the filter to a port or ports. You can assign multiple filters to one port, and you can assign the same filter to multiple ports.
Before you can create custom filters, you must configure a chassis. Before you assign the filter to a port, you must configure at least one FDDI, Ethernet, or Fiber Ethernet card with its associated ports.
Note Filters are optionally used to identify a flow for traffic profiles and multicast groups. (A filter can, of course, be used without a traffic profile or a multicast group.) The filter is assigned to the port where the traffic profile or multicast group is to be created. The profile or multicast group is thus said to be assigned to a filter-port pair. The filter specifies the packets to which the multicast group or traffic profile applies.
Defining a Filter
Use the following procedure to define a filter. The custom filter attributes are described in the following chapter in the section "Custom Filter Attributes."
Step 1 Click on the Define Filters button in the Protocols Configuration dialog box (Figure 3-25). A screen like the one shown in Figure 3-27 is displayed.
Figure 3-27 : Define Custom Filters Dialog Box
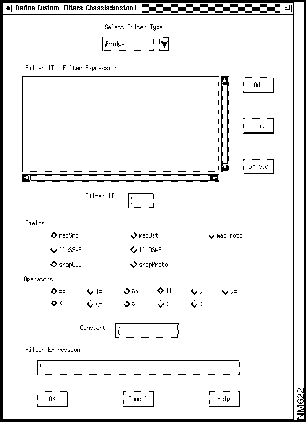
Step 2 In the Select Filter Type box, select the type of filter you want to create. The types are Bridge, IP, and IPX. Notice that the values in the Fields and Operators portions of the screen change according to the type of filter you specify.
Step 3 Enter an ID in the Filter ID box.
Step 4 Create the filter expression in the Filter Expression field by entering fields, constants, and operators in the Filter Expression field box. You can enter a maximum of 250 fields, constants, and operators. There are two ways to enter the values that you want to use:
- Click on the appropriate Fields and Operators radio buttons. The field or operator is immediately added to the Filter Expression field box. To enter a constant, type in a value in the Constant field box and click on an Operators radio button. The operator and the constant are added to the Filter Expression field box.
- Click in the Filter Expression field box and type in the fields, constants, and operators.
Note In the Filter Expression field box, you can use the Backspace key to delete characters and the left and right arrows on the right keypad to move through the text. In the Filter Expression box, you can double-click on a constant, field, or operator to select it, or you can press the first mouse button and, while holding the button down, drag past the characters you want to select. You can then delete the selected characters.
Step 5 To add the filter you have defined, click on the Add button; the Filter ID list is updated with the new filter. (Be sure to click on Add rather than on OK. If you click on OK rather than Add, the filter you just defined disappears and you are returned to the Protocols Configuration dialog box.)
- The dialog box in Figure 3-28 shows a switch that has been configured with a single custom filter (macProto == 6004).
Figure 3-28 : Sample Custom Filter Definition
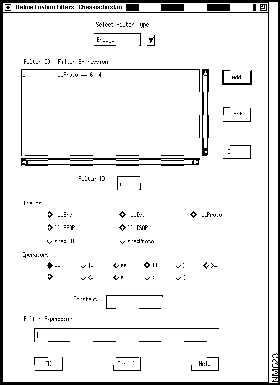
The procedure for entering the filter shown in Figure 3-28 has four steps:
Step 1 Click on the macProto radio button. macProto is added to the Filter Expression box.
Step 2 Enter 6004 in the Constant field box.
Step 3 Click on the == radio button and ==6004 is added to the Filter Expression box.
Note A constant is a decimal value by default unless it is preceded by 0x, in which case it is hexadecimal. Exceptions here include macDest and macSrc in the bridge category and ipxSrcNd and ipxDstNd in the IPX category.
Step 4 Click on the Add button to update the Filter ID list with the new filter.
Now you can assign the filter to a port, using the procedure described later in this chapter under the heading "Assigning a Filter." (A defined filter does not take effect until it has been assigned to a port.) If you are not going to assign any filters right now, you can keep the changes you have made in this dialog box by clicking on the OK button at the bottom of the dialog box. (You can also click on the Cancel button to discard the changes.)
Editing or Deleting a Filter
To edit or delete a filter, use the Define Custom Filters dialog box (Figure 3-27). To edit an existing filter, use this procedure:
Step 1 Click on the filter entry in the Filter ID list. The filter is displayed in the Filter Expression field box at the bottom of the dialog box.
Step 2 Change the expression in the Filter Expression field box as desired.
Step 3 Click on the Edit button. The Filter ID list is updated with the changed filter.
To delete an existing filter, use this procedure:
Step 1 Click on the filter ID in the Filter ID list.
Step 2 Click on the Delete button. The filter ID is removed from the Filter ID list.
If you want to assign an edited filter to a port, use the procedure described in the next section. If you are not going to assign any filters right now, you can keep the changes you have made to this dialog box by clicking on the OK button at the bottom of the dialog box. (You can also click on the Cancel button to discard the changes.)
Note You cannot delete a filter if it is assigned to a port. You must cancel the assignment first.
Assigning a Filter
After you have created or modified a filter, you can assign it to a port or to multiple ports. The attributes used in this task are described in the following chapter in the section "Assigning Filters." To assign a filter, use this procedure:
Step 1 Select Assign Filters from the Protocols Configuration screen (Figure 3-25). A screen like the one shown in Figure 3-29 is displayed.
Figure 3-29 : Sample Assign Custom Filters Dialog Box
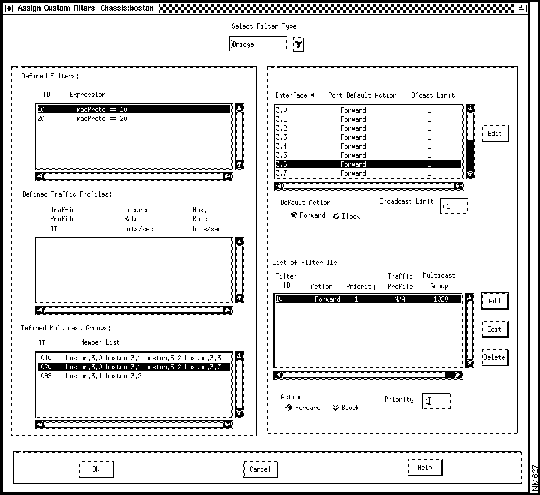
Step 2 In the list at the top of the screen, select the type of filter you want to assign.
Step 3 In the list of interfaces, click on the interface for which you want to assign a filter.
Step 4 In the Defined Filters list, click on the ID for the filter you want to assign.
Step 5 Below the List of Filter IDs, select Forward or Block.
Step 6 Enter the priority of the filter. Filters are executed in order of their priority settings. The lowest numerical value has the highest priority.
Step 7 Click on the Add button next to the list of filter IDs. The filter is assigned to the interface and is displayed in the list of filter IDs.
Step 8 Repeat the procedure in Step 2 through Step 7 for as many filters as you want to assign to the interface.
Step 9 When you are finished, click on the OK button at the bottom of the Assign Custom Filters screen. This assigns the filter(s) to the selected port(s). You are returned to the Protocols Configuration screen.
You have now defined and assigned your per-port custom filters. You can store the changes you have made in this dialog box by clicking on the OK button. (You can also click on the Cancel button to delete these changes.) Remember that these values are not written to the global database until you perform a Save operation (see the section entitled "Saving or Aborting Changes" later in this chapter).
Editing or Removing a Filter from a Port
After you have assigned a filter to a port, you can change its Action or its Priority setting, or you can remove it from among the active filters for the port. To edit a filter or cancel its assignment to a port, use the Assign Custom Filters dialog box (Figure 3-29).
To edit the filter, use this procedure:
Step 1 In the list of interfaces at the top of the box, click on the number of the interface that has the filter you want to edit. The list of applied filters is displayed below in the List of Filter IDs.
Step 2 In the List of Filter IDs, click on the desired filter.
Step 3 You can change the Action or Priority setting and then click on the Edit button.
Step 4 To store the change you have made, click on the OK button at the bottom of the dialog box. (You can also click on the Cancel button to delete your change.)
To remove a filter from a port, use this procedure:
Step 1 In the list of interfaces at the top of the box, click on the number of the interface that has the filter you want to remove. The list of applied filters is displayed.
Step 2 In the List of Filter IDs, click on the desired filter.
Step 3 Click on the Delete button. The filter is removed from the list.
Step 4 To store the change you have made, click on the OK button at the bottom of the dialog box. (You can also click on the Cancel button to delete your change.)
Traffic Profiles
You can use the Traffic Profiles option to set up one or more traffic profiles on a chassis. A traffic profile is a network-wide construct. After you define a profile, you can assign it to one or more ports.
Note Remember that you are actually assigning the profile to a filter-port pair.
Before you can create a traffic profile, you must configure one chassis and at least one FDDI, Ethernet, or Fiber Ethernet card with its associated ports.
Defining a Traffic Profile
To define a profile, use this procedure. The attributes used in this task are described in the following chapter in the section "Traffic Profiles."
Step 1 Click on the Traffic Profiles button in the Protocols Configuration dialog box (Figure 3-25). A screen like the one shown in Figure 3-30 is displayed.
Figure 3-30 : Define Traffic Profiles Dialog Box
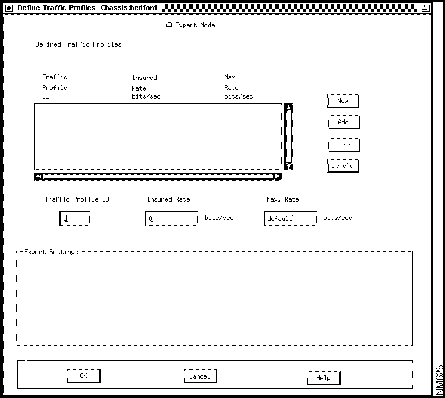
Step 2 Enter an ID, an insured rate, and a max rate for the profile, using the fields below the Traffic Profile list box. If you are an expert user, go to Step 3. Otherwise, go to Step 5.
Step 3 Click on Expert Mode. Five more options are displayed in the Expert Settings box.
Step 4 Choose values for the five Expert Settings options: Insured Burst, Max. Burst, Secondary Scale, Principal Service Type, and Transmit Priority.
Step 5 Click on the Add button. The profile appears in the Defined Traffic Profiles list.
Step 6 Repeat the procedure from Step 2 through Step 5 for each traffic profile you want to define.
Step 7 When you have finished defining traffic profiles, click on OK. The profiles are stored. You can also click on Cancel if you decide not to add the profiles you have defined.
Editing or Deleting a Traffic Profile
You can edit or delete a traffic profile if it is not assigned to an interface. To edit a traffic profile, use this procedure:
Step 1 Click on the profile entry in the Defined Traffic Profiles list in the Define Traffic Profiles dialog box (Figure 3-30).
Step 2 Make changes to the entries in the boxes below the list.
Step 3 Click on the Edit button. The Traffic Profiles list is updated with the new information.
Step 4 Click on the OK button to save the modified traffic profile information.
If you want to assign the edited profile to an interface, use the procedure described in the next section.
To delete an existing profile, use this procedure:
Step 1 Click on the profile entry in the Defined Traffic Profiles list in the Define Traffic Profiles dialog box (Figure 3-30).
Step 2 Click on the Delete button. The traffic profile is removed from the Defined Traffic Profiles list.
Step 3 Click on the OK button to save the modified traffic profile information.
Assigning a Traffic Profile
After you have created or modified a traffic profile, you can assign it to one or more filter-port pairs. To do so, use this procedure. The attributes used in this task are described in the following chapter in the section "Assigning Filters."
Step 1 Select Assign Filters from the Protocols Configuration dialog box (Figure 3-25). A screen like the one shown in Figure 3-29 is displayed.
Step 2 In the list of interfaces in the upper right portion of the screen, select the interface for which you want to assign a profile.
Step 3 In the list of defined filters, select the filter that you want to use.
Step 4 In the list of defined traffic profiles, select the profile that you want to assign to the interface.
Step 5 Specify the priority level that you want to assign to this filter.
Step 6 Make sure that Forward is selected in the Action field beneath the list of filter IDs.
Step 7 Click on the Add button. The filter and traffic profile are displayed in the List of Filter IDs.
Step 8 Repeat the procedure in Step 3 through Step 7 for each profile you want to assign.
Step 9 When you have added all of the traffic profiles you wish to use, click on the OK button at the bottom of the screen. Once you click on that button, the traffic profile assignments are saved.
Editing or Removing an Assigned Traffic Profile
After you have defined a traffic profile and assigned it to a port, you can modify its priority level or cancel its assignment to the port.
Note You cannot modify the profile itself once it has been assigned. If you want to edit an existing profile, you must first cancel its assignment to any port.
To modify the priority level of a filter assigned to the profile, use this procedure:
Step 1 Select Assign Filters from the Protocols Configuration screen (Figure 3-25). A screen like the one shown in Figure 3-29 is displayed.
Step 2 Select an assigned filter from the list of filter IDs. An entry is displayed in the List of Filter IDs showing the ID, priority, and traffic profile you have selected.
Step 3 Enter a new value in the Priority field beneath the List of Filter IDs box.
Step 4 Click on Edit. The new priority is assigned.
Step 5 Click on the OK button at the bottom of the screen to save your changes. Alternatively, you can click on Cancel to return the priority level to its previous setting.
To cancel the assignment of an assigned traffic profile, use this procedure:
Step 1 Select Assign Filters from the Protocols Configuration screen (Figure 3-25). A screen like the one shown in Figure 3-29 is displayed.
Step 2 Select the interface and traffic profile whose priority you want to modify. An entry is displayed in the List of Filter IDs showing the ID, priority, and traffic profile you have selected.
Step 3 Click on the entry for the profile in the List of Filter IDs box.
Step 4 Click on the Delete button. The profile is deleted.
Multicast Groups
You can use the Multicast Groups option to set up one or more such groups. Multicast groups are network-wide constructs. They can be configured whether or not a chassis has been specified. Once you create a multicast group, you can assign it to one or more interfaces. The group is associated with (assigned to) a filter-port pair.
Defining Multicast Groups
Use the following procedure to define a multicast group. The attributes used in this task are described in the following chapter in the section "Multicast Groups."
Step 1 Click on the Multicast Groups button in the Protocols Configuration dialog box (Figure 3-25). A screen like the one shown in Figure 3-31 is displayed.
Figure 3-31 : Define Multicast Groups Dialog Box
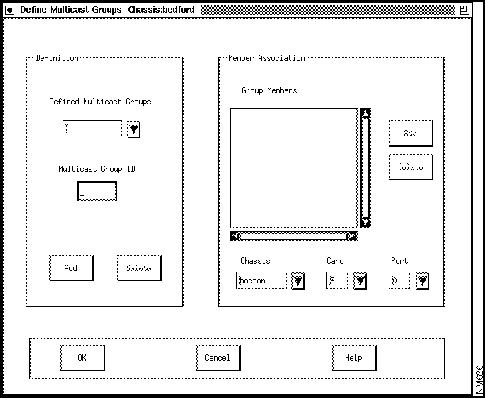
Step 2 Enter an ID for the multicast group you want to define.
Step 3 Click on Add in the Definition portion of the screen.