
Table of Contents
Cisco 7000 Front Chassis Panel and LED Board and Replacement
Cisco 7000 Front Chassis Panel and LED Board and Replacement
Cisco Part Numbers MAS-7KTFP, MAS-7KBFP, MAS-7KLED
This document contains instructions for replacing the top and bottom front chassis panels and the LED board in the Cisco 7000. The top and bottom front chassis panels comprise plastic bezels on a metal frame and should be replaced if they become warped or broken. The LED board, which contains the light-emitting diodes (LEDs) for the three front-panel system status indicators (Normal, Upper Power, and Lower Power), is mounted inside the front of the chassis.
The sections in this document include the following:
- Warning: You must turn OFF all system power and remove the front chassis panels to access the LED board. The system backplane, which is exposed when the front panels are removed, carries dangerous current levels. Before opening the chassis, read "Safety Guidelines" on page 5 to avoid injury.
This document contains instructions for replacing the Cisco 7000 LED board (MAS-7KLED) and the top and bottom front chassis panels (MAS-7KTFP and MAS-7K-BFP). If you encounter problems that you are unable to resolve, contact a service representative or the Technical Assistance Center (TAC) for assistance. You can phone the TAC at 800 553-2447, or send e-mail to
tac@cisco.com
.
Before you call a service representative, have the following information ready:
- Date you received the Cisco 7000
- Chassis serial number (located on a label on the right rear deck of the chassis)
- Type of installation or upgrade you are performing
- Title and Doc. No. of this document (from the front page)
- Brief description of the problem you are having
- Brief explanation of the steps you have taken to isolate and resolve the problem
- Maintenance agreement or warranty information
Refer to the Cisco 7000 Hardware Installation and Maintenance publication for complete system installation and startup procedures, and for physical descriptions of chassis components.
This section describes the LED board and the top and bottom front chassis panels.
The top and bottom front chassis panels each comprise a plastic injected-molded bezel on a metal frame. The top front panel covers the entire front chassis opening and attaches to the bottom of the chassis frame with two captive screws (see Figure 1). The lower section of the top front panel houses the air filter, which cleans intake air drawn in by the blower. Three cutouts in the top of the panel contain semi-opaque black plastic windows, through which the three system LEDs are visible when they are lit. EMI shielding surrounds the entire outer edge of the top front panel. The shielding acts as a spring, and compresses when you push the panel into the chassis to keep the panel fitted tightly into the chassis opening.
The bottom front panel is vented and covers the lower area of the top front panel that houses the air filter. The bottom front panel fits over the lower section of the top front panel and attaches to the chassis with ball studs. You must remove the bottom front panel before you can remove the top front panel.
You can remove the bottomD front panel while the system is operating to access or clean the air filter, but always turn system power off before removing the top front panel.
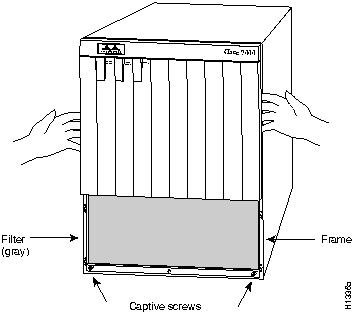
Figure 1 Chassis Top Front Panel, Shown with Bottom Front Panel Removed
The chassis panels provide shielding against electromagnetic interference (EMI) and work with the blower and air filter to maintain a constant flow of cooling air through the chassis. Replace the chassis panels if they become warped or broken.
The LED board contains the three LEDs that report system software (Normal) and power supply (Upper Power and Lower Power) status through semi-opaque panels on the front of the chassis. Figure 2 shows the three system status indicators.

Figure 2 System Status Indicators (Front-Panel LEDs)
The LED board is mounted to the backplane on a horizontal plane near the top of the chassis interior (shown edge-on in Figure 3). The board slides into two brackets mounted to the front of the backplane, and a connector on the rear of the LED board mates with a connector on the backplane.
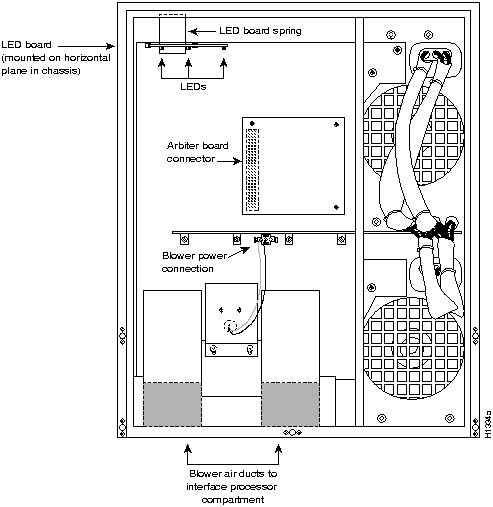
Figure 3 Cisco 7000 Internal Chassis Components, Front View
Two pins in the brackets and a metal spring that butts up against the ceiling of the chassis keep the board in place (see Figure 4). You must remove the top front chassis panel to access the LED board. Carefully follow the top front chassis panel removal instructions to avoid damaging the LEDs or the LED board.
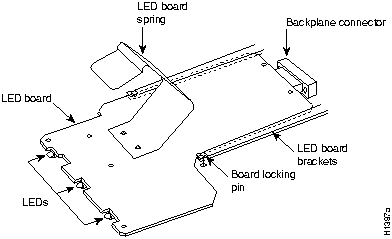
Figure 4 LED Board
Before you begin an installation, review the safety guidelines in this section to avoid injuring yourself or damaging the equipment.
The following guidelines will help to ensure your safety and protect the equipment. This list is not inclusive of all potentially hazardous situations, so be alert.
- Always turn all power supplies OFF and disconnect power cords before removing the top front chassis panel. Dangerous current levels are present on the backplane when power is on.
- Do not work alone when potentially hazardous conditions exist.
- Carefully examine your work area for possible hazards such as moist floors, ungrounded power extension cables, and missing safety grounds.
- Before beginning any procedures requiring access to the chassis interior, locate the emergency power-off switch for the room in which you are working.
- Never assume that power has been disconnected from a circuit; always check.
In addition, use the guidelines that follow when working with any equipment that is connected to telephone wiring or other network cabling.
- Never install telephone wiring during a lightening storm.
- Never install telephone jacks in wet locations unless the jack is specifically designed for wet locations.
- Never touch uninsulated telephone wires or terminals unless the telephone line has been disconnected at the network interface.
- Use caution when installing or modifying telephone lines.
Electrostatic discharge (ESD) damage, which occurs when electronic boards or components are improperly handled, can result in complete or intermittent failures. The RP, SP, and IPs each comprise a printed circuit board that is fixed in a metal carrier. Electromagnetic interference (EMI) shielding, connectors, and a handle are integral components of the carrier. The LED board, however, is not intended to be handled and has no frame or shielding. Handle the LED board by the edges only; never touch the board components, traces, or connector pins.

- Caution: Always handle an LED board by the edges only; avoid touching the board components, traces, or connector pins.
Following are guidelines for preventing ESD damage:
- Always use an ESD strap and ensure that it makes good skin contact.
- When removing or installing an LED board, connect the equipment end of the ground strap to an unpainted surface of the chassis, such as the vertical metal frame that is exposed when the front chassis panels are removed.
- Handle boards by the edges only; avoid touching the board components, traces, or connector pins.
- Place a removed board component-side-up on an antistatic surface or in a static shielding bag. If you are returning the board to the factory, immediately place it in a static shielding bag to avoid ESD damage.
- Avoid contact between the board and clothing. The wrist strap only protects the board from ESD voltages on the body; ESD voltages on clothing can still cause damage.
- Note: For safety, periodically check the resistance value of the antistatic strap. The measurement should be within the range of 1 and 10 Mohms.
You need the following tools to replace a front chassis panel or an LED board:
- If you are replacing the top front chassis panel or the LED board, you need a 3/16-inch flat-blade or No. 2 Phillips screwdriver to remove the top front chassis panel. Earlier chassis (the first several hundred shipped) use slotted screws, and later chassis use Phillips screws to secure the top front panel to the chassis.
- If you are replacing an LED board, you need an antistatic mat, foam pad, or bag for the removed board (immediately place a removed board into an antistatic bag if you will return it to the factory)
No tools are required to remove or replace the bottom front panel or the LED board.
You must remove the top and bottom front chassis panels to access the chassis interior to replace the LED board. Carefully follow the instructions for removing and replacing the top front panel; you can damage or destroy the LED board or top front panel by forcing a misaligned panel onto or off of the chassis body.

- Warning: Before accessing the chassis interior, turn all power supply switches OFF (O) and unplug the power cord. When the power is ON (|), high current (100A) is exposed on the backplane and around the power supply and wiring harnesses.
You must remove the bottom front panel before you can remove the top front panel. The plastic bottom front panel is attached to the chassis with ball studs. The top front panel is attached to the chassis with two captive screws. The EMI shielding around the outer edge of the top front panel acts as a spring, and compresses when you push the panel into the chassis to keep the panel fitted tightly into the chassis opening.
To remove the front panels, perform the following steps:
- Step 1: Grasp the bottom edge of the bottom chassis panel.
- Step 2: Pull the bottom of the panel out about one inch, then place your fingers behind the sides of the panel and pull it off the chassis (see Figure 5).
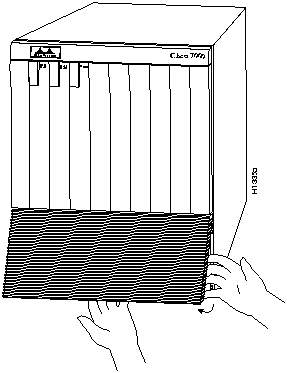
Figure 5 Removing the Bottom Front Panel
- Step 3: On the top front panel, use a screwdriver to loosen the two captive screws at the bottom edge of the panel frame.
- Step 4: Place one hand against the top front center of the panel to brace it (see Figure 6a). The top of the panel acts as a pivot point when you pull the bottom out and away from the chassis.
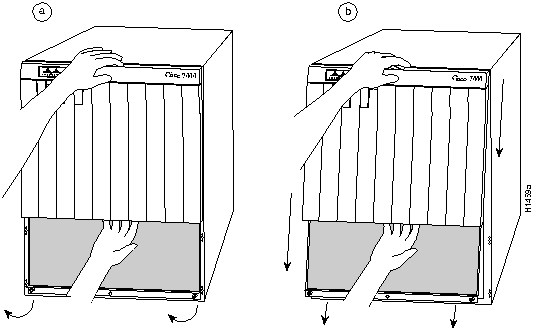
Figure 6 Removing the Top Front Panel
- Step 5: With your other hand, grasp the front of the panel by inserting your fingers into the opening on the underside of the bezel (see Figure 6a).
- Step 6: While pushing slightly against the top of the panel to constrain it, pivot the bottom edge of the frame outward about two inches (see Figure 6a). Because of the tightly compressed EMI shielding, you will have to use significant force to pull the bottom of the panel outward. However, be careful that you do not pull the panel more than two inches away from the chassis, or you can damage the inner bezel or LED board.
- Step 7: When the bottom of the frame clears the chassis opening, keep your hands in the same positions and pull the panel downward and off the chassis (see Figure 6b).
To replace the front panels, perform the following steps:
- Step 1: Grasp the sides of the top panel with both hands (see Figure 6a).
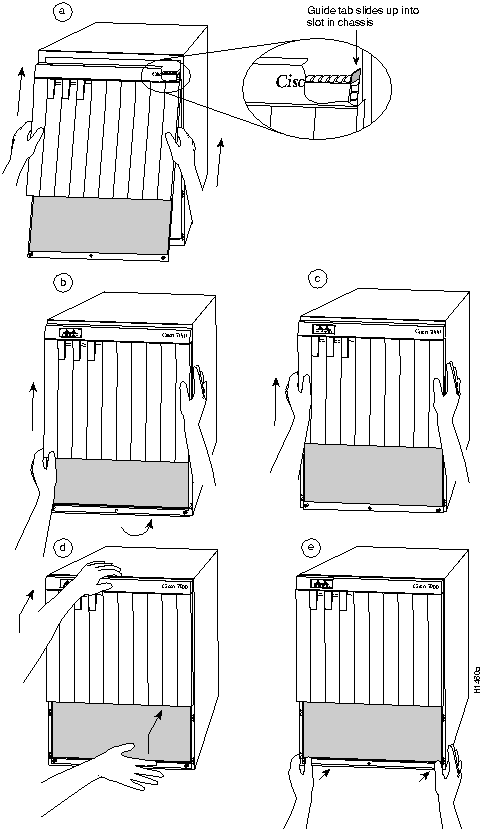
Figure 7 Replacing the Top Front Panel
- Step 2: Two guide tabs at the top edges of the panel fit into two slots in the top edges of the chassis opening. Tilt the top of the panel back (away from you) about 30 degrees from vertical and slide the two guide tabs into the chassis slots (see Figure 7a).
- Step 3: Check the top of the panel and make sure it is lined up with the top of the chassis opening. Failure to align the panel at this point can result in equipment damage when performing the next step.
- Step 4: Push the panel upward to push the tabs into the slots (see Figure 7a) and pivot the bottom of the panel toward the chassis until the panel frame meets the chassis (see Figure 7b). Maintain a steady upward pressure to keep the guide tabs in the chassis slots.
- Step 5: When the panel is flush against the front of the chassis, push the panel upward until the bottom of the panel is level with the bottom of the chassis opening (see Figure 7c).
- Step 6: While holding the panel in place, place one palm against the top front center of the panel to brace it, and place the other against the lip near the bottom edge of the frame (see Figure 7d).
- Step 7: Push the panel upward and back into the chassis opening until the tabs on the front sides of the panel are flush against the front of the chassis (see Figure 7d). You will have to use significant force to compress the EMI shielding enough to fit into the opening. If the panel resists, pull it slightly downward and make sure that the panel is lined up with the top and sides of the opening in the chassis.
- Step 8: When the tabs on the front sides of the panel are flush against the sides of the chassis, tighten the two captive screws in the bottom edge of the frame.
- Step 9: To replace the bottom front panel, place the ball studs on the back of the panel over the holes in the front lip of the chassis and push the panel onto the chassis until the ball studs snap into place.
This completes the chassis front panel removal and replacement procedures.
The LED board slides horizontally into two mounting brackets near the top of the chassis interior and connects directly to the backplane. You must turn all system power off and remove the top and bottom front chassis panels to access the chassis interior.

- Warning: Before accessing the chassis interior, turn the power switch to OFF (O) and unplug the power cord. The backplane carries dangerous current levels.
To remove the existing LED board, perform the following steps:
- Step 1: Ensure that all system power is turned OFF and that power cords are disconnected from the power supplies or the power source.
- Step 2: Follow the steps in "Removing the Panels" on page 7 to remove the top and bottom front chassis panels.
- Step 3: If you have not already done so, slip on an ESD-prevention grounding strap. (A disposable wrist strap is included with all spare boards.) Connect the equipment end of the strap to an unpainted surface inside the chassis, such as the metal frame that is exposed when the front panels are removed.
- Step 4: Locate the LED board (see Figure 3), which is mounted on a horizontal plane in two plastic brackets near the top of the chassis.
- Step 5: Two steel pins near the front of the brackets hold the board in place (see Figure 4). On each pin, place your thumb on the top of the pin and your forefinger underneath the bracket to support it, and press the pins down and out of the guide holes in the board.

- Caution: Handle the LED board by the edges only to avoid damage from ESD.
- Step 6: Grasp the edges of the board and place a finger on the top of the LED board spring to depress it.
- Step 7: Keep the spring depressed as you pull the board straight out at a 90-degree orientation to the backplane.
- Step 8: Place the board in an antistatic bag if returning it to the factory.
To install the new LED board, perform the following steps:
- Step 1: Ensure that the power supplies are still turned OFF and disconnected from the power source, and that you are still wearing a ground strap.

- Caution: Handle the LED board by the edges only to avoid damage from ESD.
- Step 2: Hold the board with the LEDs toward you, with the spring on the top, and with the LEDs and components on the underside of the board.Grasp the edges of the board and place a finger on the top of the LED board spring to depress it (see Figure 4).
- Step 3: Slide the back edge of the board (the end with the connector) into the guides in the plastic brackets (see Figure 4).
- Step 4: Keep the spring depressed as you push the board straight in at a 90-degree orientation to the backplane until the connector on the LED board is fully seated in the backplane connector.
- Step 5: Slowly release the spring and allow it to spring up against the chassis ceiling.
- Step 6: A steel pin at the front of each bracket holds the board in place (see Figure 4). On each side, place your thumb underneath the pin and your forefinger on top of the bracket to support it, and press the pin up through the guide in the board. If the pin does not extend fully upward, push the board firmly into the backplane connector until the pins align with the guide holes in the board.
- Step 7: Refer to the "Replacing the Panels" on page 8 to replace the top and bottom front chassis panels before you restart the system to verify the installation.
This completes the installation. Proceed to the next section to restart the system and verify that the new LED board functions correctly.
Perform the following steps to verify that the new LED board functions correctly.
- Step 1: Turn all power supplies back ON and observe the three system status indicators on the front panel.
- Step 2: When you turn each power supply ON, the corresponding Upper Power and Lower Power LEDs on the front panel should light for each bay in which a power supply is installed and turned ON. If any do not light, do the following:
- Check the AC Power LED on the power supply. If it is lit, suspect that the front panel LED has failed and proceed with the installation checkout to determine if the other LEDs light.
- If the AC Power LED is not lit, or if the DC Fail LED is lit, ensure that the power supply is fully inserted in the power supply bay and that the captive installation screw on the top of the supply is tightened. The switch will not turn completely to the ON (|) position unless the supply is installed correctly.
- Ensure that the power cord is fully seated in the power supply port and that the retention clip is snapped up around the plug.
- Check the cable connection at the power source and ensure that it is connected properly.
- If the AC Power on the power supply still fails to light, suspect a power supply failure. If a second (redundant) power supply is available and functioning properly, proceed with the installation checkout.
- Step 3: After the system boots successfully, verify that the front panel Normal LED lights. If it does not light, do the following:
- Check the Normal LED on the RP. If it is lit, the system software is functioning properly. Turn all power supplies OFF and reseat the LED board by following steps 2 through 6 in "Installing a New LED Board."
- If the RP Normal LED fails to light, the system software has failed to boot properly. Toggle the power supplies OFF then ON again and observe the behavior of the LEDs on the RP (so that you can report it to a service representative if you need to call for technical assistance).
- If the front-panel Normal LED fails to light but the RP Normal LED does light, suspect that the new LED board is not functioning properly.
- Step 4: If after several attempts, the LED board does not appear to be functioning properly, or if you experience trouble with the installation (for instance, if the guide pins do not align with the holes in the board), contact a customer service representative or refer to "Obtaining Technical Assistance" on page 2 for further instructions.
This completes the LED board replacement.
Copyright 1988-1995
©
Cisco Systems Inc.