|
|
4-Port and 8-Port Asynchronous/Synchronous Serial Network Module Configuration Note
Product Numbers:
NM-4A/S, NM-8A/S, CPANM-4A/S, CPANM-4A/S
This document provides information about the following network modules for the Cisco 3600 series of modular access routers:
With the appropriate serial transition cable, the ports on these modules can provide an EIA/TIA-232, EIA/TIA-449, V.35, X.21, DTE/DCE, EIA530 DTE, or NRZ/NRZI serial interface.
Figure 1 : 4-Port Asynchronous/Synchronous Serial Network Module

Figure 2 : 8-Port Asynchronous/Synchronous Serial Network Module
Use this document in conjunction with your router installation and configuration guide and the Regulatory Compliance and Safety Information document for your router. If you have questions or need help, refer to the section "Obtaining Service and Support" later in this document for further information.
This document contains the following sections:
![]()
Follow these guidelines to ensure general safety:
Follow these guidelines when working on equipment powered by electricity:
Preventing Electrostatic Discharge Damage
Electrostatic discharge (ESD) can damage equipment and impair electrical circuitry. It occurs when electronic printed circuit cards are improperly handled and can result in complete or intermittent failures. Always follow ESD prevention procedures when removing and replacing cards. Ensure that the router chassis is electrically connected to earth ground. Wear an ESD-preventive wrist strap, ensuring that it makes good skin contact. Connect the clip to an unpainted surface of the chassis frame to safely channel unwanted ESD voltages to ground. To properly guard against ESD damage and shocks, the wrist strap and cord must operate effectively. If no wrist strap is available, ground yourself by touching the metal part of the chassis.
You need the following tools and equipment to install a network module in a Cisco 3600 series chassis slot:
Installing A/S Network Modules in a Chassis Slot
The following instructions apply only to installing network modules in a chassis slot. To install a WAN interface card in a network module, see the configuration note for the WAN interface card.
You can install network modules in the chassis either before or after mounting the router, whichever is more convenient.
Follow this procedure to install a network module:
If the router is configured with fewer than four network modules, make sure that blank panels fill the open chassis slots to provide proper airflow. (See Figure 3.)
Figure 3 : Blank Network Module Panel
Connecting the A/S Serial Module to the Network
The A/S serial network module provides four or eight universal high-density 60-pin receptacles. The serial cable attached to each receptacle determines the port's electrical interface type and mode, data terminal equipment (DTE) or data communications equipment (DCE).
Cisco Systems offers five types of serial cables (also called serial adapter cables or transition cables):
All serial cables provide a universal plug at the network module end. The network end of each cable provides the physical connectors most commonly used for the interface. For example, the network end of the EIA/TIA-232 serial cable is a DB-25 connector, the most widely used EIA/TIA-232 connector.
All serial interface types except EIA-530 are available in DTE or DCE format: DTE with a plug connector at the network end and DCE with a receptacle at the network end. V.35 is available in either mode with either gender at the network end. EIA-530 is available in DTE only.
Serial cables are not provided with the network module. For ordering information, refer to the section "Obtaining Service and Support" later in this document.
Connecting the Module to the Network
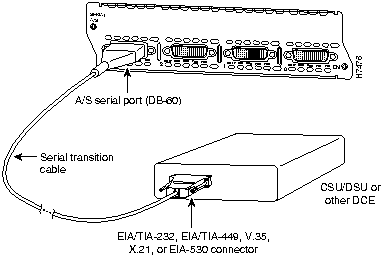
After you install an A/S serial network module, use the appropriate serial cable to connect each of the modules's DB-60 serial ports to one of the following types of equipment (see Figure 4):
Figure 4 : Connecting an A/S Serial Network Module to a CSU/DSU
The following sections illustrate serial cables of each interface type and list their signal pinouts.
EIA/TIA-232 Serial Cable Assembly
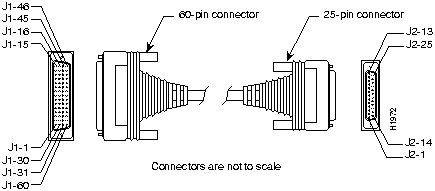
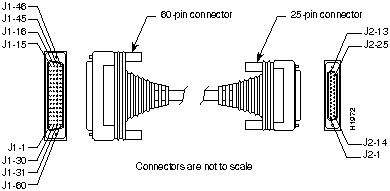
Figure 5 shows the EIA/TIA-232 serial cable assembly. Table 1 lists the DTE pinout and Table 2 lists the DCE pinout. Arrows indicate signal direction: ---> means DTE to DCE and <--- means DCE to DTE.
Figure 5 : EIA/TIA-232 Cable Assembly
EIA/TIA-449 Serial Cable Assembly
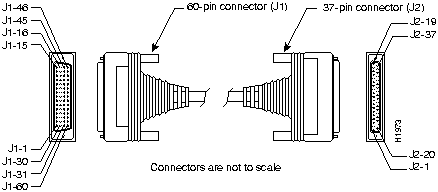
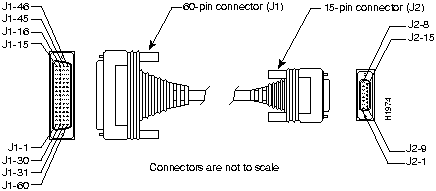
Figure 6 shows the EIA/TIA-449 serial cable assembly. Table 3 lists the DTE pinout and Table 4 lists the DCE pinout. Arrows indicate signal direction: ---> means DTE to DCE and <--- means DCE to DTE.
Figure 6 : EIA/TIA-449 Serial Cable Assembly
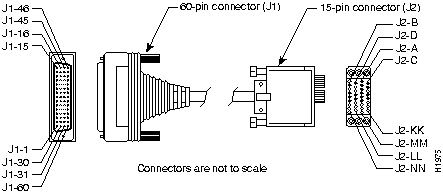
Figure 7 shows the V.35 serial cable assembly. Table 5 lists the DTE pinout and Table 6 lists the DCE pinout. Arrows indicate signal direction: ---> means DTE to DCE and <--- means DCE to DTE.
Figure 7 : V.35 Serial Cable Assembly
Figure 8 shows the X.21 serial cable assembly. Table 7 lists the DTE pinout and Table 8 lists the DCE pinout. Arrows indicate signal direction: ---> means DTE to DCE and <--- means DCE to DTE.
Figure 8 : X.21 Serial Cable Assembly
Figure 9 shows the EIA-530 serial cable assembly, and Table 9 lists the pinout. Arrows indicate signal direction: ---> means DTE to DCE and <--- means DCE to DTE.
The EIA-530 interface cannot be operated in DCE mode, and no DCE cable is available for it.
Figure 9 : EIA-530 Serial Cable Assembly
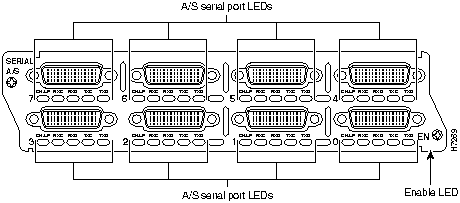
All network modules have an enable LED. This LED indicates that the module has passed its self-tests and is available to the router.
Each port on an A/S serial network module also has the additional LEDs shown in Table 10.
Table 10 : A/S Serial Network Module LEDs
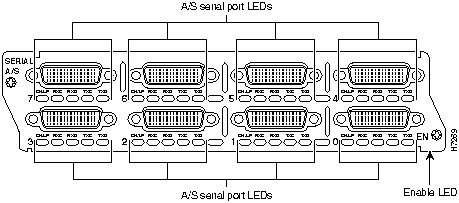
Figure 10 shows LEDs for the 4-port A/S serial network module, and Figure 11 shows LEDs for the 8-port A/S serial network module.
Figure 10 : 4-Port A/S Serial Network Module LEDs
Figure 11 : 8-Port A/S Serial Network Module LEDs
Configuring the Serial Interfaces
Whenever you install a new interface, or if you want to change the configuration of an existing interface, you must configure the interface. If you replace a module that was already configured, the router recognizes it and brings up the interface in the existing configuration.
Before you configure an interface, have the following information available:
You can configure the new interfaces and other router parameters by using any of the following methods:
These procedures are explained in the following sections. If you have questions or need help, refer to the section "Obtaining Service and Support" later in this document for further information.
You can configure the serial interfaces on your A/S serial network module manually, by entering Cisco IOS commands on the command line. This method, called configuration mode, provides the greatest power and flexibility.
Before you begin, disconnect all WAN cables from the router to keep it from trying to run the AutoInstall process. The router tries to run AutoInstall whenever you power it ON if there is a WAN connection on both ends and the router does not have a valid configuration file stored in nonvolatile random-access memory (NVRAM) (for instance, when you add a new interface). It can take several minutes for the router to determine that AutoInstall is not connected to a remote Transmission Control Protocol/Internet Protocol (TCP/IP) host.
To enter configuration mode, follow this procedure:
Table 11 : Half-Duplex Timer Commands
The AutoInstall process is designed to configure the router automatically after it connects to your WAN. For AutoInstall to work properly, a TCP/IP host on your network must be configured to provide the configuration files. The TCP/IP host can reside anywhere on the network if the following two conditions are met:
This functionality is coordinated by your system administrator at the TCP/IP host site. You should not try to use AutoInstall unless the required files have been installed on the TCP/IP host.
Follow this procedure to prepare your router for the AutoInstall process:
You can configure the router manually using the System Configuration Dialog facility. Unlike configuration mode, the System Configuration Dialog prompts you for each response.
Before you begin, disconnect all WAN cables from the router to keep it from trying to run the AutoInstall process. The router tries to run AutoInstall whenever you power it ON if there is a WAN connection on both ends and the router does not have a configuration file stored in NVRAM. It can take several minutes for the router to determine that AutoInstall is not connected to a remote TCP/IP host.
This section shows a sample configuration using the System Configuration Dialog. You should enter values appropriate for your router and network.
Many prompts in the System Configuration Dialog include default answers, shown in square brackets following the question. Enter your response, or press Return to accept the default answer.
You can request help at any time by entering a question mark (?) at a System Configuration Dialog prompt.
Follow this procedure to configure the router using the System Configuration Dialog:
All serial ports are initially configured as synchronous. You can configure serial ports you plan to use as asynchronous or make other changes to the configuration in configuration mode, explained in the section "Configuration Mode" earlier in this document.
For service and support for a product purchased from a reseller, contact the reseller. Resellers offer a wide variety of Cisco service and support programs, which are described in the section "Service and Support" in the information packet that shipped with your chassis.
For service and support for a product purchased directly from Cisco, use CCO.
CCO is Cisco Systems' primary, real-time support channel. SMARTnet customers and partners can self-register on CCO to obtain additional content and services.
Available 24 hours a day, 7 days a week, CCO provides a wealth of standard and value-added services to Cisco's customers and business partners. CCO services include product information, software updates, release notes, technical tips, the Bug Navigator, configuration notes, brochures, descriptions of service offerings, and download access to public and authorized files.
CCO serves a wide variety of users through two interfaces that are updated and enhanced simultaneously---a character-based version and a multimedia version that resides on the World Wide Web (WWW). The character-based CCO supports Zmodem, Kermit, Xmodem, FTP, and Internet e-mail, and is excellent for quick access to information over lower bandwidths. The WWW version of CCO provides richly formatted documents with photographs, figures, graphics, and video, as well as hyperlinks to related information.
You can access CCO in the following ways:
For a copy of CCO's Frequently Asked Questions (FAQ), contact ccohelp@cisco.com. For additional information, contact ccoteam@cisco.com.
Please use CCO to obtain general information about Cisco Systems, Cisco products, or upgrades. If CCO is not accessible, contact 800 553-6387, 408 526-7208, or csrep@cisco.com.
Copyright 1988-1996 © Cisco Systems Inc.
![]()
![]()
![]()
![]()
![]()
![]()
![]()
![]()
![]()
![]()
![]()
![]()
![]()
![]()

60-Pin
Signal
Note
Direction
25-Pin
Signal
J1-50
J1-51
J1-52
MODE_0
GND
MODE_DCE
Shorting group
--
--
--
J1-46
Shield GND
Single
--
J2-1
Shield GND
J1-46
Shield GND
Single
--
J2-1
Shield GND
J1-41
Shield
TXD/RXD
--
Twisted pair no. 5
--->
--
J2-2
Shield
TXD
--
J1-36
Shield
RXD/TXD
--
Twisted pair no. 9
<---
--
J2-3
Shield
RXD
--
J1-42
Shield
RTS/CTS
--
Twisted pair no. 4
--->
--
J2-4
Shield
RTS
--
J1-35
Shield
CTS/RTS
--
Twisted pair no. 10
<---
--
J2-5
Shield
CTS
--
J1-34
Shield
DSR/DTR
--
Twisted pair no. 11
<---
--
J2-6
Shield
DSR
--
J1-45
Shield
Circuit GND
--
Twisted pair no. 1
--
--
J2-7
Shield
Circuit GND
--
J1-33
Shield
DCD/LL
--
Twisted pair no. 12
<---
--
J2-8
Shield
DCD
--
J1-37
Shield
TXC/NIL
--
Twisted pair no. 8
<---
--
J2-15
Shield
TXC
--
J1-38
Shield
RXC/TXCE
--
Twisted pair no. 7
<---
--
J2-17
Shield
RXC
--
J1-44
Shield
LL/DCD
--
Twisted pair no. 2
--->
--
J2-18
Shield
LTST
--
J1-43
Shield
DTR/DSR
--
Twisted pair no. 3
--->
--
J2-20
Shield
DTR
--
J1-39
Shield
TXCE/TXC
--
Twisted pair no. 6
--->
--
J2-24
Shield
TXCE
--
60-Pin
Signal
Note
Direction
25-Pin
Signal
J1-50
J1-51
MODE_0
GND
Shorting group
--
--
--
J1-36
Shield
RXD/TXD
--
Twisted pair no. 9
<---
--
J2-2
Shield
TXD
--
J1-41
Shield
TXD/RXD
--
Twisted pair no. 5
--->
--
J2-3
Shield
RXD
--
J1-35
Shield
CTS/RTS
--
Twisted pair no. 10
<---
--
J2-4
Shield
RTS
--
J1-42
Shield
RTS/CTS
--
Twisted pair no. 4
--->
--
J2-5
Shield
CTS
--
J1-43
Shield
DTR/DSR
--
Twisted pair no. 3
--->
--
J2-6
Shield
DSR
--
J1-45
Shield
Circuit GND
--
Twisted pair no. 1
--
--
J2-7
Shield
Circuit GND
J1-44
Shield
LL/DCD
--
Twisted pair no. 2
--->
--
J2-8
Shield
DCD
--
J1-39
Shield
TXCE/TXC
--
Twisted pair no. 7
--->
--
J2-15
Shield
TXC
--
J1-40
Shield
NIL/RXC
--
Twisted pair no. 6
--->
--
J2-17
Shield
RXC
--
J1-33
Shield
DCD/LL
--
Twisted pair no. 12
<---
--
J2-18
Shield
LTST
--
J1-34
Shield
DSR/DTR
--
Twisted pair no. 11
<---
--
J2-20
Shield
DTR
--
J1-38
Shield
RXC/TXCE
--
Twisted pair no. 8
<---
--
J2-24
Shield
TXCE
--
60-Pin
Signal Name
Note
Direction
37-Pin
Signal Name
J1-49
J1-48
MODE_1
GND
Shorting group
--
--
--
J1-51
J1-52
GND
MODE_DCE
Shorting group
--
--
--
J1-46
Shield_GND
Single
_
J2-1
Shield GND
J1-11
J1-12
TXD/RXD+
TXD/RXD--
Twisted pair no. 6
--->
--->
J2-4
J2-22
SD+
SD--
J1-24
J1-23
TXC/RXC+
TXC/RXC--
Twisted pair no. 9
<---
<---
J2-5
J2-23
ST+
ST--
J1-28
J1-27
RXD/TXD+
RXD/TXD--
Twisted pair no. 11
<---
<---
J2-6
J2-24
RD+
RD--
J1-9
J1-10
RTS/CTS+
RTS/CTS--
Twisted pair no. 5
--->
--->
J2-7
J2-25
RS+
RS--
J1-26
J1-25
RXC/TXCE+
RXC/TXCE--
Twisted pair no. 10
<---
<---
J2-8
J2-26
RT+
RT--
J1-1
J1-2
CTS/RTS+
CTS/RTS--
Twisted pair no. 1
<---
<---
J2-9
J2-27
CS+
CS--
J1-44
J1-45
LL/DCD
Circuit_GND
Twisted pair no. 12
--->
_
J2-10
J2-37
LL
SC
J1-3
J1-4
DSR/DTR+
DSR/DTR--
Twisted pair no. 2
<---
<---
J2-11
J2-29
DM+
DM--
J1-7
J1-8
DTR/DSR+
DTR/DSR--
Twisted pair no. 4
--->
--->
J2-12
J2-30
TR+
TR--
J1-5
J1-6
DCD/DCD+
DCD/DCD--
Twisted pair no. 3
<---
<---
J2-13
J2-31
RR+
RR--
J1-13
J1-14
TXCE/TXC+
TXCE/TXC--
Twisted pair no. 7
--->
--->
J2-17
J2-35
TT+
TT--
J1-15
J1-16
Circuit_GND
Circuit_GND
Twisted pair no. 9
--
--
J2-19
J2-20
SG
RC
60-Pin
Signal Name
Note
Direction
37-Pin
Signal Name
J1-49
J1-48
MODE_1
GND
Shorting group
--
--
--
J1-46
Shield_GND
Single
--
J2-1
Shield GND
J1-28
J1-27
RXD/TXD+
RXD/TXD--
Twisted pair no. 11
<---
<---
J2-4
J2-22
SD+
SD--
J1-13
J1-14
TXCE/TXC+
TXCE/TXC--
Twisted pair no. 7
--->
--->
J2-5
J2-23
ST+
ST--
J1-11
J1-12
TXD/RXD+
TXD/RXD--
Twisted pair no. 6
--->
--->
J2-6
J2-24
RD+
RD--
J1-1
J1-2
CTS/RTS+
CTS/RTS--
Twisted pair no. 1
<---
<---
J2-7
J2-25
RS+
RS--
J1-24
J1-23
TXC/RXC+
TXC/RXC--
Twisted pair no. 9
--->
--->
J2-8
J2-26
RT+
RT--
J1-9
J1-10
RTS/CTS+
RTS/CTS--
Twisted pair no. 5
--->
--->
J2-9
J2-27
CS+
CS--
J1-29
J1-30
NIL/LL
Circuit_GND
Twisted pair no. 12
--->
--
J2-10
J2-37
LL
SC
J1-7
J1-8
DTR/DSR+
DTR/DSR--
Twisted pair no. 4
--->
--->
J2-11
J2-29
DM+
DM--
J1-3
J1-4
DSR/DTR+
DSR/DTR--
Twisted pair no. 2
<---
<---
J2-12
J2-30
TR+
TR--
J1-5
J1-6
DCD/DCD+
DCD/DCD--
Twisted pair no. 3
--->
--->
J2-13
J2-31
RR+
RR--
J1-26
J1-25
RXC/TXCE+
RXC/TXCE--
Twisted pair no. 10
<---
<---
J2-17
J2-35
TT+
TT--
J1-15
J1-16
Circuit_GND
Circuit_GND
Twisted pair no. 8
_
_
J2-19
J2-20
SG
RC
60-Pin
Signal Name
Type
Direction
34-Pin
Signal Name
J1-49
J1-48
MODE_1
GND
Shorting group
--
--
--
J1-50
J1-51
J1-52
MODE_0
GND
MODE_DCE
Shorting group
--
--
--
J1-53
J1-54
J1-55
J1-56
TxC/NIL
RxC_TxCE
RxD/TxD
GND
Shorting group
--
--
--
J1-46
Shield_GND
Single
--
J2-A
Frame GND
J1-45
Shield
Circuit_GND
--
Twisted pair no. 12
--
--
J2-B
Shield
Circuit GND
--
J1-42
Shield
RTS/CTS
--
Twisted pair no. 9
--->
--
J2-C
Shield
RTS
--
J1-35
Shield
CTS/RTS
--
Twisted pair no. 8
<---
--
J2-D
Shield
CTS
--
J1-34
Shield
DSR/DTR
--
Twisted pair no. 7
<---
--
J2-E
Shield
DSR
--
J1-33
Shield
DCD/LL
--
Twisted pair no. 6
<---
--
J2-F
Shield
RLSD
--
J1-43
Shield
DTR/DSR
--
Twisted pair no. 10
--->
--
J2-H
Shield
DTR
--
J1-44
Shield
LL/DCD
--
Twisted pair no. 11
--->
--
J2-K
Shield
LT
--
J1-18
J1-17
TxD/RxD+
TxD/RxD--
Twisted pair no. 1
--->
--->
J2-P
J2-S
SD+
SD--
J1-28
J1-27
RxD/TxD+
RxD/TxD--
Twisted pair no. 5
<---
<---
J2-R
J2-T
RD+
RD--
J1-20
J1-19
TxCE/TxC+
TxCE/TxC--
Twisted pair no. 2
--->
--->
J2-U
J2-W
SCTE+
SCTE--
J1-26
J1-25
RxC/TxCE+
RxC/TxCE--
Twisted pair no. 4
<---
<---
J2-V
J2-X
SCR+
SCR--
J1-24
J1-23
TxC/RxC+
TxC/RxC--
Twisted pair no. 3
<---
<---
J2-Y
J2-AA
SCT+
SCT--
60-Pin
Signal Name
Type
Direction
34-Pin
Signal Name
J1-49
J1-48
MODE_1
GND
Shorting group
--
--
--
J1-50
J1-51
MODE_0
GND
Shorting group
--
--
--
J1-53
J1-54
J1-55
J1-56
TxC/NIL
RxC_TxCE
RxD/TxD
GND
Shorting group
--
--
--
J1-46
Shield_GND
Single
--
J2-A
Frame GND
J1-45
Shield
Circuit_GND
--
Twisted pair no. 12
--
--
J2-B
Shield
Circuit GND
--
J1-35
Shield
CTS/RTS
--
Twisted pair no. 8
<---
--
J2-C
Shield
RTS
--
J1-42
Shield
RTS/CTS
--
Twisted pair no. 9
--->
--
J2-D
Shield
CTS
--
J1-43
Shield
DTR/DSR
--
Twisted pair no. 10
--->
--
J2-E
Shield
DSR
--
J1-44
Shield
LL/DCD
--
Twisted pair no. 11
--->
--
J2-F
Shield
RLSD
--
J1-34
Shield
DSR/DTR
--
Twisted pair no. 7
<---
--
J2-H
Shield
DTR
--
J1-33
Shield
DCD/LL
--
Twisted pair no. 6
<---
--
J2-K
Shield
LT
--
J1-28
J1-27
RxD/TxD+
RxD/TxD--
Twisted pair no. 5
<---
<---
J2-P
J2-S
SD+
SD--
J1-18
J1-17
TxD/RxD+
TxD/RxD--
Twisted pair no. 1
--->
--->
J2-R
J2-T
RD+
RD--
J1-26
J1-25
RxC/TxCE+
RxC/TxCE--
Twisted pair no. 4
<---
<---
J2-U
J2-W
SCTE+
SCTE--
J1-22
J1-21
NIL/RxC+
NIL/RxC--
Twisted pair no. 3
--->
--->
J2-V
J2-X
SCR+
SCR--
J1-20
J1-19
TxCE/TxC+
TxCE/TxC--
Twisted pair no. 2
--->
--->
J2-Y
J2-AA
SCT+
SCT--
60-Pin
Signal Name
Type
Direction
15-Pin
Signal Name
J1-48
J1-47
GND
MODE_2
Shorting group
-
--
--
J1-51
J1-52
GND
MODE_DCE
Shorting group
--
--
--
J1-46
Shield_GND
Single
--
J2-1
Shield GND
J1-11
J1-12
TXD/RXD+
TXD/RXD--
Twisted pair no. 3
--->
--->
J2-2
J2-9
Transmit+
Transmit--
J1-9
J1-10
RTS/CTS+
RTS/CTS--
Twisted pair no. 2
--->
--->
J2-3
J2-10
Control+
Control--
J1-28
J1-27
RXD/TXD+
RXD/TXD--
Twisted pair no. 6
<---
<---
J2-4
J2-11
Receive+
Receive--
J1-1
J1-2
CTS/RTS+
CTS/RTS--
Twisted pair no. 1
<---
<---
J2-5
J2-12
Indication+
Indication--
J1-26
J1-25
RXC/TXCE+
RXC/TXCE--
Twisted pair no. 5
<---
<---
J2-6
J2-13
Timing+
Timing--
J1-15
Shield
Control_GND
--
Twisted pair no. 4
--
--
J2-8
Shield
Control GND
--
60 Pin
Signal Name
Type
Direction
15 Pin
Signal Name
J1-48
J1-47
GND
MODE_2
Shorting group
--
--
--
J1-46
Shield_GND
Single
--
J2-1
Shield GND
J1-28
J1-27
RXD/TXD+
RXD/TXD--
Twisted pair no. 6
<---
<---
J2-2
J2-9
Transmit+
Transmit--
J1-1
J1-2
CTS/RTS+
CTS/RTS--
Twisted pair no. 1
<---
<---
J2-3
J2-10
Control+
Control--
J1-11
J1-12
TXD/RXD+
TXD/RXD--
Twisted pair no. 3
--->
--->
J2-4
J2-11
Receive+
Receive--
J1-9
J1-10
RTS/CTS+
RTS/CTS--
Twisted pair no. 2
--->
--->
J2-5
J2-12
Indication+
Indication--
J1-24
J1-23
TXC/RXC+
TXC/RXC--
Twisted pair no. 4
--->
--->
J2-6
J2-13
Timing+
Timing--
J1-15
Shield
Control_GND
--
Twisted pair no. 5
--
--
J2-8
Shield
Control GND
--
60-Pin
Signal Name
25-Pin
Signal Name
Direction
J1-11
J1-12
TXD/RXD+
TXD/RXD--
J2-2
J2-14
BA(A), TXD+
BA(B), TXD--
--->
--->
J1-28
J1-27
RXD/TXD+
RXD/TXD--
J2-3
J2-16
BB(A), RXD+
BB(B), RXD--
<---
<---
J1-9
J1-10
RTS/CTS+
RTS/CTS--
J2-4
J2-19
CA(A), RTS+
CA(B), RTS--
--->
--->
J1-1
J1-2
CTS/RTS+
CTS/RTS--
J2-5
J2-13
CB(A), CTS+
CB(B), CTS--
<---
<---
J1-3
J1-4
DSR/DTR+
DSR/DTR--
J2-6
J2-22
CC(A), DSR+
CC(B), DSR--
<---
<---
J1-46
J1-47
Shield_GND
MODE_2
J2-1
--
Shield
--
Shorted
J1-48
J1-49
GND
MODE_1
--
--
--
--
Shorted
J1-5
J1-6
DCD/DCD+
DCD/DCD--
J2-8
J2-10
CF(A), DCD+
CF(B), DCD--
<---
<---
J1-24
J1-23
TXC/RXC+
TXC/RXC--
J2-15
J2-12
DB(A), TXC+
DB(B), TXC--
<---
<---
J1-26
J1-25
RXC/TXCE+
RXC/TXCE--
J2-17
J2-9
DD(A), RXC+
DD(B), RXC--
<---
<---
J1-44
J1-45
LL/DCD
Circuit_GND
J2-18
J2-7
LL
Circuit_ GND
--->
--
J1-7
J1-8
DTR/DSR+
DTR/DSR--
J2-20
J2-23
CD(A), DTR+
CD(B), DTR--
--->
--->
J1-13
J1-14
TXCE/TXC+
TXCE/TXC--
J2-24
J2-11
DA(A), TXCE+
DA(B), TXCE--
--->
--->
J1-51
J1-52
GND
MODE_DCE
--
--
--
--
Shorted
LED
Meaning
CN/LP
Connect when green, loopback when yellow
RXC
Receive clock
RXD
Receive activity
TXC
Transmit clock
TXD
Transmit activity

![]()
Would you like to enter the initial dialog? [yes]:
If the current configuration is valid, you enter the normal operating mode automatically.
Router>
enable
Password:
Router#
Router#
config terminal
Router(config)#
Router(config)#
ip routing
Router(config)#
appletalk routing
Router(config)#
ipx routing
Router(config)#
interface serial 0/0
Router(config-if)#
Router(config-if)#
ip address 172.16.74.1 255.255.255.0
Router(config-if)#
appletalk static cable-range 5-5
Router(config-if)#
appletalk zone ZZSerial
Router(config-if)#
ipx network B003
Router(config-if)#
physical-layer async
Router(config-if)#
async mode dedicated
Router(config-if)#
async default routing
line async 19
speed 115200
Router(config-if)#
physical-layer sync
Router(config-if)#
half-duplex controlled carrier
Router(config-if)#
no half-duplex controlled carrier
Router(config-if)#
half-duplex timer dcd-drop-delay 100
Timer
Syntax
Default Setting
(Milliseconds)
CTS delay1
half-duplex timer cts-delay
100
CTS drop timeout
half-duplex timer cts-drop-timeout
5000
DCD drop delay
half-duplex timer dcd-drop-delay
100
DCD transmission start delay
half-duplex timer dcd-txstart-delay
100
RTS2 drop delay
half-duplex timer rts-drop-delay
100
RTS timeout
half-duplex timer rts-timeout
2000
Transmit delay
half-duplex timer transmit-delay
0
1 CTS = Clear To Send.
2 RTS = Ready To Send.
Router(config-if)#
clockrate 72000
1200
2400
4800
9600
19200
38400
56000
64000
72000
125000
148000
500000
800000
1000000
1300000
2000000
4000000
Router(config-if)#
dce-terminal-timing-enable
Router(config-if)#
invert-txc
Router(config-if)#
nrzi-encoding
Router#
show running-config
Router#
show startup-config
Router#
copy running-config startup-config
Building configuration. . .
[OK]
Router#
Router#
copy running-config startup-config
Building configuration. . .
[OK]
Router#
This step saves the configuration settings that the AutoInstall process created. If you do not do this, your new configuration will be lost the next time you boot the router.
Would you like to enter the initial dialog? [yes]:
You can enter the System Configuration Dialog at any time from the enable prompt (Router#) by entering the setup command.
First, would you like to see the current interface summary? [yes]:
Any interface listed with OK? value "NO" does not have a valid configuration
Interface IP-Address OK? Method Status Protocol
Serial0/0 unassigned NO unset down down
Serial0/1 unassigned NO unset down down
Serial0/2 unassigned NO unset down down
Serial0/3 unassigned NO unset down down
Configuring interface Serial0/0:
Is this interface in use? [yes]:
Configure IP on this interface? [yes]:
Configure IP unnumbered on this interface? [no]:
IP address for this interface:
172.16.74.1
Number of bits in subnet field [8]:
    Class B network is 172.16.0.0, 8 subnet bits; mask is

    255.255.255.0
Configure AppleTalk on this interface? [no]:
yes
Extended AppleTalk network? [yes]:
AppleTalk starting cable range [2]:
5
AppleTalk ending cable range [3]:
5
AppleTalk zone name [myzone]:
ZZSerial
AppleTalk additional zone name:
Configure IPX on this interface? [no]:
yes
IPX network number [2]:
B003
Use this configuration? [yes/no]:
yes
Building configuration...
Use the enabled mode 'configure' command to modify this configuration.
Press RETURN to get started!

![]()
![]()
![]()
![]()
![]()
![]()
![]()
![]()