Caution Before performing any procedures described in this appendix, review the sections "Safety Recommendations," "General Site Requirements," "Installation Checklist," and "Required Tools and Equipment" in the chapter "Preparing to Install the Router."
Removing the Cover
This section describes how to remove the cover. You must remove the chassis cover to gain access to the router's internal components, such as memory modules and the ROM.
You need a Number 1 Phillips or flat-blade screwdriver to complete this procedure.
 Warning Do not touch the power supply when the power cord is connected. For systems with a power switch, line voltages are present within the power supply even when the power switch is OFF and the power cord is connected. For systems without a power switch, line voltages are present within the power supply when the power cord is connected. (To see translated versions of this warning, refer to the Regulatory Compliance and Safety Information document that accompanied the router.)
Take the following steps to remove the cover:
Step 1 Turn OFF the power to the router. However, to channel ESD voltages to ground, do not unplug the power cable.
 Warning Before opening the chassis, disconnect the telephone-network cables to avoid contact with telephone-network voltages. (To see translated versions of this warning, refer to the Regulatory Compliance and Safety Information document that accompanied the router.)
Step 2 Remove all network interface cables from the rear panel.
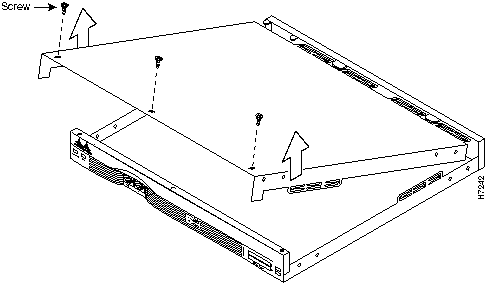
Step 3 Place the router so the front panel is facing you. Remove the three screws located on top of the cover near the front edge, as shown in Figure A-1. Set the screws aside in a safe place.
Step 4 Lift the front edge of the cover until the cover clears the front of the chassis, as shown in Figure A-1.
Figure A-1 : Lifting the Cover
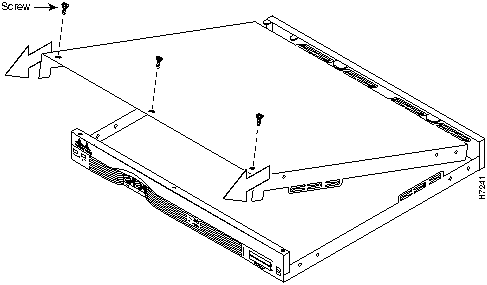
Step 5 Pull the cover toward you until the metal tabs on the rear edge separate from the chassis bottom, as shown in Figure A-2.
Step 6 Lift the cover free and set it aside.
When you are ready to replace the cover, refer to the section "Replacing the Cover" later in this appendix.
Figure A-2 : Removing the Cover
Memory Replacement Procedures
The router uses two types of replaceable or upgradable memory, DRAM and Flash memory.
DRAM
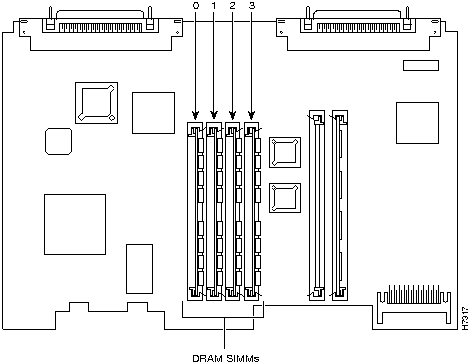
The router contains four 72-pin SIMM sockets (or banks) for DRAM. (See Figure A-3.) Each socket can be filled with a single 32-bit-wide 72-pin DRAM SIMM. DRAM can be configured as a mixture of shared memory, which is used for data transmitted or received by network modules and WAN interface cards, and primary or main memory, which is reserved for the CPU.
Note DRAM in the router only supports 32-bit operation.
Figure A-3 : DRAM SIMM Locations
Only certain combinations of DRAM SIMMs are permitted. These combinations are shown in Table A-1.
Table A-1 DRAM Configurations
| 4
|
--
|
--
|
--
|
4
|
| 4
|
4
|
--
|
--
|
8
|
| 4
|
4
|
4
|
--
|
12
|
| 4
|
8
|
--
|
--
|
12
|
| 4
|
4
|
8
|
--
|
16
|
| 4
|
16
|
--
|
--
|
20
|
| 8
|
--
|
--
|
--
|
8
|
| 8
|
4
|
--
|
--
|
12
|
| 8
|
8
|
--
|
--
|
16
|
| 8
|
16
|
--
|
--
|
24
|
| 8
|
8
|
4
|
--
|
20
|
| 8
|
8
|
8
|
--
|
24
|
| 8
|
8
|
4
|
4
|
24
|
| 8
|
8
|
4
|
8
|
28
|
| 8
|
8
|
8
|
4
|
28
|
| 8
|
8
|
16
|
--
|
32
|
| 16
|
--
|
--
|
--
|
16
|
| 16
|
4
|
--
|
--
|
20
|
| 16
|
8
|
--
|
--
|
24
|
| 16
|
16
|
4
|
--
|
36
|
| 16
|
16
|
8
|
--
|
40
|
| 16
|
16
|
4
|
4
|
40
|
| 16
|
16
|
8
|
4
|
44
|
| 16
|
16
|
4
|
8
|
44
|
| 16
|
16
|
8
|
8
|
48
|
| 16
|
16
|
16
|
--
|
48
|
| 16
|
16
|
16
|
4
|
52
|
| 16
|
16
|
4
|
16
|
52
|
| 16
|
16
|
16
|
8
|
56
|
| 16
|
16
|
8
|
16
|
56
|
| 16
|
16
|
16
|
16
|
64
|
DRAM Orientation
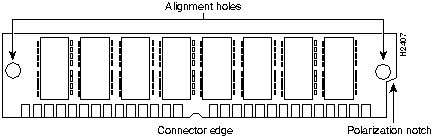
SIMMs are manufactured with a polarization notch to ensure proper orientation, and alignment holes to ensure proper positioning. Figure A-4 shows the polarization notch and alignment holes on a SIMM card. DRAM SIMM cards are installed with the connector edge down, the polarization notch near the front of the chassis, and the component side facing the right side of the chassis.
 Caution To avoid damaging ESD-sensitive components, observe all ESD precautions. To avoid damaging the underlying motherboard, avoid using excessive force when you remove or replace SIMMs.
Figure A-4 : DRAM SIMM
Removing DRAM SIMMS
Take the following steps to remove DRAM SIMMs:
Step 1 Attach an ESD-preventive wrist strap and ensure that it makes good contact with your skin. Connect the equipment end of the wrist strap to the metal back plate of the chassis, avoiding contact with the connectors.
Step 2 On the motherboard, locate the DRAM SIMM sockets shown in Figure A-3.
 Caution Handle SIMMs by the card edges only. SIMMs are ESD-sensitive components and can be damaged by mishandling.
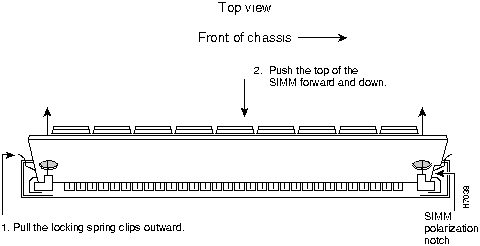
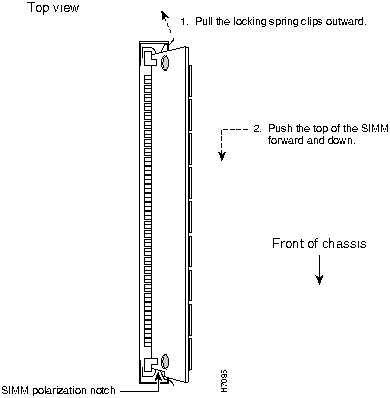
Step 3 Remove one SIMM at a time, beginning with the SIMM in bank 3. To lift the SIMM out of its socket, pull the locking spring clips on both sides outward and tilt the SIMM toward the right side of the chassis, free of the clips. (See Figure A-5.)
Figure A-5 : Removing DRAM SIMMs
Step 4 Hold the SIMM by the edges with your thumb and index finger and lift it out of the socket. Place the removed SIMM in an antistatic bag to protect it from ESD damage.
Step 5 Repeat Step 3 and Step 4 for each SIMM.
When you have removed the existing SIMMs, proceed to the next section, "Installing DRAM SIMMs," to install the new SIMMs.
Installing DRAM SIMMs
Take the following steps to install DRAM SIMMs:
Step 1 Attach an ESD-preventive wrist strap and ensure that it makes good contact with your skin. Connect the equipment end of the wrist strap to the metal back plate of the chassis, avoiding contact with the connectors.
Step 2 On the motherboard, locate the DRAM SIMM card sockets shown in Figure A-3.
 Caution Handle SIMMs by the card edges only. SIMMs are ESD-sensitive components and can be damaged by mishandling.
Step 3 Hold the SIMM with the polarization notch on the right, near the front of the chassis, and the components at the top, with the connector edge at the bottom. (See Figure A-4.)
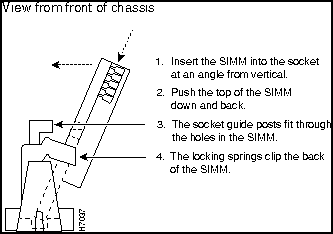
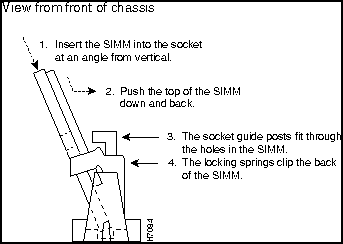
Step 4 Beginning with bank 0, insert the SIMM into the connector slot at an angle, tilted toward the right side of the chassis. Rock the SIMM into a vertical position (see Figure A-6), using the minimum amount of force required. When the SIMM is properly seated, the socket guide posts fit through the alignment holes, and the connector springs click into place.
Step 5 Ensure that each SIMM is straight and that the alignment holes (as shown in Figure A-6) line up with the plastic socket guides on the socket.
Figure A-6 : Installing DRAM SIMMs
 Caution It is normal to feel some resistance, but do not use excessive force on the SIMM, and do not touch the surface components.
Step 6 Repeat Step 3 to Step 5 for each SIMM.
When you finish replacing SIMMs, proceed to the section "Replacing the Cover" later in this appendix.
Flash Memory
This section describes how to upgrade the Flash memory SIMMs. The system code (Cisco IOS software) is stored in the Flash memory SIMMs. You might need to replace or add Flash memory SIMMs to upgrade to a new Cisco IOS software feature set.
The router contains one or two 80-pin Flash memory SIMMs. These SIMMs are not interchangeable with DRAM SIMMs. You can upgrade Flash memory by replacing the existing 4-MB SIMM with an 8-MB or 16-MB SIMM, or by adding a SIMM to the second Flash memory socket. You can install from 4 MB to 32 MB of Flash memory. The size of the SIMMs in the two Flash memory sockets need not be the same. Table A-2 lists the Flash memory SIMM configurations possible and the resulting total Flash memory.
Table A-2 Flash Memory SIMM Configurations
| 4 MB
|
--
|
4 MB
|
| 4 MB
|
4 MB
|
8 MB
|
| 4 MB
|
8 MB
|
12 MB
|
| 4 MB
|
16 MB
|
20 MB
|
| 8 MB
|
--
|
8 MB
|
| 8 MB
|
4 MB
|
12 MB
|
| 8 MB
|
8 MB
|
16 MB
|
| 8 MB
|
16 MB
|
24 MB
|
| 16 MB
|
--
|
16 MB
|
| 16 MB
|
4 MB
|
20 MB
|
| 16 MB
|
8 MB
|
24 MB
|
| 16 MB
|
16 MB
|
32 MB
|
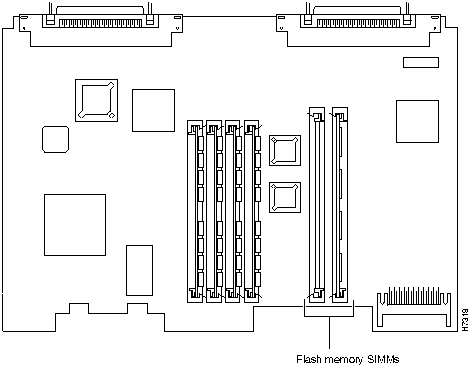
Figure A-7 shows the Flash memory SIMM locations.
Figure A-7 : Flash Memory SIMM Locations
SIMMs are manufactured with a polarization notch to ensure proper orientation, and alignment holes to ensure proper positioning, similar to those shown in Figure A-4. Flash SIMM cards are installed with the connector edge down, the polarization notch near the front of the chassis, and the component side facing the right side of the chassis.
 Caution To avoid damaging ESD-sensitive components, observe all ESD precautions. To avoid damaging the underlying motherboard, do not use excessive force when you remove or replace SIMMs.
Removing Flash Memory SIMMs
Take the following steps to remove an existing Flash memory SIMM:
Step 1 Attach an ESD-preventive wrist strap and ensure that it makes good contact with your skin. Connect the equipment end of the wrist strap to the metal back plate of the chassis, avoiding contact with the connectors.
Step 2 Locate the Flash memory SIMM sockets on the motherboard. (See Figure A-7.)
 Caution Handle SIMMs by the card edges only. SIMMs are ESD-sensitive components and can be damaged by mishandling.
Step 3 To lift the Flash memory SIMM out of its socket, pull the locking spring clips on both sides outward and tilt the SIMM toward the right side of the chassis, free of the clips. (See Figure A-8.)
Figure A-8 : Removing Flash Memory SIMMs
Installing Flash Memory SIMMs
Take the following steps to install Flash memory SIMMs:
Step 1 Locate the Flash memory SIMM sockets on the motherboard. (See Figure A-7.)
 Caution Handle SIMMs by the edges only. SIMMs are ESD-sensitive components and can be damaged by mishandling.
Step 2 Hold the SIMM with the polarization notch on the right and the component side away from you, with the connector edge at the bottom.
Step 3 Referring to Figure A-9, insert the Flash memory SIMM into its connector slot at an angle, tilted toward the left side of the chassis. Rock the SIMM into a vertical position (see Figure A-6) using the minimum amount of force required. When the SIMM is properly seated, the socket guide posts fit through the alignment holes, and the locking springs click into place. Use the minimum amount of force required.
 Caution It is normal to feel some resistance, but do not use excessive force on the SIMM and do not touch the surface components to avoid damaging them.
Step 4 Check the alignment of each SIMM to make sure that it is straight and that the alignment holes are lined up with the plastic socket guides.
When you finish replacing SIMMs, proceed to the section "Replacing the Cover" later in this appendix.
Figure A-9 : Inserting Flash Memory SIMMs
Replacing the ROM
To upgrade the router ROM software to a new ROM monitor, you must replace the existing ROM.
You will need the following tools:
- ROM extraction tool or a small flat-blade screwdriver
- Needlenose pliers
Take the following steps to replace an existing ROM:
Step 1 Attach an ESD-preventive wrist strap and ensure that it makes good contact with your skin. Connect the equipment end of the wrist strap to the metal back plate of the chassis, avoiding contact with the connectors.
 Caution Correct placement of the ROM is crucial. If improperly positioned, the new component could be damaged when the router is powered on. Read all instructions before proceeding. To prevent damage to the ROM from ESD (when handling the router and its components), follow the ESD procedures described in the section "Preventing Electrostatic Discharge Damage" in the chapter "Preparing to Install the Router." Be careful not to damage or scratch the printed circuit card under the ROM.
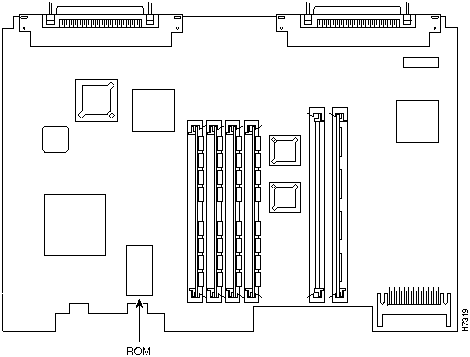
Step 2 Locate the ROM on the motherboard. (See Figure A-10.)
Figure A-10 : ROM Location
Step 3 Gently remove the old ROM with a ROM extraction tool or a small flat-blade screwdriver, and set it aside.
Step 4 Insert the new ROM in its socket in the orientation shown in Figure A-10, being careful to not bend or crush any of the bottom pins. To straighten out a bent pin, use needlenose pliers. Align the notch in the new ROM with the notch in the ROM socket, ignoring the orientation of the label.
 Caution The notch on the ROM must match the notch on the socket on the card. Installing the ROM backward will damage it.
When you finish replacing the ROM, proceed to the section "Replacing the Cover" later in this appendix.
Testing ROM Installation
Test your installation by rebooting the router. If you installed the ROM correctly, the router will boot into the ROM monitor or operating system.
Take the following steps if you suspect that the ROM is inserted incorrectly:
Step 1 Open the chassis. (See the section "Removing the Cover" earlier in this appendix.)
Step 2 Gently remove the old ROM with a ROM extraction tool or a small flat-blade screwdriver, and set it aside.
Step 3 Use needlenose pliers to straighten any bent pins on the ROM.
Step 4 Insert the new ROM in its socket in the orientation shown in Figure A-10, being careful to not bend or crush any of the bottom pins. Align the notch in the new ROM with the notch in the ROM socket, ignoring the orientation of the label.
Step 5 Replace the cover following the steps provided in the next section "Replacing the Cover."
Step 6 Try rebooting the router.
If you are still having problems after following the steps in this procedure, refer to the appendix "Troubleshooting."
Replacing the Cover
This section describes how to replace the router cover. You need a number 1 Phillips screwdriver to complete this procedure.
Take the following steps to replace the cover:
Step 1 Place the chassis so the front panel is closest to you.
Step 2 Hold the cover so the tabs at the rear of the cover are aligned with the chassis bottom, as shown in Figure A-11.
Figure A-11 : Replacing the Cover
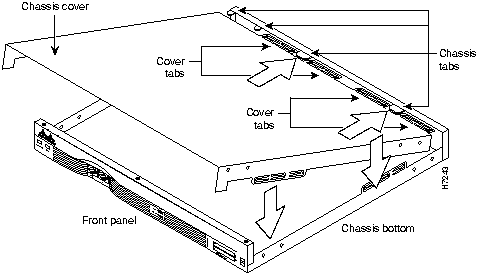
Step 3 Push the cover toward the rear, making sure that the cover tabs fit under the rear panel of the chassis, and the chassis tabs fit under the top cover.
Step 4 Lower the front of the cover onto the chassis, making sure that the tabs on the side of the cover fit inside the chassis side panels, and the tabs on the side of the chassis fit under the cover side panels.
Step 5 Fasten the cover with the three screws you set aside in Step 3 in the section "Removing the Cover" earlier in this appendix.
Step 6 Reinstall the chassis on a rack, desktop, or table.
Step 7 Reinstall network interface cables.
If the router does not power on, refer to the appendix "Troubleshooting."
Copyright 1988-1996 © Cisco Systems Inc.
