|
|

This chapter describes how to install your router, how to install module s and WAN interface cards, and how to connect the router to networks and external devices. It contains the following sections:
You can set the chassis on a desktop, or install it in a rack. Use the procedure that best meets the needs of your installation.
Setting the Chassis on a Desktop
For desktop or shelf mounting, use the rubber "feet" shipped on a black adhesive strip with the chassis. They protect the chassis and provide a nonskid surface.
Take the following steps to attach the rubber feet:
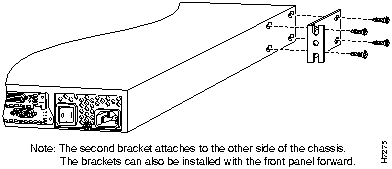
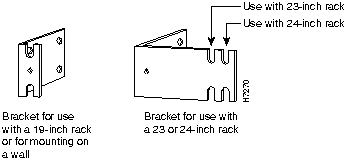
The router is shipped with one set of brackets. Brackets for 19-inch racks are shipped unless the 23-inch or 24-inch brackets are specified at the time of your order. The brackets are shown in Figure 3-1.
Figure 3-1 : Identifying the Brackets
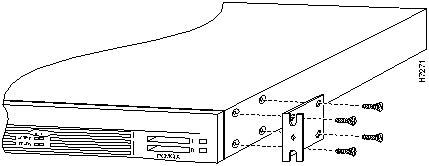
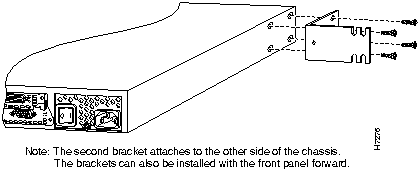
To install the chassis in a rack with the front panel forward, attach the brackets on each side of the chassis as shown in Figure 3-2 or Figure 3-3.
Figure 3-2 : 19-Inch Bracket Installation---Front Panel Forward
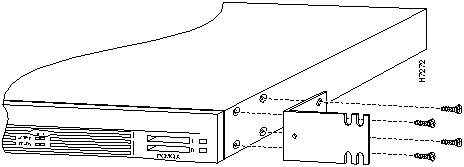
Figure 3-3 : 23-Inch or 24-Inch Bracket Installation---Front Panel Forward
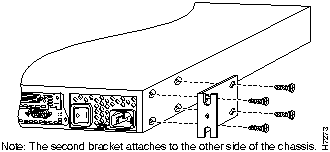
To install the chassis in a rack with the rear panel forward, attach the brackets on each side of the chassis as shown in Figure 3-4 or Figure 3-5.
Figure 3-4 : 19-Inch Bracket Installation---Rear Panel Forward
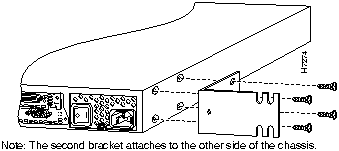
Figure 3-5 : 23-Inch or 24-Inch Bracket Installation---Rear Panel Forward
To install the chassis in a center-mount telco rack, attach the brackets on each side of the chassis as shown in Figure 3-6 or Figure 3-7.
Figure 3-6 : Telco 19-Inch Bracket Installation---Rear Panel Forward
Figure 3-7 : Telco 23-Inch or 24-Inch Bracket Installation---Rear Panel Forward
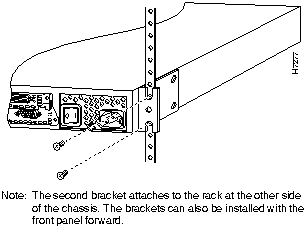
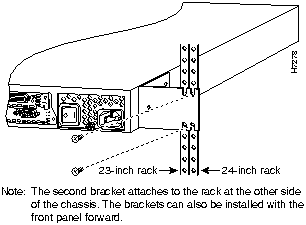
When the brackets have been fastened to the chassis, you can rack-mount the chassis. Using your own screws, attach the chassis to the rack as shown in Figure 3-8 or Figure 3-9.
Figure 3-8 : Attaching the Chassis to a 19-Inch Rack---Rear Panel Forward
Figure 3-9 : Attaching the Chassis to a 23-Inch or 24-Inch Rack---Rear Panel Forward
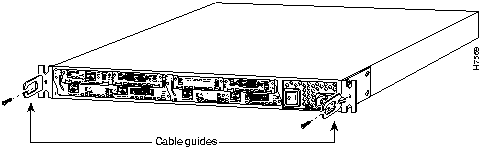
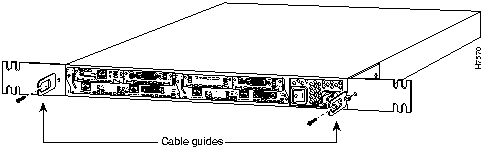
Attach the cable guides to the rack-mounting brackets on each side of the chassis as shown in Figure 3-10 or Figure 3-11.
Figure 3-10 : Attaching Cable Guides to 19-Inch Rack-Mounting Brackets
Figure 3-11 : Attaching Cable Guides to 23-Inch or 24-Inch Rack-Mounting Brackets
This section explains how to mount the router on a wall. If you have questions or need help with the wall-mounting procedure, refer to the chapter "Troubleshooting."
If you are planning to wall-mount your router, do so before making network and power connections. If you need to install network modules or WAN interface cards, you can do so either before or after mounting the router, whenever you have better access to the rear of the router.
You need the following tools and equipment to install a Cisco 3600 series router on a wall:
Cisco Systems does not provide the board or screws.
Each router is shipped with one set of brackets. The router uses 19-inch rack brackets to mount on a wall. 23-inch or 24-inch brackets may be used for wall mounting if desired. Brackets for 19-inch racks are shipped unless you specify 23-inch or 24-inch brackets at the time of your order. Figure 3-12 shows brackets for the router.
Figure 3-12 : Cisco 3620 Wall-Mount Brackets
This section explains how to wall-mount the Cisco 3620 router.
Attaching Wall-Mounting Brackets to the Router
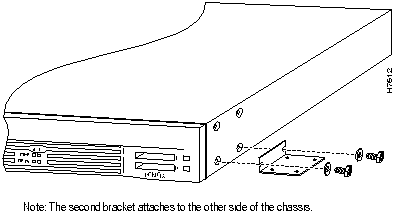
To install the router on a wall, first attach the brackets on each side of the chassis as shown in Figure 3-13, using the special plastic washers and slotted hex-head screws. Place the washers so that the narrow shoulder faces the router chassis.
Figure 3-13 : Wall-Mount Bracket Attachment
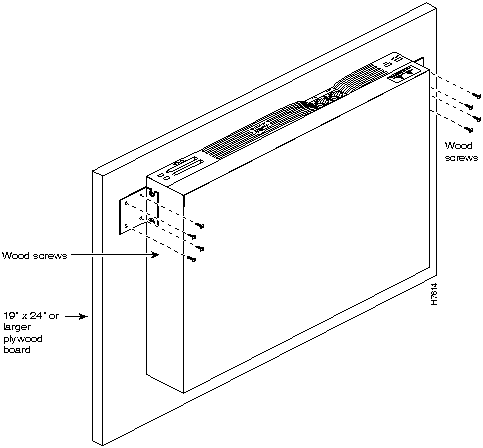
Mounting the Router on the Wall
After fastening the brackets to the chassis, follow this procedure to mount it on the wall (refer to Figure 3-14):
Figure 3-14 : Mounting the Router on a Wall
When the router has been installed, proceed to one of the following sections: "Installing a WAN Interface Card in a Module Slot," "Installing Modules in a Chassis Slot," or "Network Connections" later in this chapter.
Installing a WAN Interface Card in a Module Slot
The following instructions apply only to installing a WAN interface card in a module that has slots for WAN cards (called a base module). To install a module in a chassis slot, see the section "Installing Modules in a Chassis Slot" later in this chapter.
A WAN interface card can be installed in a module that is already installed in a router. Before inserting a WAN interface card into a base module that is already installed in the router chassis, you must turn off electrical power.
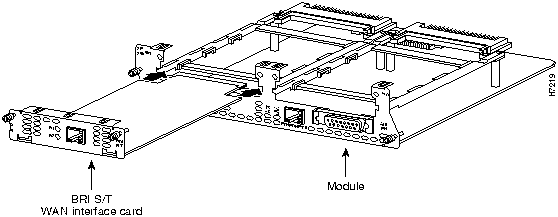
You need either a number 1 Phillips screwdriver or a flat-blade screwdriver. Take the following steps to install a WAN interface card:
Figure 3-15 : Installing a WAN Interface Card in a module
WAN Interface Card Filler Panels
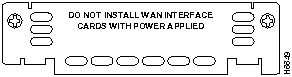
If the base module is configured with only one, WAN interface card, secure a slot filler panel into the open base module slot to ensure proper airflow. Filler panels must also be installed if no WAN interface cards are installed in the module. See Figure 3-16.
Figure 3-16 : WAN Interface Card Slot Filler Panel
After installing any WAN interface cards you have, proceed to the next section, "Installing Modules in a Chassis Slot," to install the modules into the router.
Installing Modules in a Chassis Slot
The following instructions apply only to installing module s in a chassis slot. To install a WAN interface card in a module that has WAN card slots, see the section "Installing a WAN Interface Card in a Module Slot" earlier in this chapter or see the configuration note that shipped with the WAN interface card.
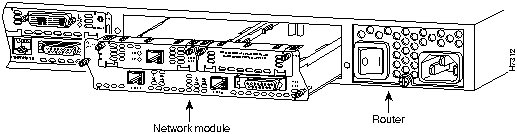
You can install module s in the chassis either before or after installing the router. If you have a choice, install the module s with the router in the position that provides the best access to the rear panel. You can install any module into any available slot in the chassis.
You need either a number 1 Phillips screwdriver or a flat-blade screwdriver. Take the following steps to install a module:
Figure 3-17 : Installing a Module in a Router
If the router is configured with fewer than two module s, slot filler panels must fill the open slots to ensure proper airflow. (See Figure 3-18.)
Figure 3-18 : Slot Filler Panel
After installing module s into the router, proceed to the section "Network Connections" later in this chapter.
This section explains how to connect the router to your network. The Ethernet and Token Ring interfaces are used to connect the router to a LAN. The synchronous serial and ISDN BRI interfaces are used to connect the router to a WAN.
The cables required to connect the router to a network are not provided with the router. However, cables and transceivers can be ordered from us. For ordering information, contact customer service. For cable pinouts, refer to the appendix "Cable Specifications."
Connecting to an Ethernet Network
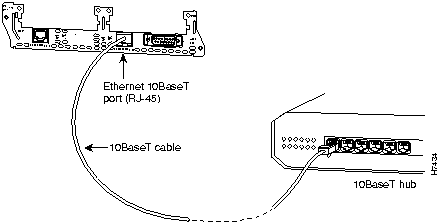
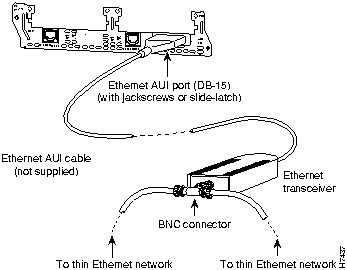
Use an Ethernet AUI cable to connect the Ethernet AUI port (DB-15) to an Ethernet transceiver. Use an Ethernet 10BaseT cable to connect to an Ethernet 10BaseT port (RJ-45). (See Figure 3-19 and Figure 3-20.) Only one connector can be used per Ethernet interface. The Ethernet modules will automatically detect which connector is used.
Figure 3-19 : Connecting an Ethernet 10BaseT Port to a 10BaseT Hub
Figure 3-20 : Connecting an Ethernet AUI Port to an Ethernet Transceiver
Connecting to a Token Ring Network
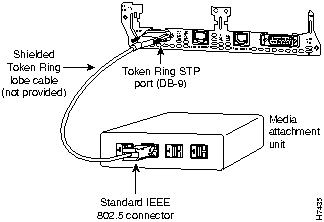
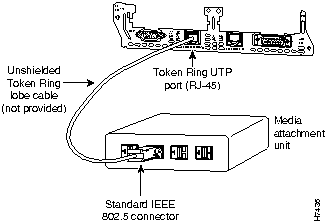
Use a shielded Token Ring lobe cable to connect the Token Ring STP port (DB-9) to a MAU. Use an unshielded Token Ring lobe cable to connect the Token Ring UTP port (RJ-45) to a MAU. (See Figure 3-21 and Figure 3-22.) Only one of the Token Ring connectors can be used. The module will automatically detect which connector is in use.
Figure 3-21 : Connecting a Token Ring STP Port (DB-9) to a MAU
Figure 3-22 : Connecting a Token Ring UTP Port (RJ-45) to a MAU
This section describes how to connect the router to the following WAN interfaces:
Take the following steps to connect the router to a WAN:
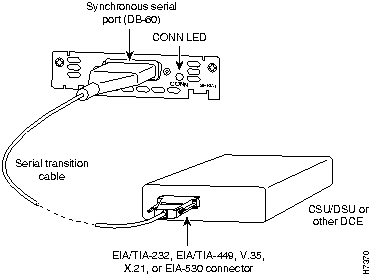
Figure 3-23 : Connecting a Serial WAN Interface Card to a CSU/DSU
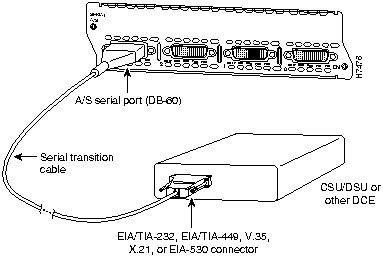
Figure 3-24 : Connecting an A/S Serial Module to a CSU/DSU
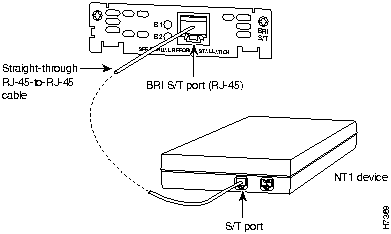
Figure 3-25 : Connecting a BRI-S/T WAN Interface Card to an NT1
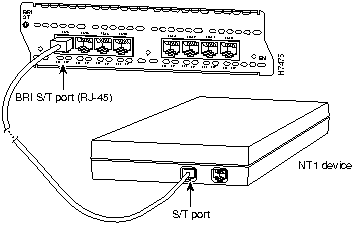
Figure 3-26 : Connecting a BRI-S/T Module to an NT1
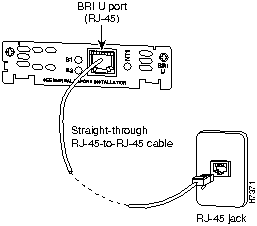
Figure 3-27 : Connecting a BRI-U WAN Interface Card to an RJ-45 ISDN Jack
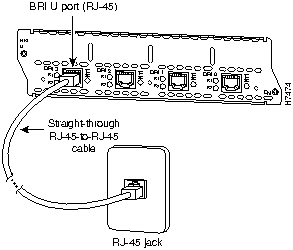
Figure 3-28 : Connecting a BRI U Module to an RJ-45 ISDN Jack
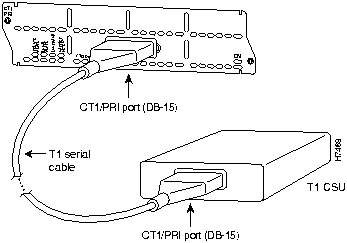
Figure 3-29 : Connecting a CT1/PRI Module to a T1 CSU
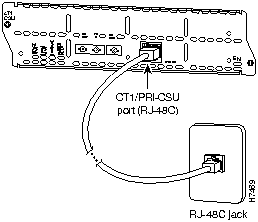
Figure 3-30 : Connecting a CT1/PRI-CSU Module to an RJ-48C T1 Jack
Figure 3-31 : Connecting a 75-Ohm CE1/PRI-U Module to an E1 CSU (DB-15-to-BNC connectors)
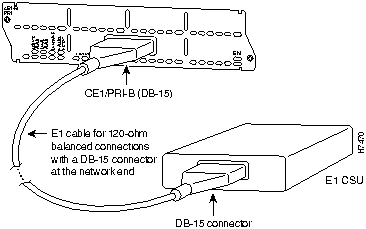
Figure 3-32 : Connecting a 120-Ohm CE1/PRI-B Module to an E1 CSU (DB-15-to-DB-15 Connectors)
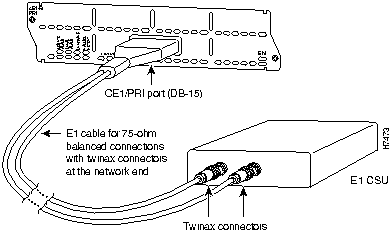
Figure 3-33 : Connecting a 120-Ohm CE1/PRI-B Module to an E1 CSU (DB-15-to-Twinax Connectors)
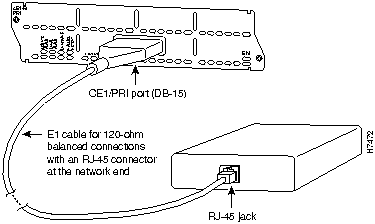
Figure 3-34 : Connecting a 120-Ohm CE1/PRI-B Module to an E1 CSU (DB-15-to-RJ-45 Connectors)
When you have connected the router to your network, proceed to the next section "Electrical Connections."
Connecting the Console Terminal and Modem
This section describes how to connect a console terminal and a modem to the router. You can connect only a terminal to the console port. Use the auxiliary port with a terminal or a modem for remote access to the router.
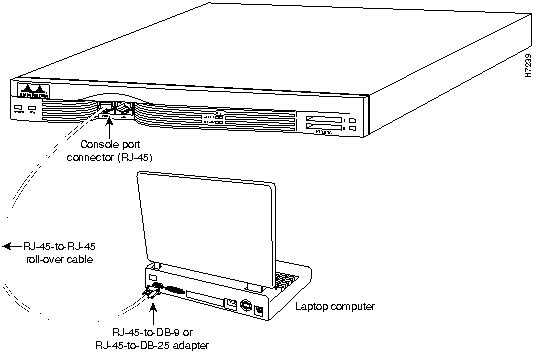
Take the following steps to connect a terminal or a PC running terminal emulation software to the console port on the router:
Figure 3-35 : Connecting the Console
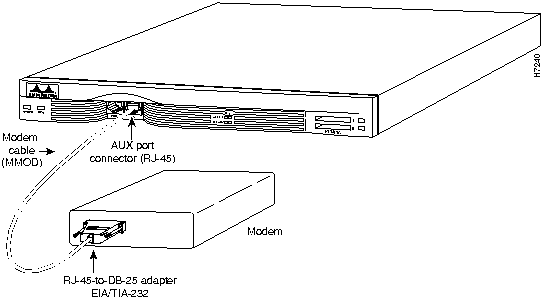
Take the following steps to connect a modem to the auxiliary port on the router:
Figure 3-36 : Connecting a Modem to the Auxiliary Port
This section explains how to connect AC or DC power to a router, and how to power up both AC and DC routers. If you have a DC-powered router, go to the next section, "Connecting Routers with a DC-Input Power Supply." If you have an AC-powered router, go to the section "Powering On the Router" later in this chapter.
Connecting Routers with a DC-Input Power Supply
If you ordered the router with a DC-input power supply, follow the directions in this section for proper wiring. A router with a DC-input power supply has a terminal block cover in place of a three-pronged connector for an AC power cord.
Wiring the DC-Input Power Supply
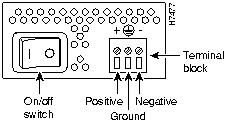
Figure 3-37 shows the router DC-input power supply terminal block.
Figure 3-37 : DC-Input Power Supply Connections
Take the following steps to wire the terminal block:
Take the following steps to power on the router:
If you encounter problems when you power up the router, see the appendix "Troubleshooting."
What to Do After Installing the Hardware
When you have installed the router hardware, continue with the chapter "Configuring the Software."
Copyright 1988-1996 © Cisco Systems Inc.
![]()

![]()
Plan to mount the router so that the front and rear of the chassis are perpendicular to the floor, with the front upward and at eye level, so you can read the LEDs.
![]()
![]()
![]()
![]()
![]()
![]()
![]()

![]()
![]()

![]()
![]()
![]()
![]()
![]()
![]()
![]()
![]()
![]()
![]()
![]()
![]()
![]()
![]()
![]()
![]()
![]()
![]()