|
|
Cisco 3000 Series Hardware Installation
Following is the information required to install the router chassis.
Follow this procedural path to install your router:
This section guides you through the installation of the router and includes information on safety, inspecting the system, preventing electrostatic discharge (ESD) damage, tools and parts required, rack mounting, wall mounting, and making external cable connections.
Follow these guidelines to ensure general safety:
![]()
Do not unpack the router until you are prepared to install it. If the final installation site will not be ready for some time, keep the chassis in the shipping container to prevent accidental damage. When you have determined where you want the router installed, proceed with the unpacking. The router, cables, publications, and any optional equipment you ordered might be shipped in more than one container. When you unpack each shipping container, check the packing list to ensure that you received all of the following items:
Electrostatic discharge (ESD) can damage equipment and impair electrical circuitry. It occurs when electronic printed circuit cards are improperly handled and can result in complete or intermittent failures. Always follow ESD prevention procedures when removing and replacing cards. Ensure that the chassis is electrically connected to earth ground. Wear an ESD wrist strap, ensuring that it makes good skin contact. Connect the clip to an unpainted chassis frame surface to safely channel unwanted ESD voltages to ground. To properly guard against ESD damage and shocks, the wrist strap and cord must operate effectively. If no wrist strap is available, ground yourself by touching the metal part of the chassis.
![]()
Following are the tools and parts required to install the router:
In addition, you might need the following external equipment:
If you want to rack or wall mount your chassis, refer to the Cisco 3000 Rack-Mount/Wall-Mount Installation configuration note publication that accompanied your optional rack-mount/wall-mount kit.
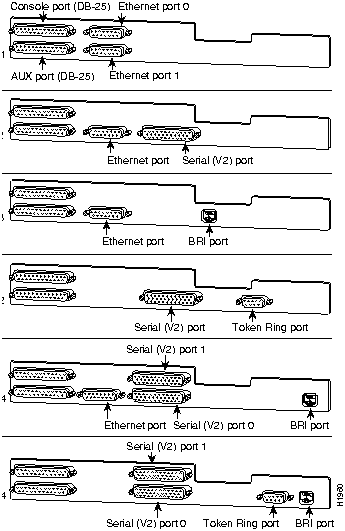
Following are the procedures for making external connections to the router. Figure 1 shows partial rear-panel views of the six router models.
Cisco Systems declaration of operating conditions:
The Cisco 3000 Series is designed to meet the requirements of NET1 and NET2.
Interconnection directly, or by way of other apparatus, of ports marked:
"Safety Warning --- See instructions for use"
with ports marked or not so marked may produce hazardous conditions on the network and that advice should be obtained from a competent engineer before such a connection is made.
The ports marked "Ethernet," "Token Ring," "Console," and "AUX" have a safety warning applied to them as follows:
"These ports do not provide isolation sufficient to satisfy the requirement of BS6301; apparatus connected to these ports should either have been approved to BS6301 or have previously been evaluated against British Telecommunications plc (Post Office) Technical Guides 2 or 26 and given permission to attach; any that other usage will invalidate any approval given to this apparatus."
Connection of Power Supply. The Gateway Server is intended for use when supplied with power from a supply providing 220--240 VAC, 50/60 Hz up to 5 Amps.
Other usage will invalidate any approval given to this apparatus if as a result it ceases to comply with BS6301: 1989.
The Cisco 3000 Series is brought into service by the supplier.
The ports marked "Ethernet," "Token Ring," "Console," and "AUX" are SELV circuits. SELV circuits should only be connected to other SELV circuits.
Following is the procedure for connecting cables to the router:
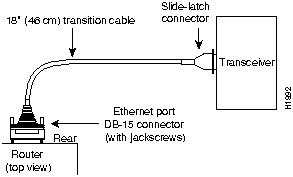
Figure 2 Ethernet Transition Cable Connections
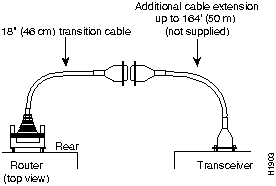
Figure 3 Extending the Transition Cable from the Router Ethernet Port
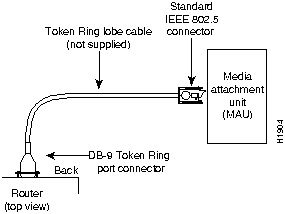
Figure 4 Token Ring Cable Connections
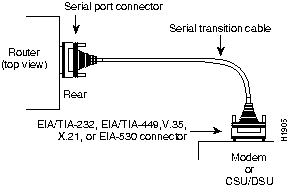
Figure 5 Serial Cable Connections

Figure 6 RJ-45 Female Connector---BRI
![]()
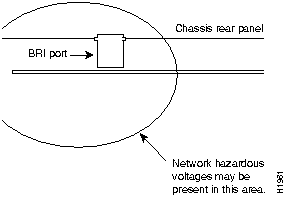
Figure 7 Network Hazardous Voltage Area near the BRI Port
After the router hardware is installed, the system is ready to be powered on and configured. For information on router configuration, refer to the following publications:
To order these or additional associated publications, refer to the Service and Support card that accompanied your router.
This section includes the following information:
The key to problem solving in this system is to try to isolate the problem to a specific subsystem. By comparing what the system is doing to what it should be doing, the task of isolating a problem is greatly simplified.
Check the following items to help isolate the problem:
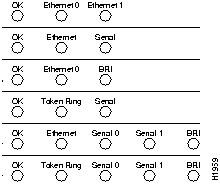
Figure 8 Router LEDs by Model---Front-Panel View
For more complete network troubleshooting information, refer to the Troubleshooting Internetworking Systems publication.
Following are the specifications for the router system.
Table 1 System Specifications
| Description | Design Specification |
|---|---|
| Dimensions H x W x D | 4" x 13" x 14" (10.16 cm x 33.02 cm x 35.56 cm) |
| Weight | 15 lb (4.5 kg) |
| Input voltage, frequency,and power dissipation | 100 through 240 volts alternating current (VAC)at 50 to 60 hertz (Hz) 55W (max.) 273 British thermal units (Btu)/hr |
| Processor | 20-MHz Motorola 68EC030 |
| Memory | 4-MB processor DRAM (primary memory, expandable to 16 MB)0.5-MB shared memory (2-MB for 3104, 3204)2-MB Flash (expandable)32-KB nonvolatile configuration RAM |
| Network interface options and router models | 1 Token Ring and 1 synchronous serial (3202)1 Ethernet and 1 BRI (3103)2 Ethernet (3101)1 Ethernet and 1 synchronous serial (3102)1 Ethernet, 2 synchronous serial, and 1 BRI (3104)1 Token Ring, 2 synchronous serial, and 1 BRI (3204) |
| Ethernet interfaces | Attachment unit interface IEEE 802.3 (DB-15) |
| Token Ring | IEEE 802.5 (DB-9) |
| Synchronous serial interfaces | RS-232, RS-449, V.35, X.21 (NRZ/NRZI(1), DTE/DCE(2))EIA-530 (NRZ/NRZI, DTE)All serial cables use a DB-50 chassis connector. |
| BRI interface | ISDN Basic Rate S/T (RJ-45) (3103, 3104, and 3204) |
| Console and auxiliary port | Asynchronous serial (RJ-45) |
| Operating environment | 32 to 104°F (0 to 40°C) |
| Nonoperating temperature | --40 to 185°F (--40 to 85°C) |
| Operating humidity | 5 to 95%, noncondensing |
| Noise level | 40 dBa |
The following tables list the pinouts for the cables that can be used with the router:
Table 2 Console and Auxiliary Port Pinouts (DB-25)
| Console | Auxiliary | ||||
|---|---|---|---|---|---|
| Pin(1) | Signal | Input/Output | Pin | Signal | Input/Output |
| 1 | Frame GND | -- | 1 | Frame GND | -- |
| 2 | TxD | Input | 2 | TxD | Output |
| 3 | RxD | Output | 3 | RxD | Input |
| 4 | RTS | Shorted to pin 5 | 4 | RTS | Output |
| 5 | CTS | Shorted to pin 4 | 5 | CTS | Input |
| 6 | Shorted to pin 8 | Output | 7 | GND | -- |
| 7 | GND | -- | 8 | CD | Input |
| 8 | CD | Output | 20 | DTR | Output |
| 20 | DTR | Input | 22 | Ring Indicator | Input |
Table 3 BRI Port Pinout (RJ-45)
| 8 Pin(1) | TE(2) | NT(3) | Polarity |
|---|---|---|---|
| 3 | Transmit | Receive | + |
| 4 | Receive | Transmit | + |
| 5 | Receive | Transmit | -- |
| 6 | Transmit | Receive | -- |
![]()
Table 4 EIA-530 DTE Serial Cable Pinouts (DB-25)
| 25 Pin(1) | Signal | DirectionDTE DCE(2) | 25 Pin | Signal | DirectionDTE DCE |
|---|---|---|---|---|---|
| J2-1-- | Shield-- | ---- | J2-8J2-10 | CF(A), DCD +CF(B), DCD -- | <---<--- |
| J2-2J2-14 | BA(A), TxD +BA(B), TxD -- | --->---> | J2-15J2-12 | DB(A), TxC +DB(B), TxC -- | <---<--- |
| J2-3J2-16 | BB(A), RxD +BB(B), RxD -- | <---<--- | J2-17J2-9 | DD(A), RxC +DD(B), RxC -- | <---<--- |
| J2-4J2-19 | CA(A), RTS +CA(B), RTS -- | --->---> | J2-18J2-7 | LL Circuit GND | --->-- |
| J2-5J2-13 | CB(A), CTS + CB(B), CTS -- | <---<--- | J2-20J2-23 | CD(A), DTR +CD(B), DTR -- | --->---> |
| J2-6J2-22 | CC(A), DSR + CC(B), DSR -- | <---<--- | J2-24J2-11 | DA(A), TxCE +DA(B), TxCE -- | --->---> |
Table 5 RS-232 DTE and DCE Serial Cable Pinouts (DB-25)
| 25 Pin(1) | Signal | DirectionDTE DCE | 25 Pin | Signal | DirectionDTE DCE |
|---|---|---|---|---|---|
| J2-1 | Shield GND | _ | J2-7Shield | Circuit GND-- | ---- |
| J2-2Shield | TxD-- | --->-- | J2-8Shield | DCD-- | <----- |
| J2-3Shield | RxD-- | <----- | J2-15Shield | TxC-- | <----- |
| J2-4Shield | RTS-- | --->-- | J2-17Shield | RxC -- | <----- |
| J2-5Shield | CTS-- | <----- | J2-18Shield | LTST-- | --->-- |
| J2-6Shield | DSR-- | <----- | J2-20Shield | DTR-- | --->-- |
| J2-24Shield | SCTE-- | --->-- |
Table 6 RS-449 DTE and DCE Serial Cable Pinouts (DB-37)
| 37 Pin(1) | Signal | DirectionDTE DCE | 37 Pin | Signal | DirectionDTE DCE |
|---|---|---|---|---|---|
| J2-1 | Shield GND | -- | J2-9J2-27 | CS +CS -- | --->---> |
| J2-4J2-22 | SD +SD -- | <---<--- | J2-10J2-37 | LLSC | --->-- |
| J2-5J2-23 | ST +ST -- | --->---> | J2-11J2-29 | DM +DM -- | --->---> |
| J2-6J2-24 | RD +RD -- | --->---> | J2-12J2-30 | TR +TR -- | <---<--- |
| J2-7J2-25 | RS +RS -- | <---<--- | J2-13J2-31 | RR +RR -- | --->---> |
| J2-8J2-26 | RT +RT -- | --->---> | J2-17J2-35 | TT +TT -- | <---<--- |
| J2-19J2-20 | SGRC | ---- |
Table 7 V.35 DTE and DCE Serial Cable Pinouts (Winchester-Type)
| 34 Pin(1) | Signal | DirectionDTE DCE | 34 Pin | Signal | DirectionDTE DCE |
|---|---|---|---|---|---|
| J2-A | Frame GND | -- | J2-HShield | DTR-- | --->-- |
| J2-BShield | Circuit GND-- | ---- | J2-KShield | LT-- | --->-- |
| J2-CShield | RTS-- | --->-- | J2-PJ2-S | SD +SD -- | --->---> |
| J2-DShield | CTS-- | <----- | J2-RJ2-T | RD +RD -- | <---<--- |
| J2-EShield | DSR-- | <----- | J2-UJ2-W | SCTE +SCTE -- | --->---> |
| J2-FShield | RLSD-- | <----- | J2-VJ2-X | SCR +SCR -- | <---<--- |
| J2-YJ2-AA | SCT +SCT -- | <---<--- |
Table 8 X.21 DTE and DCE Serial Cable Pinouts (DB-15)
| 15 Pin(1) | Signal | DirectionDTE DCE |
|---|---|---|
| J2-1 | -- | -- |
| J2-2J2-9 | Transmit +Transmit -- | --->---> |
| J2-3J2-10 | Control +Control -- | --->---> |
| J2-4J2-11 | Receive +Receive -- | <---<--- |
| J2-5J2-12 | Indication +Indication -- | <---<--- |
| J2-6J2-13 | Timing +Timing -- | <---<--- |
| J2-8Shield | Circuit GND-- | ---- |
Table 9 Ethernet Port Pinout (AUI---DB-15)
| 15 Pin | Ethernet Circuit | Signal |
|---|---|---|
| 1 | CI-S | Control In Circuit Shield |
| 2 | CI-A | Control In Circuit A |
| 3 | DO-A | Data Out Circuit A |
| 4 | DI-S | Data In Circuit Shield |
| 5 | DI-A | Data In Circuit A |
| 6 | VC | Voltage Common |
| 7 | CO-A | Control Out Circuit A (not connected) |
| 8 | CO-S | Control Out Circuit Shield (not connected) |
| 9 | CI-B | Control In Circuit B |
| 10 | DO-B | Data Out Circuit B |
| 11 | DO-S | Data Out Circuit Shield |
| 12 | DI-B | Data In Circuit B |
| 13 | VP | Voltage Plus |
| 14 | VS | Voltage Shield (L25 and M25) |
| 15 | CO-B | Control Out Circuit B (not connected) |
| Shell | PG | Protective Ground |
Table 10 Token Ring Port Pinout (DB-9)
| 9 Pin(1) | Signal |
|---|---|
| 1 | Receive R1 -- |
| 3 | +5V(2) |
| 5 | Transmit O5 -- |
| 6 | Receive G6 + |
| 9 | Transmit B9 + |
|
|
Copyright 1988-1995 © Cisco Systems Inc.