
Table of Contents
Troubleshooting Security Implementations
Troubleshooting Security Implementations
This chapter outlines troubleshooting information relating to security implementations. The first part of the chapter describes problems commonly encountered in TACACS+ and XTACACS security implementations. The section "Recovering a Lost Password" describes password recovery procedures for common Cisco router platforms.
The TACACS+ and XTACACS sections describe specific symptoms, the problems that are likely to cause each symptom, and the solutions to those problems.
The sections on troubleshooting TACACS+ include the following:
The sections on troubleshooting XTACACS include the following:
If you want detailed information about configuring and using TACACS+ and XTACACS, refer to the Cisco IOS Configuration Fundamentals Configuration Guide and Configuration Fundamentals Command Reference. In addition, for TACACS+, download the TACACS+ User Guide from the TACACS+ Software Images page on Cisco Connection Online (CCO). For more information about XTACACS, refer to the README file that you downloaded with your XTACACS source file.
TACACS+: Errors Unarchiving Source File
Symptom: Errors are generated when unarchiving the TACACS+ archive file (tac_plus.2.1.tar).
Table 22-1 outlines the problems that might cause this symptom and describes solutions to those problems.
Table 22-1 : TACACS+: Errors Unarchiving Source File
| Archive file was not transferred using FTP binary (image) mode
|
The TACACS+ archive file must be transferred using FTP binary (image) mode. FTP the tac_plus.2.1.tar file again using binary transfer mode. From the FTP command line, enter the image command to set the image mode. For other FTP software, refer to your documentation for instructions on setting the image mode.
|
| Insufficient disk space
|
Make sure there is sufficient disk space for the expanded tac_plus.2.1.tar file. If there is not enough space on your UNIX system, free up enough disk space to accommodate decompression of the file. TACACS+ requires about 900 KB.
|
TACACS+: Cannot Compile Daemon
Symptom: Attempts to compile the TACACS+ daemon result in errors.
Table 22-2 outlines the problems that might cause this symptom and describes solutions to those problems.
Table 22-2 : TACACS+: Cannot Compile Daemon
| make is not in $PATH or is not installed on the UNIX machine
|
Step 1 Enter the command which make at the UNIX prompt. If the output says "No make in $PATH...," make is not in the specified path or is not installed.
Step 2 If make is already installed, modify the $PATH variable to include the directory in which make is located.
- If make is not installed, see your system administrator for help installing it.
Step 3 Compile the TACACS+ daemon again.
|
| gcc not in $PATH or not installed correctly
|
Step 1 Enter the command which gcc at the UNIX prompt. If the output says "No gcc in $PATH...," gcc is not in the specified path or is not installed.
Step 2 If gcc is already installed, modify the $PATH variable to include the directory in which gcc is located.
- If gcc is not installed, ask your system administrator to install it.
Step 3 Compile the TACACS+ daemon again.
|
| UNIX platform commented out or not in Makefile
|
Your UNIX platform must be listed and uncommented in the Makefile for make to compile the TACACS+ source code properly. The Makefile is located in the tac_plus.2.1 directory.
Step 1 Make sure that your UNIX platform is not commented out in the Makefile.
Step 2 If your platform is not listed at all, see your system administrator for help compiling the source code. The only supported platforms are those listed in the Makefile.
Step 3 Compile the TACACS+ daemon again.
|
TACACS+: Daemon Not Up and Running
Symptom: The TACACS+ daemon is not running.
Table 22-3 outlines the problems that might cause this symptom and describes solutions to those problems.
Table 22-3 : TACACS+: Daemon Not Up and Running
| TACACS+ has not been launched
|
Launch TACACS+ with the command tac_plus -C configuration filename.
|
| TACACS+ not specified in /etc/services file
|
Step 1 Check the /etc/services file for the following line:
tacacs 49/tcp
Step 2 This line must be included in the file. If the line is not present, add the line to the file.
|
| tac_plus executable does not exist
|
The TACACS+ daemon cannot run if the tac_plus executable does not exist.
Step 1 Check the directory where you installed tac_plus.2.1 to see if the tac_plus file exists.
Step 2 If the file does not exist, use the make tac_plus command to compile tac_plus.
|
TACACS+: Daemon Does Not Run
Symptom: The TACACS+ daemon does not run when invoked.
Table 22-4 outlines the problems that might cause this symptom and describes solutions to those problems.
Table 22-4 : TACACS+: Daemon Does Not Run
| TACACS+ configuration file not present
|
Step 1 Check the directory in which you installed TACACS+ for a configuration file in the TACACS+ format.
Step 2 If there is no TACACS+ configuration file present and you are upgrading from XTACACS, convert your password file into a configuration file by issuing the following command:
unix_host%
convert.pl /etc/passwd >
configuration-file
- The configuration file can have any name you want.
Step 3 If there is no TACACS+ configuration file present, create one using a text editor. At a minimum, the configuration file must contain the following text:
user = userid {
login = cleartext "passwd"
}
- The configuration file can have any name you want.
- For more information, refer to the user's guide located in the tac_plus.2.1 directory.
|
TACACS+: Users Cannot Log In Using TACACS+
Symptom: Users cannot log in using TACACS+. Either users cannot get the "Username" prompt or they get the prompt but authentication or authorization fails.
Table 22-5 outlines the problems that might cause this symptom and describes solutions to those problems.
Table 22-5 : TACACS+: Users Cannot Log In Using TACACS+
| Router missing minimum configuration
|
Step 1 Use the show running-config privileged EXEC command to view the local router configuration. Look for the following commands:
aaa new-model
aaa authentication login default tacacs+ enable
[...]
tacacs-server host
name
tacacs-server key
key
- where name is the IP address or DNS1 hostname of the TACACS+ server and key is the authentication and encryption key.
Step 2 If all of these commands are not present, add the missing commands to the configuration. If there is no key configured on the TACACS+ daemon, the tacacs-server key command is not necessary.
|
| aaa authorization command present
|
Step 1 Use the show running-config privileged EXEC command to view the local router configuration. Look for an aaa authorization exec tacacs+ global configuration command entry.
Step 2 If the command is present, remove it from the configuration using the no version of the command.
|
| PPP not functioning correctly
|
If PPP is not functioning properly, problems will occur when using TACACS+. Use the debug ppp negotiation privileged EXEC command to see if both sides are communicating.
For information on configuring PPP, refer to the Cisco IOS Configuration Fundamentals Configuration Guide and Configuration Fundamentals Command Reference.
|
| PAP is misconfigured
|
Step 1 Use the show running-config privileged EXEC command to make sure your configuration includes the following global configuration command:
aaa authentication ppp default if-needed tacacs+
Step 2 If the command is not present, add it to the configuration.
Step 3 In addition, check the configuration of the async interface being used. The interface must have the following commands configured:
encapsulation ppp
ppp authentication pap
Step 4 If these commands are not present, add them to the interface configuration.
|
| CHAP is misconfigured
|
Step 1 Use the show running-config privileged EXEC command to make sure your configuration includes the following global configuration command:
aaa authentication ppp default if-needed tacacs+
Step 2 If the command is not present, add it to the configuration.
Step 3 In addition, check the configuration of the async interface being used. The interface must have the following commands configured:
encapsulation ppp
ppp authentication chap
Step 4 If these commands are not present, add them to the interface configuration.
Step 5 Make sure your daemon configuration file, located in the tac_plus.2.1 directory, includes one of the following lines, as appropriate:
chap = cleartext
password
- or
global = cleartext
password
|
| Username and password not in /etc/passwd
|
Step 1 Check to make sure that the appropriate username and password pairs are contained in the /etc/passwd file.
Step 2 If the appropriate users are not specified, generate a new user with the correct username and password using the add user command.
|
| No TCP connection to TACACS+ daemon
|
Step 1 From the router, try to Telnet to port 49 on the TACACS+ daemon.
Step 2 If the Telnet is unsuccessful, make sure the daemon is running. For more information, refer to the section "TACACS+: Daemon Not Up and Running" earlier in this chapter.
Step 3 If the daemon is running but the Telnet times out, check IP connectivity. For more information, see the "Troubleshooting TCP/IP" chapter.
|
1 DNS=Domain Naming System
XTACACS: Errors Decompressing File
Symptom: Error messages are generated when unarchiving the XTACACS archive file (either xtacacsd.tar.z or xtacacsd.tar).
Table 22-6 outlines the problems that might cause this symptom and describes solutions to those problems.
Table 22-6 : XTACACS: Errors Decompressing File
| File was not transferred using FTP binary (image) mode
|
The XTACACS archive file must be transferred using FTP binary (image) mode. FTP the xtacacsd.tar.z or the xtacacsd.tar file again using binary transfer mode. From the FTP command line, enter the image command to set the image mode. For other FTP software, refer to your documentation for instructions on setting the image mode.
|
| Insufficient disk space
|
Make sure there is sufficient disk space for the expanded xtacacsd.tar.z or xtacacsd.tar file. If there is not enough space on your UNIX system, free up enough disk space to accommodate decompression of the file. XTACACS requires about 350 KB.
|
XTACACS: Cannot Compile Daemon
Symptom: Attempts to compile the XTACACS daemon result in errors.
Table 22-7 outlines the problems that might cause this symptom and describes solutions to those problems.
Table 22-7 : XTACACS: Cannot Compile Daemon
| make is not in $PATH or is not installed on the UNIX machine
|
Step 1 Enter the command which make at the UNIX prompt. If the output says "No make in $PATH...," make is not in the specified path or is not installed.
Step 2 If make is already installed, modify the $PATH variable to include the directory in which make is located.
- If make is not installed, see your system administrator for help installing it.
Step 3 Compile the XTACACS daemon again.
|
| gcc not in $PATH or not installed correctly
|
Step 1 Enter the command which gcc at the UNIX prompt. If the output says "No gcc in $PATH...," gcc is not in the specified path or is not installed.
Step 2 If gcc is already installed, modify the $PATH variable to include the directory in which gcc is located.
- If gcc is not installed, see your system administrator for help installing it.
Step 3 Compile the TACACS+ daemon again.
|
| UNIX platform commented out or not in makefile
|
Your UNIX platform must be listed and uncommented in the Makefile for make to compile the XTACACS source code properly. The Makefile is located in the directory where you installed XTACACS.
Step 1 Make sure that your UNIX platform is not commented out in the Makefile.
Step 2 If your platform is not listed at all, see your system administrator for help compiling the source code. The only supported platforms are those listed in the Makefile.
Step 3 Compile the XTACACS daemon again.
|
XTACACS: Daemon Not Up and Running
Symptom: The XTACACS daemon is not up and running.
Table 22-8 outlines the problems that might cause this symptom and describes solutions to those problems.
Table 22-8 : XTACACS: Daemon Not Up and Running
| XTACACS has not been launched
|
Launch the XTACACS daemon with the command xtacacsd -s -l.
|
| XTACACS not specified in /etc/services file
|
Step 1 Check the /etc/services file for the following line:
tacacs 49/udp
Step 2 This line must be included in the file. If the line is not present, add the line to the file.
|
| xtacacsd executable does not exist
|
Check the directory where you installed xtacacsd for the xtacacsd file. If the executable is not present, use the make command to compile xtacacsd.
|
XTACACS: Slow Response from Daemon
Symptom: The response time from the XTACACS daemon is slow. Users have to wait a long time before being prompted for their username and password.
Table 22-9 outlines the problems that might cause this symptom and describes solutions to those problems.
Table 22-9 : XTACACS: Slow Response from Daemon
| DNS is misconfigured
|
In order for XTACACS to function correctly, you must properly configure DNS.
Consult your DNS software documentation or your system administrator for information on how to properly configure DNS.
|
| DNS is not set up for reverse lookups
|
If the DNS server is not configured to perform reverse lookups, XTACACS can suffer excessive delays.
Consult your DNS software documentation or your system administrator for information on how to properly configure the DNS for reverse lookups.
|
XTACACS: Users Cannot Connect Using XTACACS
Symptom: Users cannot log in using XTACACS. Either users cannot get the "Username" prompt or they get the prompt but authentication or authorization fails.
Table 22-10 outlines the problems that might cause this symptom and describes solutions to those problems.
Table 22-10 : XTACACS: Users Cannot Connect Using XTACACS
| Missing login tacacs command
|
Step 1 Use the show running-config privileged EXEC command on the router to see if the login tacacs line configuration command is present.
Step 2 If the command is not present, add the command on each line that should use XTACACS. For example, to configure line 2 to use XTACACS, enter the following commands:
C2500(config)#
line 2
C2500(config-line)#
login tacacs
For detailed information on configuring XTACACS, refer to the Cisco IOS Configuration Fundamentals Configuration Guide and Configuration Fundamentals Command Reference.
|
| Router does not have minimum XTACACS configuration
|
Step 1 Use the show running-config privileged EXEC command to view the local router configuration. Look for the following commands:
tacacs-server host
name
tacacs-server extended
- where name is the DNS hostname or IP address of the XTACACS server.
Step 2 If these commands are not present, add them to the configuration.
|
| PPP not functioning correctly
|
If PPP is not functioning properly, problems will occur when using XTACACS. Use the debug ppp negotiation privileged EXEC command to see if both sides are communicating.
For information on configuring PPP, refer to the Cisco IOS Configuration Fundamentals Configuration Guide and Configuration Fundamentals Command Reference.
|
| PAP is misconfigured
|
Step 1 Use the show running-config privileged EXEC command to make sure the router is configured for PAP authentication. The router configuration should include the following interface configuration commands for each async interface that should use PAP authentication:
ppp authentication pap
ppp use-tacacs
Step 2 If the commands are not present, add them to the configuration.
|
| CHAP is misconfigured
|
Step 1 Use the show running-config privileged EXEC command to make sure the router is configured for CHAP authentication. The router configuration should include the following interface configuration commands for each async interface that should use CHAP authentication:
encapsulation ppp
ppp authentication chap
ppp use-tacacs
Step 2 If the commands are not present, add them to the configuration.
|
| No CHAP supplementary file defined on XTACACS server
|
Step 1 Check to see if there is a CHAP supplementary file defined on the XTACACS server. This file should be located in the xtacacsd directory.
Step 2 If there is not, create a supplementary file. The file should contain a list of usernames and cleartext CHAP passwords in the following format:
user:#:#:ARAP password:CHAP password
- Note: You cannot use /etc/passwd with CHAP.
Step 3 Once the supplementary file is created, restart the XTACACS daemon with the following command:
xtacacsd -s -l -f
supplementary-filename
|
| Username and password not in /etc/passwd
|
Step 1 Make sure that the appropriate username and password pairs are contained in the /etc/passwd file.
Step 2 If the appropriate users are not specified, generate a new user with the correct username and password using the add user command.
|
| IP connectivity problem
|
For information on troubleshooting IP connectivity, see the "Troubleshooting TCP/IP" chapter.
|
Recovering a Lost Password
The following procedures describe the steps required to recover a lost login or enable password. The procedure differs depending on the platform and the software used, but in all cases, password recovery requires that the router be taken out of operation and powered down.
If you need to perform one of the following procedures, make certain that there are secondary systems that can temporarily serve the functions of the router undergoing the procedure. If this is not possible, advise all potential users and, if possible, perform the procedure during low-use hours.
Note Make a note of your password and store it in a secure place.
All of the procedures for recovering lost passwords depend upon changing the configuration register of the router. Depending on the platform and software you are using, this will be done by reconfiguring the router software or by physically moving a jumper or DIP switch on the router.
Table 22-11 shows which platforms have configuration registers in software and which require that you change the jumper or DIP switch position to change the configuration register.
Table 22-11 : Configuration Registers for Specific Cisco Platforms and Software
| Cisco 2000 series
|
Yes
|
--
|
--
|
| Cisco 2500 series
|
Yes
|
--
|
--
|
| Cisco 3000 series
|
Yes
|
--
|
--
|
| Cisco 4000 series
|
Yes
|
--
|
--
|
| Cisco 7000 series running Software Release 9.17(4) or later (Flash/netboot) or Cisco IOS Release 10.0 or later (ROM)
|
Yes
|
--
|
--
|
| Cisco 7000 running Software Release 9.21 or earlier from ROM
|
--
|
Yes
|
--
|
| Cisco 7200
|
Yes
|
--
|
--
|
| Cisco 7500
|
Yes
|
--
|
--
|
| Cisco IGS running Software Release 9.1 or later
|
Yes
|
--
|
--
|
| Cisco IGS running software prior to Software Release 9.1
|
--
|
--
|
Yes
|
| Cisco CGS
|
--
|
Yes
|
--
|
| Cisco MGS
|
--
|
Yes
|
--
|
| Cisco AGS
|
--
|
Yes
|
--
|
| Cisco AGS+
|
--
|
Yes
|
--
|
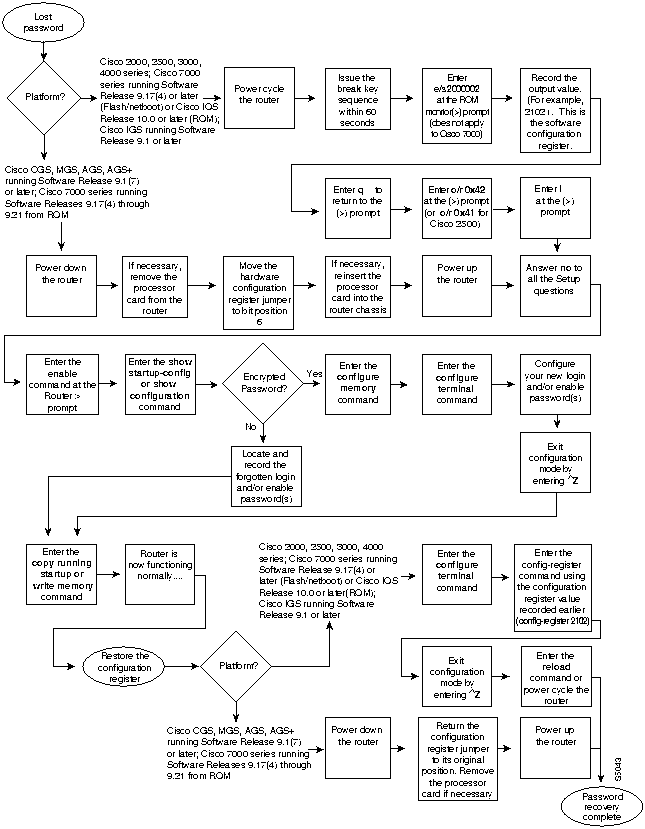
Password Recovery Procedure: Platforms Running Current Cisco IOS Releases
More recent Cisco platforms run from Flash memory or are netbooted and can ignore the contents of NVRAM upon booting. (Cisco 7000 series routers that boot from Flash memory or netboot have this capability as well; a Cisco 7000 that boots from ROM has this capability if it is running Cisco IOS Release 10.0 or later.) Ignoring the contents of NVRAM permits you to bypass the configuration file (which contains the passwords) and gain complete access to the router. You can then recover the lost password or configure a new one.
Note If your password is encrypted, you cannot recover it. You must configure a new password.
Figure 22-1 shows a flow chart describing the password recovery procedure for the following platforms:
- Cisco 2000, Cisco 2500, Cisco 3000, and Cisco 4000 series access servers and routers
- Cisco 7000 series routers running Software Release 9.17(4) and later from Flash/netboot or Cisco IOS Release 10.0 or later from ROM
- Cisco IGS routers running Software Release 9.1 or later
- Cisco CGS, MGS, AGS, and AGS+ routers running Software Release 9.1(7) or later
- Cisco 7000 series routers running Software Release 9.17(4) through 9.21 from ROM
Some of these platforms are configurable in software. Others require that you physically change the position of the configuration register jumper on the processor card. Figure 22-1 shows diverging paths, when necessary, to take you through the steps required for the platform and software with which you are working.
Refer to Table 22-11 to determine if the platform with which you are working is configurable in software, or if it requires you to physically move the jumper.
The following procedure describes the password recovery process for the following platforms only:
- Cisco 2000, Cisco 2500, Cisco 3000, and Cisco 4000 series routers
- Cisco 7000 series routers running Software Release 9.17(4) or later (Flash memory or netboot) or Cisco IOS Release 10.0 or later from ROM
- Cisco IGS Running Software Release 9.1 or later
For the platforms listed, be certain to follow the path labeled "Cisco 2000, 2500, 3000, 4000 series; Cisco 7000 series running Software Release 9.17(4) or later (Flash/netboot) or Cisco IOS Release 10.0 or later (ROM); IGS running Software Release 9.1 or later " in the flowchart (see Figure 22-1).
For the step-by-step password recovery sequence for other platforms, see one of the following sections: "Password Recovery Procedure: Platforms Running Recent Software Releases," "Password Recovery Procedure: Platforms Running Earlier Software Releases," "Password Recovery Procedure: IGS Running Software Prior to Software Release 9.1," or "Password Recovery Procedure: Cisco 500-CS Communication Server."
Note To complete this procedure, you must have a terminal or a personal computer (running terminal emulation software) connected to the console port of the router. In addition, make sure you know the break command key sequence.
Following is the password-recovery procedure for Cisco platforms running current Cisco IOS software:
Step 1 Power cycle the router.
Step 2 Use the break key sequence for your terminal or terminal emulation software within 60 seconds of turning on the power.
- The ROM monitor (>) prompt will appear.
Step 3 Enter the command, e/s 2000002. (For Cisco 7000 series routers, enter e/s XXXXXXXX.) This command examines the short (16-bit) memory location for the software configuration register.
- Record the output resulting from this command. This is the software configuration register value.
Step 4 Enter q (quit) to return to the ROM monitor (>) prompt.
Step 5 Enter the o/r 0x42 command. The value 42 sets the software configuration register bit to position 6, which allows the router to ignore the contents of NVRAM when booting. (Be sure to enter 0x followed by the configuration register value.)
Step 6 Enter i (initialize) at the ROM monitor (>) prompt. The router will reboot.
Step 7 Answer no to all of the Setup questions.
Step 8 Enter the enable EXEC command at the Router> prompt.
Step 9 Enter the show startup-config or show configuration privileged EXEC command to see if your password is clear text (is not encrypted) or if it is encrypted.
Step 10 If your password is clear text, proceed to Step 14.
- or
- If your password is encrypted, continue with Step 11.
Step 11 If your password is encrypted, enter the configure memory privileged EXEC command. This transfers the stored configuration into running memory.
Step 12 Enter the configure terminal privileged EXEC command to enter router configuration mode.
Step 13 If you lost the enable password, use the enable-password global configuration command to configure a new password and press ^Z to exit configuration mode.
- If you lost the login password, configure the console line using the login and password line configuration commands. Enter ^Z to exit configuration mode and proceed to Step 15.
Step 14 If you lost the enable password, locate the enable-password global configuration command entry in the configuration and record the password.
- If you lost the login password, find the configuration entries for the console line and record the password indicated by the password line configuration command.
Step 15 Use the copy running-config startup-config or write memory privileged EXEC command to write the configuration into running memory.
 Caution Issuing the copy running-config startup-config or write memory command at this point on a Cisco 2500, Cisco 3000, or Cisco 4000 will overwrite the configuration. Make certain you have a backup of your configuration file.
Step 16 The router is now fully functional, and you can use your recovered or reconfigured passwords as usual.
Note Restore the software configuration register to its original value as soon as possible. If it is not returned to the value you noted in Step 3, the router will always ignore the contents of NVRAM and enter the Setup routine upon booting. Continue with Step 17 to return the software configuration register to its original value.
Step 17 In privileged EXEC mode, enter router configuration mode using the configure terminal privileged EXEC command.
Step 18 Change the software configuration register to its original value using the config-register global configuration command. You must enter 0x and then the software configuration register value that you recorded in Step 3. Using the example value of 2102, the command would be config-register 0x2102.
Step 19 Exit from router configuration mode by entering ^Z.
- The next time the router is power cycled or restarted with the reload privileged EXEC command, the bootup process will proceed as normal. Use your new or recovered password to gain access to the router after it reboots.
Figure 22-1 : Password Recovery: Platforms Running Current Cisco IOS Releases and Recent Software Releases
Password Recovery Procedure: Platforms Running Recent Software Releases
The Cisco CGS, MGS, AGS, and AGS+ platforms, and Cisco 7000 series routers running software prior to Cisco IOS Release 10.0 from ROM, all have their configuration registers in hardware, so you must physically change the position of the configuration register jumper during the password recovery process.
It might be necessary to remove the processor card from the router chassis in order to access the hardware configuration register jumper. Consult your hardware documentation for detailed instructions on removing and inserting the processor card from the router chassis if necessary.
Moving the hardware configuration register jumper to bit position 6 allows the router to ignore the contents of NVRAM while booting. This permits you to bypass the configuration file (and therefore the passwords) and gain complete access to the router. You can then recover the lost password or configure a new one.
Note If your password is encrypted, you cannot recover it. You must configure a new password.
Figure 22-1 shows a flow chart describing the password recovery procedure for the following platforms:
- Cisco 2000, Cisco 2500, Cisco 3000, and Cisco 4000 series access servers and routers
- Cisco 7000 series routers running Software Release 9.17(4) and later from Flash memory/netboot
- or
- Cisco 7000 series routers running Cisco IOS Release 10.0 or later from ROM
- Cisco IGS routers running Software Release 9.1 or later
- Cisco CGS, MGS, AGS, and AGS+ routers running Software Release 9.1(7) or later
- Cisco 7000 series routers running Software Release 9.17(4) through 9.21 from ROM
Some of these platforms are configurable in software and do not require a hardware change. Others require that you physically change the position of the configuration register jumper on the processor card. Figure 22-1 takes you through the steps required for the platform and software with which you are working, and shows diverging paths when necessary to account for platform-specific requirements.
Refer to Table 22-11 to determine if the platform on which you are working is configurable in the software, or if it requires you to physically move the jumper.
The following textual procedure describes the password recovery process for the following platforms only:
- Cisco CGS, MGS, AGS, and AGS+ routers running Software Release 9.1(7) and later
- Cisco 7000 series routers running Software Release 9.17(4) through 9.21 from ROM
For these platforms, follow the path labeled "Cisco CGS, MGS, AGS, AGS+ running Software Release 9.1(7) or later; Cisco 7000 series running Software Release 9.17(4) through 9.21 from ROM" in the flowchart (see Figure 22-1).
For the step-by-step password recovery sequence for other platforms, see one of the following sections: "Password Recovery Procedure: Platforms Running Current Cisco IOS Releases," "Password Recovery Procedure: Platforms Running Earlier Software Releases," "Password Recovery Procedure: IGS Running Software Prior to Software Release 9.1," or "Password Recovery Procedure: Cisco 500-CS Communication Server."
Note To complete this procedure, you must have a terminal or a personal computer (running terminal emulation software) connected to the console port of the router.
Following is the password-recovery procedure for Cisco platforms running recent software releases:
Step 1 Power down the router.
Step 2 Change the hardware configuration register by moving the jumper from bit position 0 (zero) or 1 to bit position 6.
- This will force the router to ignore the contents of NVRAM, and therefore the configuration file, after it loads the operating system. Note the original position of the jumper.
Note To move the hardware configuration register jumper, you might need to remove the processor card from the router chassis. This is the case with the Route Processor (RP) card in Cisco 7000 series routers. Refer to your hardware documentation for complete instructions on removing and inserting the processor card. If you had to remove the processor card, reinsert it before continuing.
Step 3 Power up the router.
- The router will boot but will ignore the contents of NVRAM and enter the Setup routine.
Step 4 Answer no to all of the Setup questions.
- The Router> prompt appears.
Step 5 Enter the enable EXEC command.
Step 6 Enter the show configuration privileged EXEC command to see if the password is clear text (is not encrypted) or if it is encrypted.
- If the password is clear text, go to Step 10. If the password is encrypted, continue with Step 7.
Step 7 If the password is encrypted, enter the configure memory privileged EXEC command. This writes the stored configuration into running memory.
Step 8 Enter the configure terminal privileged EXEC command to enter router configuration mode.
Step 9 If you have lost the enable password, use the enable-password global configuration command to configure a new password.
- If you have lost the login password, configure the console line with a new login password using the login and password line configuration commands. Press ^Z to exit configuration mode. Proceed to Step 11.
Step 10 If you have lost the enable password, locate the enable-password global configuration command entry and record the password.
- If you have lost the login password, find the configuration entries for the console line and record the password indicated by the password line configuration command.
Step 11 Use the write memory privileged EXEC command to write the configuration into running memory.
Step 12 The router is now fully functional and you can use your recovered or reconfigured passwords as usual.
Note Return the hardware configuration register jumper to its original position as soon as possible. If the jumper is not returned to the bit position you noted in Step 2, the router will always ignore the contents of NVRAM and enter the Setup routine upon booting. Continue with Step 13 to return the jumper to its original position.
Step 13 Power down the router.
Step 14 Move the hardware configuration register jumper from bit position 6 to its original position (the position you noted in Step 2).
- It might be necessary to remove the processor card to gain access to the jumper. Consult your hardware documentation for complete instructions on removing and inserting the processor card if necessary. If you had to remove the processor card, reinsert it before continuing.
Step 15 Power up the router. Use your new or recovered password to gain access to the router.
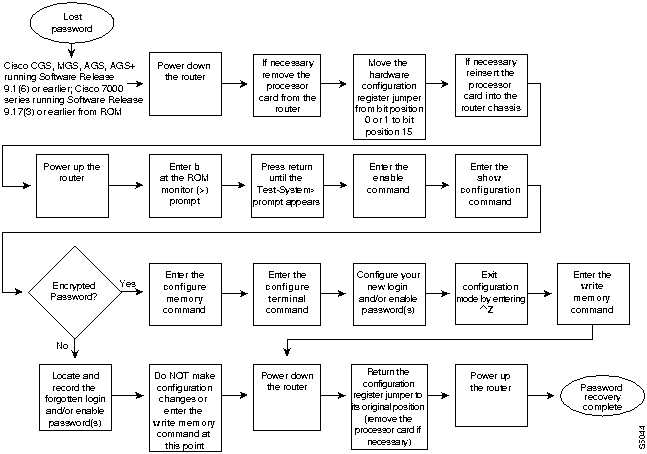
Password Recovery Procedure: Platforms Running Earlier Software Releases
Cisco CGS, MGS, AGS, and AGS+ platforms, and Cisco 7000 series routers running software prior to Cisco IOS Release 10.0 from ROM, all have their configuration registers in the hardware, so you must physically change the position of the configuration register jumper during the password recovery process.
It might be necessary to remove the processor card from the router chassis in order to access the hardware configuration register jumper. Consult your hardware documentation for detailed instructions on removing and inserting the processor card from the router chassis if necessary.
Note If your password is encrypted, you cannot recover it. You must configure a new password.
Figure 22-2 shows a flowchart that describes the password recovery procedure for the following platforms:
- CGS, MGS, AGS, and AGS+ routers running Software Release 9.1(6) and earlier
- Cisco 7000 series routers running Software Release 9.17(3) and earlier from ROM
The step-by-step procedure that follows and the password recovery flow chart shown in Figure 22-2 apply only to the indicated platforms running the indicated software. There is another procedure for recovering a password on these platforms if they are running more recent software. See the previous section, "Password Recovery Procedure: Platforms Running Recent Software Releases."
Note To complete this procedure, you must have a terminal or a personal computer (running terminal emulation software) connected to the console port of the router.
Following is the password-recovery procedure for Cisco platforms running earlier software releases:
Step 1 Power down the router.
Step 2 Change the hardware configuration register by moving the jumper from bit position 0 (zero) or 1 to bit position 15.
- Note the original position of the jumper.
Note To move the hardware configuration register jumper, you might need to remove the processor card from the router chassis. This is the case with the Route Processor (RP) card in Cisco 7000 series routers. Consult your hardware documentation for complete instructions on removing and inserting the processor card. If you had to remove the processor card, reinsert it before continuing.
Step 3 Power up the router. The ROM monitor (>) prompt appears.
Step 4 Enter b (bootstrap) at the (>) prompt.
Step 5 Press the Return key until the Test-System> prompt appears.
Step 6 Enter privileged mode by issuing the enable EXEC command.
Step 7 Enter the show configuration privileged EXEC command to see if the password is clear text (is not encrypted) or if it is encrypted.
- If the password is clear text, go to Step 12.
- or
- If the password is encrypted, continue with Step 8.
Step 8 If the password is encrypted, enter the configure memory privileged EXEC command.
- This writes the stored configuration into running memory.
Step 9 Enter the configure terminal privileged EXEC command to enter router configuration mode.
Step 10 If you have lost the enable password, use the enable-password global configuration command to configure a new password and press ^Z to exit configuration mode.
- If you have lost the login password, configure the console line with a new password using the login and password line configuration commands. Press ^Z to exit configuration mode.
Step 11 Use the write memory privileged EXEC command to write the configuration into running memory. Proceed to Step 13.
Step 12 If you have lost the enable password, locate the enable-password global configuration command entry in the configuration and record the password.
- If you have lost the login password, find the configuration entries for the console line and record the password indicated by the password line configuration command. Do not make configuration changes or use the write memory command at this time.
Step 13 Power down the router.
Step 14 Remove the processor card and move the hardware configuration register jumper from bit position 15 to its original position (the position you noted in Step 2).
Step 15 Power up the router. Use your new or recovered password to gain access to the router.
Figure 22-2 : Password Recovery: Platforms Running Earlier Software Releases
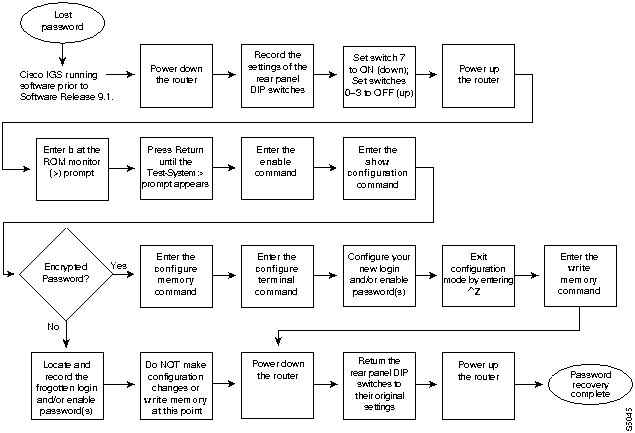
Password Recovery Procedure: IGS Running Software Prior to Software Release 9.1
Cisco IGS routers have a bank of DIP switches located on the rear panel. These DIP switches are used to set the hardware configuration register and must used in the password recovery process if the router is running system software prior to Software Release 9.1.
Note If your password is encrypted, you cannot recover it. You must configure a new password.
Figure 22-3 shows the password recovery procedure for the Cisco IGS running software prior to Software Release 9.1. There is another procedure for the IGS platform if it is running Software Release 9.1 or later. See the section "Password Recovery Procedure: Platforms Running Current Cisco IOS Releases."
Note To complete this procedure, you must have a terminal or a personal computer (running terminal emulation software) connected to the console port of the router.
Following is the password-recovery procedure for IGS routers running software prior to Software Release 9.1:
Step 1 Power down the router.
Step 2 Record the settings of the DIP switches located on the rear panel of the router. You will need to return these switches to their original positions after you have recovered your password.
Step 3 Set switch number 7 to the ON position (down).
Step 4 Set switches 0--3 to the OFF position (up).
Step 5 Power up the router.
- The router will boot up, and the terminal will display the ROM monitor (>) prompt.
Step 6 Enter b (bootstrap) at the (>) prompt.
Step 7 Press the Return key until the Test-System> prompt appears.
Step 8 Enter the enable privileged EXEC command at the Test-System> prompt.
Step 9 If the password is clear text (is not encrypted), go to Step 14.
- If the password is encrypted, continue with Step 10.
Step 10 If the password is encrypted, enter the configure memory privileged EXEC command. This writes the stored configuration into running memory.
Step 11 Enter the configure terminal privileged EXEC command to enter router configuration mode.
Step 12 If you have lost the enable password, use the enable-password global configuration command to configure a new password and press ^Z to exit configuration mode.
- If you have lost the login password, configure a new password on the console line using the login and password line configuration commands. Press ^Z to exit configuration mode.
Step 13 Enter the write memory privileged EXEC command to write the configuration changes into stored memory. Proceed to Step 16.
Step 14 If your password is clear text (is not encrypted), enter the show configuration privileged EXEC command.
Step 15 If you have lost the enable password, locate the enable-password global configuration command entry in the configuration and record the password.
- If you have lost the login password, find the configuration entries for the console line and record the password indicated by the password line configuration command. Do not make configuration changes or use the write memory command at this time.
Step 16 Power down the router.
Step 17 Return the hardware configuration register DIP switches located on the back panel of the router to their original settings (the settings you noted in Step 2).
Step 18 Power up the router. Use your new or recovered password to gain access to the router.
Figure 22-3 : Password Recovery: IGS Running Software Release Prior to 9.1
Password Recovery Procedure: Cisco 500-CS Communication Server
Lost passwords cannot be recovered from Cisco 500-CS communication servers. The only way to recover from a lost password is to return the communication server to its factory default configuration using the reset button located on the top of the case.
The following procedure describes how to restore the Cisco 500-CS to its default configuration.
 Caution When you perform this procedure, your configuration will be lost.
Step 1 Power down the communication server.
Step 2 Press and hold down the reset button on the top of the case while turning on the power to the communication server.
Step 3 The 500-CS is returned to its factory default configuration.
- You must reconfigure the communication server.
Copyright 1988-1996 © Cisco Systems Inc.