|
|

This appendix includes checklists, instructions, examples, and blank worksheets used for the initial installation and subsequent maintenance of the LightStream 1010 Asynchronous Transfer Mode (ATM) switch. The checklists, worksheets, and log provide reference and history information that may be useful when troubleshooting the switch in the future.
Following is a list of worksheets:
Obtain copies of the worksheets shown in Figure A-1, Table A-1, Figure A-8, Figure A-9, Figure A-10, Figure A-11, Figure A-12, and Figure A-13 before continuing so that, as you proceed through the following descriptions, you can record your information on the copies.
Each of the forms should be completed and kept in a safe place for future reference in the permanent-site record.
The worksheets are described in the following sections:
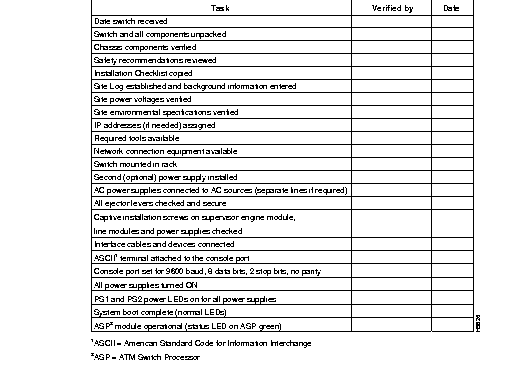
The Switch Installation Checklist is used to confirm that you have all the information needed to install and configure the LightStream 1010 ATM switch and that all the components are installed and operating correctly.
Before starting the installation, copy the Switch Installation Checklist shown in Figure A-1. Each task in the Switch Installation Checklist should be verified by the person performing the installation and then dated for the permanent-site record.
Every task in the Switch Installation Checklist is listed in the index and described in detail in previous chapters of this document.
The Switch Component Checklist in Table A-1 is used to verify that all hardware and documentation items needed to complete this installation have been received before starting the installation process.
Each component in the Switch Component Checklist should be verified by the person unpacking the equipment and kept for the permanent site record. Every component in the Switch Component Checklist is listed in the index and described in this document.
| Component | Description | Received |
|---|---|---|
| Chassis | Switch chassis | |
| Accessories Box: | ||
| Power cables | One power cable for each power supply received (may be shipped separately) | |
Other optional equipment | Optional second power supply for redundant power feature | |
| Ethernet transceiver | ||
Documentation1 | Unpacking Instructions | |
| LightStream 1010 ATM Switch Hardware Installation Guide2 | ||
| LightStream 1010 ATM Switch ASP Installation Guide | ||
| LightStream 1010 ATM Switch PAM Installation Guide | ||
| Software license agreement | ||
| System Components: | ||
| ATM switch processor module | Installed in slot 23 | |
| 155 UTP5 port adapter module (unshielded twisted pair) | Enter slot location and port addresses on the Port Configuration Worksheet | |
| 155 MM port adapter module (multimode fiber) | Enter slot location and port addresses on the Port Configuration Worksheet | |
| 155 SM port adapter module (single-mode fiber) | Enter slot location and port addresses on the Port Configuration Worksheet | |
| 155 SM/MM port adapter module (single-mode and multimode fiber) | Enter slot location and port addresses on the Port Configuration Worksheet | |
| 155 LR port adapter module (single-mode long-reach) | Enter slot location and port addresses on the Port Configuration Worksheet | |
| 1622 MM port adapter module (multimode fiber) | Enter slot location and port addresses on the Port Configuration Worksheet | |
| 622 SM port adapter module (single-mode fiber) | Enter slot location and port addresses on the Port Configuration Worksheet | |
| 622 LR port adapter module (single-mode long-reach) | Enter slot location and port addresses on the Port Configuration Worksheet | |
| DS-3 (Quad) port adapter module | Enter slot location and port addresses on the Port Configuration Worksheet | |
| DS-3 port adapter module | Enter slot location and port addresses on the Port Configuration Worksheet | |
| E3 port adapter module | Enter slot location and port addresses on the Port Configuration Worksheet | |
| T1 DSX1 port adapter module | Enter slot location and port addresses on the Port Configuration Worksheet | |
| E1 DSX1 port adapter module | Enter slot location and port addresses on the Port Configuration Worksheet | |
| E1 75 ohm port adapter module | Enter slot location and port addresses on the Port Configuration Worksheet | |
| CES T1 port adapter module | Enter slot location and port addresses on the Port Configuration Worksheet | |
| CES T1 120 ohm port adapter module | Enter slot location and port addresses on the Port Configuration Worksheet | |
| CES T1 75 ohm port adapter module | Enter slot location and port addresses on the Port Configuration Worksheet | |
| Other equipment | ||
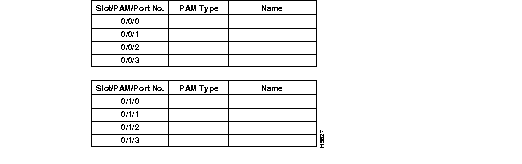
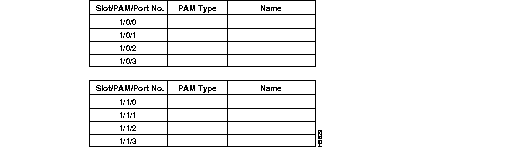
The Port Configuration Worksheet is used during the software configuration process.
Each heading in the Port Configuration Worksheet should be completed by the person configuring the switch and kept for the permanent-site record.
Every component in the Port Configuration Worksheet is listed in the index and described in detail in previous chapters of this document.
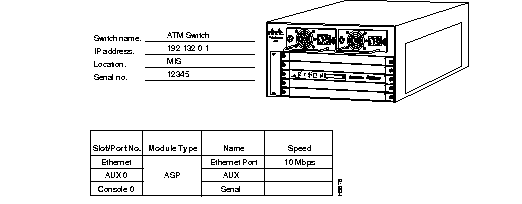
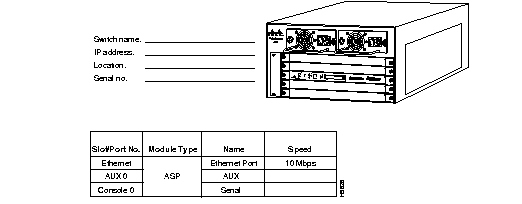
This section contains a sample LightStream 1010 ATM switch configuration and the corresponding port configuration forms.
The LightStream 1010 ATM switch example is shown in Figure A-2, and the completed Port Configuration Worksheets are shown in Figure A-3 through Figure A-7.
The first configuration shows a very simple case, which includes the following elements:

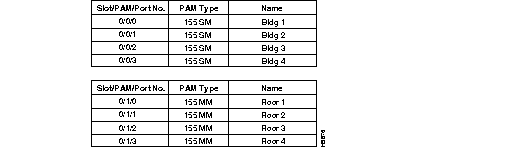
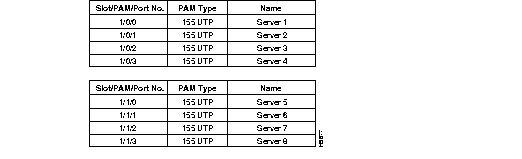


You can fill out the blank Port Configuration Worksheets (Figure A-8 to Figure A-12) before starting to configure the LightStream 1010 ATM switch.


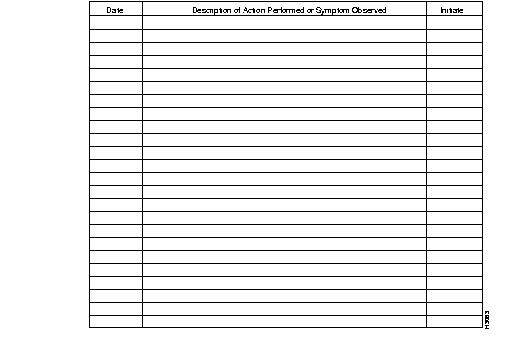
The Site Log (see Figure A-13) is used for subsequent maintenance of the switch. A detailed description of actions performed and symptoms observed should be completed by the person performing the maintenance and kept as part of the permanent site record.
The installation and configuration of the LightStream 1010 ATM switch can be separated into specific steps. If each step described in the Quick Installation Worksheet (see Table A-2) is completed following the instructions provided in this publication, LightStream 1010 ATM switch installation should be successful. If the installation fails to make the LightStream 1010 ATM switch function properly in the first attempt, the Quick Installation Worksheet can be used to systematically check that each step was performed correctly.
Copy the Quick Installation Worksheet and initial each procedure as it is completed. Each task in the Quick Installation Worksheet should be verified by the person performing the installation and dated for the permanent site record.
Every task in the Quick Installation Worksheet is described in detail in this publication or in one of the following documents:
| Task | Completed | Date |
|---|---|---|
| Complete Switch Installation Checklist | ||
| Complete Switch Component Checklist | ||
| Complete Port Configuration Worksheets | ||
| Rack-mount the switch | ||
| Connect cables | ||
| Connect power cables | ||
| Switch power on | ||
| Configure IP address (optional) | ||
| Configure ATM Address (optional) | ||
| Configure line [aux/console] | ||
| Configure SNMP | ||
| Set clock (optional) | ||
| Test the configuration | ||
| Store configuration |
|
|